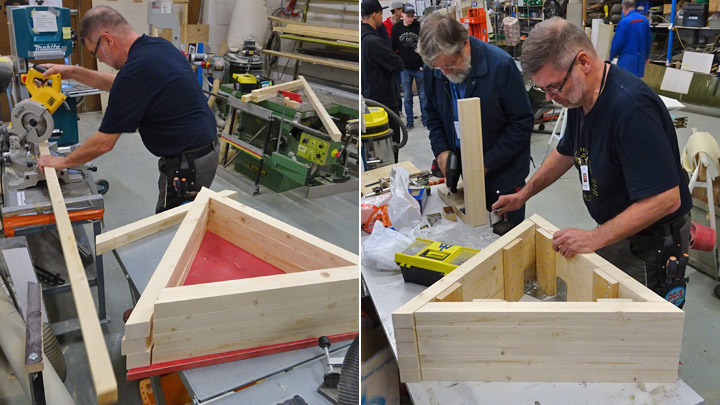
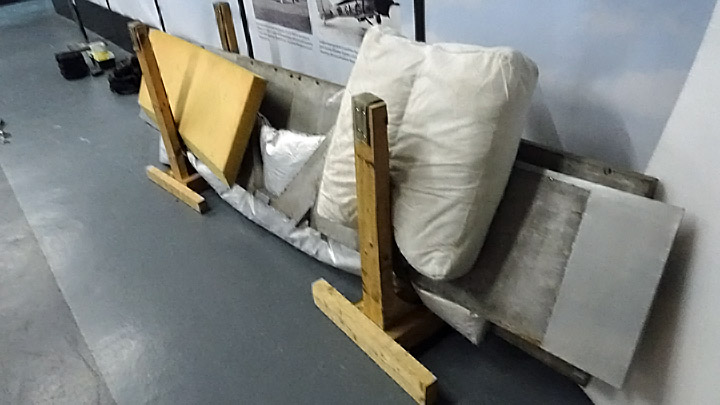
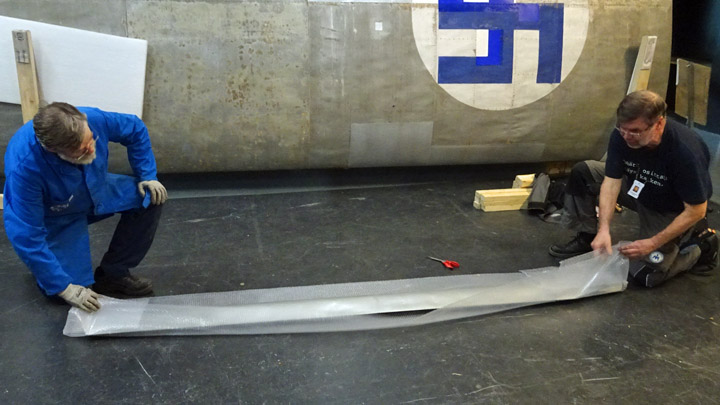
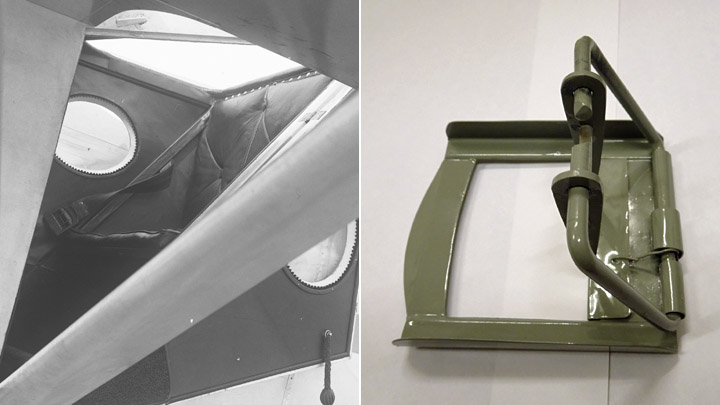
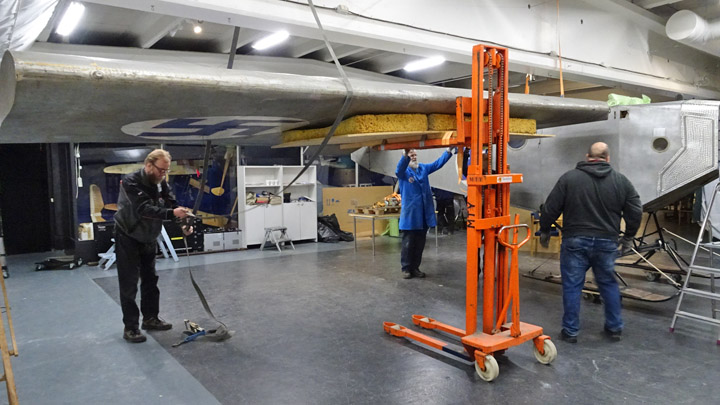
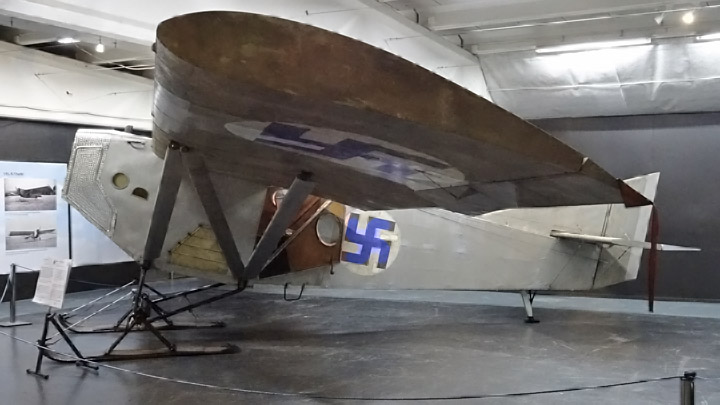
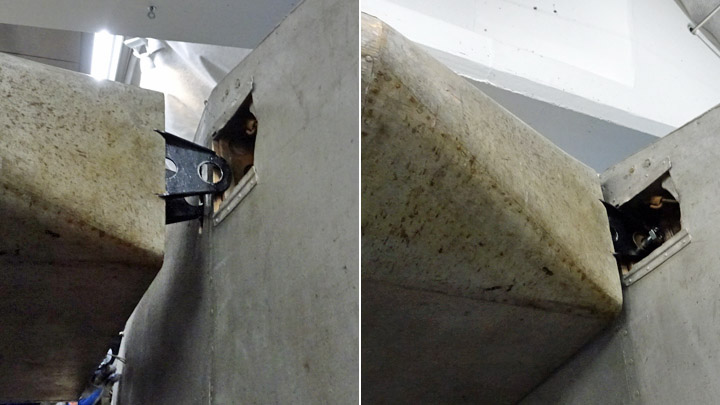
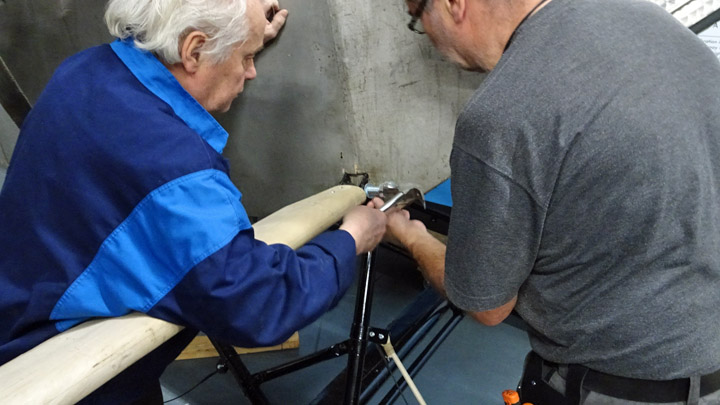
Final assembly work on Kurki at VesivehmaaMaanantai 17.6.2019 - Member of Tuesday Club The I.V.L.K.1 Kurki airplane, manufactured in 1927 at the Finnish Air Force Airplane Factory, was assembled and placed on display at the Päijänne-Tavastia Aviation Museum on May 15th, after three years of restoration work. Some minor details still had to be finished, such as adding the protecting lacquer on the wing struts, wing bolts and some bolts on the tail part. Also the covers for the wing spar attachment bolts had to be added in the upper corners of the cabin. The Tuesday Club members also decided to build a nice platform to support the metal tripod under Kurki’s tail. The improvised platform had consisted of two cargo pallets.
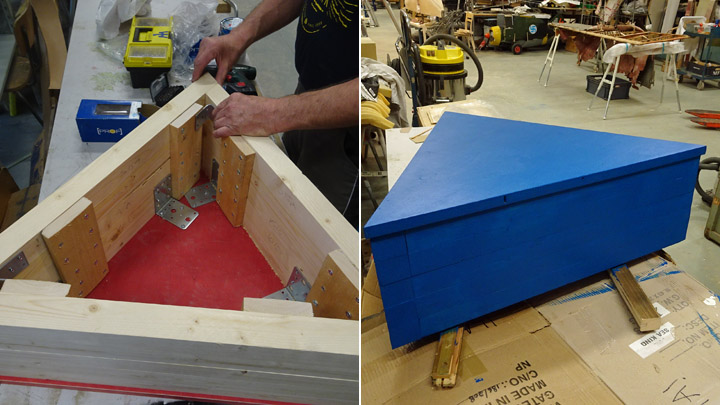
Suitable timber was bought for the platform. It was decided that the platform would be triangular to match the tripod under Kurki’s tail. The sides of the platform were built from 50x50 planed timber and the top plate was sawed from blockboard. The platform was built so that the parts were fastened from the inside, using concealed fixing, and the outer surfaces were nice and smooth. The platform was painted blue to match the colour of the metal tripod supporting the tail.
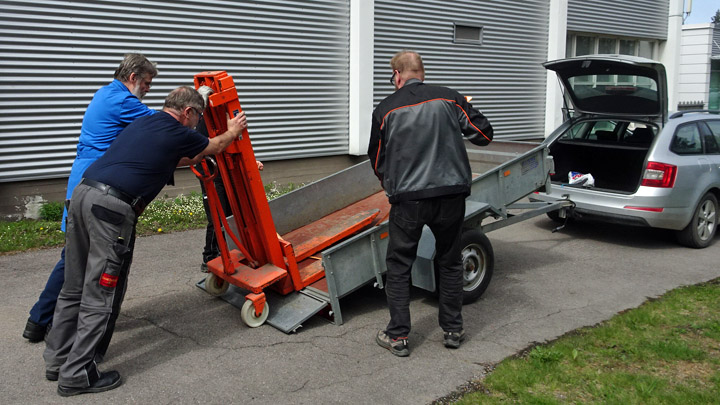
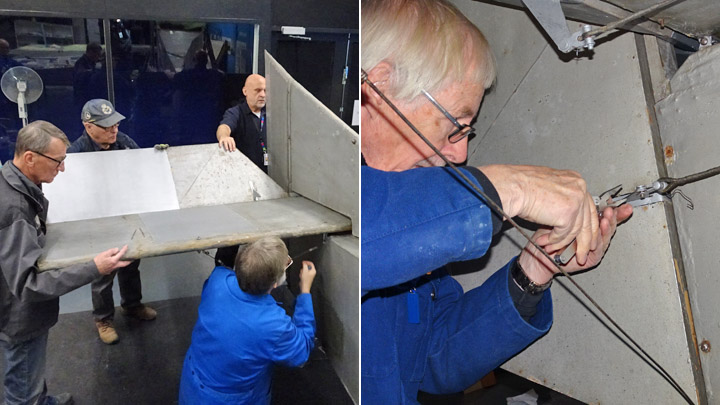
On Monday June 10th a group of Tuesday Club members drove to Vesivehmaa with the platform, some paint and screws, detergent and cloths. The team carried also the last one of the six metal shelves the Tuesday Club had assembled for the Päijänne-Tavastia Aviation Museum.
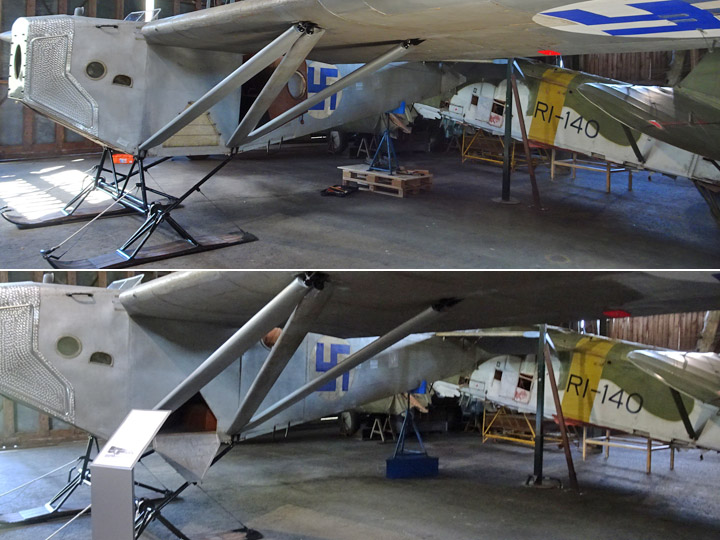
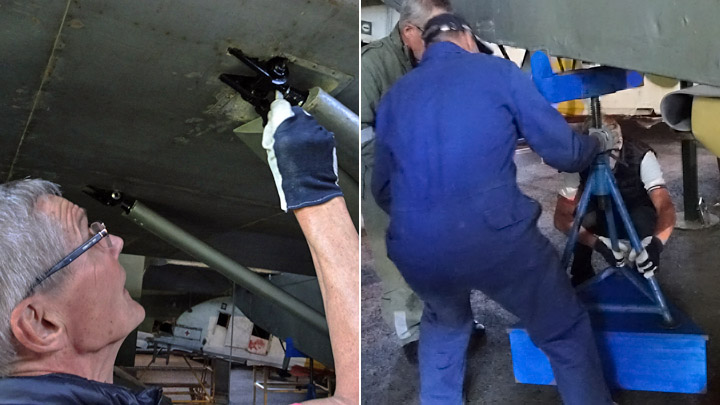
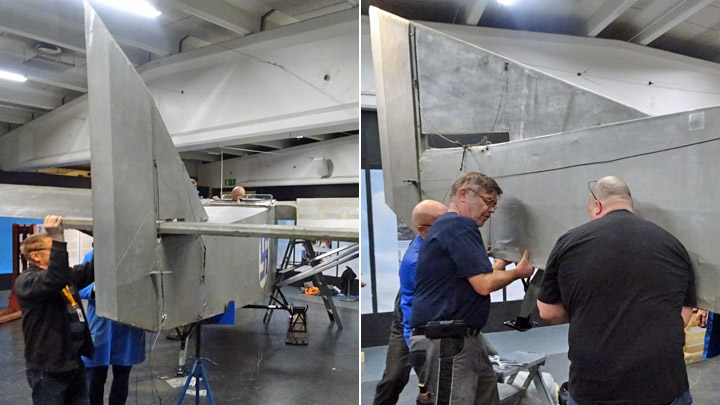
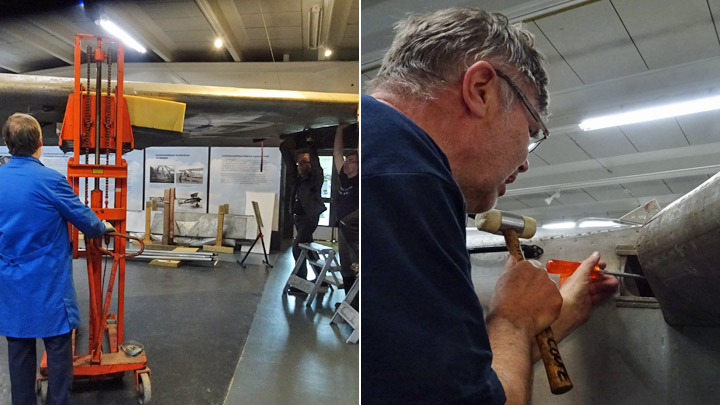
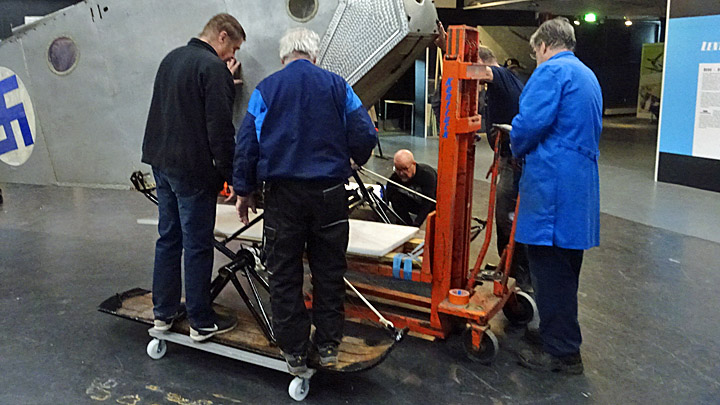
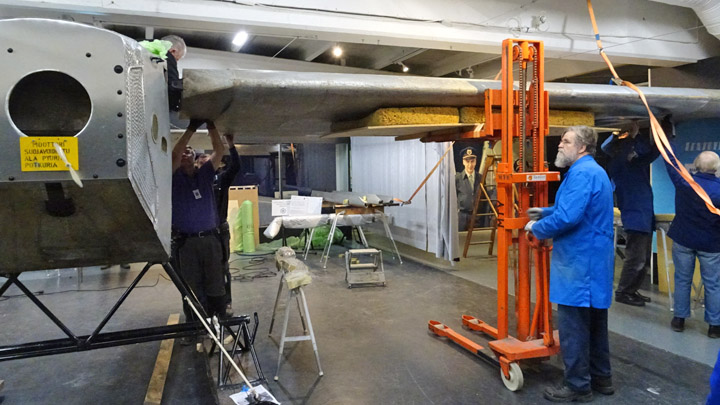
In Vesivehmaa the new platform was installed first. Kurki’s tail was lifted with a stacker so that the metal support could be unfastened, and the pallets moved aside. After this the triangular platform was placed under Kurki and the metal tripod was assembled on top. Kurki’s tail was lowered back on the tripod, which looked much better on the blue platform than on the cargo pallets.
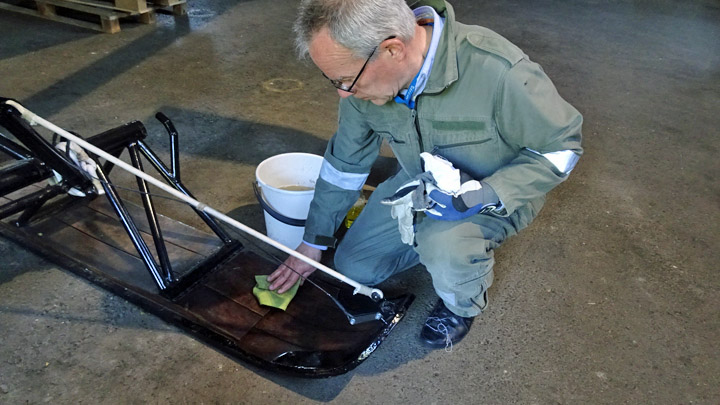
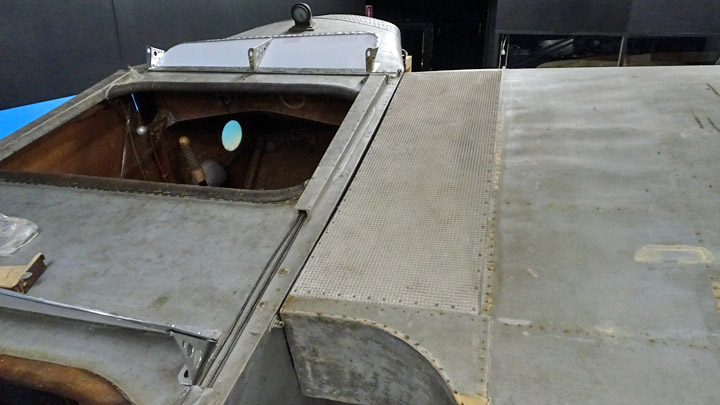
When the Kurki was back on its place, the team could carry on with other work. Some protected on the bolt heads and nuts, using rust-protective black or silver Isotrol lacquer, others fastened protective covers in the cabin and the rest of the team washed Kurki’s ski surfaces (which were dirty after the move and assembly work).
When all the planned work had been completed, Lahti Ilmasilta invited the team to have coffee and buns in the Vesivehmaa Airport cafeteria. The team was happy and ready to meet new challenges…. Photos: Lassi Karivalo. Translation from Finnish to English: Erja Reinikainen. |
|
Avainsanat: aviation history, restoring, old aircraft, I.V.L. K.1 Kurki |
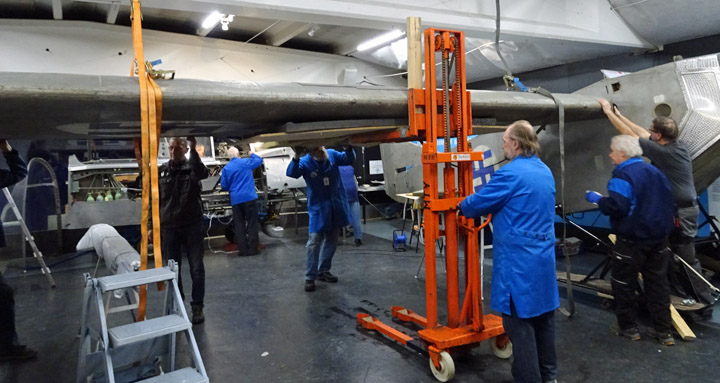
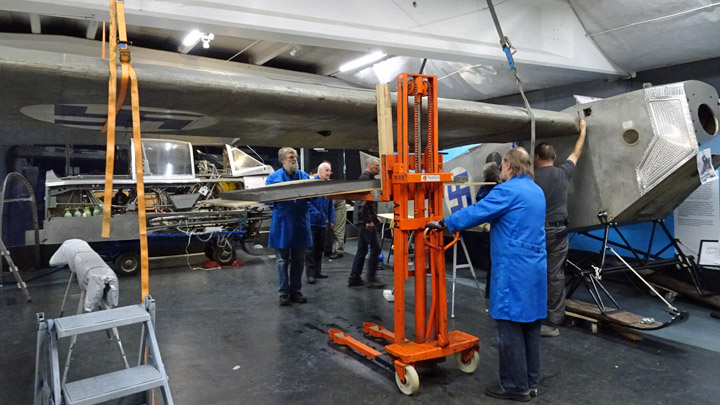
Operation "Kurki returns to Vesivehmaa" - Part 2Sunnuntai 19.5.2019 - Member of Tuesday Club The I.V.L.K.1 Kurki, designed and built by the Air force Airplane Factory in 1927, returned to the Päijänne-Tavastia Aviation museum in Vesivehmaa after a 3-year restoration project. The Tuesday Club of the Aviation Museum Society and the Finnish Aviation museum staff were responsible for the restoration work. It took about 5,000 man-hours to restore the badly damaged Kurki.
Returning Kurki to Vesivehmaa from the Finnish Aviation Museum was a 3-day project. First the plane was dismantled at the Museum for transport. Then it was transported by the Defence Forces’ truck to Vesivehmaa. And finally, the Kurki was re-assembled and placed on display in the museum hall in Vesivehmaa. The dismantling has been described in the previous blog.
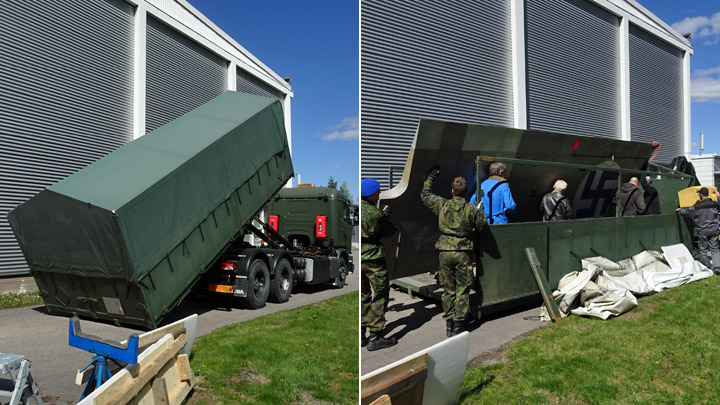
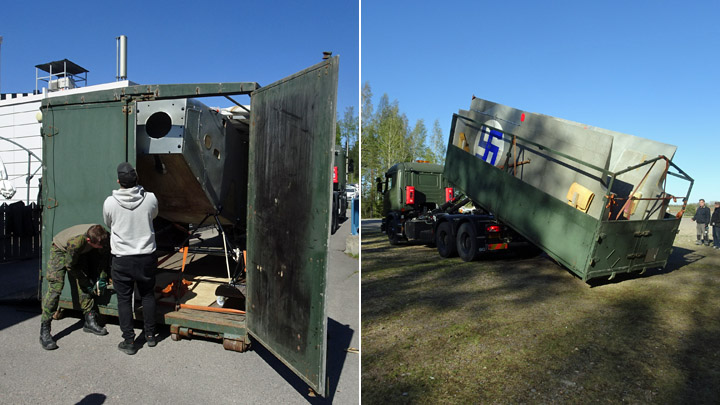
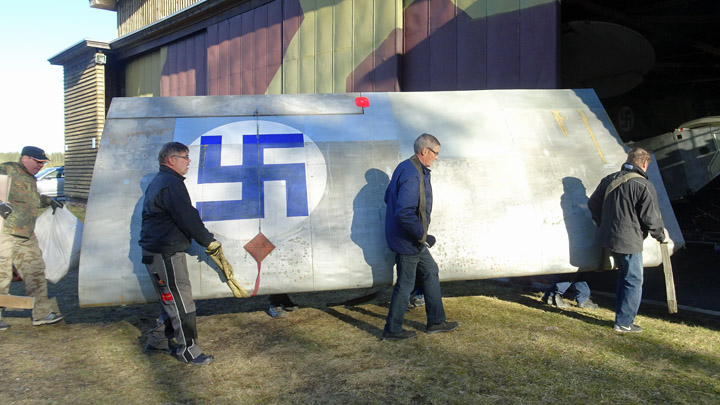
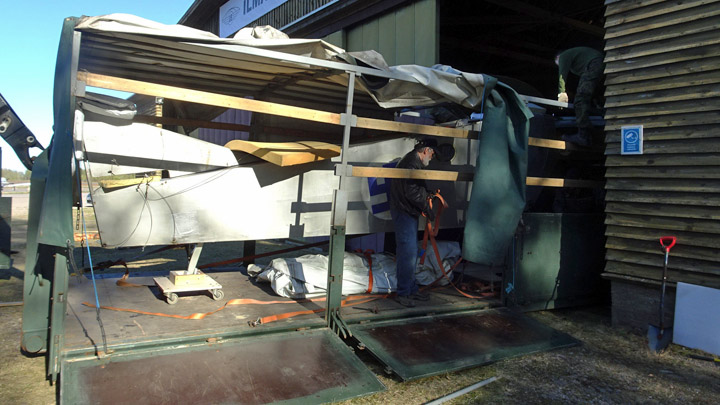
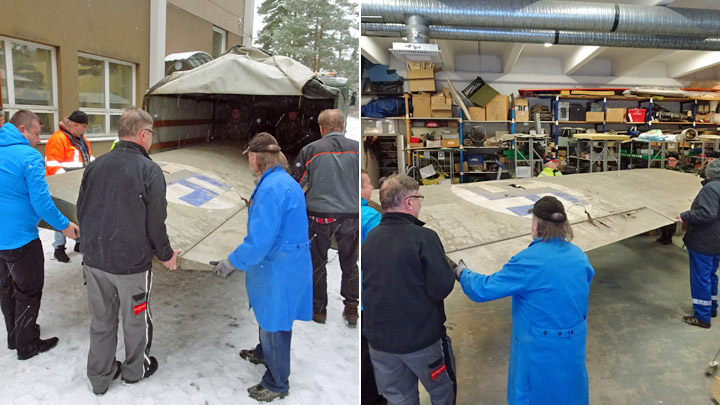
On Tuesday, May 14th before noon the Defence Forces’ truck with a trailer arrived from Tikkakoski to transport Kurki from Vantaa to Vesivehmaa. The transport assignment was also a training session for two draftees, so everybody benefitted. Kurki’s wings were loaded on the truck bed, and the fuselage on the trailer bed. It turned out that the sides of the beds were not tall enough for the wings and fuselage. Luckily the truck bed and the trailer bed both had canvas roofs on a metal frame that could be removed. It happened to be a nice and sunny day, because in rainy weather the Kurki couldn’t have been transported on an open truck bed.
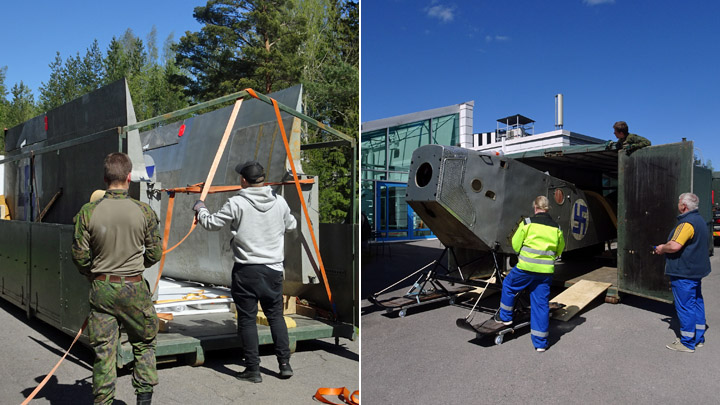
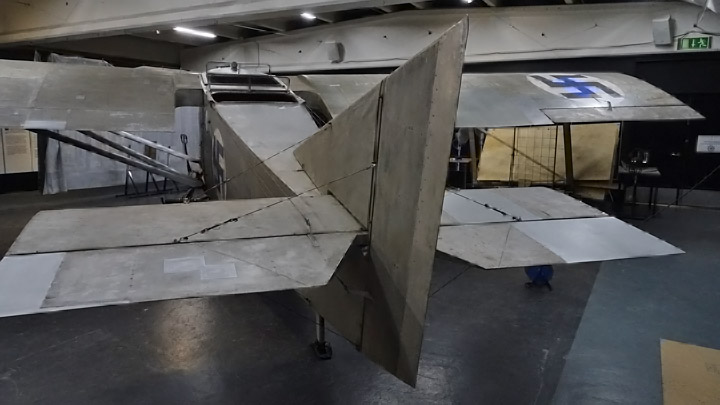
The canvas roof had to be removed before loading the wings. The fuselage, however, could be placed on the trailer bed. Only the back end of the canvas roof was opened so that the Kurki’s nose could be maneuvered on the trailer bed. The vertical stabilizer had to be dismantled to make the fuselage shorter and to fit it on the trailer. In addition to the wings and fuselage the wing struts, horizontal stabilizer, elevators and vertical stabilizer were loaded on the truck. When the cargo had been secured with cargo straps, the trip towards Vesivehmaa could begin.
A couple of cars, carrying Tuesday Club members, drove ahead of the truck to Vesivehmaa to be there to meet the transport vehicle and to move Kurki’s wings and fuselage into the hall of Päijänne-Tavastia Aviation Museum. One of the cars towed the Tuesday Club’s trailer carrying one of the stackers that will be needed in the re-assembling or Kurki’s wings.
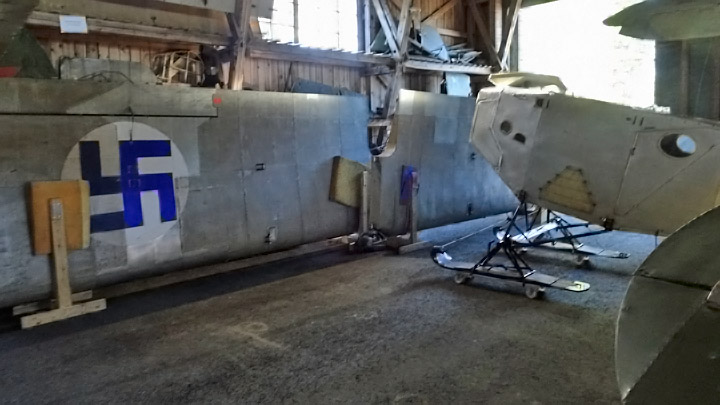
When the truck arrived in Vesivehmaa, the wings were moved first into the hall and the fuselage followed. The assembly would take place on the following day. The Tuesday Club team returned to Vantaa and the Defence Forces’ truck continued towards Tikkakoski. The team thanked the Defence Forces, once again, for helping in the transportation.
Early on Wednesday morning, May 15th the team gathered again at the Finnish Aviation Museum. All the equipment needed in the re-assembling of the Kurki was packed on a trailer, including another stacker. The six metal shelves, also assembled by the Tuesday Club, were taken on board. The Kurki assembly team consisted of about ten Tuesday Club members and of the Aviation Museum staff members.
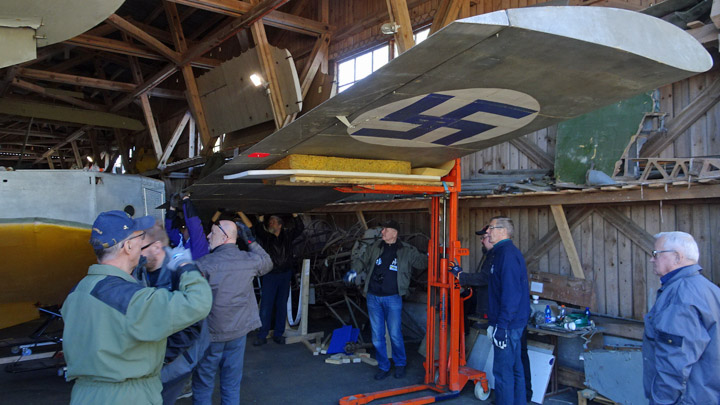
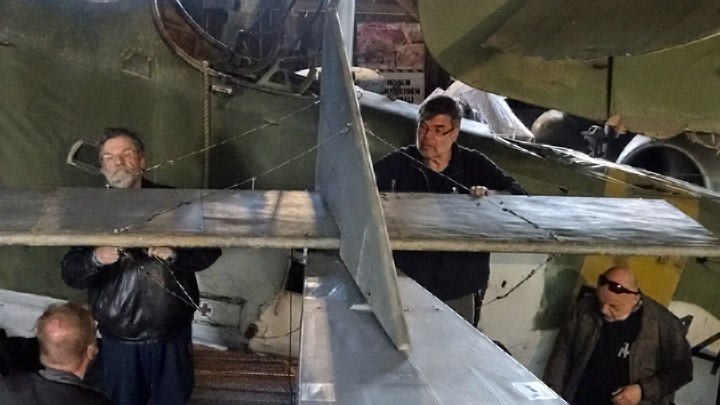
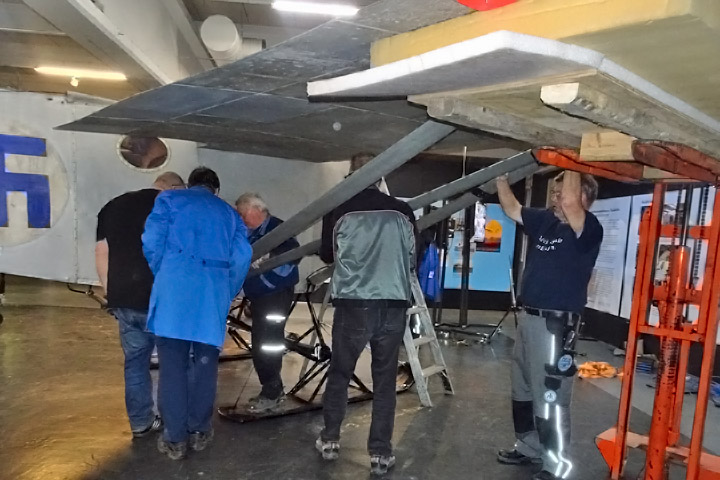
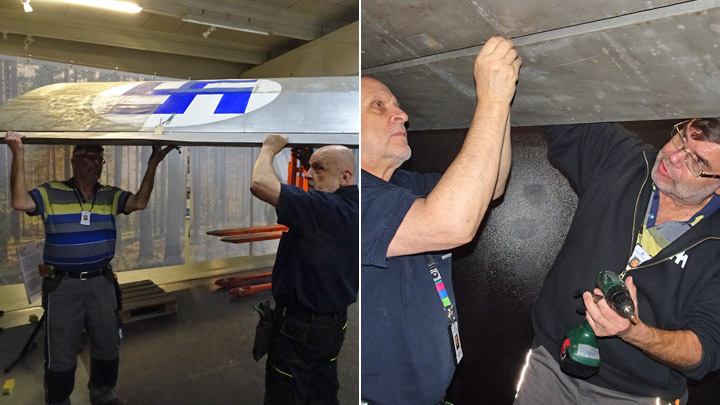
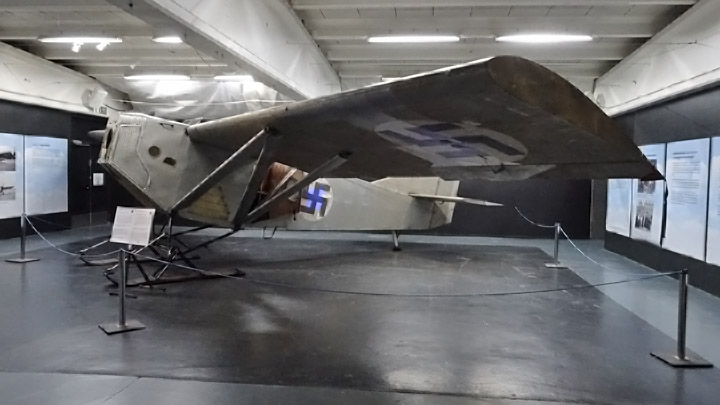
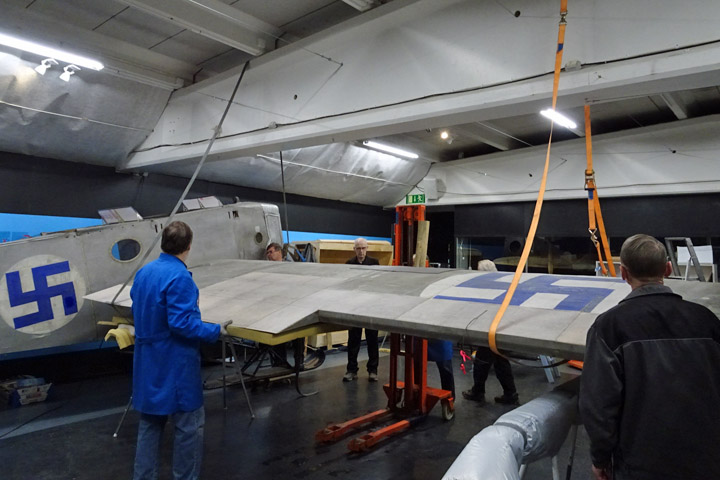
The assembly team arrived in Vesivehmaa at about ten AM and hurried to work. First the port wing was lifted into assembly height, using a stacker, and locked into place on the fuselage by the upper fasteners. Special attention was paid to the vertical position of the wing tip. The Kurki will be placed on display in the hall so that the tip of its port wing will be only a few centimeters under the lower starboard wing of the Aero Jupiter, which is placed on a stand. The sufficient distance between Kurki’s and Aero’s wings was ensured by supporting Kurki to stand slightly leaning on its port wing, with a block of wood under its starboard ski.
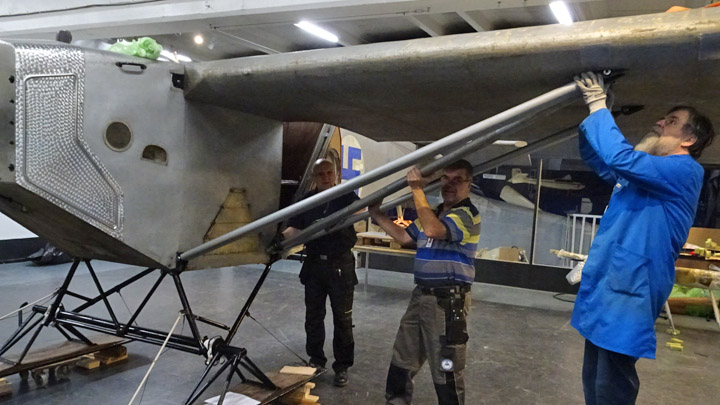
Then the wing struts of the port wing could be fastened, first the front strut, then the rear strut and finally the diagonal strut between them. Now the port wing had been assembled and it was supported by the struts, but the stacker couldn’t be moved yet. With the starboard wing still missing, the Kurki would have keeled over on its left side.
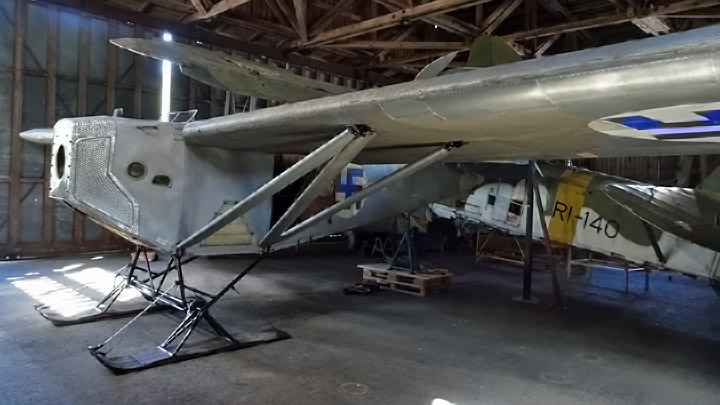
The other stacker was used to lift the starboard wing to assembly height. The wing was locked in place by the upper fastener and then the struts were fastened. Now the Kurki had its both wings in place and the stackers could be removed. Before assembling the tail part, the plane was maneuvered into its final display position. When the plane was in its place, the boards with wheels under the skis and tailskid could be removed.
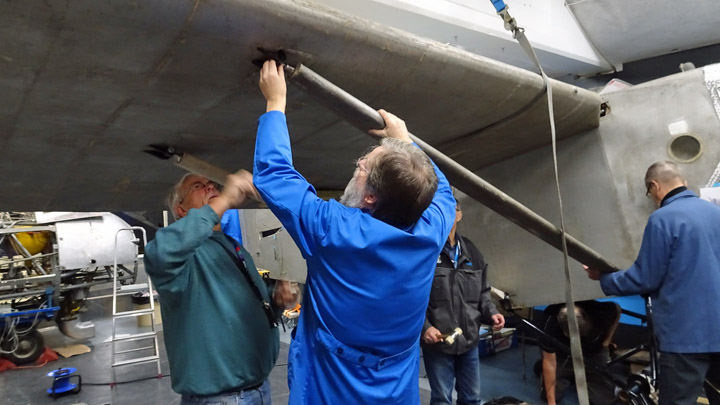
The tail was assembled by fastening first the vertical stabilizer. Then the horizontal stabilizer was fastened and onto that the elevators. The horizontal stabilizer was secured into place with a cable between the fuselage and the stabilizer. When the Kurki was dismantled at the Finnish Aviation Museum, all the control cables in the tail part were carefully labelled so that the assembly would be easy. However, some cable-shuffling was needed before all the cables had found their right places and the rudder and the elevators worked as they should.
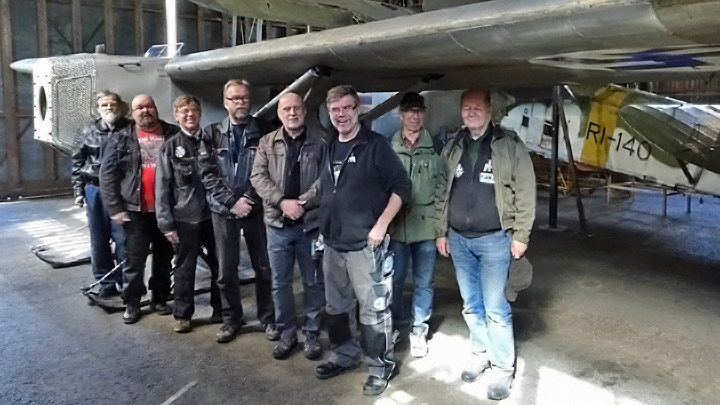
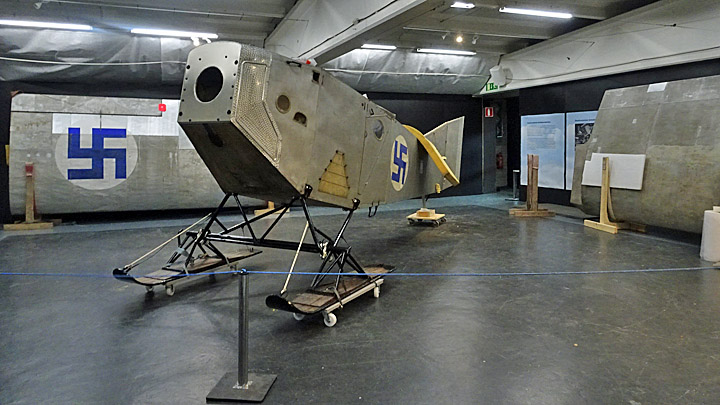
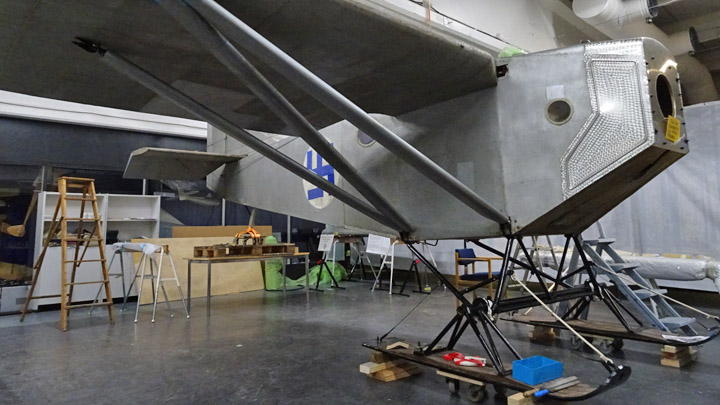
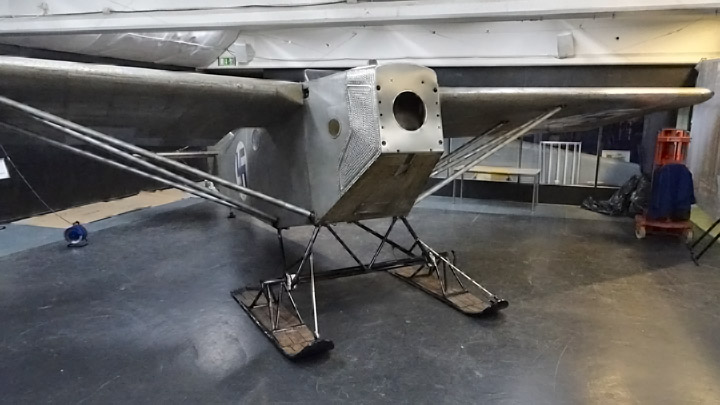
After about five hours’ work the Tuesday Club team had re-assembled the I.V.L.K.1 Kurki and placed it on display in the Vesivehmaa hall. It was time to document the moment and take a picture of the pleased Tuesday Club members.
Kuva: Janne Salonen.
Also Hannu Iivarinen (chairman of Lahti Ilmasilta), Janne Salonen (chairman of the Finnish Aviation Museum Society) and Antti Laukkanen (museum mechanic of the Finnish Aviation Museum) were pleased: the I.V.L.K.1 Kurki restoration project had been completed and the plane had returned to Vesivehmaa. Photos: Lassi Karivalo except otherwise separately mentioned. Translation from Finnish to English: Erja Reinikainen. |
|
Avainsanat: aviation history, restoring, old aircraft, I.V.L. K.1 Kurki |
Operation "Kurki returns to Vesivehmaa" - Part 1Maanantai 13.5.2019 - Member of Tuesday Club Half a dozen Tuesday Club members and members of the Finnish Aviation Museum staff gathered in the mid-hall of the Finnish Aviation Museum on Monday, May 13. The task at hand was to dismantle the I.V.L.K.1 Kurki, which had been on display for about six monthts, and prepare it for the transportation to the Päijänne-Tavastis Aviation Museum in Vesivehmaa. The Kurki is returning to the place where it was before its restoration in 2016.
The dismantling of Kurki is Part 1 in the operation “Kurki returns to Vesivehmaa”. The following episodes in the operation are the transport of Kurki from Helsinki-Vantaa to Vesivehmaa on May 14th and the re-assembling of the plane on May 15th.
The dismantling was started by removing the venturi-tube on the wing strut of the starboard wing and unfastening the tail part. The bracing cables for the horizontal stabilizer and the control cables for the tail were unfastened and tied on a roll for the journey.
Two stackers were needed when the wings were unfastened. A padded platform had been built on the forks of the stackers. First one stacker was placed under one wing to support the wing when the wing on the other side was removed. This was necessary to prevent the plane from keeling over to one side when the wing is unfastened.
The unfastening of the wing was started by pulling out the fastening pins on the main wing brackets at the wing root and unfastening the aileron cables. Then the front, middle and rear wing struts could be removed one by one and finally the wing rested on the stacker.
The wing struts had been in the way and the stacker couldn’t be placed under the wing’s center of mass. When the struts were unfastened, the stacker could be moved towards the center of the wing. This was done by manually lifting the wing tip. The wing was resting on the stacker and it was unfastened by inching the wing manually outwards and supporting it at the wing tip. When the wing had come loose, it was lowered on the floor. It was turned up, standing on its leading edge and placed on wooden frame. The other wing was unfastened in similar manner. It would be interesting to know what the mechanics of the Air Force airplane factory had thought when watching the activities of the Tuesday Club team. In 1927 the mechanics were the professionals in assembling and dismantling the Kurki.
The Kurki’s fuselage was now without wings and it was lifted by the landing gear with a stacker so that boards with wheels could be placed under the skis. Another board with wheels was placed under the tailskid. Now the fuselage could be maneuvered easily when loading it for transportation.
The smaller parts, included wing struts, elevators and horizontal stabilizer, were wrapped in bubble wrap for the transportation.
Finally, all the tools for the re-assembling of the Kurki at Vesivehmaa and all other items (small ladder, paddings, timber, padded platforms for stackers, etc.) where gathered and packed to take along to Vesivehmaa. Equipment of the Defence Forces will be used for the transport.
One stacker was loaded on a trailer, to be used for re-assembling Kurki at Vesivehmaa. It will be taken there when the Kurki is unloaded from the truck. The other stacker will be taken to Vesivehmaa on May 15th when the Tuesday Club team travels there to re-assemble the plane.
The story continues in Part 2 of the project “Kurki returns to Vesivehmaa”. Photos: Lassi Karivalo except if separately otherwise mentioned. Translation from Finnish to English: Erja Reinikainen. |
|
Avainsanat: aviation history, restoring, old aircraft, I.V.L. K.1 Kurki |
Last items of Kurki restoration workSunnuntai 12.5.2019 - Member of Tuesday Club The restoration project of the I.V.L.K.1 Kurki plane has been completed at the Tuesday Club. The Kurki was designed and built by the Air Force Airplane Factory in the 1920’s and its restoration work began in spring 2016. Kurki has been on display in the mid-hall of the Finnish Aviation Museum since December but some small items have been missing: the new seat belt in the passengers’ seat and the ribbons around the window edges. |
|
Avainsanat: aviation history, restoring, old aircraft, I.V.L. K.1 Kurki |
Kurki restoration work has been completed and plane is on display!Torstai 27.12.2018 - Member of Tuesday Club The Tuesday Club team worked hard before Christmas to finish the I.V.L. K.1 Kurki restoration work so that the plane could be placed on display at the Finnish Aviation Museum before Christmas.
The fuselage of Kurki was in the Middle hall of the Aviation Museum, where the other parts were assembled as soon as the painting work of the new plywood surfaces on the tail parts and wings had been completed. The first parts to be assembled on the fuselage were the elevator and the horizontal stabilizer. The assembly work went well, and the control cables could be installed.
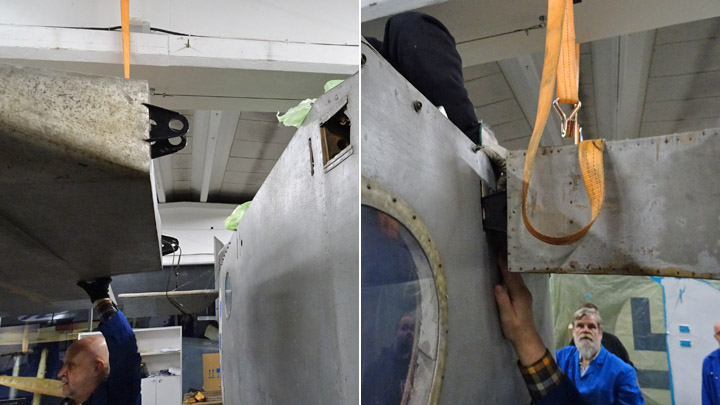
Kurki’s large wings had been partly covered with new plywood and the painting work on the new areas on the right / starboard wing were completed first. The assembly work of the starboard wing could be started in the beginning of December. The wing was lifted to the correct assembly height using a stacker. The lifting was secured with a cargo strap around the wing, attached on a beam in the ceiling. The cargo strap also prevented the Kurki from falling over when it had only the starboard wing assembled.
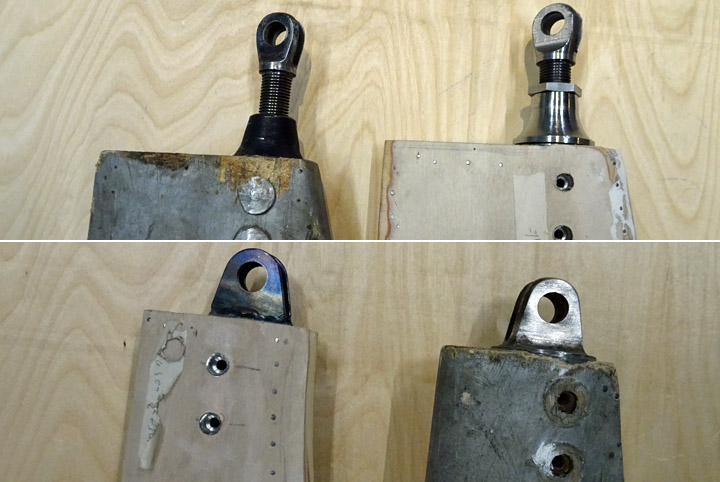
The lifting of the wing went well and the fastening elements on the root of the wing were pushed into the holes in the fuselage. The wing was easily locked in place. The assembly of the three wing struts was far more difficult. Four of the six wing struts had been made by the Tuesday Club team, because only two original parts were available. The team had no information on the actual shape of the fasteners at the ends of those struts and had improvised. This was why the strut fasteners had to be slightly modified during the assembly work to make them fit on the fasteners on the fuselage and on the wing. Finally, the fasteners slid into position and could be locked.
The painting of the port wing had been completed and the assembly work could be started on December 11th. The assembly procedure followed the procedure with the other wing, everything went smoothly until the wing struts were installed. Again, the fasteners on the wing struts had to be modified to make them fit. The wing was fastened in place and the wing struts fastened. Now both wings had been assembled and the securing cargo line could be removed. The ailerons were assembled on the wings and finally Kurki was a real airplane, for the first time in 91 years. When the test flights were finished in the autumn in 1927 the Kurki was dismantled and the parts were stored.
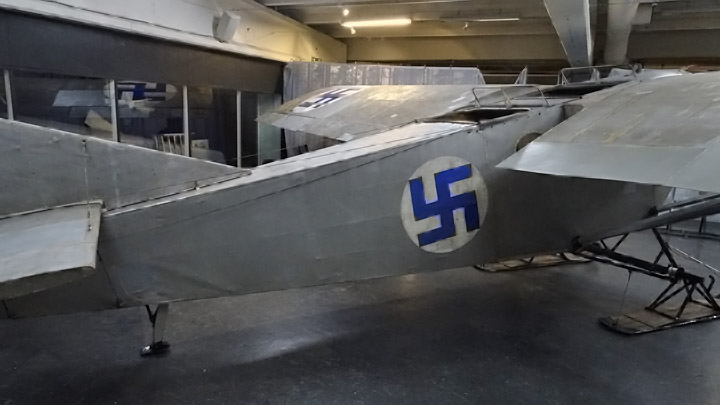
The Kurki can’t be described as smooth and beautiful! No wonder that it was nicknamed at the time as “Järvinen’s box”, according to its designer Asser Järvinen, the manager of the Airplane Factory. However, the Kurki is impressive with its huge wings. The Tuesday Club wish they had the proper Siemens-Halske 12 engine for the Kurki so that the plane would look like a real flying airplane. Unfortunately, there is not a single SH 12 engine available in Finland for the Kurki.
The remaining task was to turn Kurki around in the Middle hall of the museum, into its final display position. Maneuvering the plane was fairly easy, the Kurki rested on its skis and tail wheel on pallets with wheels. The problem was that the final assembly work had taken place under the main ceiling beam in the middle of the hall and now the wingtips of the Kurki nearly touched the walls of the hall. The plane was inched into a diagonal position in the hall, but that was a close call: there was a marginal of 5 cm between the wingtip and the wall.
When the Tuesday Club was working on the assembly, the Aviation Museum Society had been making preparations for the Kurki exhibition, including information posters. The posters describe the history of Kurki and also the restoration work at the Tuesday Club. There is also information about the design and construction of Kurki and about the history of the Air Force Airplane Factory, which operated in the Viapori sea fortress in the 1920’s.
The Kurki exhibition was opened on December 18th. The plane is on display in the Middle hall of the Finnish Aviation Museum, at least until the end of January but probably longer. The exhibition is definitely worth a visit: Kurki is one of the most extraordinary products of the Air Force Airplane Factory. |
|
Avainsanat: aviation history, restoring, old aircraft, I.V.L. K.1 Kurki |
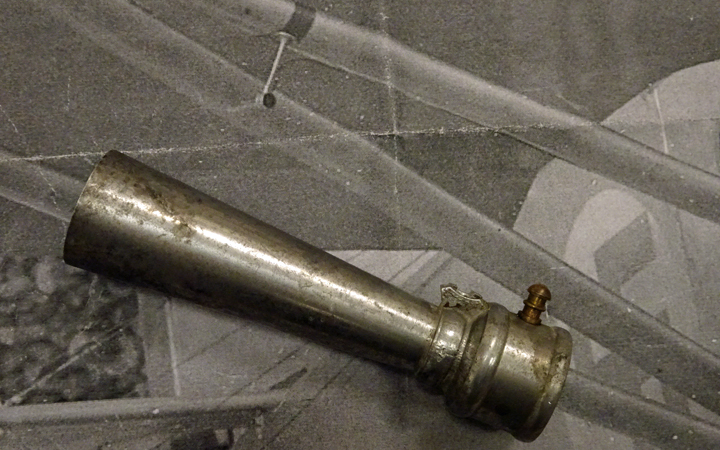
Kurki got its venturi tubeMaanantai 26.11.2018 - Member of Tuesday Club The I.V.L. K.1 Kurki was built in 1927 in the Air Force airplane factory at the Viapori sea fortress. The restoration of the Kurki prototype has reached its final phases in the Tuesday Club. One of the last, but not least tasks was to find and install the lost venturi tube on Kurki’s wing strut. The venturi tube is used for indicating the plane’s speed and it is based on the changes in air flow velocity.
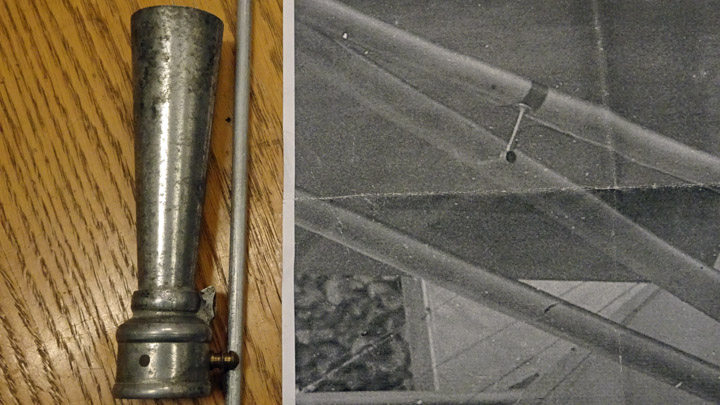
The venturi tube has been fastened on the forward wing strut on the right / starboard wing – this can be seen on old photographs of Kurki. On the original wing strut the fastening point of the venturi tube can be seen and also some fastener clips for the air tube leading from the venturi tube to the cockpit.
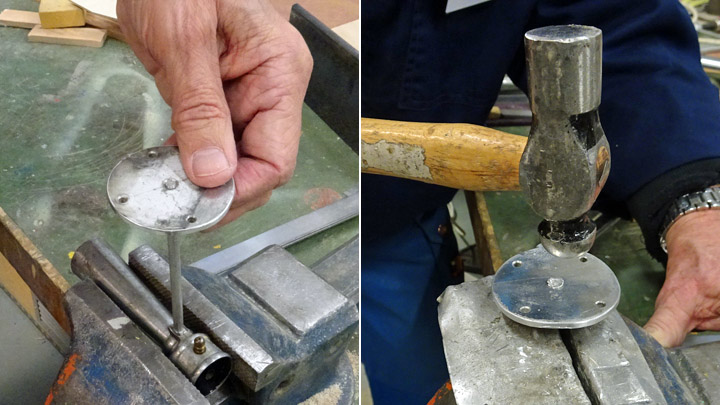
An old but damaged venturi tube was found at the Finnish Air Force Museum, resembling the old one on the Kurki photograph. The Tuesday Club was pleased of the find, although the stem of the venturi tube had disappeared. Also the round plate at the end of the stem had disappeared, the plate is necessary for fastening the venturi tube on the wing strut. The old venturi tube from the 1920’s is made of cast siluminium, an alloy of zink and aluminium.
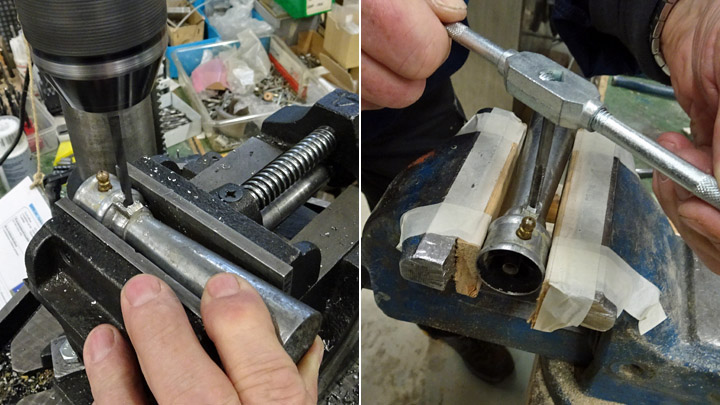
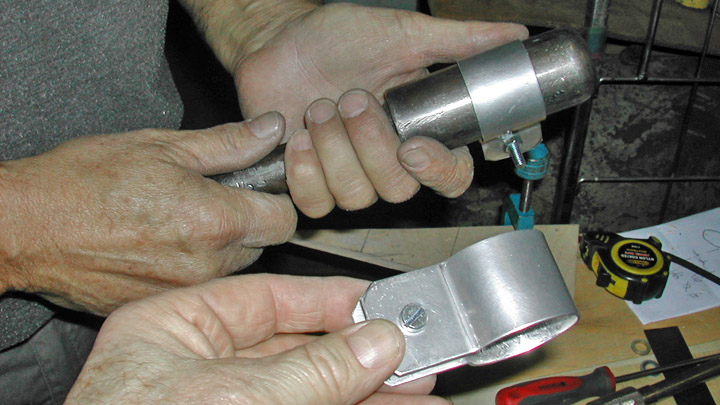
The motto of the Tuesday Club says: what is missing, we will make. So without further discussion the club members started making the missing venturi tube stem and fastening plate. The first task was to drill a hole on the venturi tube at the point where the original stem had broken. New nut thread was made for fastening the new stem. The new 15 cm long stem was cut from round aluminium pole, 5,5 mm in diameter. Screw thread was made on both ends of the stem so that it can be fastened on the venturi tube and on the fastening plate.
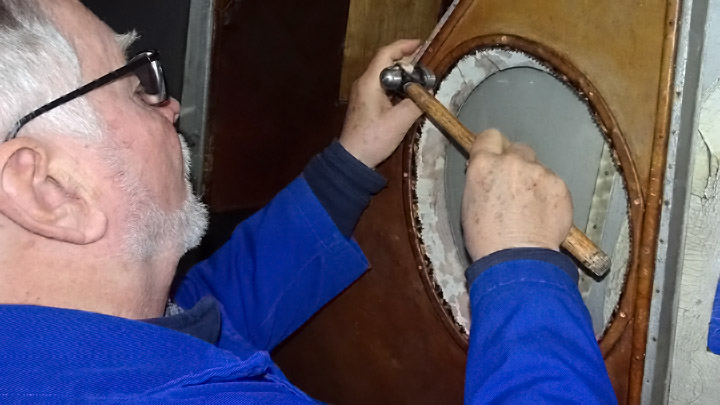
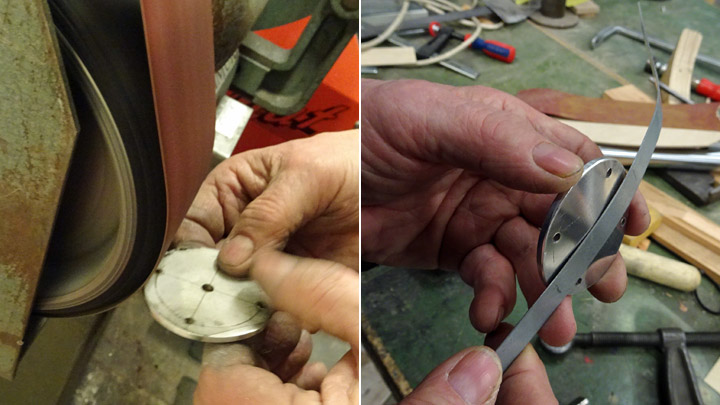
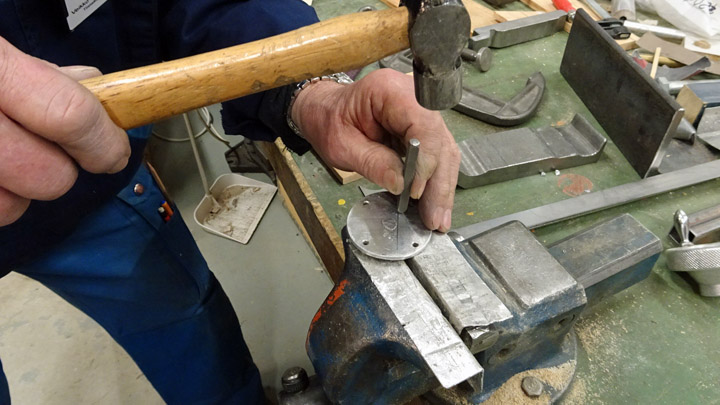
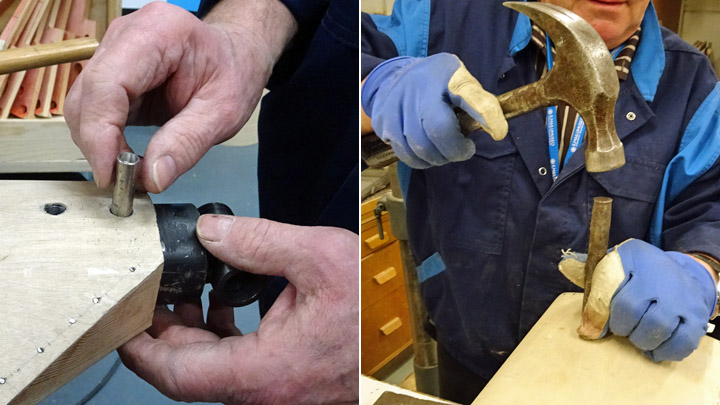
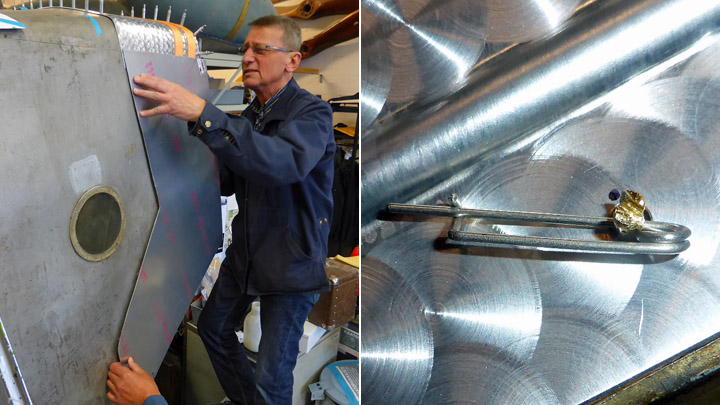
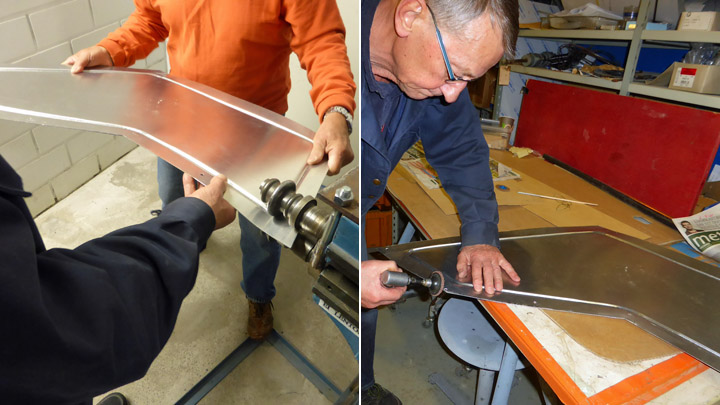
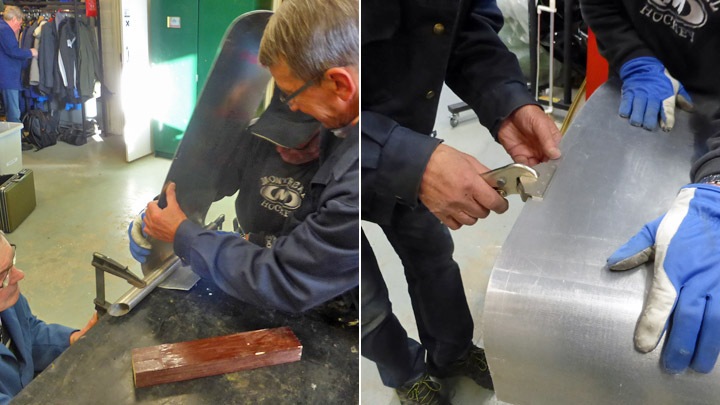
The fastening plate was made by cutting a piece from 4 mm thick aluminium plate and grinding it round. Holes for fastening screws were made and a hole was drilled in the middle, with nut thread for fastening the venturi tube stem. The sides of the wing strut are slightly curved, the fastening plate of the venturi tube has to be similarly curved. A model of the wing strut was made from stiff steel plate and this was used when hammering the fastening plate into the right curved shape.
Finally the parts of the venturi tube were ready to be fastened to one another. First the stem was screwed into the hole in the venturi tube. Then the fastening plate was screwed onto the other end of the stem so that the end of the stem penetrated the plate and was about 2mm out on the other side. The venturi tube was firmly fastened on a vise by its stem and the end of the stem was hammered flat on the underside of the fastening plate. Now the stem was tightly fastened and locked onto the fastening plate. The final phase was to stamp the year 2018 on the underside of the fastening plate so that the new plate and tube stem can be seen to be different from the original parts of the venturi tube. The venturi tube had now been repaired and was ready to be fastened.
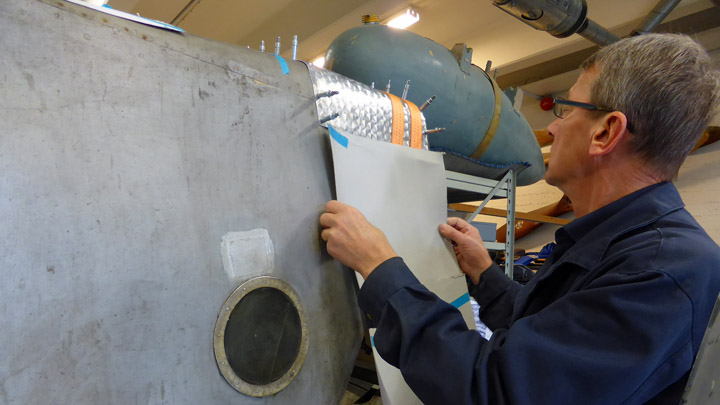
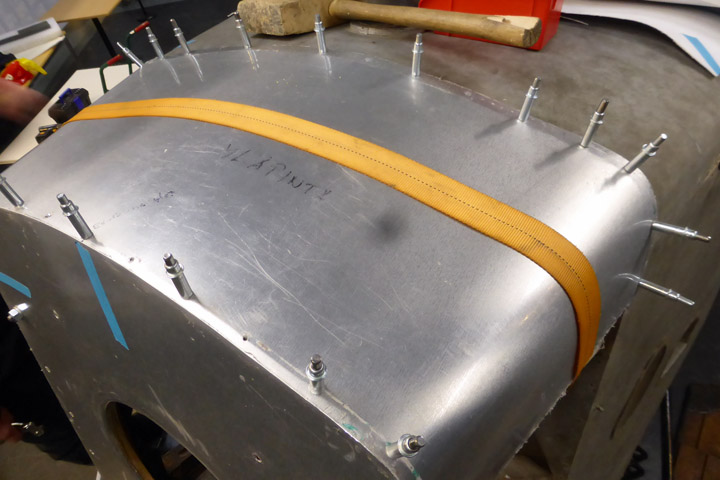
The venturi tube was preliminarily attached on the front wing strut of Kurki’s starboard wing. The tube won’t be fastened before the collar-shaped support made of aluminium plate has been installed around the wing strut. This supporting collar under the venturi tube can be seen on old photographs of Kurki. The covering plywood on the wing strut is only 1,2mm thick so the venturi tube fastening plate and its screws need the additional support of the collar. Photos: Lassi Karivalo. |
|
Avainsanat: aviation history, restoring, old aircraft, I.V.L. K.1 Kurki |
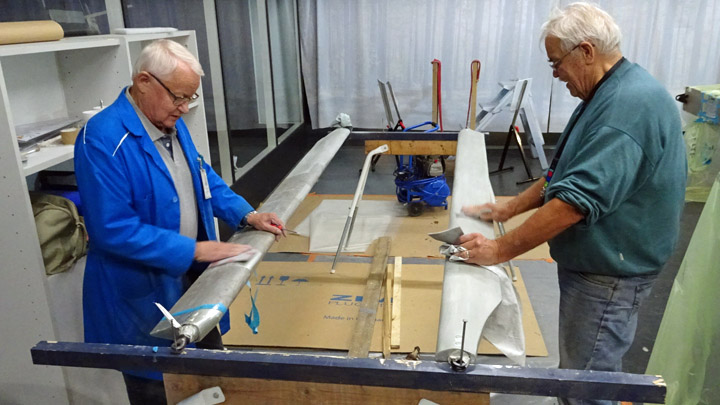
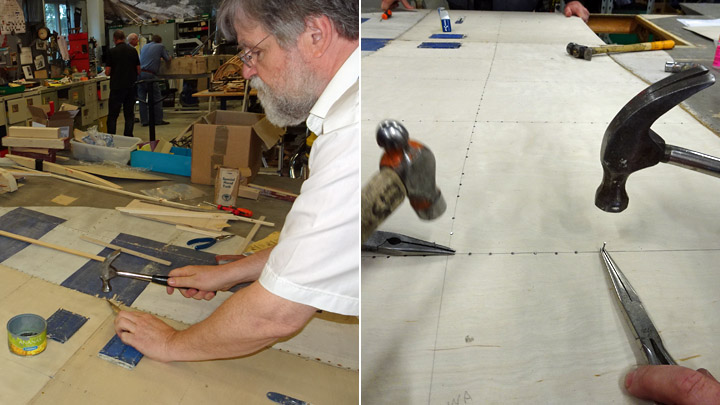
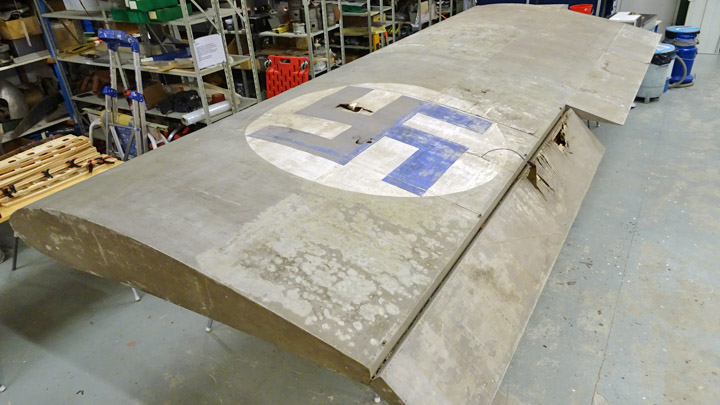
New plywood surfaces of Kurki wings and wing struts paintedTiistai 9.10.2018 - Member of Tuesday Club The restoration work of I.V.L.K.1 Kurki has been almost completed at the Tuesday Club. The painting work of the partly replaced plywood areas on Kurki’s wings and of the new and repaired plywood surfaces on its wing struts remains to be completed. On both wings several square meters of rotten plywood had to be dismantled, mainly around the national emblems. Now the new covering areas are painted using a method similar to the original one.
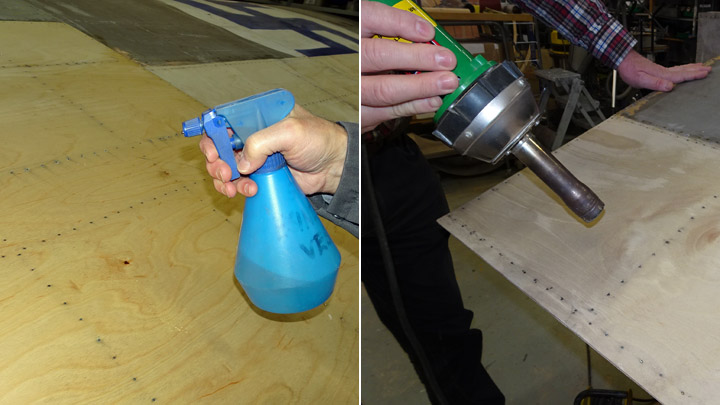
First the new plywood areas had to be buffed out to remove the “lint” on the surfaces. The plywood surface was moistened using a spray bottle and dried using a heater fan, to make the “lint” stand upright. Then the surface was buffed out using 320 sand paper.
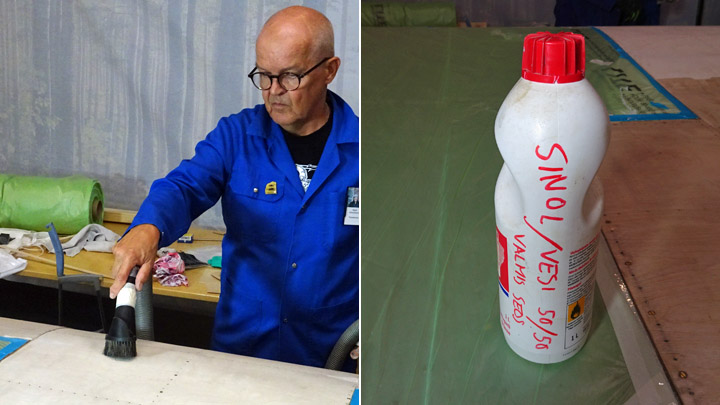
This procedure was repeated several times so that the plywood surface became very smooth. Chemical wood was used to putty the seams between the new and the original plywood sheets, then the seams were honed. Finally, the plywood surfaces were vacuumed and cleaned with a damp cloth, dipped in a solution containing 50 % Sinol and 50 % water.
Some expert advice for the Kurki wing painting was provided by the surface finishing teacher of the Tavastia Vocational College. A brief painting course took place at the Finnish Aviation Museum and the wings of Kurki were used as an example when discussing the treatment of new plywood surfaces and the painting work itself.
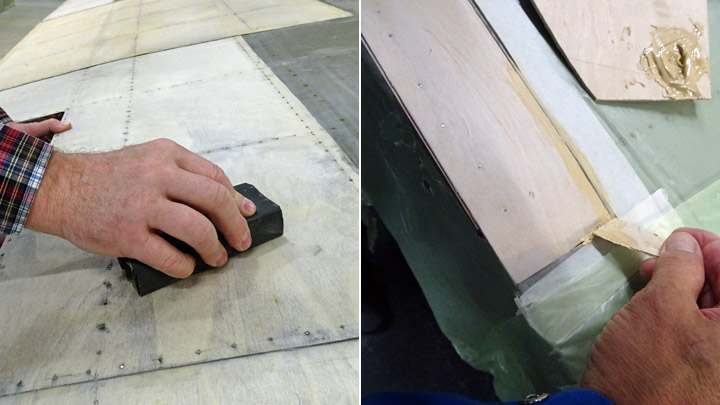
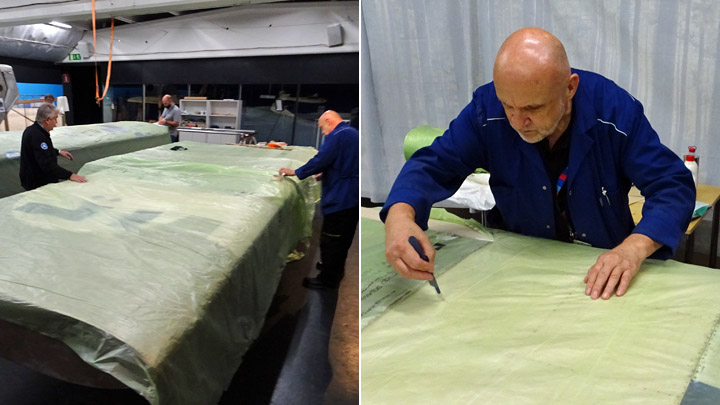
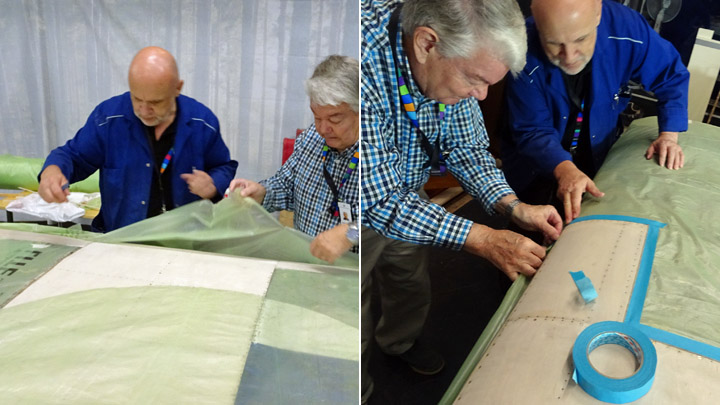
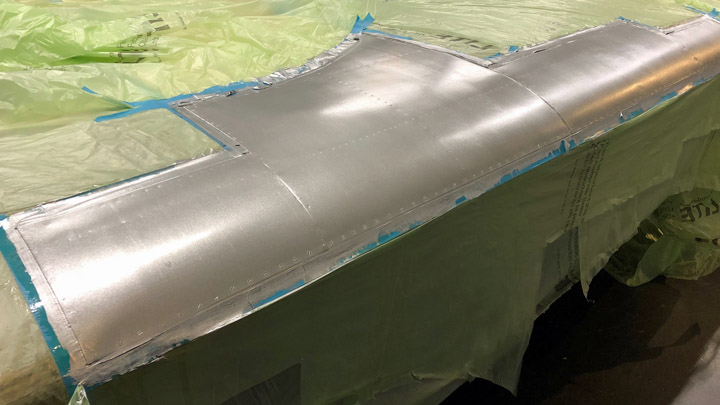
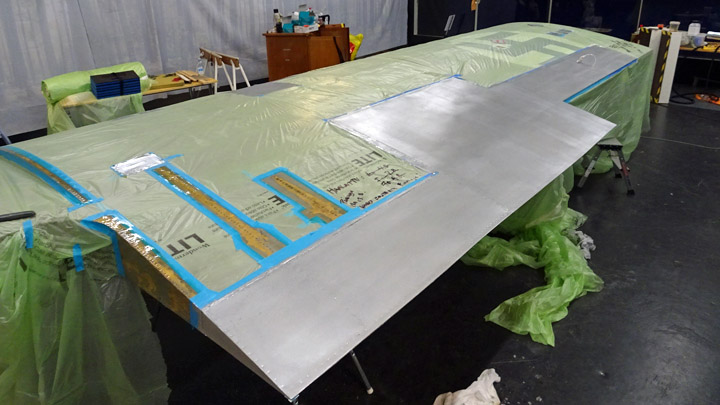
One of the key issues in successful painting is to keep dust away from the painting room and the surfaces which are being painted. After the wings had been vacuumed, they were covered using a thin film of plastic, which was cut open at the areas to be painted. On the edges of the painting areas the plastic film was taped tightly onto the surfaces.
The plywood surfaces of Kurki had originally been painted by first applying clear varnish on the clean plywood. On top of that a varnish tinted with silver bronze colour pigment was applied, and finally a layer of clear varnish added on top. A similar method is being used in the restoration work. Instead of clear varnish a corresponding modern material is used: La Tonkinois -lacquer, which is a mixture of varnish and Japan tree oil.
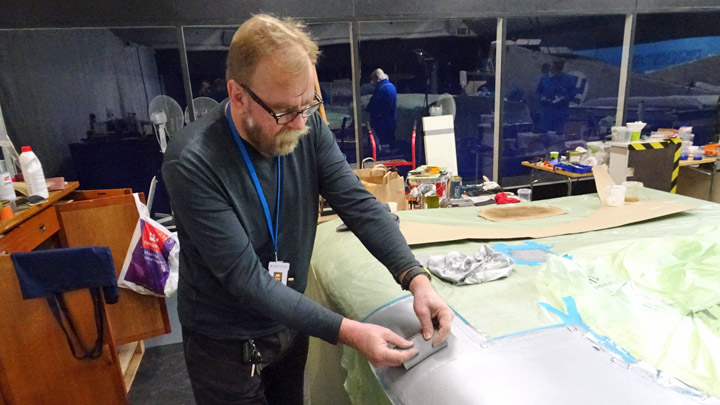
Before the Le Tonkinois-lacquer can be applied on the surface, the amount needed has to be filtered, in order to remove possible “bits and nuggets” in the lacquer. Then a clear base layer of Le Tonkinois was applied on the new and clean plywood surfaces on the Kurki wings and wing struts. A narrow and thin foam rubber roller was used, because fluffy mohair rollers aren’t suitable. When the lacquer had been applied using the roller, the surface was smoothed with a paint brush using long, parallel and light strokes.
When the lacquer had dried, the surface was buffed out with INDASA Fine and Super Fine buffing pads, vacuumed and wiped using the sinol/water-solution. When the plywood surface had dried, a new layer of lacquer was applied. This procedure was repeated so many times that the clear base lacquer layer was so smooth that the tinted layer of Le Tonkinois could be added.
Now the Le Tonkinois lacquer tinted with silver bronze could be applied on top of the clear and smooth base layer. A similar method was used to add the tinted paint layer as described above.
Photo: Jouni Ripatti. To reach a good result, it is important that the foam rubber roller is moved only in one direction, not back and forth as usually when painting with a roller. After several layers of tinted lacquer and honing the surface between painting the layers, a very smooth silver bronze surface was ready. It had almost a metal shine. Finally, a top layer of clear Le Tonkinois lacquer will be added.
The Tuesday Club has established “a painting factory” in the Mid-hall of the Finnish Aviation Museum. The aim is to finish the painting of the new plywood surfaces on Kurki’s wings and wing struts before the end of October. Photos: Lassi Karivalo except if separately mentioned. |
|
Avainsanat: aviation history, restoring, old aircraft, I.V.L. K.1 Kurki |
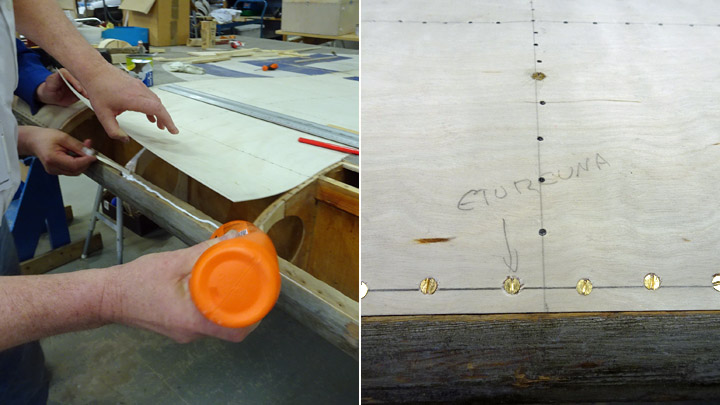
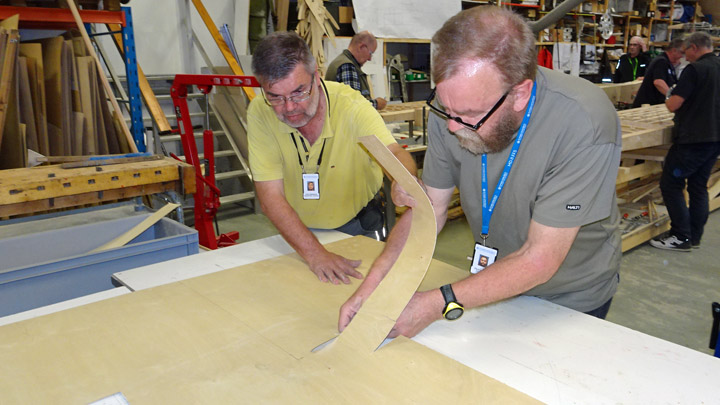
Repairs on Kurki's port wing are almost completedTiistai 17.7.2018 - Member of Tuesday Club The damaged and partly rotten wings of I.V.L.K.1 Kurki are being repaired by the Finnish Aviation Society’s Tuesday Club. The repair work is at the phase where the starboard wing is ready and its new covering is being painted. At the end of January the port wing was brought to the workshop from the Päijät-Häme aviation museum storage in Vesivehmaa. Now the repairs on the port wing have been almost completed.
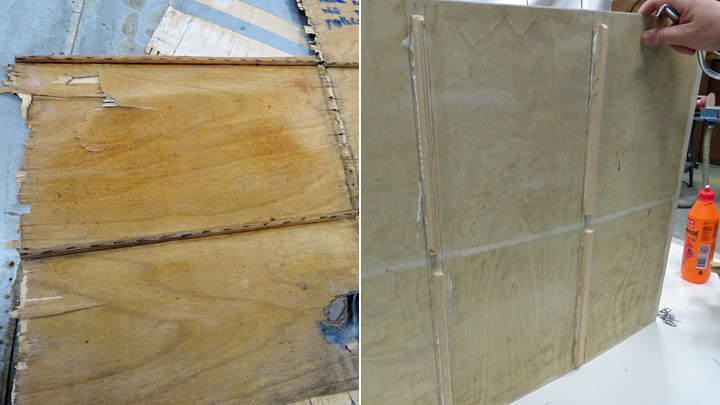
The rotten plywood covering of the Kurki’s port wing had to be dismantled around the national swastika emblem on both sides of the wing, several square meters in total. Before the dismantled areas could be covered with new plywood, the damaged inner structures of the wing had to be repaired and partly renewed. These repairs were finished in mid-April. The preparations for the new covering included also building wooden bridge structures under the seams where the new plywood covering meets the old. When this had been completed, the installation of the new covering could be started.
The lower surface of the wing was covered first and the work was started at the small dismantled areas between the leading edge and the front spar. New 1.2 mm thick plywood was used, matching the original covering material. After this the large area was covered, extending across the whole width of the lower surface of the wing. There a different approach had to be taken – the original installation of the Kurki covering from 1927 couldn’t be followed.
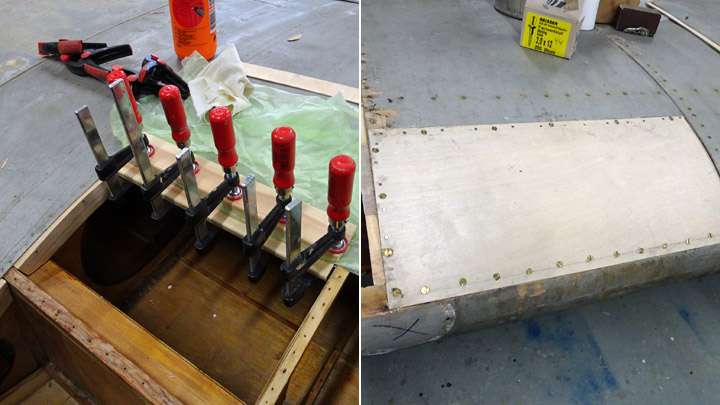
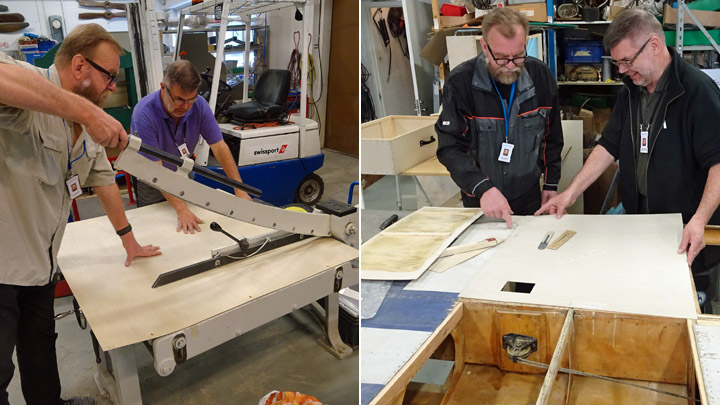
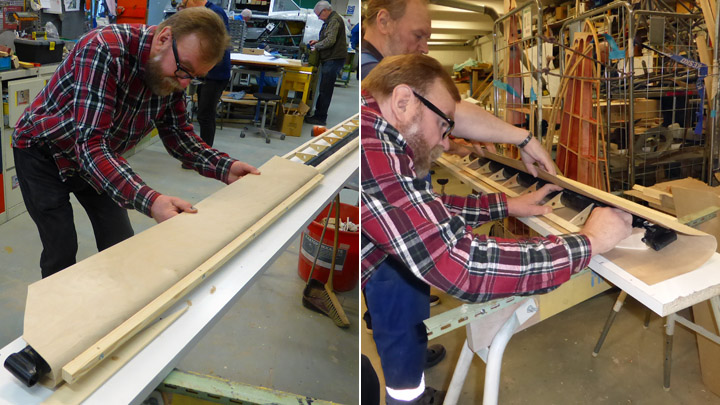
The Kurki wing is very wide (225 cm) and it has been originally covered with a single board of plywood which is as wide as the wing. Such large boards were not available and a different method had to be used when installing new covering on the lower side of the wing. The existing plywood boards were 150x150 cm. Therefore the wing had to be covered using two sheets of plywood with a butt joint on the rear spar.
Two pieces were cut from the plywood board, one to cover the area between the rear spar and trailing edge and the other to cover the area between the rear spar and leading edge. The pieces were modified to fit in their places. Special attention was paid to the edges meeting at the butt joint: the seam on the rear spar must be tight.
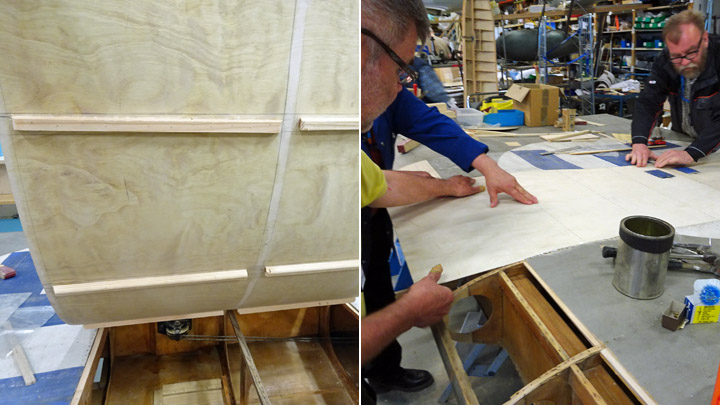
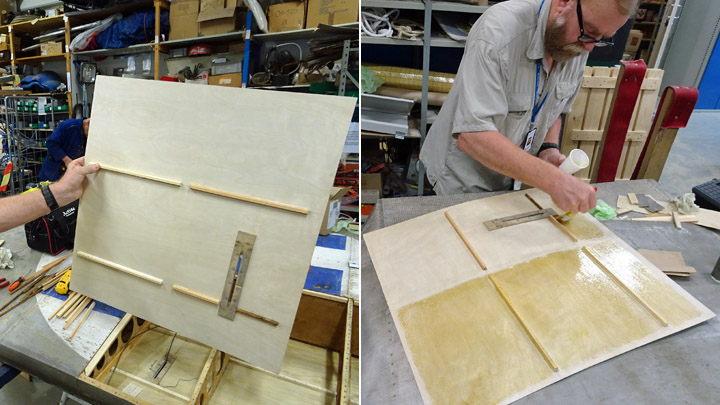
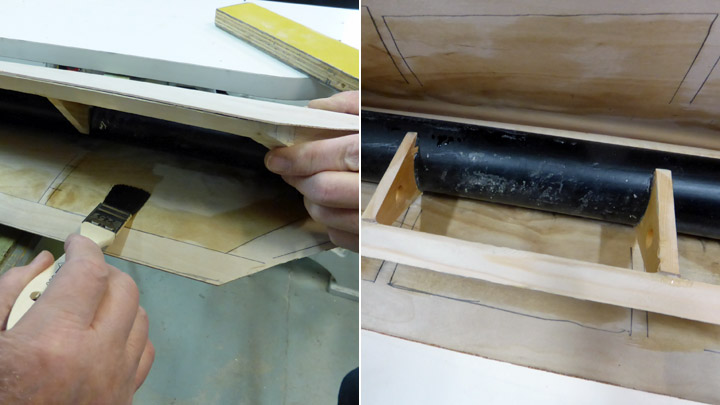
When the plywood pieces had been correctly positioned, supporting battens were fastened on their lower surface, following the original construction where the battens support the covering between the ribs. The supporting battens keep the plywood from bending inwards due to aerodynamic reasons when the plane is in the air. The lower surface of the plywood was protected against humidity using Le Tonkinois varnish.
Casco Outdoor wood glue was used when gluing the new plywood sheets on the ribs, wing spars and leading and trailing edges.
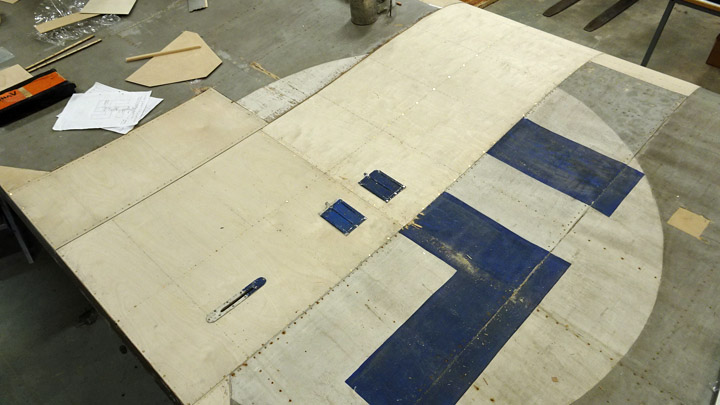
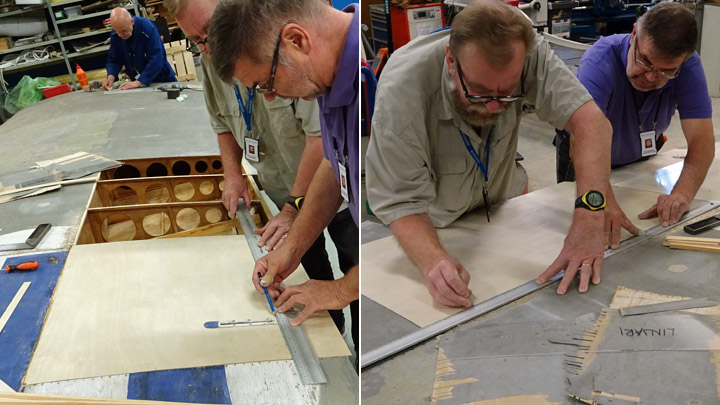
On the upper side of the wing less damaged covering had been dismantled than on the lower side. The largest area was around the national emblem, between the rear spar and the trailing edge, extending the width of five ribs. Some old covering had also been removed between the front spar and the leading edge, between two or three ribs.
Two sheets were cut from the 1.2 mm thick plywood board, matching the dismantled area between the rear spar and trailing edge. One of the sheets covers the area between three ribs on the left side of the area, the other the area between four ribs on the right.
The plywood sheets were positioned in their places and the supporting battens were installed as described above. The surfaces were protected with varnish. An elongated opening was made for the aileron wire lead-in and the aluminium plate collar, dismantled from the original covering, was installed.
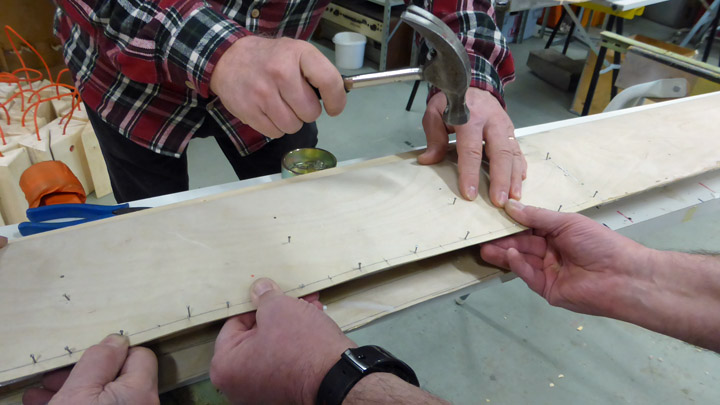
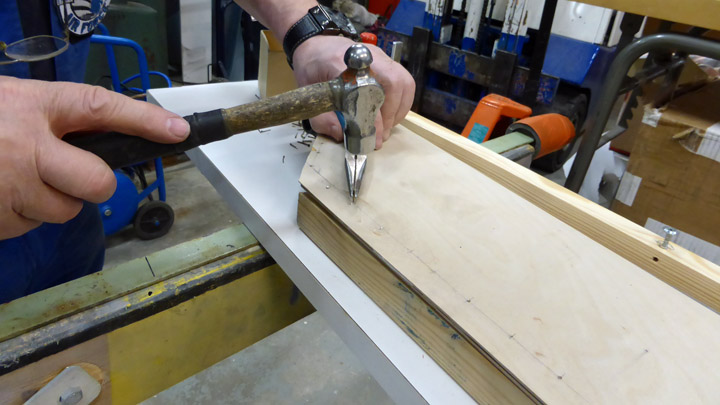
The sheets covering the dismantled area will be fastened on their upper edge to the edge of the original plywood, using a butt joint at the rear spar. The lower edge the plywood will be fastened on the batten of the trailing edge. Along the length of the wing the new plywood sheets will be fastened to each other and the adjoining old plywood, using lap joints. This method was chosen because the original plywood covering of the Kurki wing have been fastened at the ribs using lap joints so that the edges of the plywood sheets overlap a couple of centimeters. The plywood covering has been started from the tip of the wing.
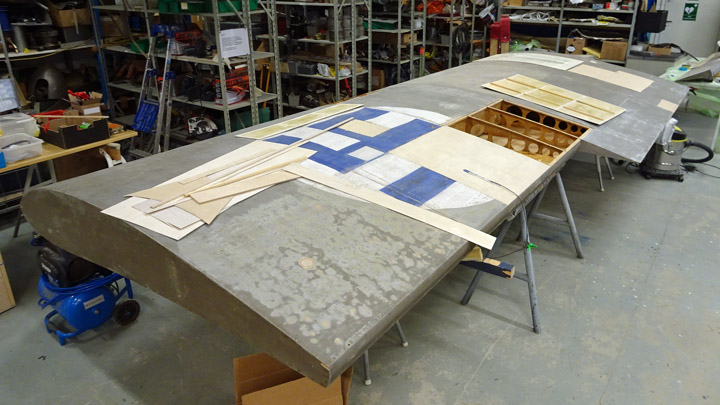
The plywood sheets on the upper surface of the wing will have to be modified a little before they are ready to be glued in place. The restoration work was left at this point before when a summer break started in the Kurki project. The autumn season of the Tuesday Club will begin on August 14th and the work goes on. Photos: Lassi Karivalo. |
|
Avainsanat: aviation history, restoring, old aircraft, I.V.L. K.1 Kurki |
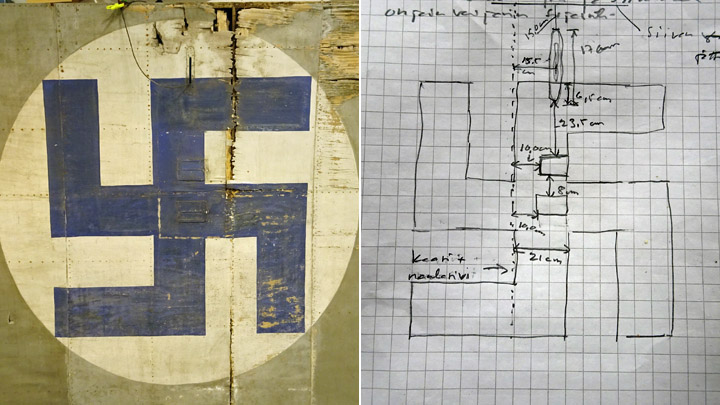
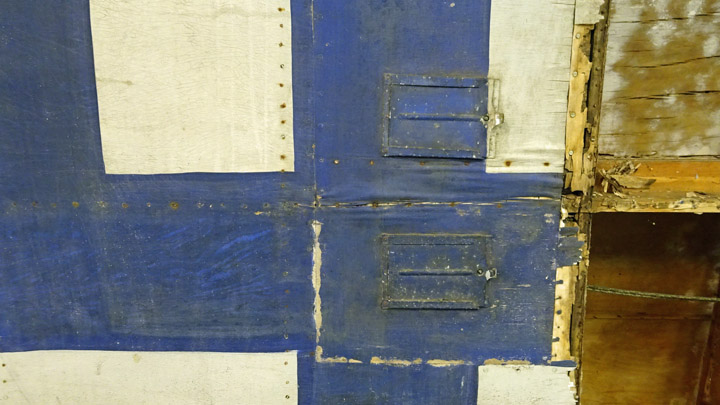
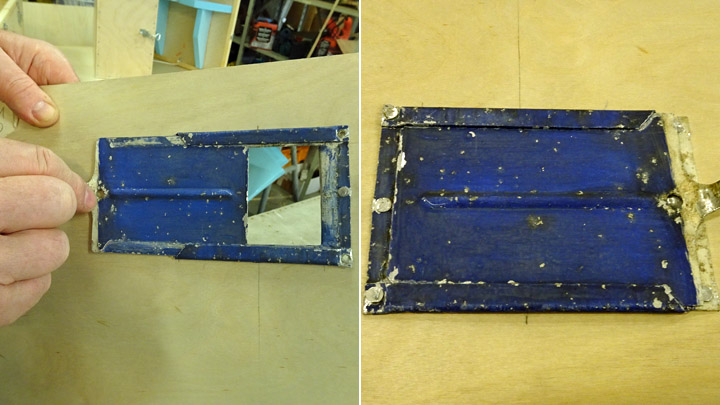
Access hatches on left wing of KurkiMaanantai 28.5.2018 - Member of Tuesday Club The covering of I.V.L.K.1 Kurki’s left wing with new plywood is going on at the Tuesday Club. The rotten plywood on the lower side of the wing was dismantled and has already been replaced by new plywood covering and now the dismantled areas on the upper surface of the wing are being covered. The aluminium plate access hatches for the aileron wire pulleys and aluminium plate collar for the aileron wire lead-in are located in the dismantled area on the lower surface of the wing, at the swastika emblem. The wire pulleys inside the wing are attached to the sides of the rear spar.
The Tuesday Club team wanted to keep the access hatches and the wire lead-in collar as they were and move them from the rotten plywood on the new plywood covering. For this procedure the location of the hatches and the collar were measured when the rotten plywood was still attached. The measurements were documented to a drawn scheme which will be used for placing the hatches and the collar in their correct places on the new plywood.
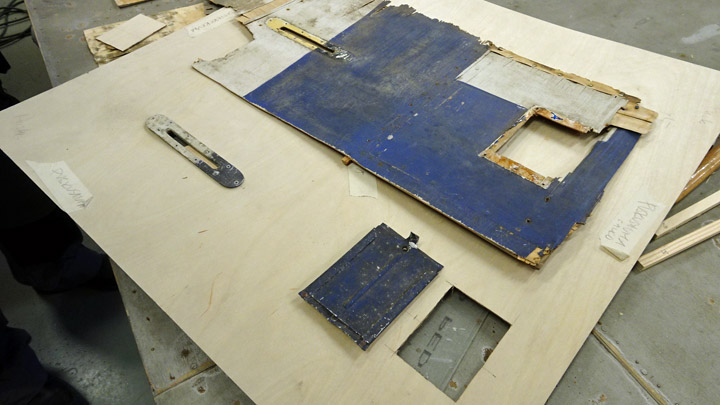
The sliding access hatches had been fastened to the plywood using copper rivets. The aileron wire lead-in collar had been fastened with screws to the supporting batten under the plywood. The collar was easy to dismantle by removing the screws. The access hatches were unfastened by drilling out the rivets without damaging the hatches. The unfastened hatches and aluminium collar still had their original paint in reasonable condition and the team decided not to remove the paint. The surfaces were just cleaned carefully. The hatches and the wire lead-in collar will not be repainted when the national swastika emblem will be painted on the new plywood covering.
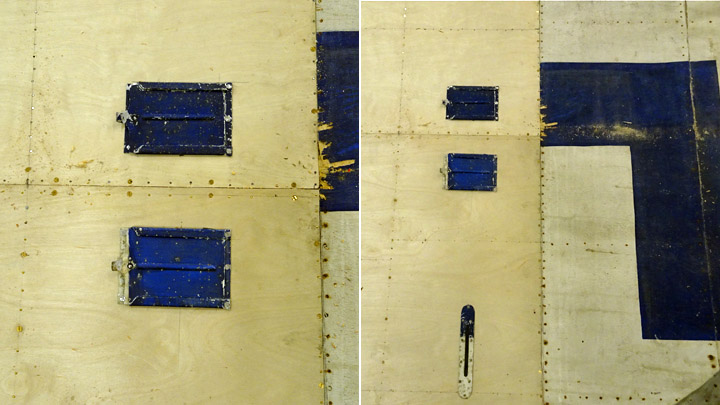
The Kurki wing is 225 cm wide and it has been originally covered with a plywood board 1,2 mm thick which is as wide as the wing. The Tuesday Club team has 1,2 mm thick plywood boards which are 150x150 cm so the dismantled wing area will be covered using two plywood boards with a seam on the rear spar. This means that the access hatches, which are located on either side of the rear spar, will be fastened on two different boards: one hatch to the plywood area towards the trailing edge and the other to the plywood area towards the leading edge.
The plywood sheet towards the trailing edge was cut to measure from the 1,2 mm thick plywood board and preliminarily installed in its place. Then the location of the hatch and the aileron wire lead-in collar were marked on the plywood using the drawn scheme. Holes were cut in the plywood according to the drawing. The sizes of the holes were compared to the ones on the dismantled rotten plywood. Finally the access hatch and the aluminium collar could be fastened onto the new plywood covering.
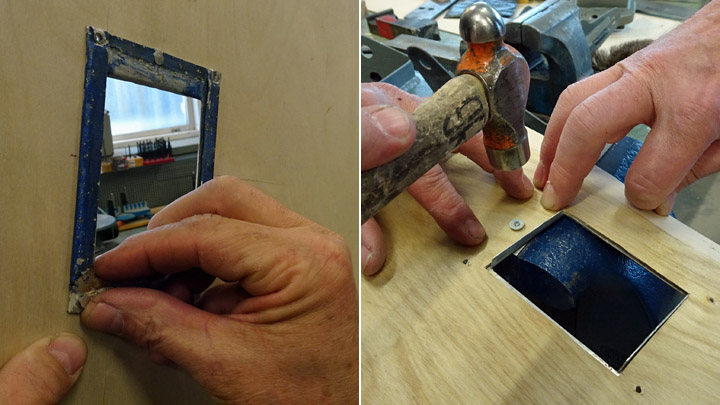
The sliding cover of the access hatch was unfastened and the cover frame was fitted into the hole made for it. Holes were drilled in the plywood at the places where the frame had the rivet holes. Aluminium rivets were used instead of copper ones. A protecting ring was placed on each rivet before hammering the rivets one at a time against an anvil, until the rivet was at the level of the plywood surface.
When all the rivets had been hammered in and the cover frame had been fastened by its corners, the sliding hatch cover could be pushed in place. The aluminium collar for the aileron wire lead-in was fastened in its place using screws.
Now the new plywood covering between the rear spar and the trailing edge had the original access hatch and the aileron wire lead-in collar in their correct places. The plywood sheet was fastened on the ribs using Casco Outdoor glue and rows of nails and screws. The access hatch for the other aileron wire pulley were installed in a similar technique to the new plywood between the rear spar and the leading edge and the plywood was fastened on the wing. Photos: Lassi Karivalo. |
|
Avainsanat: aviation history, restoring, old aircraft, I.V.L. K.1 Kurki |
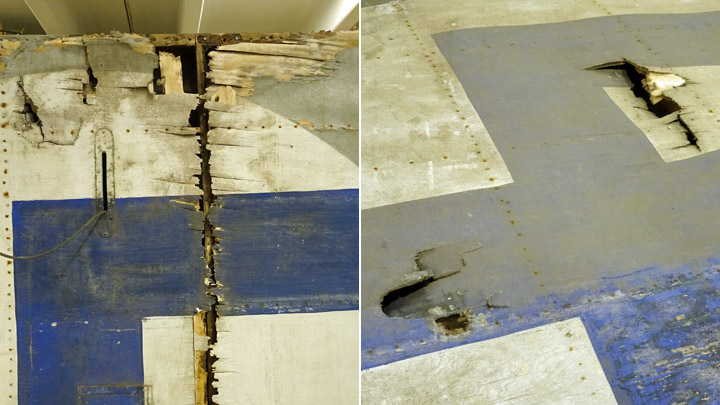
Repair of left aileron of KurkiSunnuntai 18.3.2018 - Member of Tuesday Club The rotten parts of the left wing of I.V.L.K.1 Kurki have been under restoration in the Tuesday Club already for a month and a half. An additional project was launched to repair the aileron which had also been badly damaged. The aileron is located in the area of the wing which has been damaged during the 90 years of storage: water has been dripping on the plywood covering of the wing and aileron and caused rotting and moulding. The Tuesday Club will remove the rotten parts of the plywood covering of the aileron and rebuild the covering using new 1.2 mm thick plywood. Also the inner structures of the aileron will be repaired.
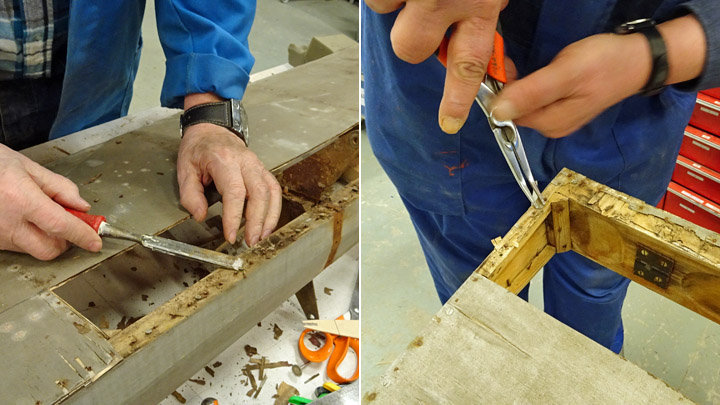
The work was started by defining which parts of the aileron covering needed to be dismantled. Then the plywood was cut along the marked line using a Dremel cutter blade. The rotten plywood was removed and it actually almost fell off from the aileron ribs, end and leading edge. The remaining fragments of the plywood were chiselled off the leading edge. When the plywood had been removed, further damage could be seen: parts of the aileron ribs and the rib plywood sides were partly badly rotten and will have to be renewed.
When the plywood covering had been dismantled, the attaching nails and screws remained on the leading edge, ribs and end batten. The plywood had originally been glued on the aileron structure and gluing had been reinforced with rows of nails and brass screws at 10 cm intervals. The team tried to pull out the rusted nails but only some came out and others broke. The broken nail stubs were either filed down to the wooden surface or struck into the wood using a punch. The brass screws were easy to remove.
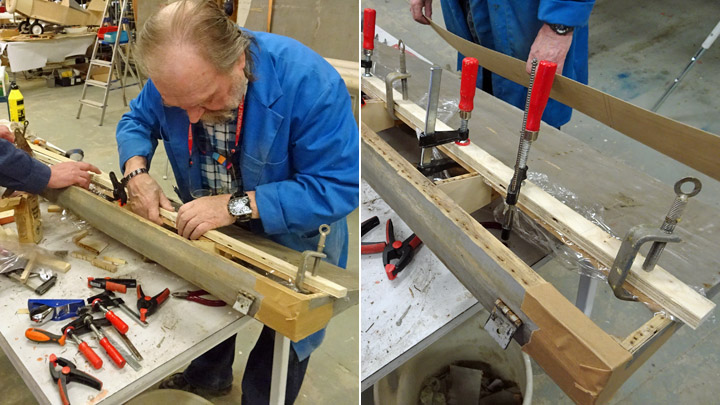
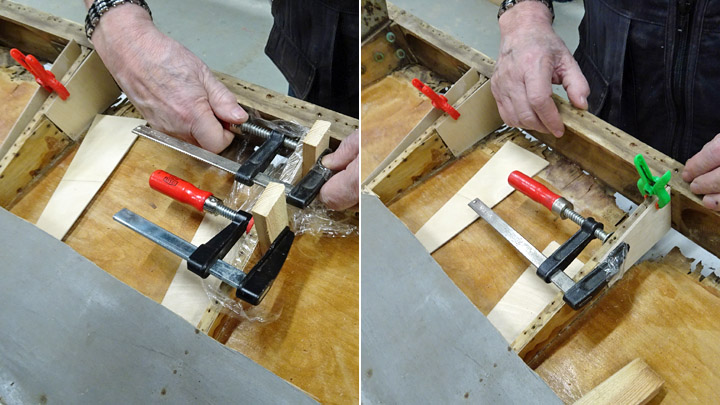
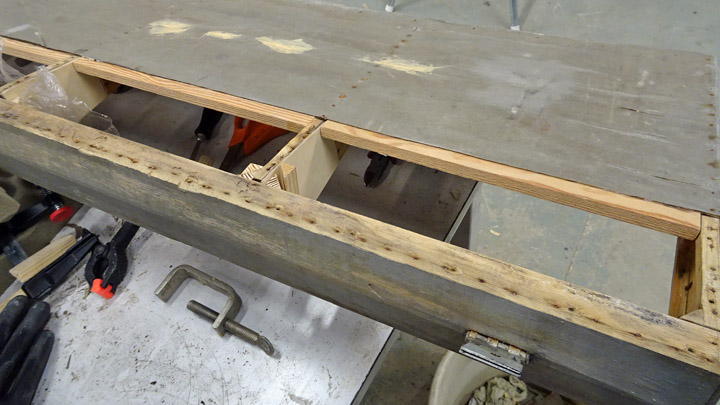
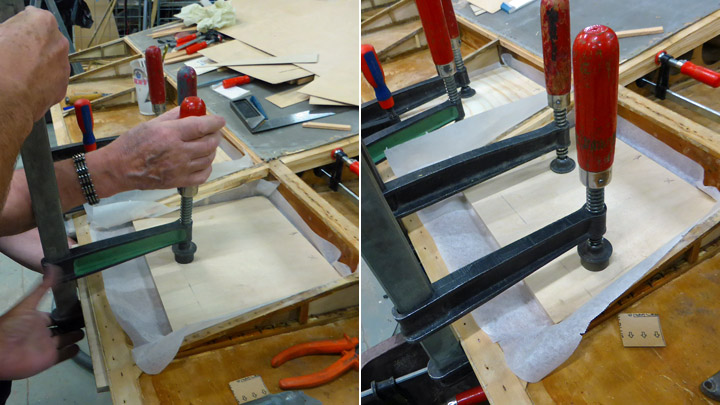
The dismantled area is covered with new plywood so that the new material is attached on the aileron ribs, leading edge and end batten and meets the existing covering in a butt joint. A new joining batten is installed between each rib and under the edge of the old plywood, reaching a couple of centimetres outside the edge. These battens form the structure under the butt joint seams of the old and new material. The wooden batten was cut to measure to fit between the ribs. Before gluing the battens into place, old protecting varnish had to be buffed out from the lower surface of the covering plywood. The battens were glued in place under the edge of the covering using Erikeeper Plus glue. A protecting plastic foil was spread over the edge of the plywood and a long wooden batten placed on top. The batten on top was an assisting element when squeezing the plywood edge and glued battens together using clamps. The plastic foil was necessary to keep the additional batten from attaching to the plywood in case some glue seeped out from the seam.
The repairs on the rotten aileron ribs has also been started. The plywood sides of the ribs, especially at the front ends, were so rotten on many ribs that the rotten parts had to be cut off and replaced using new plywood.
When the inner structures of the aileron have been repaired and the supporting battens for the butt joints of the new and old plywood covering are ready, the actual installation of the new plywood covering can be started in the dismantled areas. |
|
Avainsanat: aviation history, restoring, old aircraft, I.V.L. K.1 Kurki |
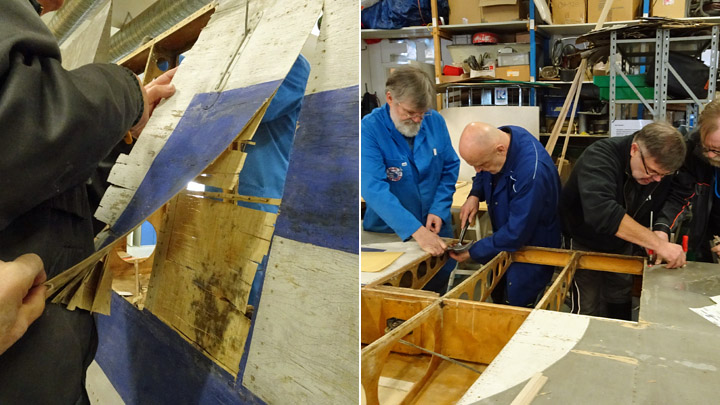
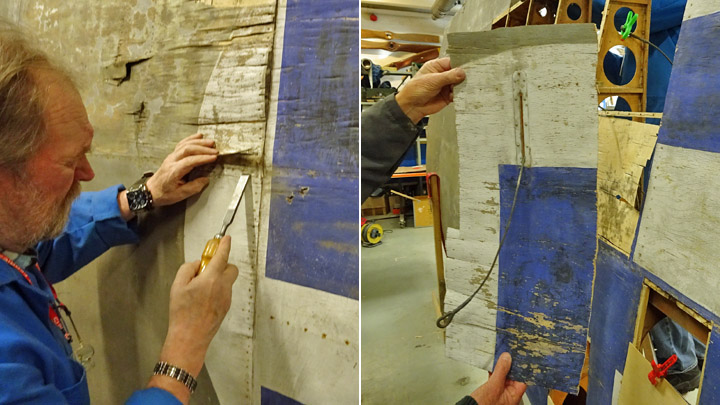
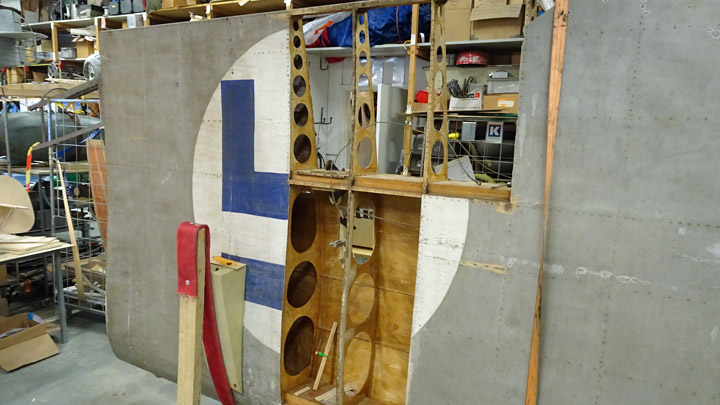
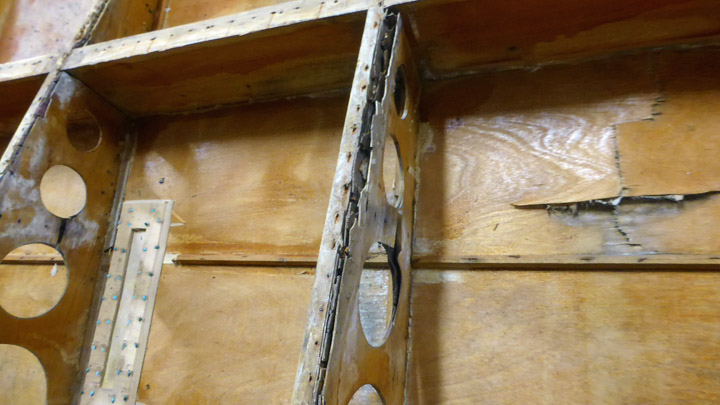
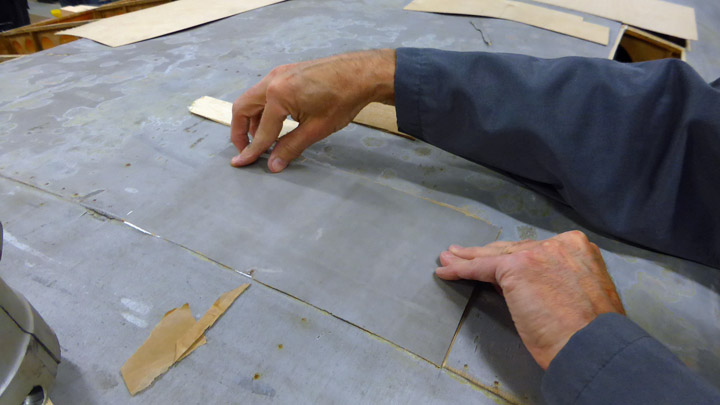
Dismantling of rotten parts of left wing of KurkiTiistai 6.3.2018 - Member of Tuesday Club The I.V.L.K.1 Kurki plane was transported from the Päijät-Häme Aviation Museum in Vesivehmaa to the Tuesday Club workshop and the restoration work of its left wing has been started. The wing (5.75 m long and 2.32 m wide) is covered with 1.2 mm thick plywood. Rotten areas in the plywood covering of the wing have had to be dismantled.
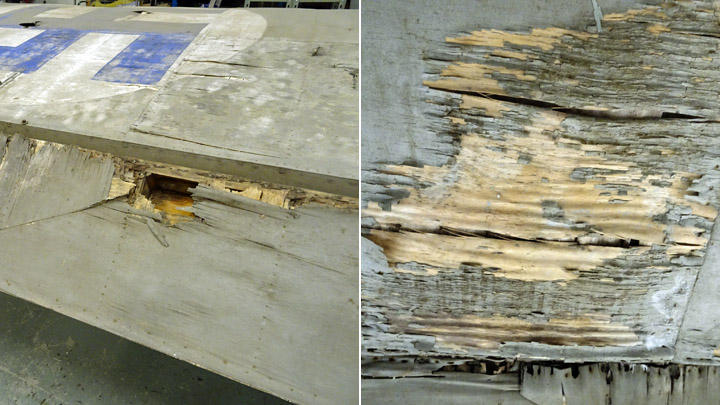
The plywood covering of the wing has several stricken holes which are easy to repair. The worst problem is the extensive rotten area around the national insignia on both sides of the wing. During the storage of the wing water has been dripping on this part of the wing and the plywood covering has been badly damaged. Also the aileron covering is badly rotten.
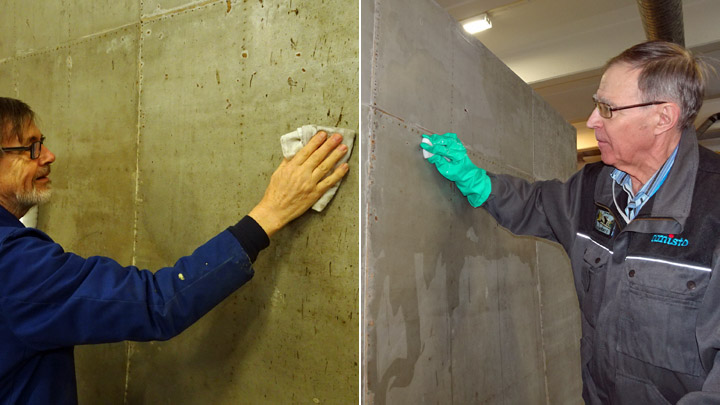
The wing surfacing is intact and in reasonably good condition outside the rotten area and the stricken holes. The intact parts of the wing were washed clean using a miraclean sponge soaked in water and wiped dry with a cloth. Chemicals were not used when cleaning the plywood covering of the wing.
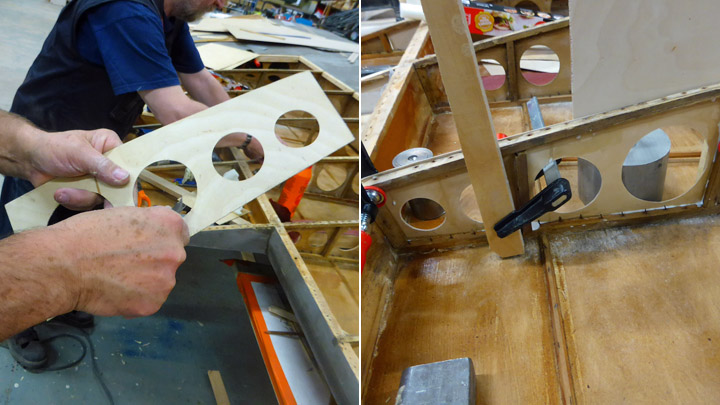
When the plywood covering is badly rotten, there is no other option than to remove it entirely and use new plywood to cover the area. This is how parts of the Kurki wing had to be restored. First a sketch was made of the rotten area to document the location of the national insignia, the maintenance panels and the aileron control wire holes. This documentation was necessary in order to place all the items correctly in their original locations when the new covering has been installed.
The rotten plywood covering was dismantled using a carpet knife. The dismantling covered the area between two or three ribs on both sides of the wing. Usually the dismantled area is extended as far as the ribs, which makes it easier to install the new covering.
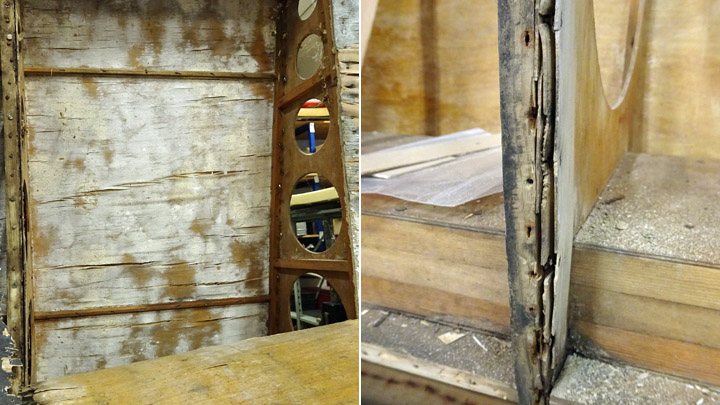
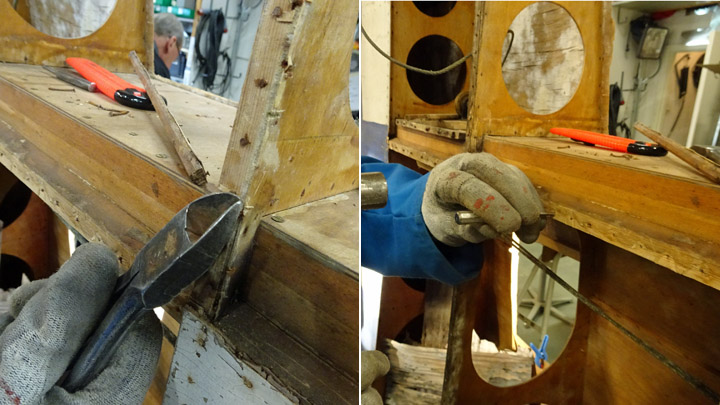
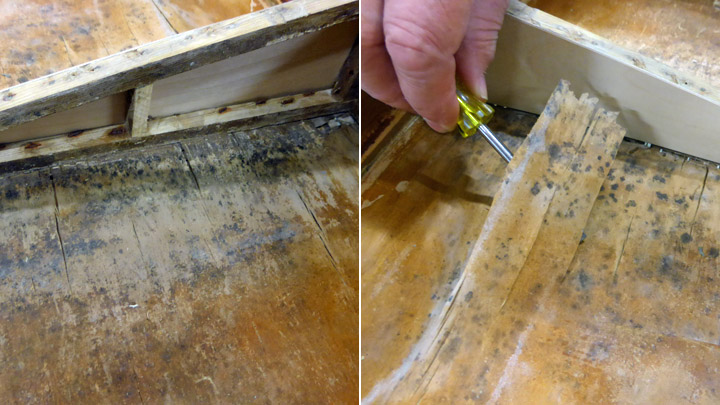
When the rotten plywood covering was removed, further damage was revealed: there was mould on the inner surfaces of the plywood covering and the upper edges of the rib plywood sides were rotten and the sheets of plywood had come apart. The frayed upped edges of the rib sides can fortunately be repaired using glue, they don’t have to be dismantled and renewed.
When the rotten wing covering had been dismantled, the remaining plywood nails and screws had to be removed from the ribs. Some nails could be carefully pulled out using pliers but some nails broke in the procedure. The broken nail stubs were either filed down to the rib surface or struck into the rib using a punch. The brass screws were easy to remove.
The work will be continued by preparing the dismantled areas for covering. First the rib plywood sides will have to be repaired as well as all the damaged areas in the inner structures of the wing. New supporting battens will have to be built in order to assemble the new plywood covering in the dismantled area. |
|
Avainsanat: aviation history, restoring, old aircraft, I.V.L. K.1 Kurki |
Left wing of Kurki to Tuesday ClubKeskiviikko 14.2.2018 - Member of Tuesday Club Since spring 2016 the Tuesday Club has been working on the restoration of the I.V.L.K.1. Kurki fuselage and right wing and the building of the wing struts. This work has been almost completed. Now it was time to bring the left wing of the Kurki to the Tuesday Club. Up to now the plywood-covered wing has been stored at the Päijät-Häme Aviation Museum in Vesivehmaa.
The wing arrived from Vesivehmaa on Tuesday, January 30th, transported by the Finnish Defence Forces. The transportation had been arranged by the Finnish Air Force Museum. The truck left Tikkakoski in the morning, bringing to the Päijät-Häme Aviation Museum the ejection seat simulator of MiG-21 that had been used by the Air Force and is now withdrawn from use. When the simulator had been transferred into the museum, the Kurki wing was loaded on the truck and the journey towards the Finnish Aviation Museum in Vantaa began. When the truck arrived at the Aviation Museum, the wing was moved directly into the restoration space of the museum.
The right wing of the Kurki – which has now been almost completely restored at the Tuesday Club – as well as the left wing have suffered major damage during the 90 years of storage. There are punched holes in the plywood covering of the wing and during the storing period water and moisture have damaged the covering and inner structures of the wing. The plywood covering has partly moulded beyond repair and will have to be renewed.
The first task will be to clean the wing surfaces and remove dust and dirt. Then the repairing work of the damaged parts can be started. The hard work ahead is expected to be completed in autumn. |
|
Avainsanat: aviation history, restoring, old aircraft, I.V.L. K.1 Kurki |
Kurki has a wing!Lauantai 30.12.2017 - Member of Tuesday Club A lot of work was needed before the right wing of the I.V.L. K.1 Kurki was ready for testing how to attach it to the fuselage. The Tuesday Club of the Aviation Museum Society had repaired the plywood covering of the wing and the damages in the inner structures and built the missing four wing struts. Also the restoration of the Kurki fuselage was almost completed, so it was time to test how the wing would be attached.
The Kurki wing had been restored in the work space of the Finnish Aviation Museum and now it was carried to the mid-hall where the restored Kurki fuselage was waiting. A lot of excitement was in the air when the assembly work was started by picking the wing up by a stacker and moving it slowly to the proper installation position.
Boards had been placed on the fork of the stacker so that the whole length of the wing could be supported. Two cargo lashes were attached to the ceiling beam of the hall and wrapped around the wing to ensure the lifting. The cargo lashes were tightened as the stacker lifted the wing higher.
When the correct installation height had been reached, the stacker was moved away and the cargo lashes now carried the whole weight of the wing. The wing was tilted so that the locating lugs were in line with the wing assembly holes in the fuselage.
Then the wing was pushed against the Kurki fuselage and the locating lugs at the root of the wing slid into the holes in the fuselage. The installation was surprisingly easy and the lugs were locked in place using bolts.
More stress was coming: would the two original wing struts and the two new ones (which had been made based on the original ones) fit the Kurki wing now that it was in place? The new wing struts had been made assuming that the two old wing struts found in the Vesivehmaa museum hall (and used as models) had belonged to Kurki. There was no evidence to support this assumption.
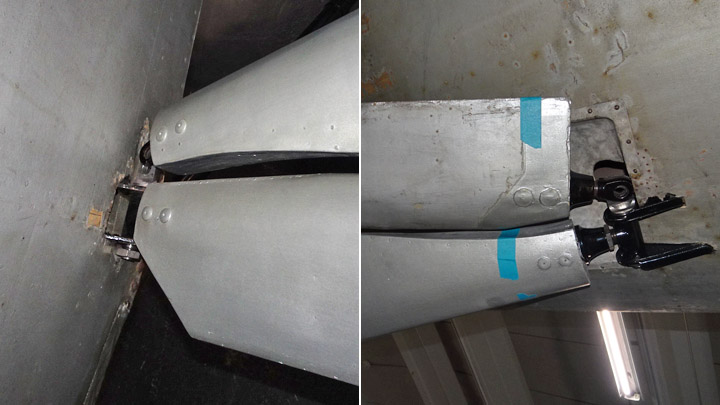
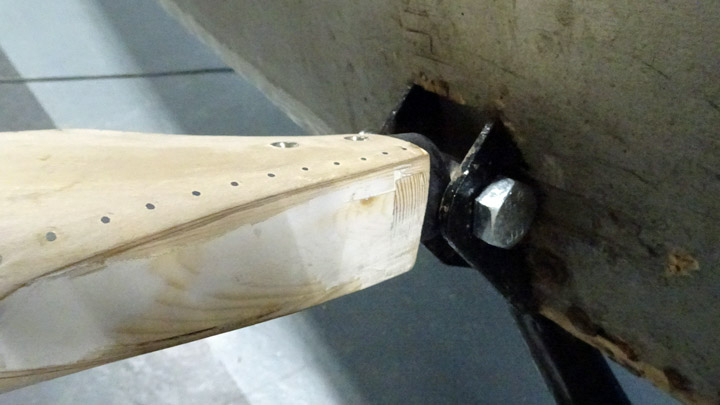
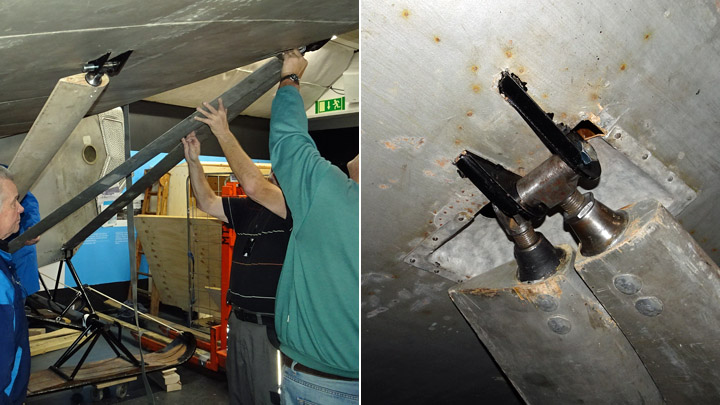
The original and repaired straight wing strut on the leading edge of the wing was installed first. The quill-shaped fastener at the lower end of the wing strut was attached to the brackets on the fuselage. This went well and the connection was secured with a bolt. Then the upper end of the front wing strut was lifted up in an angle to meet the brackets on the wing. After some adjustments the fastener was attached to the brackets. Now the front wing strut had been installed.
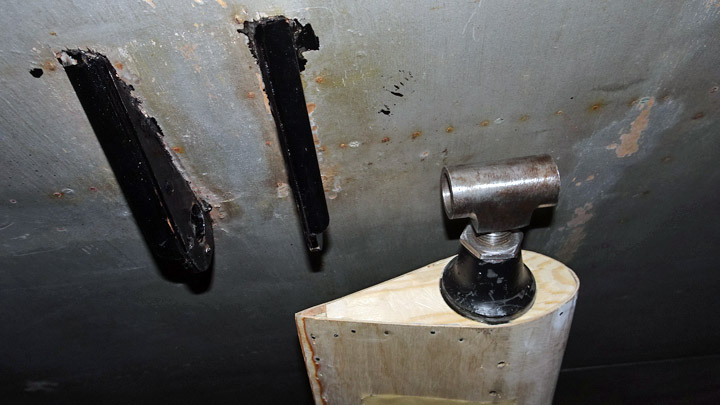
It was time to install the straight wing strut to the rear part of the wing. The rear wing strut had been made based on the original and repaired strut main tube and covered with plywood. The wing strut had been attached by its lower end to the brackets on the fuselage. Then a problem arose. When the strut was lifted up in an angle towards the brackets on the wing, the strut was positioned about 15 cm in front of the brackets. This meant that the brackets on the fuselage and on the wing were not in a perpendicular line. The brackets on the wing are located about 10 cm further back than the ones on the fuselage.
When the wing strut was rotated 180 degrees around its axis (the leading edge of the strut now pointing towards the trailing edge of the wing), the wing strut settled nicely between the brackets on the fuselage and the brackets on the wing. The Tuesday Club team noticed that the fastening quill on the lower end of the wing strut tube had been originally welded at an angle of 5 degrees to compensate the difference in the positioning of the brackets on the wing and the fuselage. This was something the team hadn’t noticed earlier and this couldn’t have been observed by naked eye.
The team had to face the fact that the wing strut tube had been covered the wrong way round: its leading edge was pointing backwards to the trailing edge of the wing and vice versa. The chance of getting it right had been 50/50 but it didn’t happen. Now the decision had to be made whether to dismantle the strut tube covering and do it right or to solve the assembly problem by modifying the fastening part on the lower end of the strut or the brackets on the wing in order to change the angle of the strut. A new approach was taken: the unfortunate rear wing strut was first replaced by an original strut and then by a new wing strut which had been made using a new main tube. The fasteners at the ends of the new wing strut had been welded at a 90 degree angle to the center line of the strut. The original wing strut met both fastening brackets nicely and accurately. Fortunately also the new rear wing strut could be installed – with some assistance - to meet the brackets. Before the test assembly of the wing will be completed, decisions will have to be made on how to install and fasten the diagonal wing strut which is positioned between the front and rear wing struts. There are no separate brackets for the diagonal strut on the wing or on the fuselage – and there is no drawing, photo or instruction about this either. The diagonal strut was preliminarily installed between the straight wing struts in order to find a solution how to attach it. Some ideas already came up but the decisions will be made after the Tuesday Club Christmas break.
When the wing and wing struts had been attached to the Kurki fuselage, the team knew that it had two original Kurki wing struts, three eligible wing struts that had been made according to the original ones plus one wing strut that could be modified to fit.
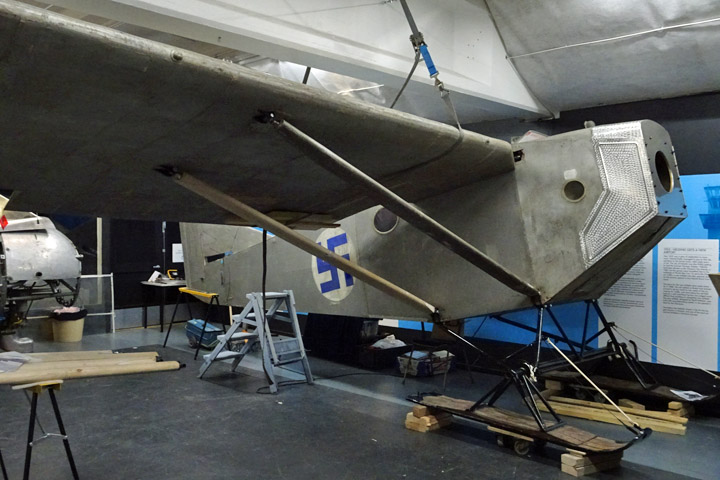
For the first time since 1927, after 90 years, the Kurki fuselage has wings. To be more precise, at the moment it has one wing. The left wing is waiting in Vesivehmaa for its restoration work. |
|
Avainsanat: aviation history, restoring, old aircraft, I.V.L. K.1 Kurki |
Kurki wing struts ready for paintingTiistai 26.12.2017 - Member of Tuesday Club The Tuesday Club of the Finnish Aviation Museum Association has completed the missing wing struts in the I.V.L. K.1 Kurki restoration project. The wing struts have been built at the workshop of the Finnish Aviation Museum according to the original wing struts. They were built already in summer, covered with plywood, but without the connecting fasteners. The club members spent all autumn making the metal fasteners and installing them on the wing struts.
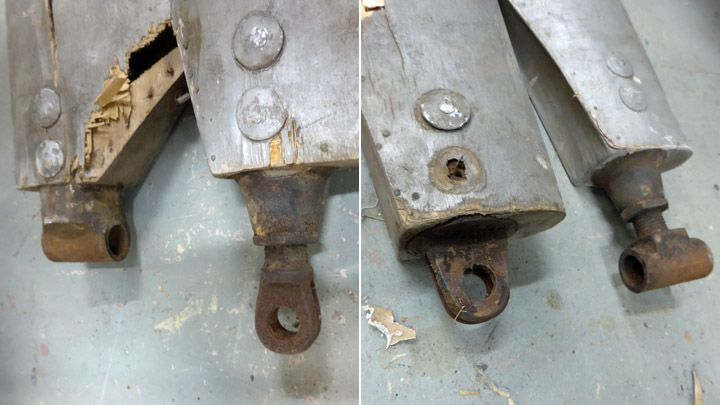
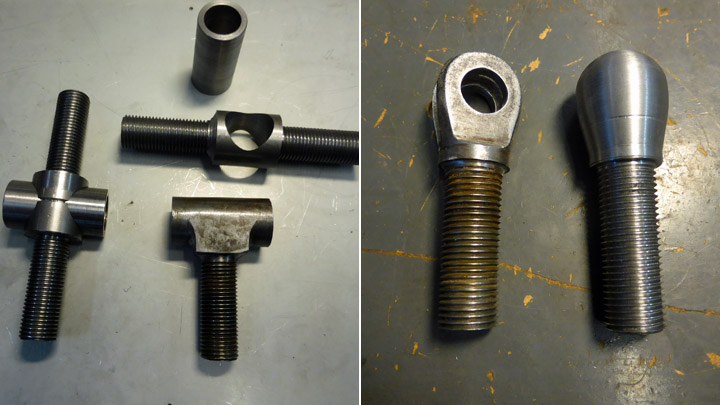
The wing struts of the Kurki are fastened on the lower edge of the fuselage and connected to brackets of the front and rear wing struts using quill-type fasteners. These fasteners are locked between the brackets on the fuselage and on the wing struts using bolts. Between the straight struts there is a diagonal N-shaped strut which has slot-type fasteners. The fasteners at the upper end of the wing struts can be adjusted.
The work on the new fasteners was started by measuring accurately the two existing original wing strut fasteners and examining their structure and the way they had been made. The basic structures of the quill-type and slot-type fastener are the same.
Each fastener consists of an installation tube about 10 cm long and of the actual fastener, which is pushed inside the installation tube and attached to it by welding. The installation tube has a dimension which matches the steel frame tube inside the wing strut. The installation tube and the attached fastener are pushed inside the end of the wing strut tube and locked in place using two steel bayonets which go through the end of the wing strut.
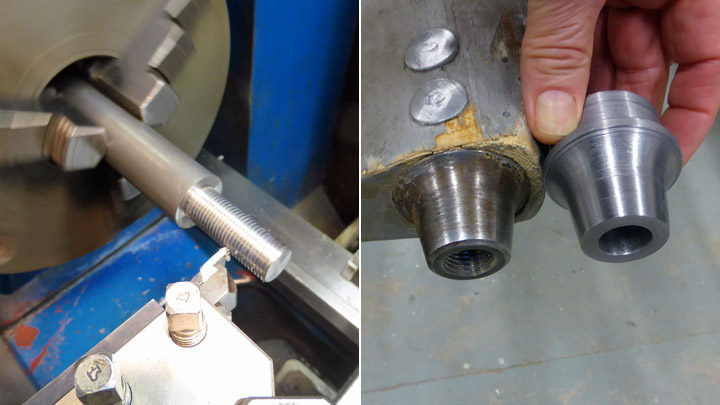
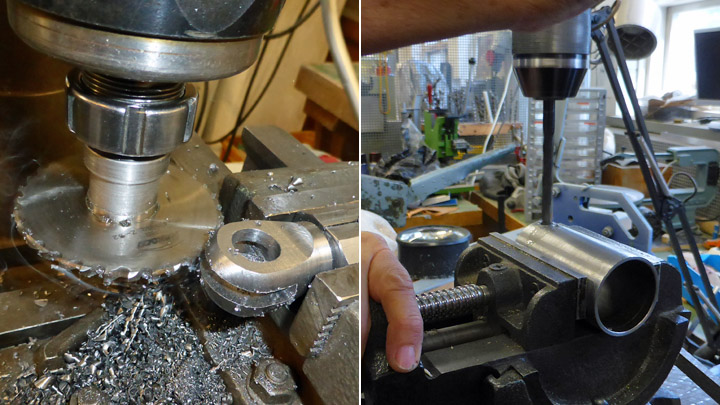
The work on the wing strut fasteners was started by lathing the six installation tubes that are needed. Then the quill-type and slot-type fasteners, which will be pushed into the installation tubes, were made by lathing, welding and milling. Two holes were drilled into each installation tube. The fastener was pushed into the installation tube and spot-welded in place through the holes. The welded spots were ground even and smooth. This is how all four quill-type and two slot-type fasteners were made.
Then the fasteners and their installation tubes were attached to the ends of the wing struts. Some of the installation tubes slid easily into place in the strut tubes, but some didn’t. Therefore some of the wing strut tubes had to be filed on the inside to make the installation tube fit. The next phase was to lock the fasteners to the wing strut pipe by using two steel bayonets.
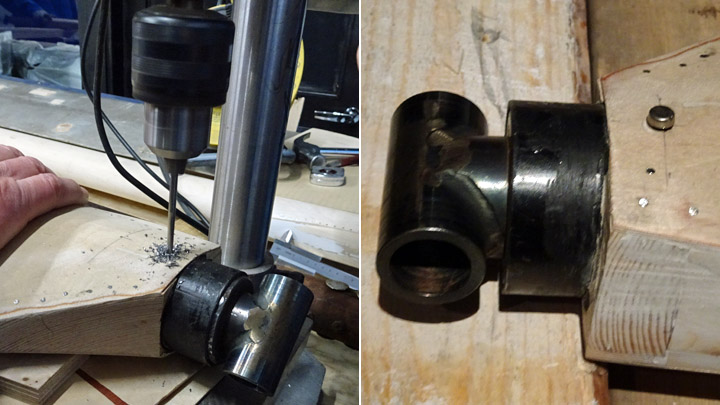
The work on the first wing strut was started by making sure that the fastener was attached to the wing strut in the correct position. Then the fastener was locked in place with clamps. Two holes were drilled through the end of the wing strut using a 5mm drill piece and then screws were temporarily placed into the holes to prevent the fastener from moving. Then the holes were enlarged by using a 10 mm drill piece in order to match the diameter of the locking bayonet.
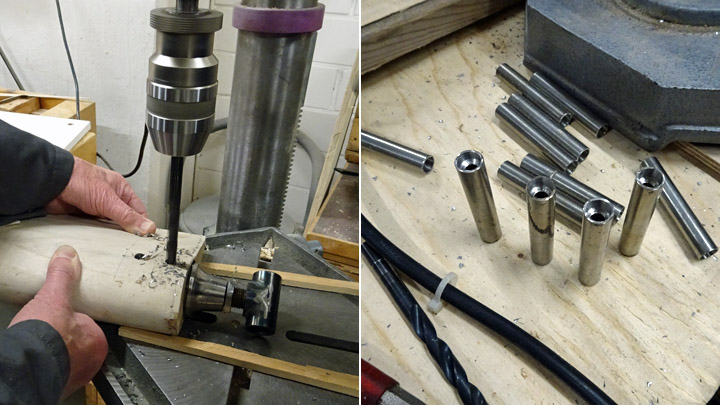
A total of 12 locking bayonets are needed and they were made by cutting 55 mm long pieces from a steel bar 10 mm in diameter. The length of the bayonet was based on the fact that the wing strut metal tube is 50,5 mm in diameter and a reserve of 2 mm is needed at each end for riveting. A small cavity was drilled on both ends of the bar so that the end would enlarge when riveted onto the wing strut bar.
A 5 mm hole was drilled through the bar. This hole is needed for the cover which is installed on the locking bayonet hole in the plywood cover of the wing strut. The cover prevents moisture from getting inside the wing strut. The original Kurki wing struts had round covers, 20 mm in diameter, which were connected to the locking bayonets using aluminum wire. In the restoring work this structure won’t be used. The locking bayonet holes will be protected by using wide-headed pop-rivets which are pressed into the holes in the bayonets.
When the holes for the locking bayonets had been drilled at both ends of the wing strut, the bayonets were pushed into place one by one. The ends of the bayonets were riveted onto the wing strut frame. The fasteners were now in place on the wing struts and the work was nearly ready: only the covers were missing. The remaining wing strut fasteners were assembled in a similar way and all the wing struts were now ready for painting.
The wing struts will be painted using silver-bronze varnish. The plywood-covered wing struts won’t be painted before the right side wing of Kurki has been preliminarily installed onto the Kurki frame. The wing has been under restoration work in the Tuesday Club as well. This preliminary installation will ensure that the two original wing struts have actually belonged to the Kurki. These two original parts were used as models for making the missing wing struts. |
|
Avainsanat: aviation history, restoring, old aircraft, I.V.L. K.1 Kurki |
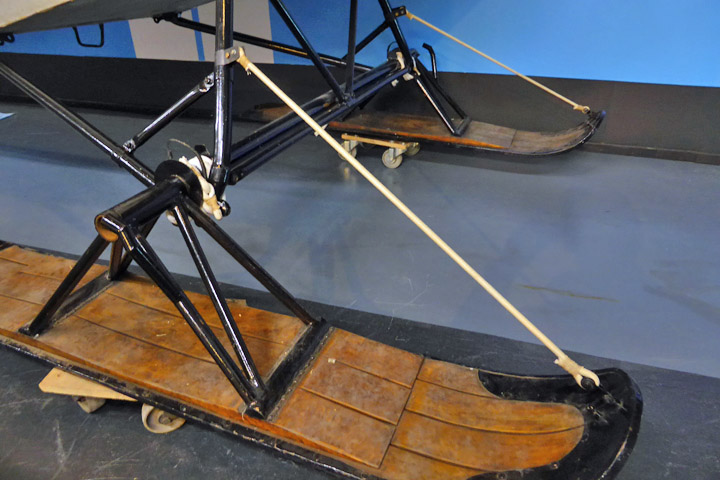
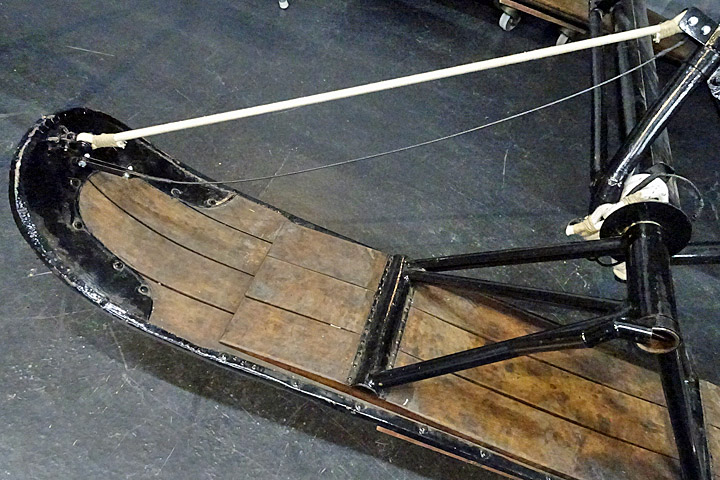
Sandums and safety wires on Kurki skisSunnuntai 26.11.2017 - Member of Tuesday Club The skis of an aircraft are kept in a proper position by flexible rubber ropes (sandums) and restricting safety cables which are connected to the tips of the skis and to the landing gear frame. When the plane is taxing, the sandums flex according to the movement of the skis and when the plane is in the air they keep the skis in an angled position with the ski tips pointing slightly upwards. The safety cables make sure that the skis remain in the correct flying position even if the rubber rope breaks. Without the restricting cables the skis would move uncontrollably, making it impossible to land safely. There is a cable from the tip and from the heel of each ski, connecting to the landing gear or the fuselage of the plane. Steel wire has also been used instead of cables. The I.V.L.K.1 Kurki, which is being renovated by the Tuesday Club of the Finnish Aviation Museum, had skis with some traces of old sandums and safety wires still left. The sandums were rubber rope, about 2 cm thick and the safety wires were steel wire, 5 mm thick. However, judging by the old photographs taken of Kurki, it is quite certain that the present skis have not originally belonged to Kurki. The skis have been made according to the State Aircraft Factory standards and might well have been under the Kurki, but the existing sandums and safety wires don’t match with the old photographs taken of Kurki. The Tuesday Club decided to install sandums and safety wires which match the ones on the old Kurki photographs. The remains of the existing sandums and safety wires were removed. There was still one more difficulty to overcome: there are differences in the old photographs showing how the sandums and safety wires are connected. The Club members decided to follow the installation principle shown on the photographs taken of Kurki in early spring in 1927.
The installation of the sandums was started by lifting up the Kurki tail, allowing the skis to hang in the flying position. The correct length of the sandums keeps the skis in the appropriate angled position when the rubber rope is tight. The rubber rope is flexible when the plane is on the ground or in a taxing position on its tail wheel.
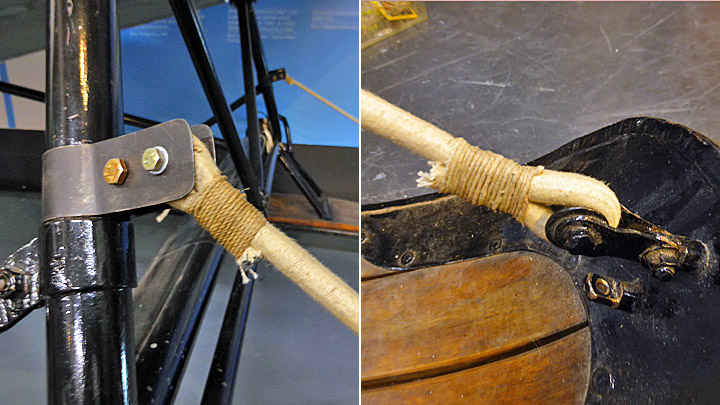
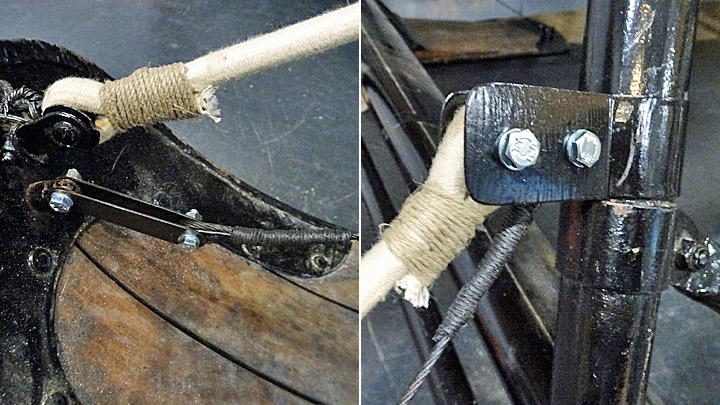
Before the sandums and safety wires could be installed, the fastening brackets had to be made on the landing gear. There were no brackets left on the landing gear to hold the upper ends of the rubber ropes and safety wires. This may be because on its last flights Kurki had float gear which don’t need sandums or safety wires. According to the old photograph, the sandums and safety wires on Kurki are installed so that the sandum and safety wire from the tip of the ski are attached to the same fastening bracket on the landing gear frame. The safety wire from the heel of the ski is attached to its own bracket on the landing gear. The missing brackets were made of aluminium plate, painted black and attached to the landing gear frame.
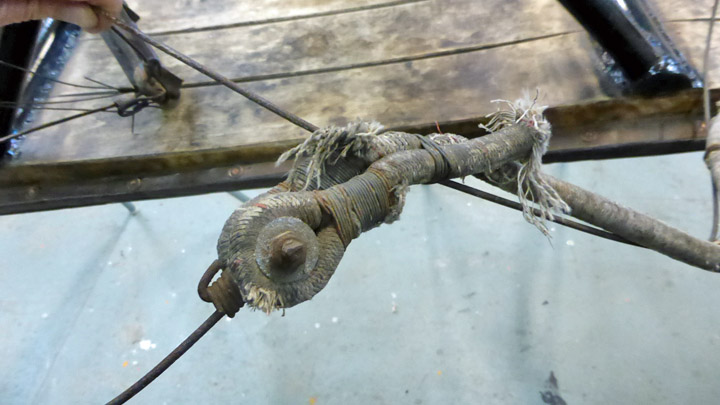
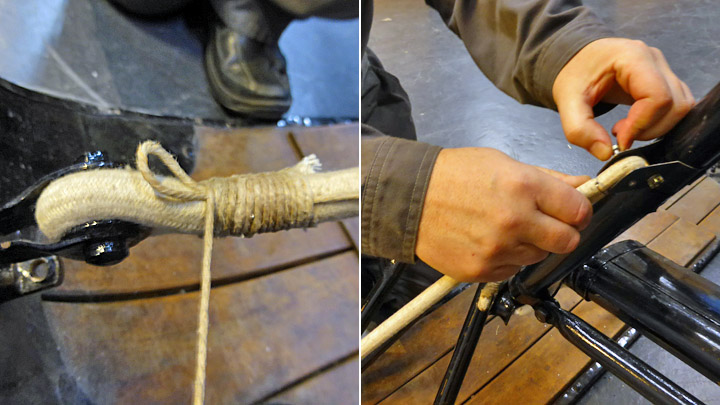
A piece of appropriate rubber rope was found at the Finnish Aviation Museum to make the sandums. The rope was cut to measure and the end of the sandum rope was passed through the block wheel on the tip of the right side ski and bent into a loop. The loop was locked at its base, using first thin steel wire and then flax yarn to make the actual locking weave. The yarn was spun around the base of the loop into a tight braid.
A similar loop was made at the upper end of the sandum and the loop was connected to the bracket on the landing gear using a bolt. Now the right ski had its sandum in place. Using the same method the sandum on the left ski was installed.
Suitable 3.7 mm thick wire to make the safety wires was found at the Finnish Aviation Museum. The length of the wire was measured from the fastening points on the skis to the brackets on the landing gear frame. The length of the wire has to allow the ski to move when the plane is taxing and to restrict the movement of the ski in case the sandum breaks. About 10 cm was added to the measured wire length to allow a fastening loop to be made at each end of the wire.
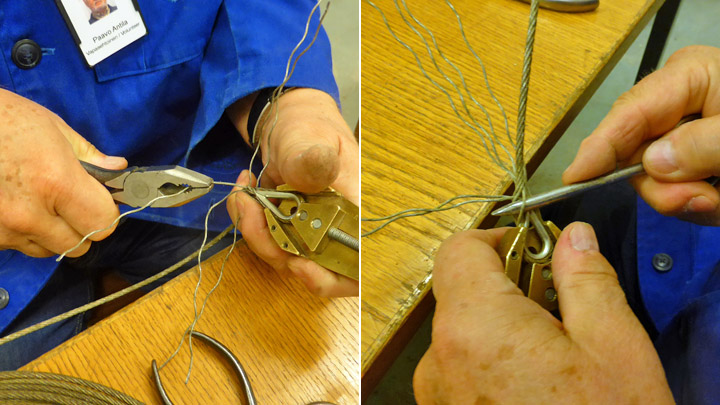
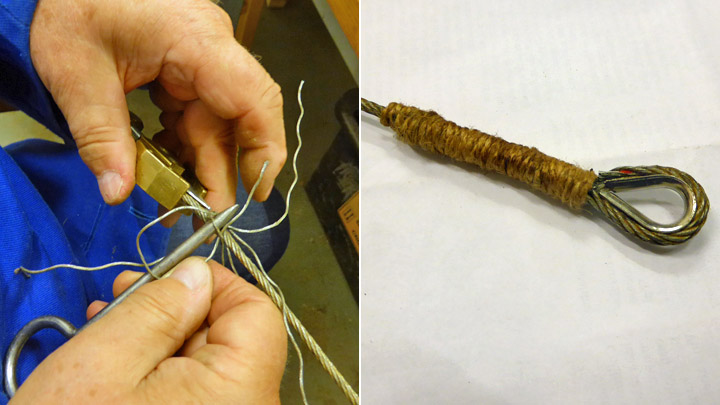
Modern schackles couldn’t be used when making the wire loops. The original Kurki wire loops were made by splicing the wire. This means that the ends of the wire threads are braided into the wire itself.
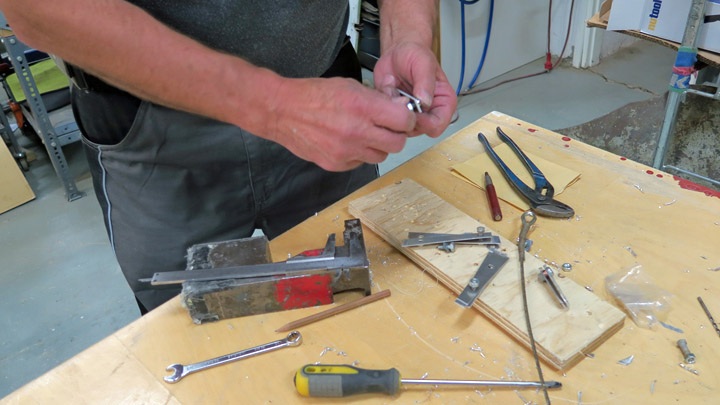
The fastening loops were made with the help of a metal chute loop which supported the wire. The loop was attached on a splicing jig and the jig keeps the loop firmly on place when the wire is being spliced. Using a splicing tool the threads of the wire were opened before the loop and the open ends of the wire threads were braided between the wire threads. Thread by thread the end of the wire was braided firmly into the wire. The spliced section was covered using flax yarn. Varnish was applied onto the spliced section covered with yarn to make the surface water resistant. All four connecting loops of the safety wire were prepared in the same way. When the loops were ready, all wires were painted using black Isotrol-varnish to protect the wires from corrosion.
The tips and heels of the skis had the original bayonets still in place for attaching the safety wires. However, the fastening brackets for the safety wire loops were missing. The brackets were made from aluminium plate, painted black and attached with bolts on either side of the bayonets. The lower ends of the spliced wire loops were placed between the brackets and locked with bolts. A thin copper tube was used as a sleeve on the bolts to prevent the wire loop from moving loosely on the bolt.
The upper ends of the front wires were attached to fastening bracket on the landing gear frame where the sandums already were in place. Bolts with copper sleeves were used. The upper ends of the rear wires were attached to their own brackets on the landing gear frame.
The safety wires were attached using modern 6 mm hexagonal bolts. The Kurki skis still have the original block wheels for the sandums with slot head bolts.
In fact all original bolts on Kurki are of the same type. This is why all the new bolts on the sandums and safety wires will be replaced later with slot head bolts. This kind of bolts are not available in hardware stores any more but hopefully some will be found in a special store. If not, the Tuesday Club members will modify them from standard modern bolts. |
|
Avainsanat: aviation history, restoring, old aircraft, I.V.L. K.1 Kurki |
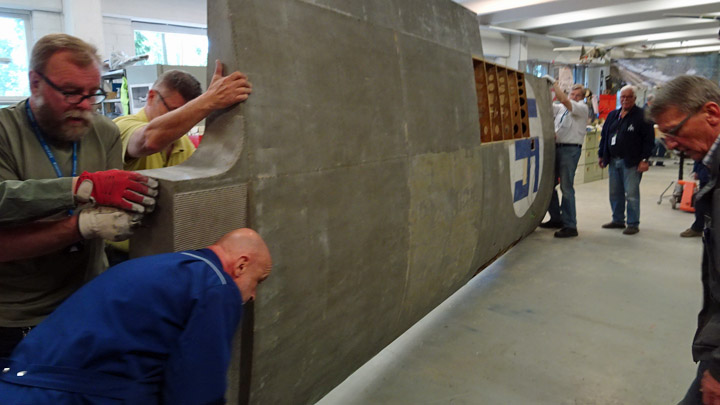
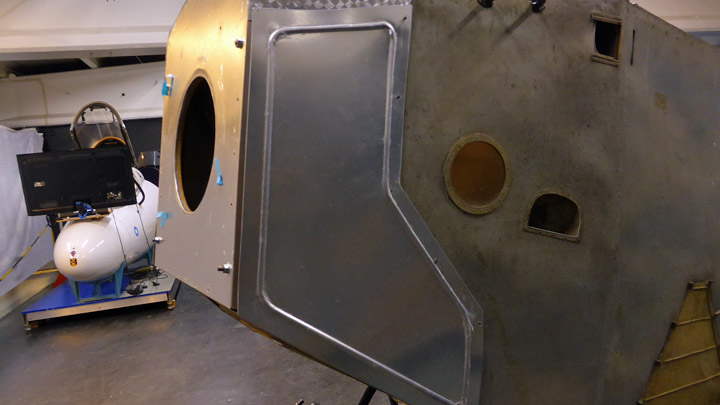
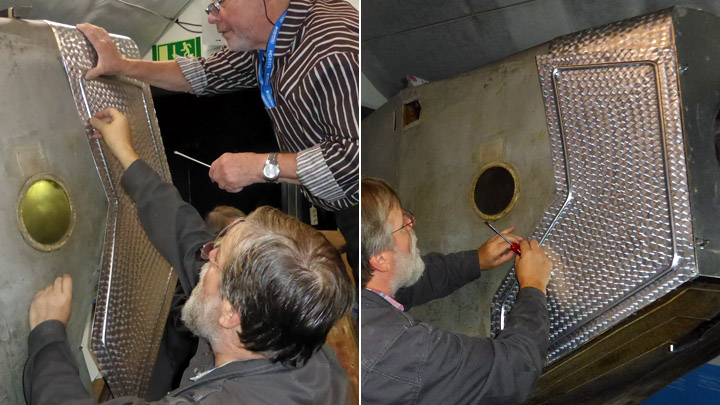
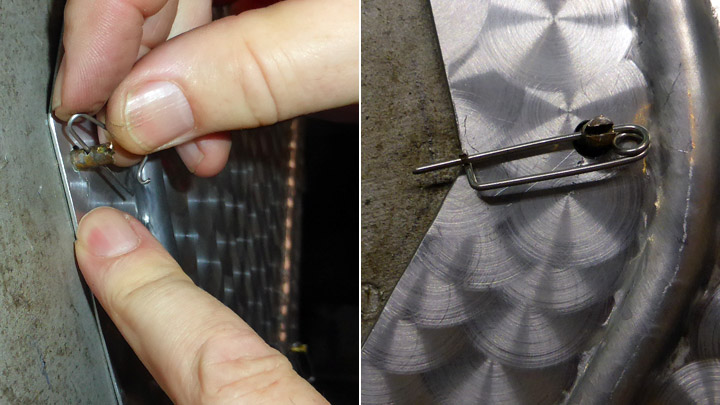
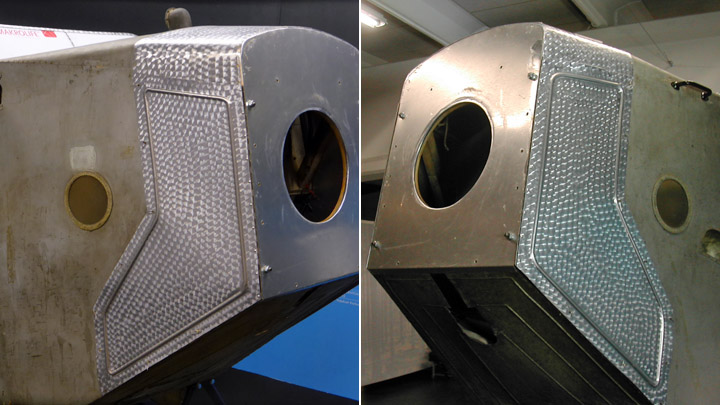
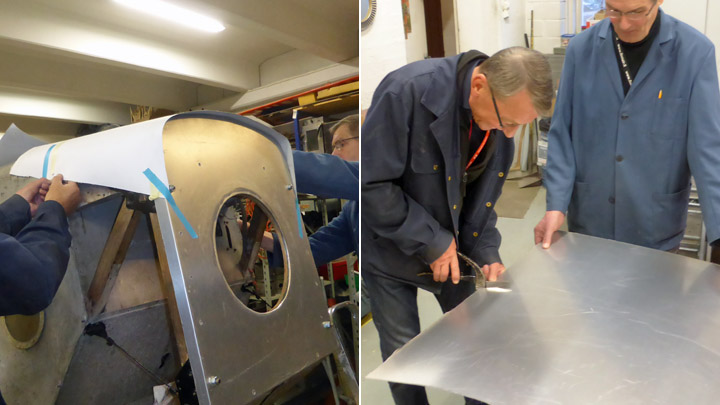
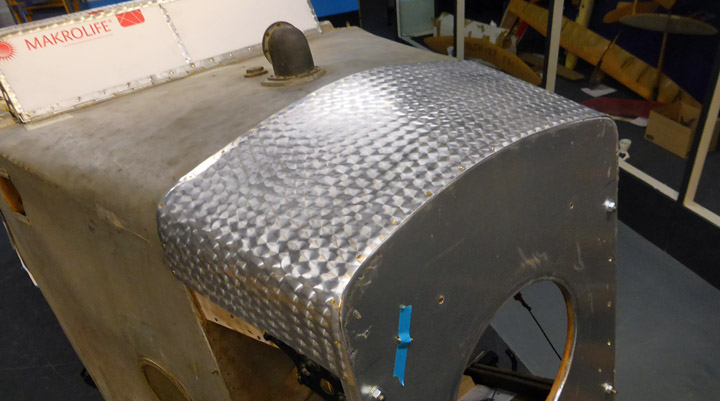
Side panels of Kurki engine mountingLauantai 21.10.2017 - Member of Tuesday Club When the frame of I.V.L.K.1 Kurki was brought in spring from Vesivehmaa to the Tuesday Club work space for renovation, it was in poor condition. After a year of hard work it is now nearly ready. One of the latest renovation phases was to build the openable side panels that were missing from the wooden engine mounting. The side panels are opened when maintenance work on the motor is done. The panel covering the upper part of the engine mounting was made already in spring.
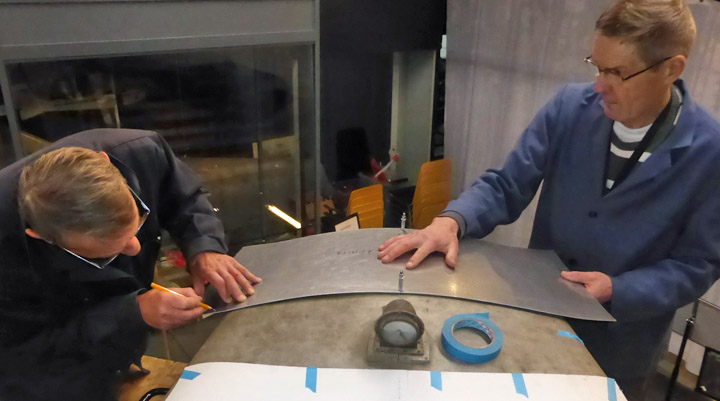
Old photographs of Kurki showed how the side panels of the plane had looked like. Cardboard models for the side panels were made based on old photographs and dimension measurements taken on the engine mounting. The rough shape of the side panel was then cut from 1,4 mm aluminium plate (quality class 6061). The rough cut was improved when placing the plate on the engine mounting. The side panels are locked on the mounting by their rear edge using Fokker-pins. When the panel shape was correct and matched the engine mounting dimensions, holes were drilled into the rear edge of the panel for the Fokker-pin locking bayonets.
Five original locking bayonets were still left on both sides of the engine mounting frame, but the actual pins were missing. A few pins were available at the Finnish Airforce Museum but the rest of the pins had to be bent from steel wire. A couple of the brass locking bayonets had been damaged and had to be replaced by new ones made of brass screws of appropriate size. Some work was needed before the Fokker-needle bayonets found their way into the holes on the rear edge of the side panel.
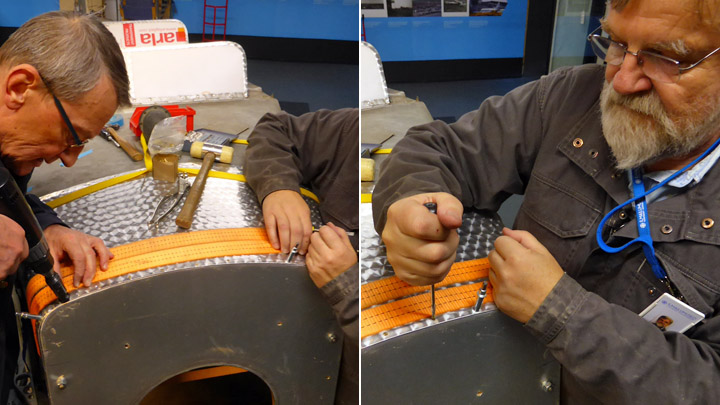
Based on old photographs the side panels had stiffening bends along the edges of the panel. Based on the photos, the knuckles were made at a distance of 5 cm from the edge of the panel. Some practice on the rotary machine was needed before appropriate knuckles were completed. However, making the stiffening knuckle caused the plate to stretch and bend a little and the plate had to be flattened and straightened. The straightening work was done using different methods and tools, such as a wooden hammer and tongs. Finally the panel fitted evenly onto the sides of the mounting.
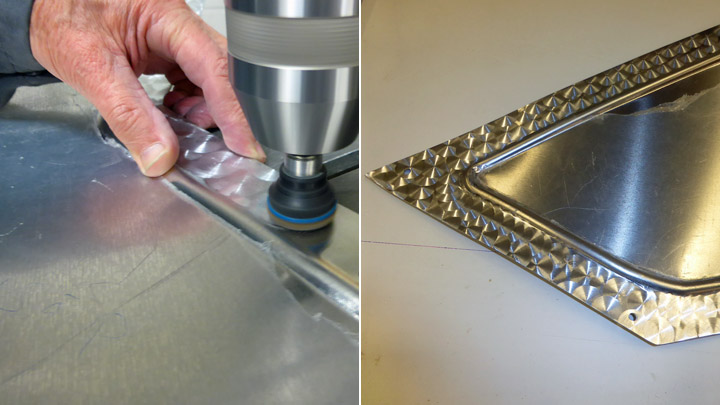
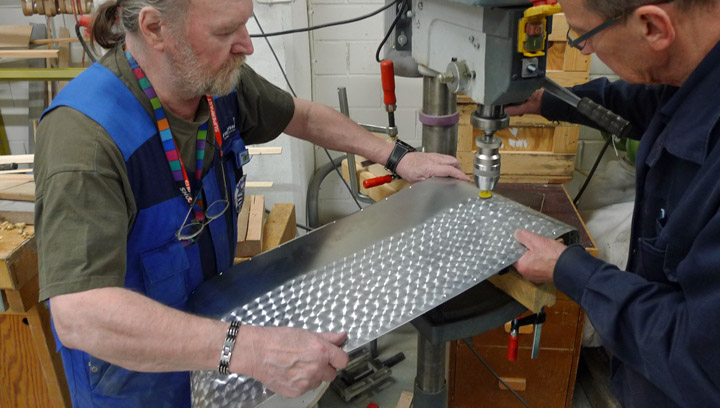
The engine mounting side panel surface has a circular grinding pattern, typical of the 1920’s. A similar grinding pattern had already been made on the upper panel in spring. The meaning of this pattern was originally mainly cosmetic. In the 1920’s the aluminium plate manufacturing process didn’t produce uniform quality and therefore the plating looked somewhat mottled. Applying circular grinding on the panel, the surface could be made look even and uniform in colour.
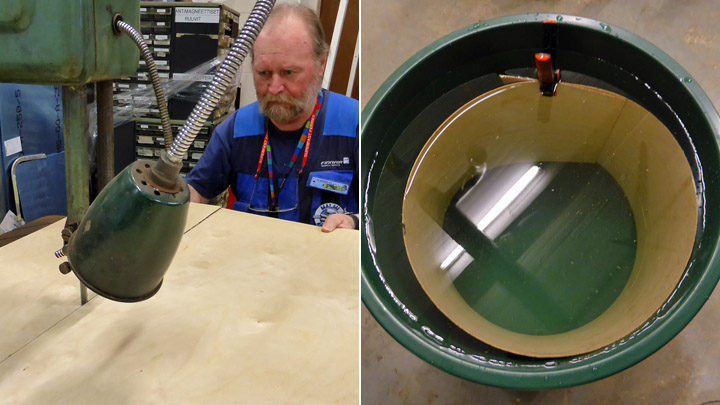
The circular grinding pattern was made using a nog plate installed on a pillar type drilling machine. The panel was moved forward under the nog plate half a pattern at a time. In the first phase the pattern was made on both panels on the area between the knuckle and the edge.
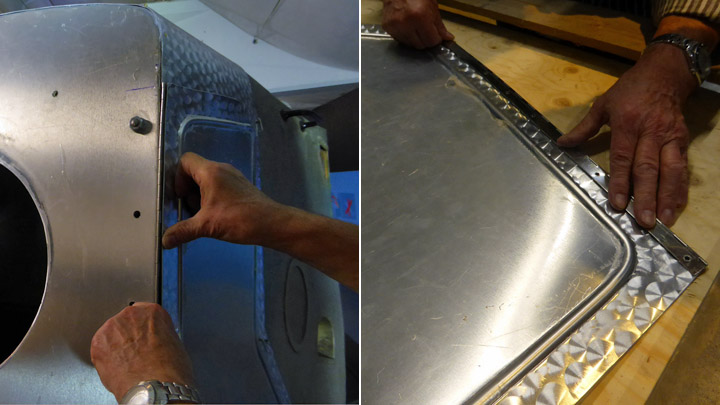
In the area inside the knuckle the pattern couldn’t be made before the panel fitted tightly on the engine mounting and the hinges were installed. The openable side panels are fixed on the engine mounting by their front edge using a piano hinge.
Some effort and shaping work was required before both of the side panels with their hinges were preliminarily fitted in their place. Now the circular grinding of the remaining areas could be done and the work to install the piano hinges could be started.
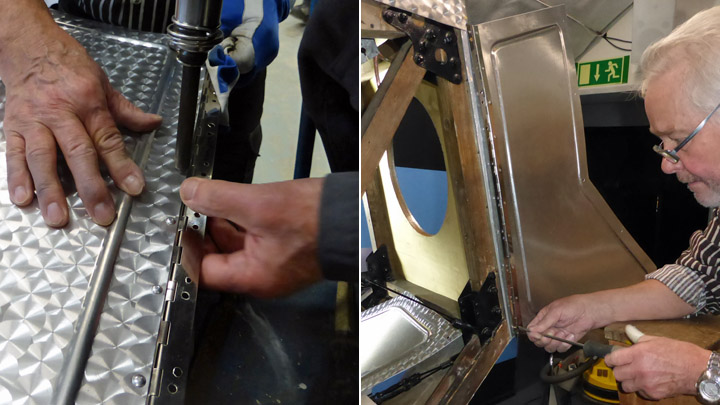
The piano hinges were cut to match the dimension of the engine mounting front edge and fitted onto the vertical wooden front edge. Also the places of the screws for the hinges were marked. Now the hinges could be riveted onto the front edges of the panels. The places of the rivets were marked on the front edge and holes were made for the rivets. 3 mm aluminium rivets were applied using a compressed air rivet gun. After the riveting the side panels were ready to be installed and brass screws were used when fixing the piano hinges onto the vertical wooden front edge of the engine mounting.
The side panels were now fixed to the mounting by their front edge and when they were closed against the mounting, all of the Fokker-pin bayonets didn’t fit into the holes on the rear edge of the panel.
It could also be seen that the lower edges of the panels were slightly bulging. The panels had obviously been slightly bent when riveting the piano hinge. Therefore two additional locking bayonets had to be installed on the supporting wood on the lower edge and the corresponding additional bayonet holes had to be made on the panels. After this addition the side panels fitted tightly in their place against the engine mounting.
The work on the missing side panels was now completed. |
|
Avainsanat: aviation history, restoring, old aircraft, I.V.L. K.1 Kurki |
Work on Kurki wing is well on waySunnuntai 1.10.2017 - Member of Tuesday Club So far the main emphasis in the refurbishment of I.V.L.K.1 Kurki has been in repairing the fuselage and in building the missing wing struts. As this work is now nearly finished, the repair and conservation of the right side wing has been started. In early autumn the wing, which has up to now been waiting in the mid hall of the Finnish Aviation museum, was brought into the conservation room in the museum basement where the Tuesday club members started working on it. Some preliminary work had already been done in spring when some of the rotten wing covering was dismantled.
The main phase in the restoration of the wing is to renew the plywood board covering and the rotten parts in the inner structure of the wing and to patch the holes in the covering. The rotten covering plywood had to be dismantled between the backmost spar and the trailing edge, covering almost the whole length of the wing. Also in the mid-wing section dismantling was necessary from the trailing edge up to the foremost spar.
Rotted and damaged ribs and their plywood sides were revealed when the covering was peeled away. All the plywood sides of the ribs between the backmost spar and the trailing edge were badly damaged and needed to be replaced. The shape of the rib was drawn on a piece of new plywood and this piece was glued onto the side of the rib. The rib sides between the backmost and foremost spar, made lighter with holes, needed to be only partly renewed. In addition the frayed upper edges of the ribs were repaired with glue.
At the same time also the holes in the upper surface covering of the wing were patched either by using pieces of new plywood or by using intact pieces dismantled from the old covering.
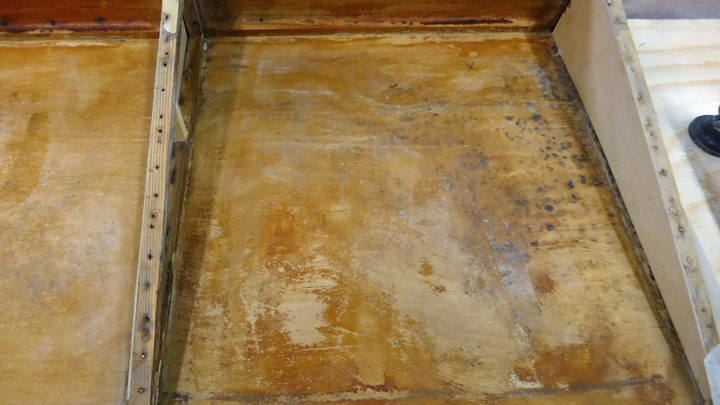
When the plywood on the upper surface of the wing had been taken away, damaged and partly rotten plywood on the inside of the lower surface of the wing could be seen. Especially in the area between the backmost spar and the trailing edge the veneer of the plywood board had come apart. The top veneer was also cracked and frayed. The whole plywood board was soft and buckled. In unfavorable storage conditions humidity had taken its toll.
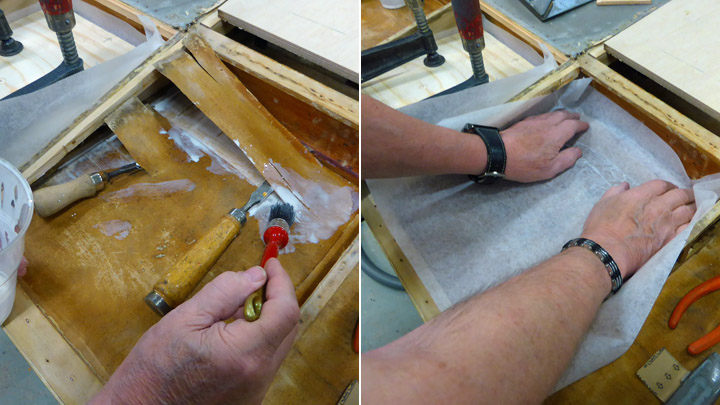
The first idea was to dismantle the damaged covering of the lower surface of the wing. However, the Tuesday club team decided to try and save the covering by using repairing conservation, which meant by trying to fix the plywood board with glue.
The team debated whether to use epoxy glue or to experiment with Casco Outdoor glue diluted with water. The fixing of the plywood was started in the area between the first two ribs of the trailing edge. The area was cleaned and the cracks in the topmost layer / veneer of the plywood were lifted by using the tip of a screwdriver, in order to make space for the glue under the top veneer. Then the diluted wood glue was spread on the plywood, making sure that it went also under the separated material layers.
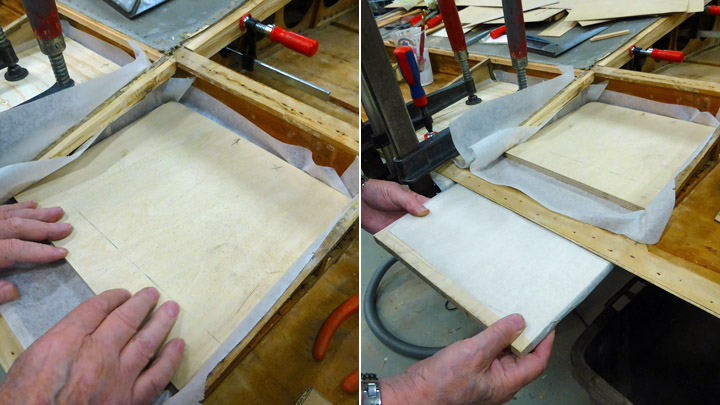
When the glue had been applied, a layer of bakery paper was placed on top of the glued area in order to prevent the compression plate from sticking onto the glued plywood surface. A supporting plate and a layer of bakery paper were placed also on the other side of the plywood. The glued area was then pressed tightly between the plates by using several clamps.
After a couple of days the clamps were removed. The former soft and frayed plywood had adhered into hard and intact plywood surface. This method will be used to fix all the rotten and decayed covering plywood areas between the backmost spar and the trailing edge.
When the damaged plywood covers of the lower surface of the wing and the rotten ribs have been repaired, it is time to begin with the new covering on the upper surface where the old plywood has been dismantled. |
|
Avainsanat: aviation history, restoring, old aircraft, I.V.L. K.1 Kurki |
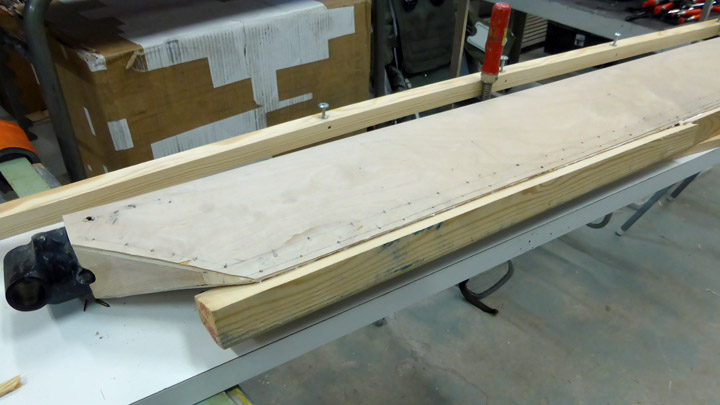
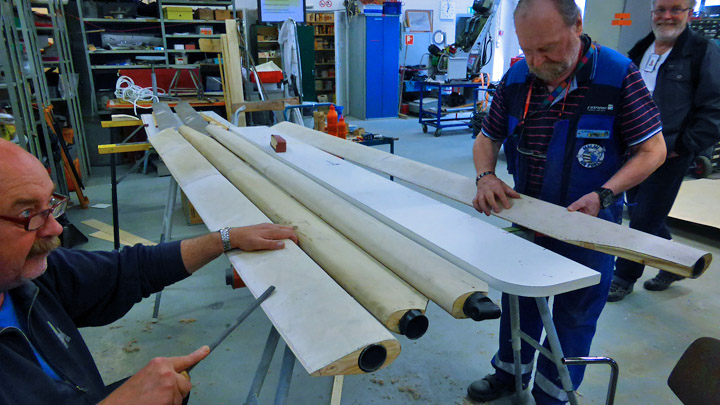
Wooden parts of ?Kurki? wing-struts madeMaanantai 10.7.2017 - Member of Tuesday Club The February blog covered the preparatory work for making the four missing wing-struts for the I.V.L. K.1 “Kurki”. The total number of wing-struts for the high-wing “Kurki” is six, three for each wing. Two original ones had survived at the Päijänne-Tavastia Aviation Museum at Vesivehmaa and they were brought to the Tuesday –Club for conservation, but the four missing ones we had to make. Work on the wooden parts of the wing-struts begun in February and by the end of June the wooden parts, including the struts plywood cover are in place ready for painting. But the metal fittings at the ends of the struts still have to be made. The struts main loadbearing part is a steel tube of 51.5 mm outer diameter. A wooden leading edge, formed from a 50x50 mm piece of wood is attached to the tube. The trailing part is made up of wooden ribs glued to a triangular wooden trailing edge. Profiled wooden end-caps were then attached to the top and bottom ends of the struts.
A close look at the damaged original wing-struts showed that they were covered with 1.2 mm thick plywood so plywood of similar thickness was used when covering the struts. As the total circumference of the strut is 37 cm, 39 cm wide strips, giving us a 2 cm working-allowance, were cut out of 140X140 cm plywood boards.
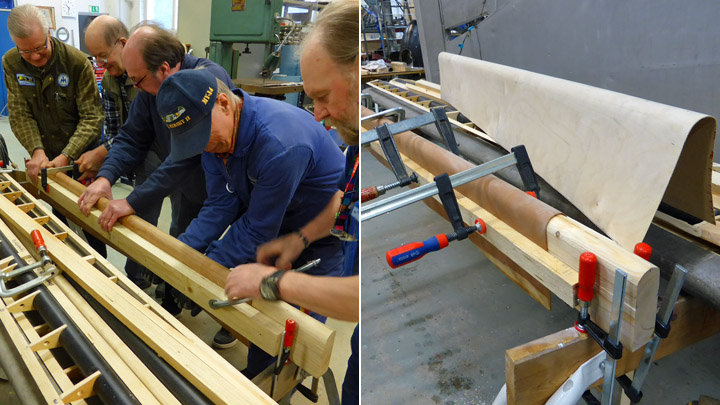
Before the covering-strips could be fitted to the struts, they had to be formed to the correct curvature to give a good fit. The forming was done by wetting the strips in water for some days, after which they were clamped to a wooden beam-mould that had bene worked to the same profile as the wing-strut. When the strips had dried they were released from the mould and found to have the correct curvature. As the length of the struts are 262 cm and 273 cm two butt-joined strips per strut were needed.
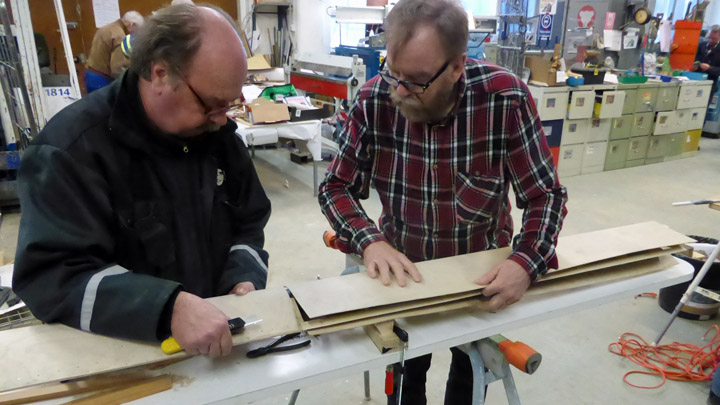
The covering of the first strut was begun by gluing the formed plywood-strips to the wooden leading-edge using Erikeeper-Plus adhesive and firmly clamping the strip using a strong lath of wood kept in place by three screws fastened through the lath and the strips into the wooden leading edge. Later the small holes in the leading edge made by the screws were plugged using wooden plugs.
When the strips were firmly glued to the leading-edge the work of gluing them to trailing-edge ribs was begun, piece by piece. Before spreading the adhesive the positions of the ribs end the trailing edge were drawn on the inside of the strips. This done the rest of the inside was varnished using Le Tonkinos varnish. Before applying the adhesive we drilled small holes for the nails through the strips into the ribs and the trailing edge-lath to prevent any splitting when nailing the strips in place during the gluing. The sheets on the original wing-struts had also been nailed like this.
Now the adhesive was applied to the ribs and the trailing edge and the first strip pressed firmly against the ribs while simultaneously nailing it to the ribs and the trailing edge using 10 mm long nails. The heads of the nails were sunk into the plywood using nail punches.
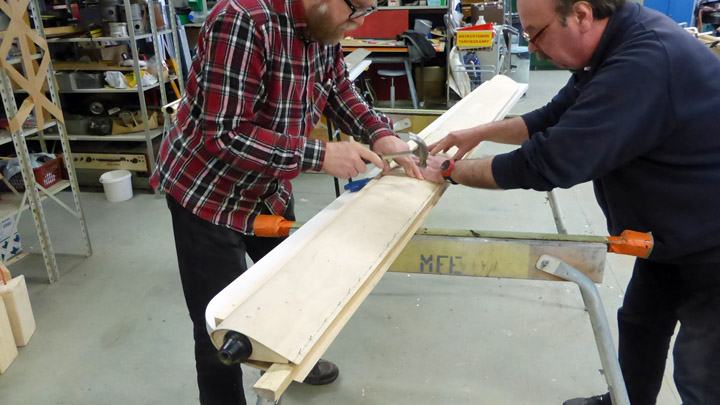
First we tried to glue the strip to the trailing edge by pressing it into place between two wooden lathes. The result was not what we wanted as the strip did not set in place evenly, but left some “grinning” waves along the edge.
To ensure that the strip would make a good fit to the trailing edge a wooden lath the length of the strip was fitted under the trailing-edge and then the strip was nailed to the trailing edge and this under-laying lath with nails at 1.5 cm intervals, 1 cm from the trailing edge. Of course this also meant that the trailing edge lath was firmly nailed to the supporting lath.
When the adhesive had set properly the supporting lath was removed with care, leaving the nail-tips sticking out. These were cut and sanded even with the surface of the trailing edge.
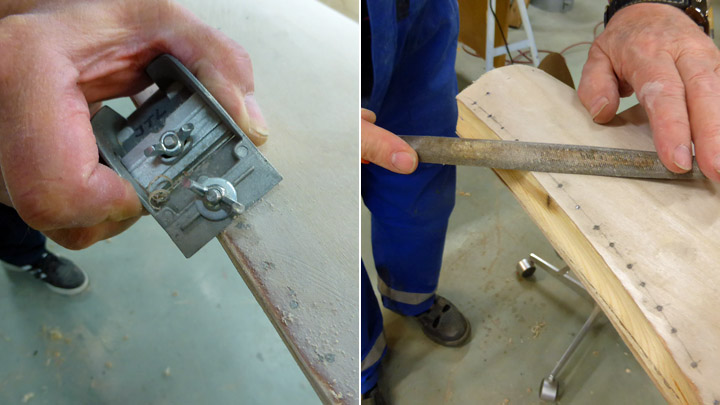
Midway on the strut the two plywood strips were joined using a butt-joint. To make the joint the small gap present was filled using a filler made of sawdust and glue. When it had dried the joint was sanded down until smooth and was now practically invisible.
To finish off the work on the strut any excess plywood at the edges was planed off and the trailing edge of the strut was sanded to form a sharp edge. After this the cut ends of the nails securing the strips were filed down to the plywood surface and now the wood-work of the strut was done.
The other three new wing-struts of the ”Kurki” were made in the same way using the same ”manufacturing” materials and methods. When the metal fittings for the end of the struts have been made and fitted, it will be time to paint the wing-struts. This will be done using silver-bronze varnish in the autumn. |
|
Avainsanat: aviation history, restoring, old aircraft, I.V.L. K.1 Kurki |
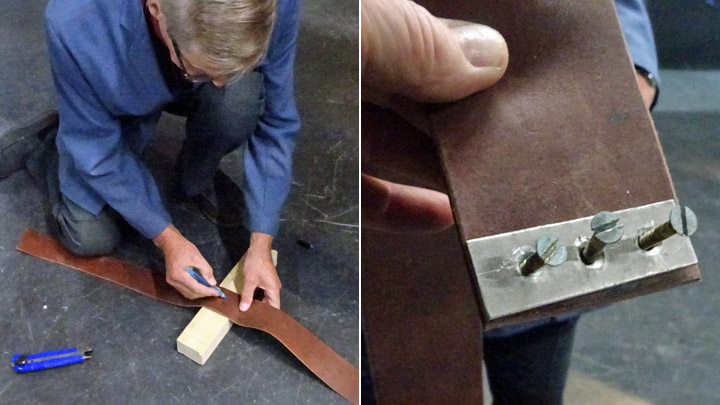
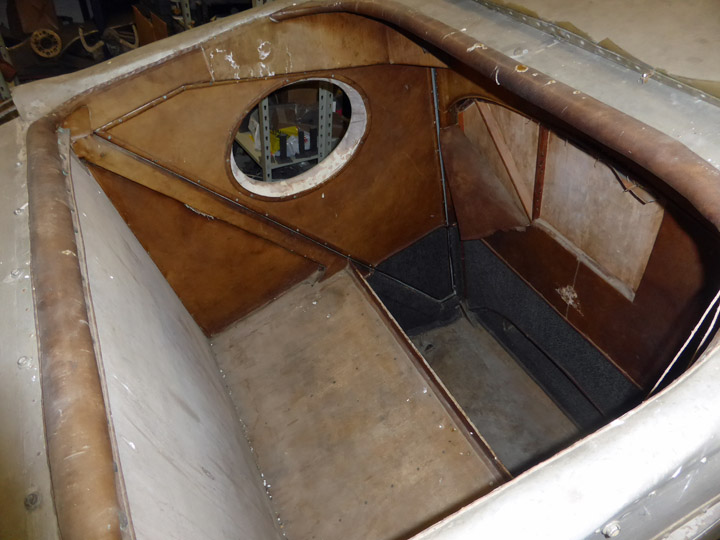
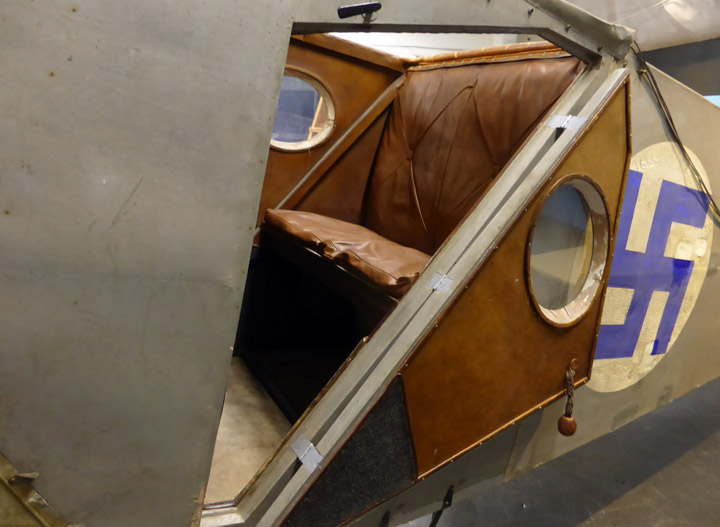
Passenger compartment chair of Kurki got original-like upholsterySunnuntai 25.6.2017 - Member of Tuesday Club The I.V.L. K.1 Kurki has already been under restoration for about a year in the Tuesday Club. It’s almost luxurious passenger-cabin has stood the test of time remarkably well. The upper parts of the passenger-cabin walls are upholstered in leather, while the lower parts have a textile covering (with a wall-to-wall carpet like material). The passenger-seat resembles a soft leather arm-chair. Or more precisely, has resembled, as its padding has gone AWOL during the long storage. Also missing is the ribboning that once framed the cabin-windows
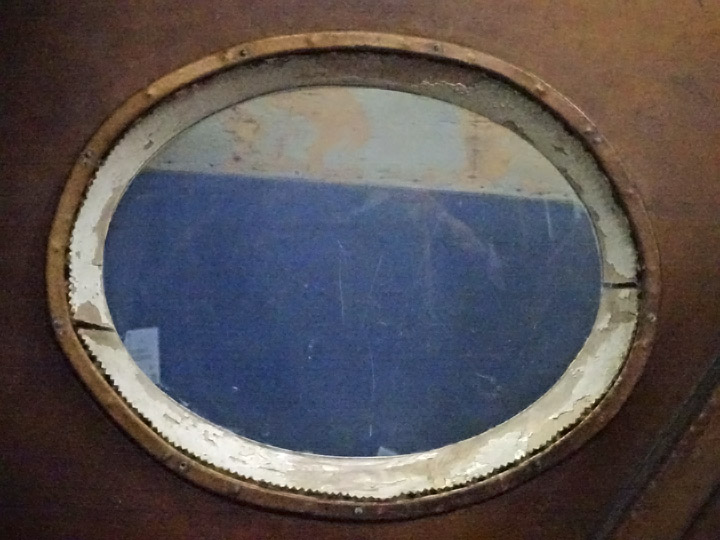
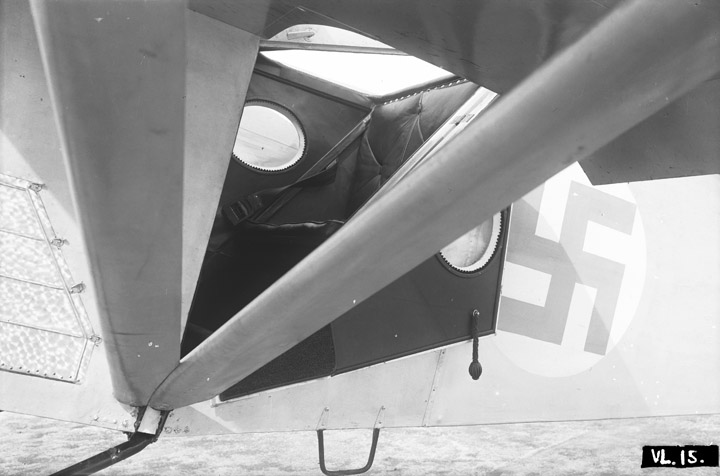
It seems that marketing reasons have been a driver when the Aviation Forces Aircraft Factory (since 1927 the State Aircraft Factory), operational on the Suomenlinna Islands in the 1920ies and -30ies, when designing the passenger-cabin. Originally the Kurki was designed with civilian use in mind, and later offered as a liaison-plane to the FAF. In the end it failed to convince neither civilian nor military customers and remained a single prototype. The already 90 years old original leather- and fabric wall-upholstery does not need any major conservation work. But the seat does need new padding. But what type of padding would be correct? Original drawings are not available so there we cannot find an answer. But luckily the photo-collection of the Finnish Aviation Museum has a photograph that helps us in the decision-making.
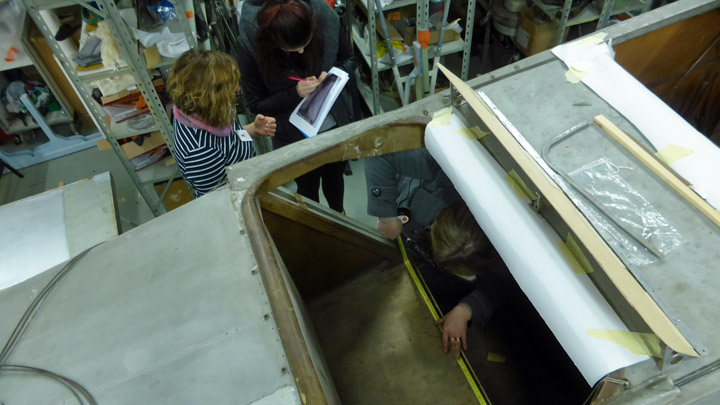
The photograph is of the Kurki with the door to the passenger-cabin open, giving a partial view of its interior. It shows enough of the seat-bottom and backrest to give us the confidence to proceed with the upholstering of the seat according to what shows in the picture. But who should do the work- though the Tuesday Club members master many a trade, upholstering is not one of them.
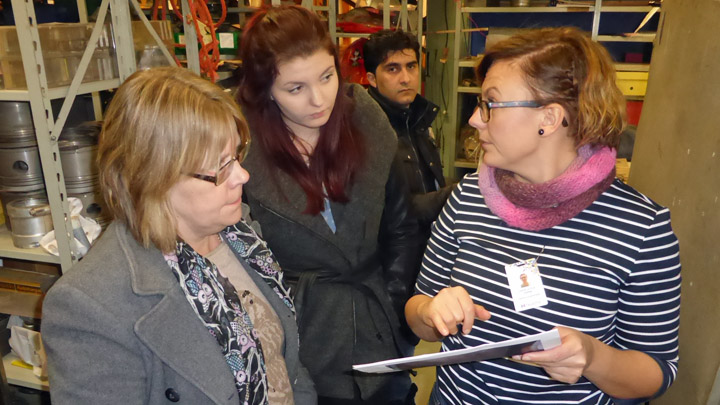
The solution to the challenge was found at the Tavastia Vocational College’s upholstery program. Since last spring, the fuselage and wings of the Valmet Tuuli III trainer, under restoration in the Tuesday Club, have been undergoing surface treatment and painting at Tavastia. Through our contacts at the college we got connected to its upholstery program, which joyfully accepted the challenge to let the students do this part of the project as a part of their studies. And so a number of Tavastia upholstery program students, led by their teacher Virve Juola came to the Finnish Aviation Museum to familiarize themselves with the Kurki and to do the necessary measurements of the passenger seat for the making of its new seat cushions.
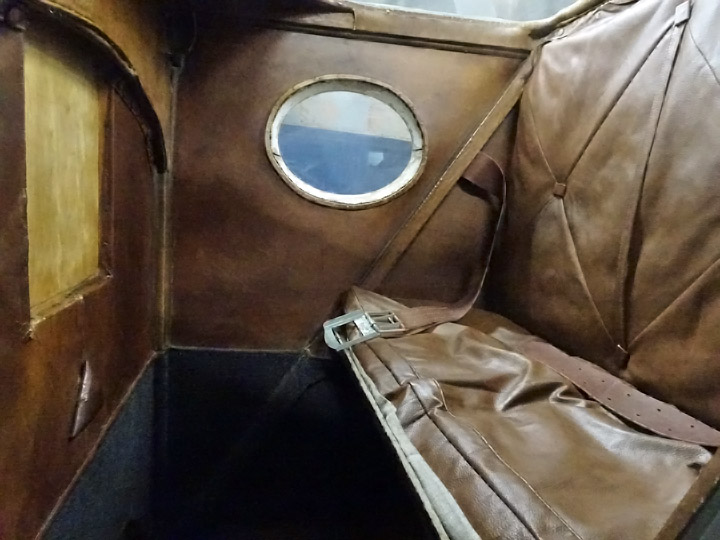
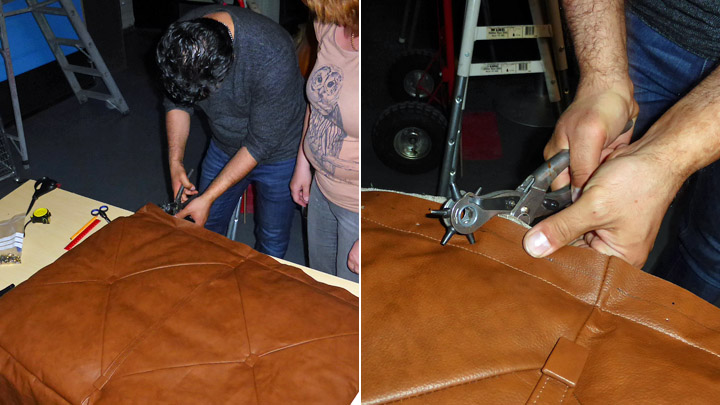
In late spring Tavastia informed us that the cushions made by the students was ready for installation and that they were coming to the museum to install it. At the Tavastia Vocational College the cushions had been made using 1920 type materials and work-methods. The top-side of the cushions were made of leather and the bottom side of linen-fabric. The seams in the seat-back cushions had been made using crossing seams as in the original one and using leather-covered buttons at the cross-points. At the top-side of the cushion a leather border for fastening the seat-back cushion to the seatbacks leather-covered top using press-fasteners had been sewn, just as on the original cushion.
At Tavastia horse-hair had been chosen to fill the cushions. Horse-hair is an old, traditional cushioning material that can stand moisture well and it does not mildew. The horse-hair cushioning was put into purpose-made linen bags that were sawn into the seat- and backrest cushions.
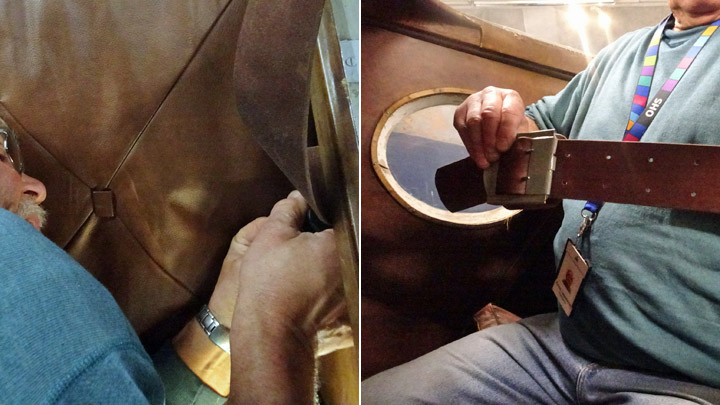
The old photograph also showed a hanging braided leather handle fastened to the inside of the cabin door, intended to enable the passengers to pull the door close when seated in the cabin. This had also gone amiss. The photo also showed that the free end of the braided handle was larger than the main part thereof, most probably there was a wooden ball inside the braid at its end. The new braided leather handle was made at Tavastia, with a wooden ball in its free end.
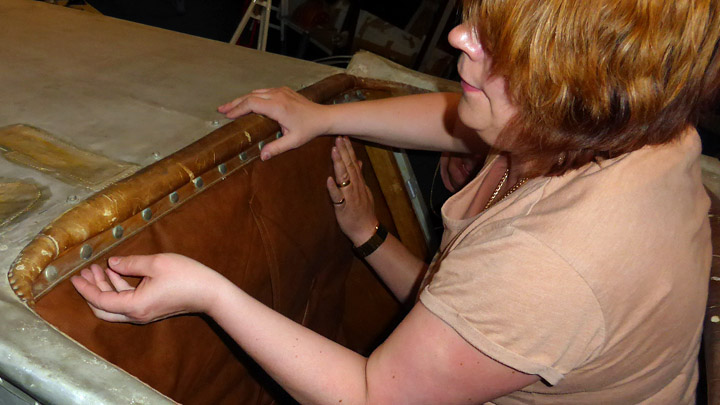
On Tuesday, June 6. was the big Kurki-day, when the upholstery students of the Tavastia Vocational College together with their teacher arrived at the Finnish Aviation Museum to install the seat cushions and the door handle into the Kurki passenger compartment. They fit like a glove! A bit of a surprise was the perfect fit of the press-fasteners into the existing original receiving parts from 1927 – what a measure of standardisation.
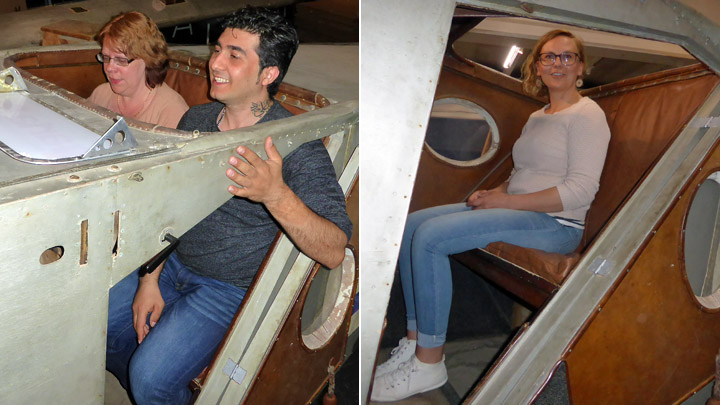
When the seat-cushions and the door-handle had been installed, it was time to test-sit the cushions and take “cold-types” of the “new original” Kurki passenger-cabin.
Our sincerest thanks to the students of the Tavastia Vocational College’s upholstery program and their teacher Virve Juola for their excellent contribution to the restoration of the I.V.L K1. Kurki passenger cabin. Historical photo: The Finnish Aviation Museum. Other photos: Lassi Karivalo. |
|
Avainsanat: aviation history, restoring, old aircraft, I.V.L. K.1 Kurki |
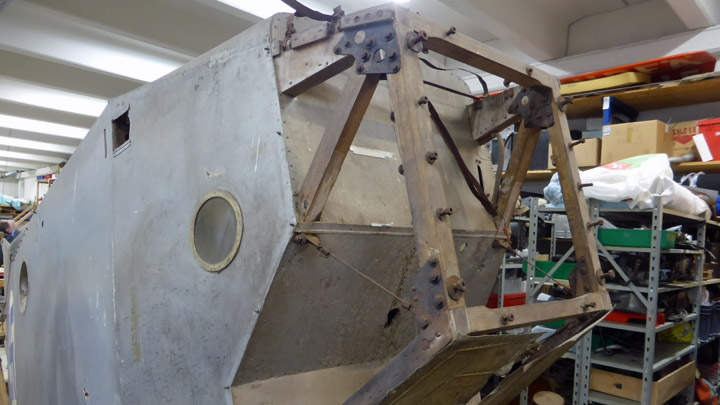
The engine-mounting cover-plate for the Kurki in placeMaanantai 22.5.2017 - Member of Tuesday Club When the fuselage of the I.V.L. K.1 Kurki was brought from the Päijät-Tavastia Avaition Museum to the Aviation Museum Society (Finland) Tuesday-Club for renovation it was a rather sorry sight. The tail was broken, the covering of the fuselage had holes and other damage, only bits and pieces of the windscreens remained, the metal parts were badly corroded and the engine mounting lacked both cover- and endplates.
During the year this fuselage has been worked on in the restauration workshop at the Finnish Aviation Museum and this work will soon be finished. In the Tuesday-Club the last months have been spent making the missing parts of the engine-mounting. The first part to be finished was the engine mounting plate, the work on which has already bene covered in an earlier blog-entry. Now we have finished the upper cover-plate and work on the side-plates is ongoing.
The work on making the top cover-plate started with making a cardboard model of it. Then a piece of 1.4 mm aluminium plate was cut to measure according to the cardboard model, after which the fitting of the aluminium plate to the engine-mountings top framework was begun. Working the aluminium plate proved to be a bit of a challenge as it was rather stiff and bending it into the required form took some doing. But we did it anyway, and did not try to do the work using a thinner plate.
When the plate had been formed into its nearly finished shape work was continued by fastening the front- and rear parts of the plate to the cover framework using Cleco-pins.
Thus the plate was held in place so that we could determine where and to what extent the plate still needed bending. It took a number of fastenings, removals and bending of the plate before it had been given its final shape.
This done, the cover-plate was fastened to the engine-mounting framework using Cleco-pins. The forward edge was fastened to the top of the engine-mounting front-plate and the rear edge to the plywood cover at the joint of the engine-mounting and fuselage. Ca. 15 mm of the edge of the cover-plate was bent downwards/inwards to fit tightly to the plywood.
Before installing the top cover-plate, its surface was given a perlée finish using about 50% overlap.
The final fastening of the finished cover-plate was done using slot-drive brass screws in the holes drilled for the Cleco-pins. As such screws were not readily available at the hardware stores, but such screws were obtained by special order from a specialist screw supplier and thus the top cover-plate could be secured in place in a proper manner. Using modern cross-drive or torx screws is not an option in a 1920ies aeroplane.
Beneath the top cover-plate there is space for the oil-tank of the Kurki´s Siemens-Halske Sh 10 engine. This means that there has been a hole in the top cover-plate for the oil filler-tube and cap. As the original oil-tank has disappeared and we have no drawings for it we were not able to determine the original location of the filler-tube. Thus we did not make any hole for the oil filler-tube. If we could find the original oil-tank, then we would fit it and make the needed hole in the top cover-plate. |
|
Avainsanat: aviation history, restoring, old aircraft, I.V.L. K.1 Kurki |
Ilmailumuseot.fi - Aviationmuseums.fi