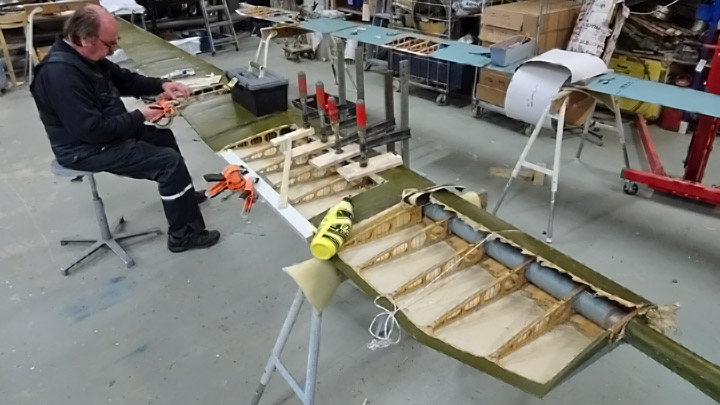
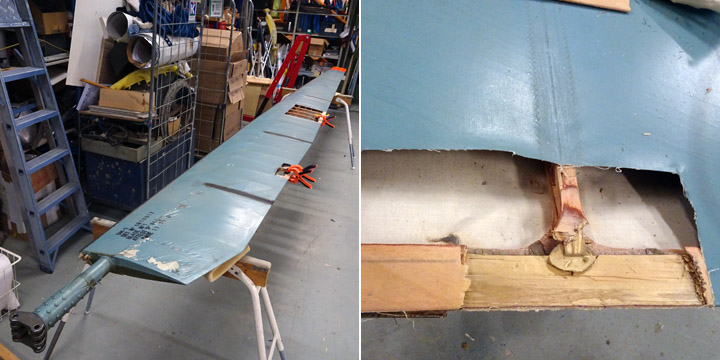
Fabric covering of SM-1 rotor blade is patchedTiistai 12.3.2019 - Member of Tuesday Club The repair of the SM-1 helicopter’s (HK-1) two rotor blades (No1 and No3) has been going on for about a month. The fractures on the trailing edge of the blades have been repaired. Now the focus is on repairing the damages in the fabric and plywood covering. The damaged fabric covering has had to be dismantled in large areas.
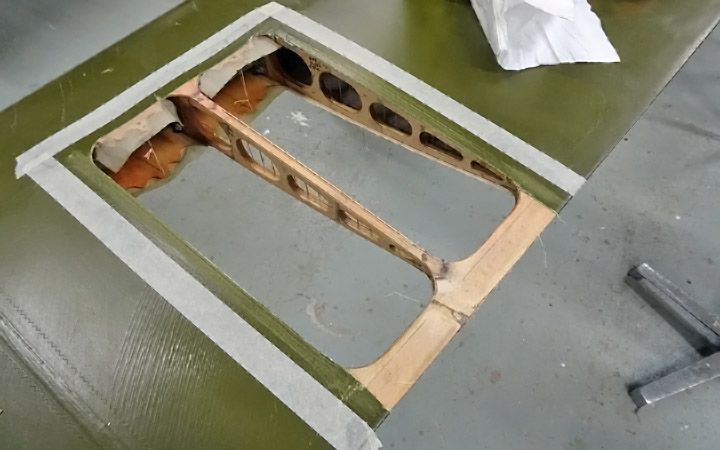
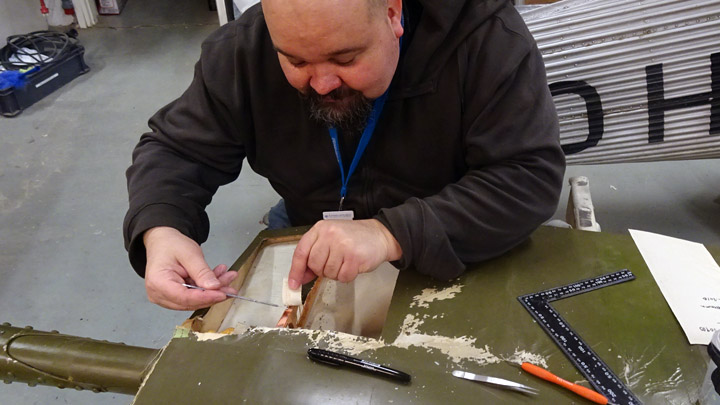
The installation of the new fabric covering was first tested in the small damaged area in the middle of blade No 3. The damaged fabric had been dismantled in an area which was two rib-sections wide and reached up to the plywood-covered area in the leading edge and to the wooden strip on the trailing edge. The new fabric will not be sewn onto the ribs as it has originally been. The fabric has been sewn on the ribs in such a complicated way that it is not possible to follow a similar procedure in the repair work. The Tuesday Club team considered the situation. If the rotor blade had been damaged during the using period of the helicopter, the wooden and fabric covered rotor blade wouldn’t have been repaired. Most likely a new rotor blade would have been installed. The Team decided that their task was to repair the rotor blades so that they would look intact and the outcome of the repair work would resemble the original blade structure as far as possible.
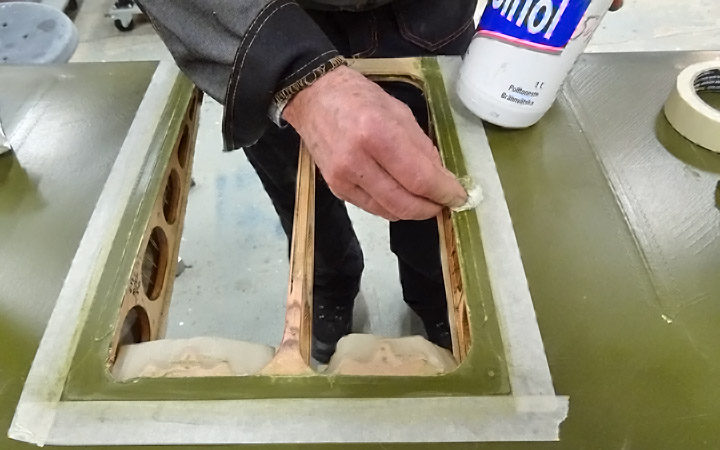
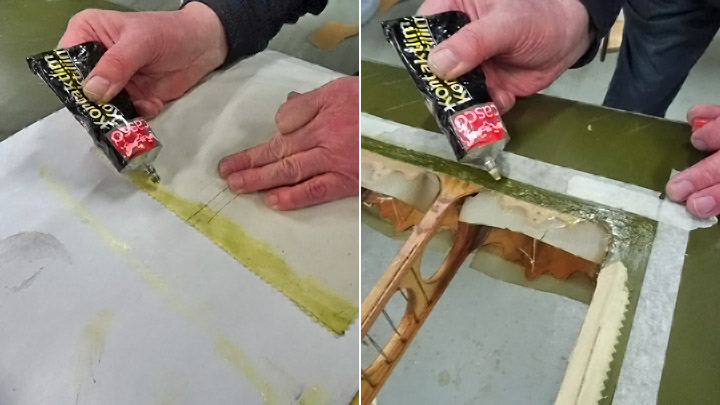
The patching of the damaged area was started by fastening painter’s tape around the edges of the dismantled area so that the original surface was visible about 1,5 cm at the edges. The original fabric areas were sanded smooth using sandpaper 250. The sanding dust was removed using a cloth moistened with a mixture of Sinol and water.
The area to be repaired was two rib sections wide (25 cm) and reaching from the trailing edge up to the plywood on the leading edge (35 cm). The Team decided to fasten the new cotton fabric covering by its edges using contact adhesive. Small fabric patches can be fastened by using only shrinking dope.
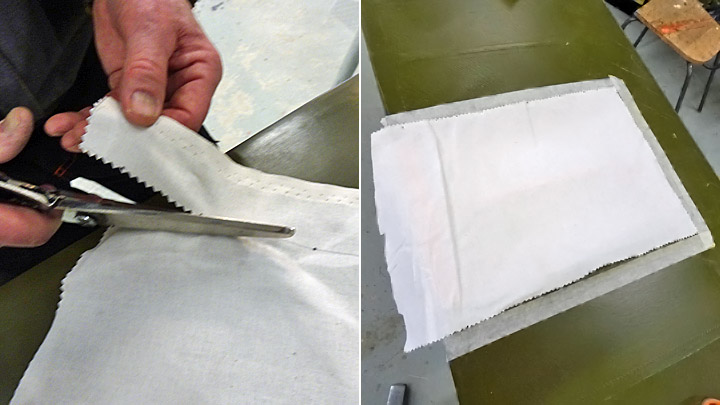
A piece of fabric matching the size of the hole in the rotor blade was cut from cotton fabric, which is used for covering airplanes. Scissors with zigzag blades were used so that the fabric will have a saw-toothed edge, which will fasten more firmly onto the bottom material than a straight-cut fabric edge. The rotor blades of SM-1 helicopter have originally been covered with cotton fabric and that is why the Team didn’t use modern reinforced fabric in the repair work.
The patch of new fabric was first glued onto the existing material at the top edge. The Team used contact adhesive (Bostik) and the adhesive was spread in equal width on the new fabric and on the edge of the repair area. When the adhesive had dried for about ten minutes, the upper edge of the fabric was pressed, pulling the edge at the same time, onto the upper edge of the opening.
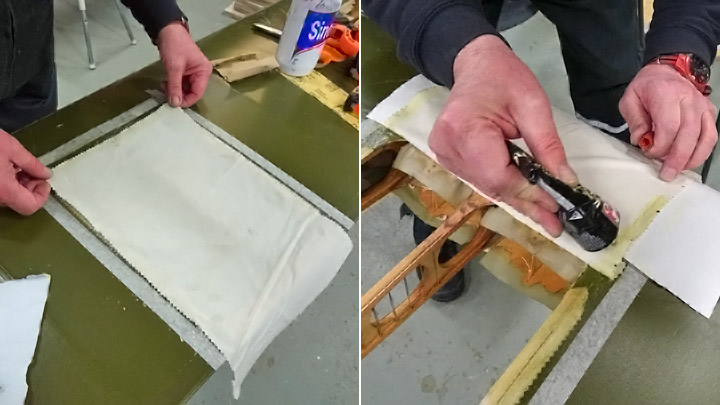
Then the sides of the fabric patch were glued. This was done in 10 cm long phases, advancing towards to the trailing edge of the rotor blade. When the edges of the patch, with adhesive, were pressed against the edges of the dismantled area, the premature contact of the surfaces was prevented by using a piece of cardboard between the surfaces. When the work progressed, the piece of cardboard was slowly pulled away.
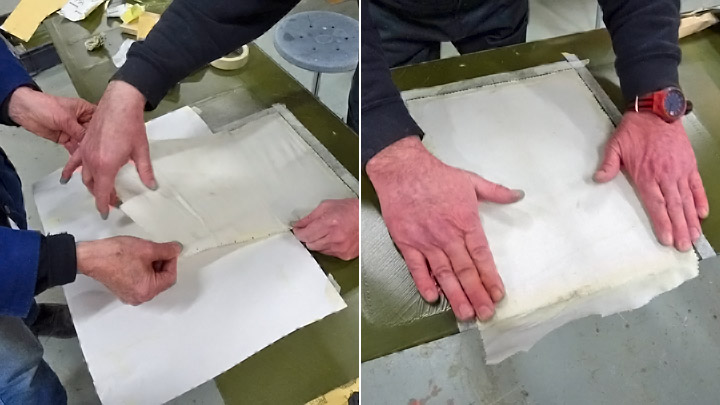
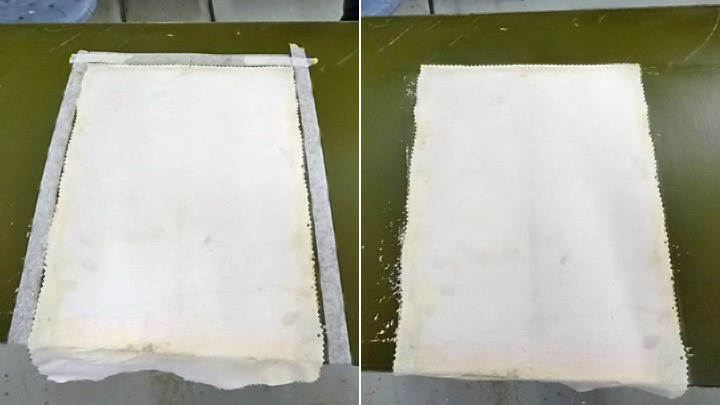
Working in a similar way as when fastening the upper edge of the fabric, the side edge of the fabric was pulled in both directions when fastening it. This is how the fabric got its preliminary tightness before the actual tightening with shrinking dope. When the new fabric had been glued by its edges all the way up to the wooden strip on the trailing edge, the patch was ready to be tightened.
The tightening of the covering fabric will be started by water treatment where the fabric is sprayed wet a few times and left to dry. Then the actual tightening will be done by applying several layers of nitrocellulose varnish on the fabric. The varnish, i.e. shrinking dope, will give the fabric its final impermeability and tightness. Photos: Lassi Karivalo Translation: Erja Reinikainen |
|
Avainsanat: aviation history, restoring, old aircraft, helicopter, SM-1 |
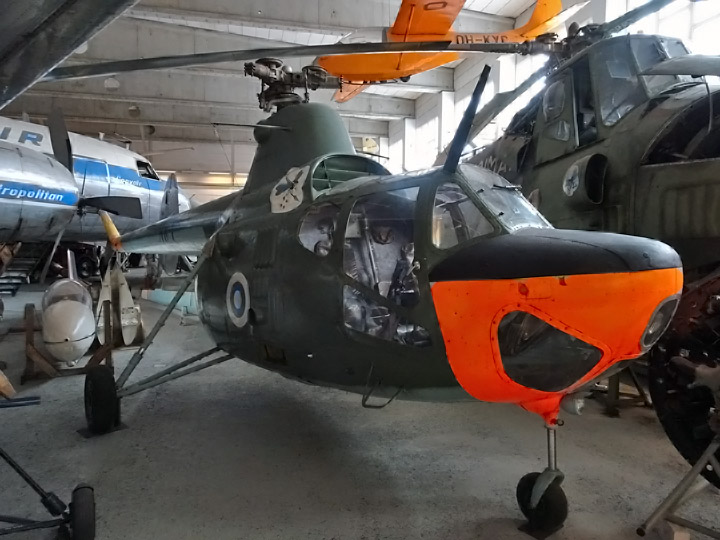
Rotor blades of helicopter SM-1 are being repairedMaanantai 25.2.2019 - Member of Tuesday Club A Polish helicopter SM-1 (SM1/600 SZ) is on display in the Finnish Aviation Museum’s Hall II. It has been in use in the Finnish Air Force and it has the registration number of HK-1. The helicopter was made in Poland, based on the principles of the Soviet Mil Mi-1 copter. The Finnish Air Force had four Polish SM-1’s in use during 1961-1967. These helicopters were assembled Finland at the Air Force hangars in Tampere in early 1961. Helicopters HK-1 and HK-2 were modified for training purposes.
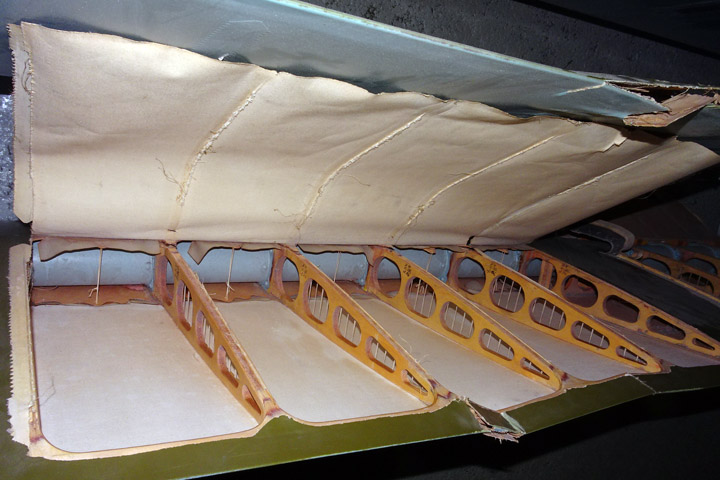
The SM-1 has rotor blades which are over 6 meters long and have mainly wooden structure. Each blade has a round metal tube as a spar, surrounded by wooden ribs on the leading and trailing edges. The leading edge of the blade is covered with plywood and the tip of the edge has a narrow metal strip, covering the full length of the blade.
The tip of the blade has plywood covering, otherwise the blade has fabric covering. The upper surface has been painted dark green and the lower side pale blue. The root of blade No1 has the manufacturer’s labelling SM-1, No 1R10012, BLADE No 1, ATTEST No 844, DATE 11.1.1961.
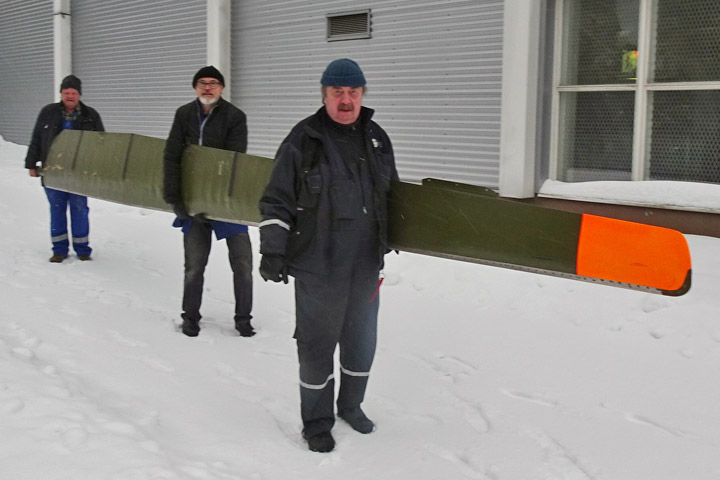
Two of the three rotor blades of HK-1 have been damaged. It is not known when and how this happened. The Tuesday Club agreed with the Finnish Aviation Museum and the Aviation Museum Association that the rotor blades will be repaired by the Club. The rotor blade No1 was carried from the museum’s Hall II into the restoration space on February 5th, 2019 and the repair work was started.
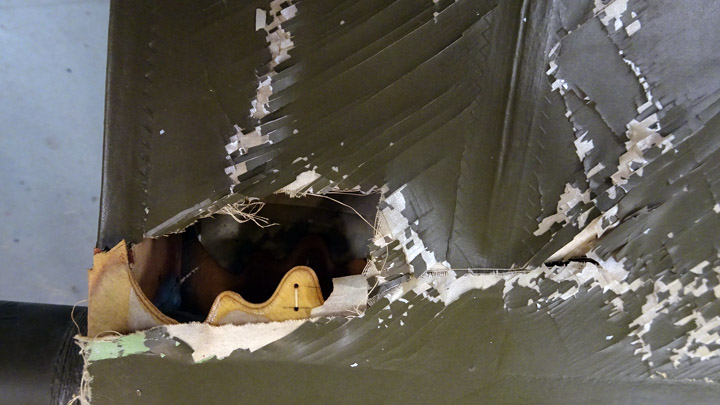
The trailing edge of the rotor blade consists of the wooden strips on the upper and lower surface, which have been glued together at the edge and to which the ribs are fastened. The trailing edge on blade No1 is fractured in two places. The plywood and fabric covering has some holes, tears and scratches and the paint is badly flaking in some places.
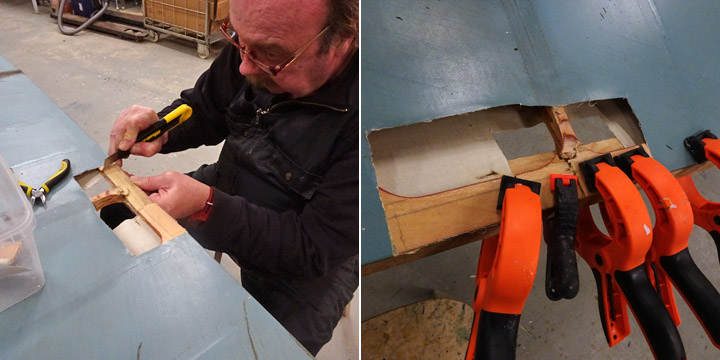
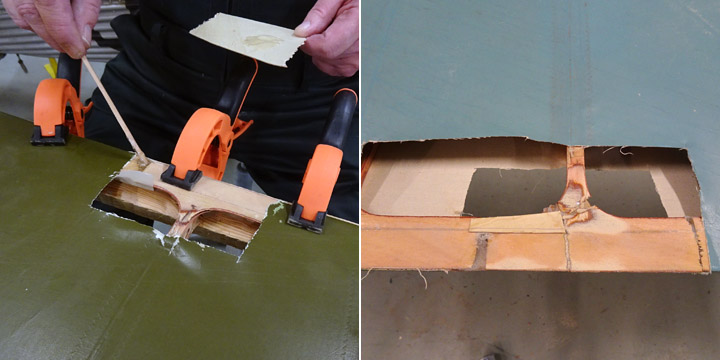
The repair work was started at one of the fractured points on the trailing edge. There the wooden strip on the lower side of the trailing edge has broken into three parts. To have a good view of the damage, the torn fabric covering around the area was dismantled. The broken pieces of the trailing edge were removed, cleaned and fitted together on a table. The team decided to glue the pieces together and replace a small missing piece with epoxy.
The pieces of the trailing edge were glued together against the wooden strip on the upper side of the blade, using clamps. The glue was Erikeeper Plus. When the glue had dried, the clamps were removed, and the team was happy with the result. There were small gaps between the glued pieces and a small piece was missing, so the gaps were filled with epoxy. When the epoxy had dried, the trailing edge was in good condition and the outcome was even better than the team had expected. Finally, the surface of the glued trailing edge was buffed out. Now one of the fractures on the trailing edge had been repaired and it was left to wait for the covering of the damaged area.
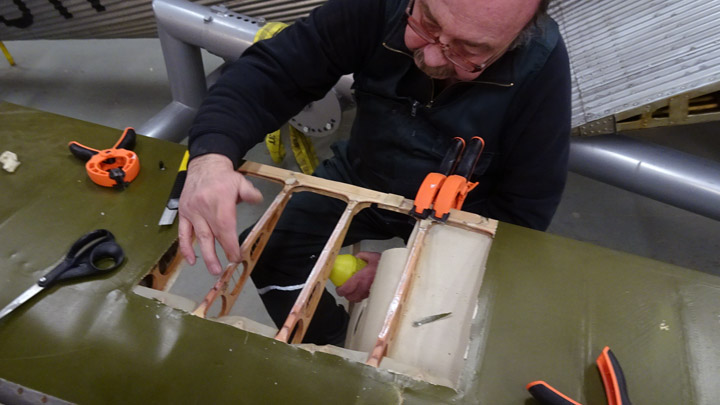
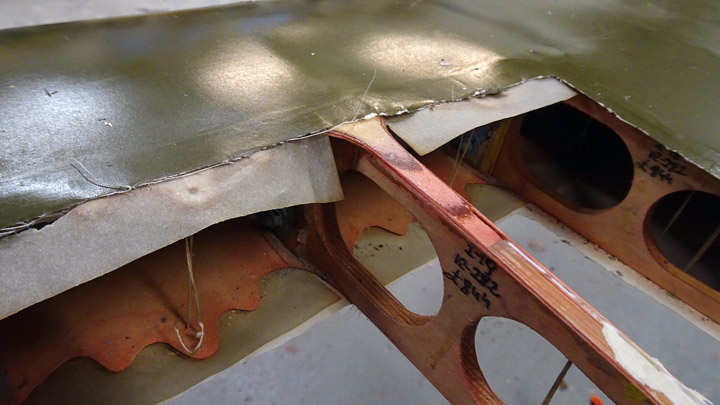
There are bruises and cracks in the plywood covering and in some places the ribs under the covering have been damaged. The small cracks in the plywood were repaired using epoxy. When the epoxy had dried, the surface was honed smooth. The team hasn’t yet decided how to repair the larger cracks in the plywood covering.
The small holes in the fabric covering can be repaired using fabric patches. However, in most damaged places the fabric will have to be dismantled as far as the nearest ribs and to the leading and trailing edges. This is necessary in order to have sufficient gluing surface around the edges of the new fabric. The team hasn’t decided whether the new fabric will be glued onto the ribs or sewn on the ribs (as it has originally been). The new fabric will be pulled tight using shrinking dope.
The fabric covering was cut off in the damaged area in the mid-section on the upper surface of the blade. A thin rim of fabric, about 1 cm wide, was left on the edges of the ribs. When the fabric was removed up to the plywood covering on the leading edge, the team noticed something strange. There was a thin layer of paper under the plywood covering on the leading edge, resembling wax paper. There was no paper under the fabric covering and the team didn’t know why it had been installed under the plywood.
The painted surface of the fabric covering on the rotor blade is badly flaking and damaged in large areas. The paint peels off in thin strips. In some places it may be possible to fix the flaking using varnish or paint but in the worst places the flaking and damaged fabric will have to be dismantled and replaced. This is how the place on the upper side at the root of the blade had been repaired. The SM-1 rotor blade repairs are well on the way. Photos: Lassi Karivalo. Translation: Erja Reinikainen. |
|
Avainsanat: aviation history, restoring, old aircraft, helicopter, SM-1 |
Ilmailumuseot.fi - Aviationmuseums.fi