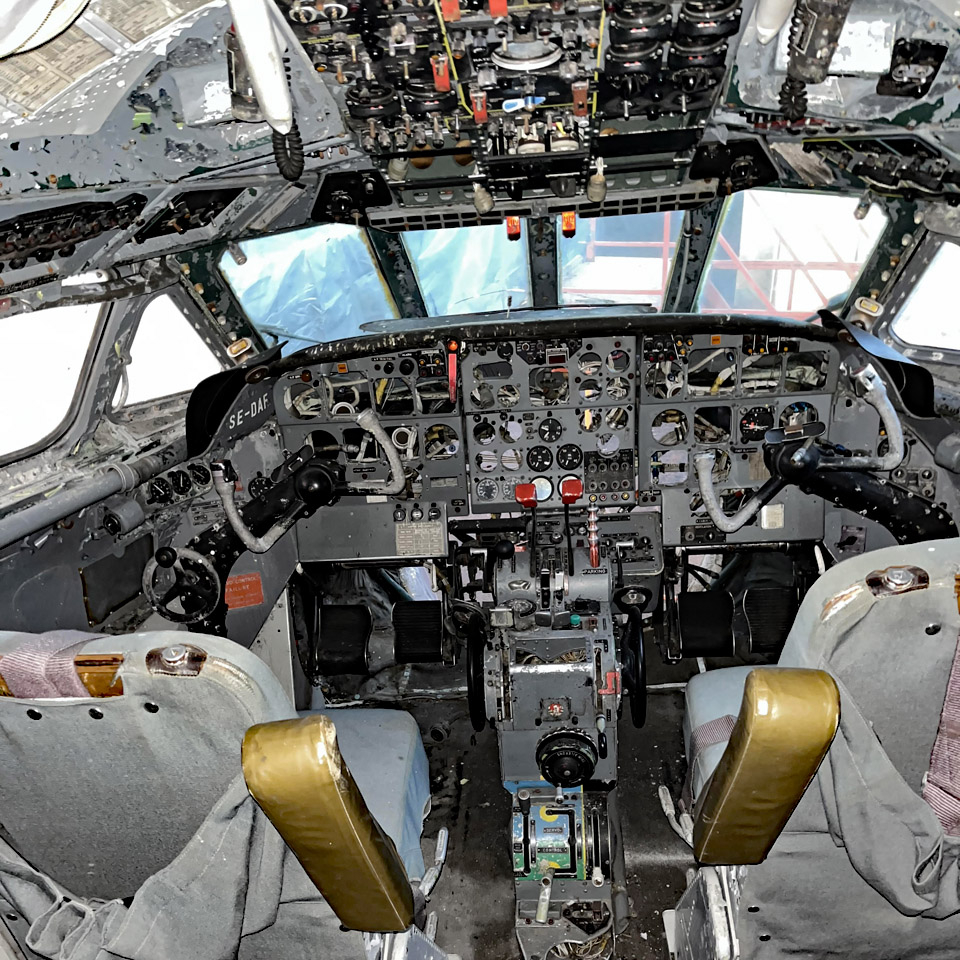
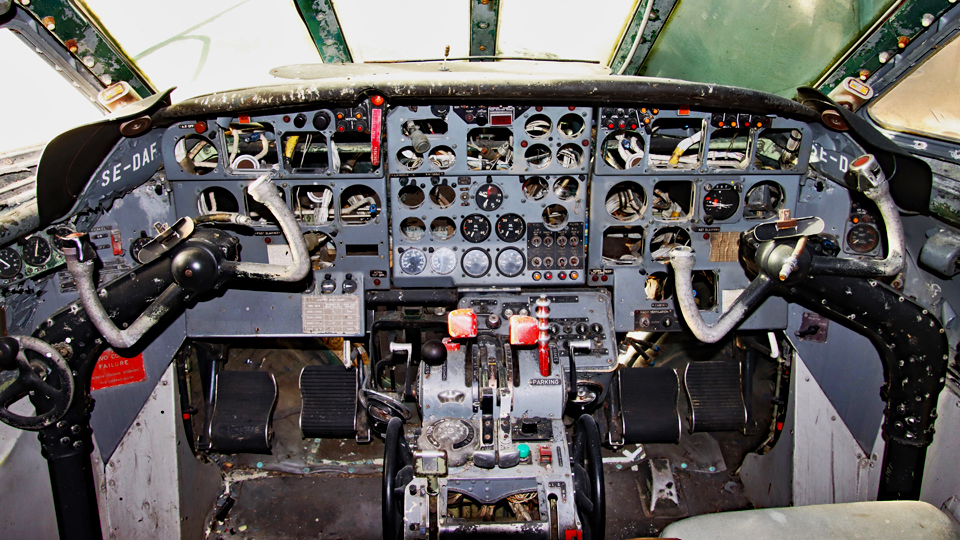
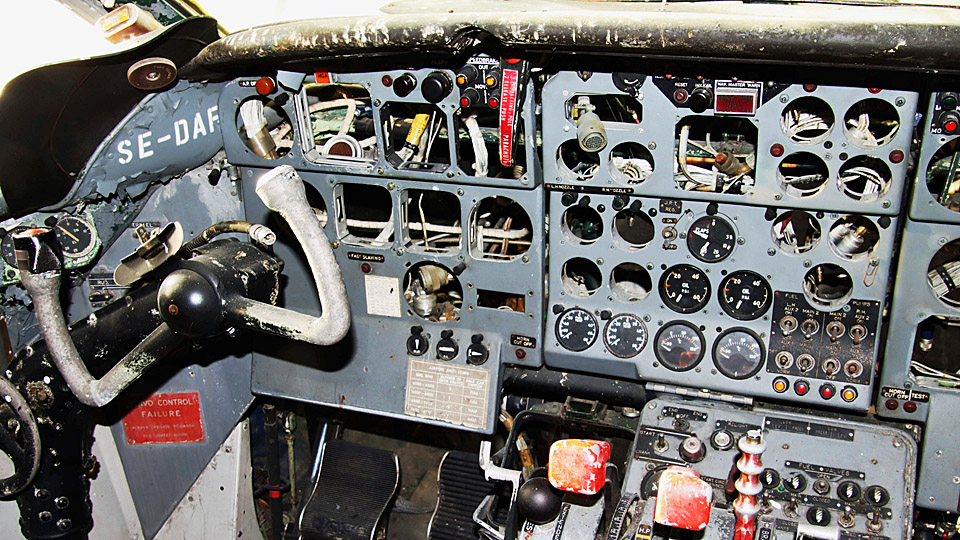
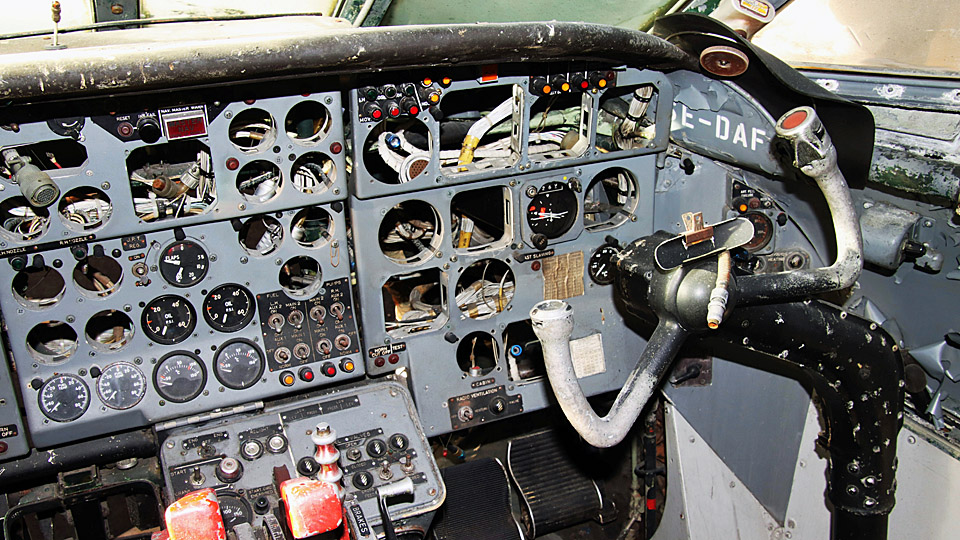
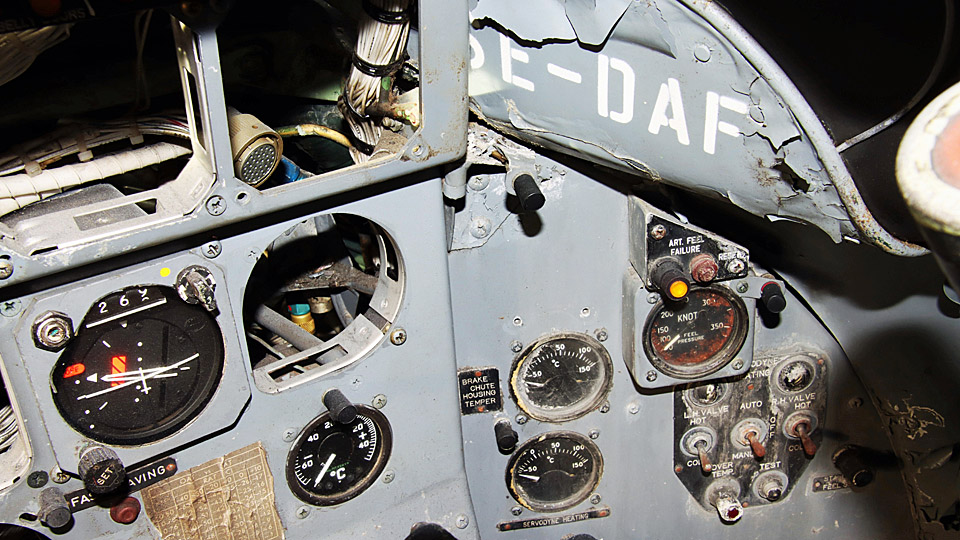
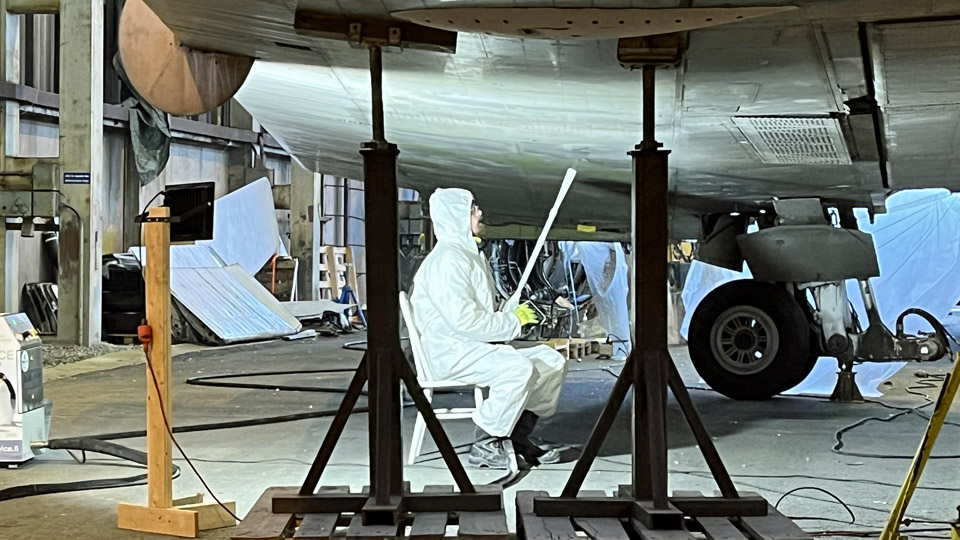
The Caravelle's cockpit is missing instruments and equipmentKeskiviikko 1.3.2023 - Erja Reinikainen At the moment, the Caravelle SE-DAF’s cockpit looks rather bare and stark. There are a lot of instruments missing and the surfaces and fittings are shabby. The decades of being stored outdoors at Arlanda have left their mark.
Photo by Ismo Matinlauri. We will not let this discourage us, instead we take this as a challenge. Our aim is to find the missing instruments and equipment and restore the cockpit and its surfaces as well as we can.
Now we are looking for analogue instruments which were used in the 1960s’ and 1970s’ aircraft and we turn to our readers for help. The instruments don’t have to be original ones which were used in the Caravelles, a similar style is sufficient. A list of the missing instruments is below, we need two of each. Flight monitoring instrumentsThe size of the flight monitoring instruments varies. Some have a rectangular housing 82 x 82 mm, others a round housing with a diameter of 80 mm. The housing for the Flight Director Indicator / Attitude indicator is rectangular 100 x 100 mm. A round instrument can be installed instead, using a reducer plate.
Engine monitoring instrumentsThe engine monitoring instruments have a diameter of 49 mm. A different size can be used but will be difficult. Instruments with the original displays will probably not be found but the dial face can be changed. The following instruments are missing.
Photos by Ismo Matinlauri.
Radio control panelsThe following items are missing:
If you happen to know anything about the items listed above or if you know where they could be found, please contact Caravelle project manager Janne Salonen, mobile +358 50 5291135 or email janne.salonen@imy.fi Translation with help of Martti Saarinen. Photos by Jouko Tarponen except if otherwise separately mentioned. |
|
Avainsanat: aviation history, restoration, Caravelle, SE-DAF, Sven Viking |
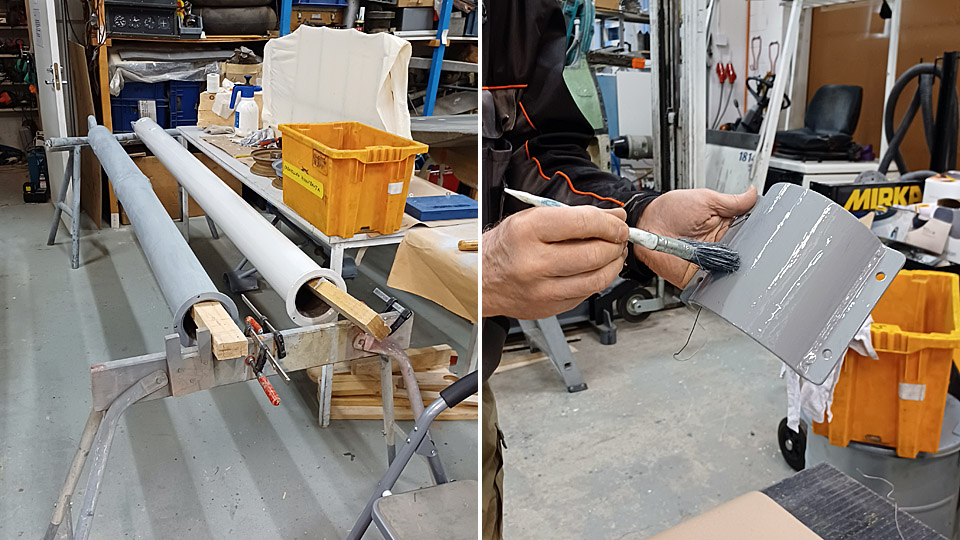
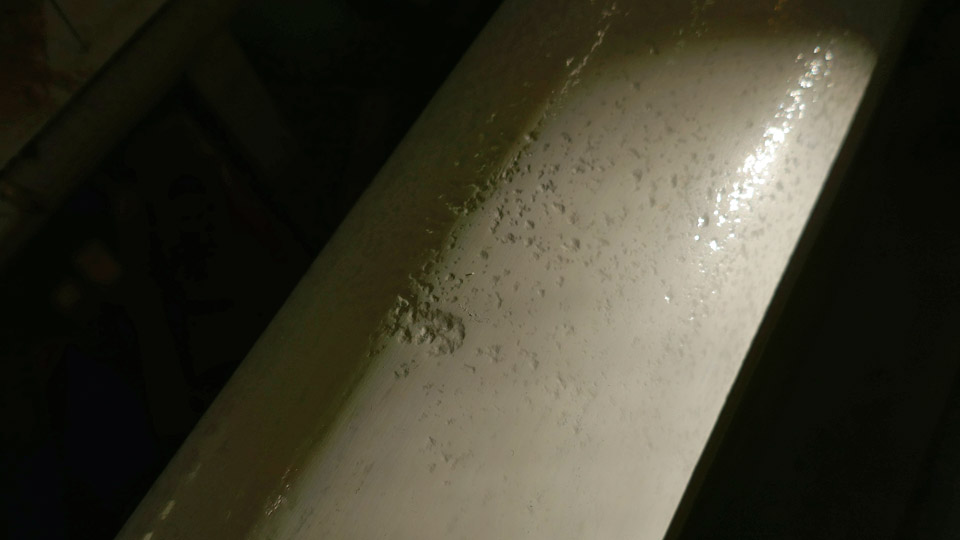
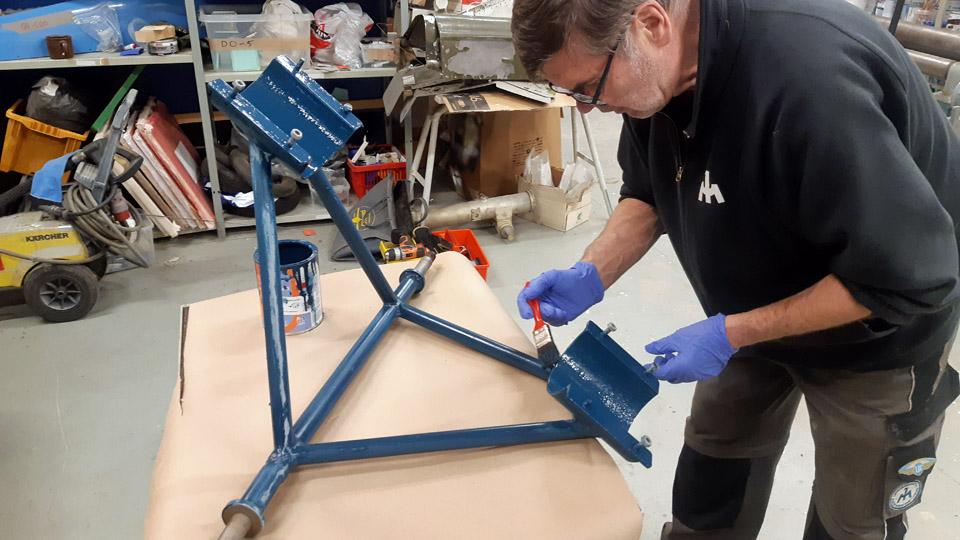
The restoration of the Caravelle III towbar is progressingKeskiviikko 1.3.2023 - Tuesday Club member During Tuesday Club’s autumn season the Caravelle III towbar restoration work reached the point where the majority of the towbar parts had been painted with Isotrol primer, which prevents rusting. Half of them were painted with dark grey Isotrol and the other half with pale grey. We could see that the paint made the corrosion marks on the towbar surface clearly visible.
Photos by Juha Veijalainen.
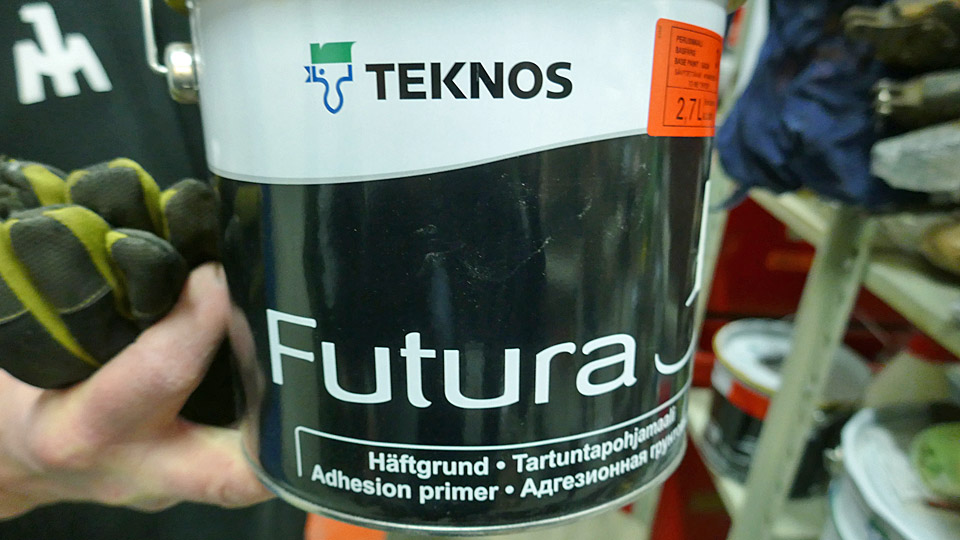
We made a test where a small area of the towbar was painted with Teknos adhesive primer to see whether it would cover the corrosion. It did, indeed, but the corrosion marks were still visible. The next step would have been to spackle the whole towbar to make the corrosion marks disappear. However, we decided not to. We shall let the corrosion spots show and prove that the Caravelle III towbar has been rusting under the open sky for fifty years at Arlanda airport.
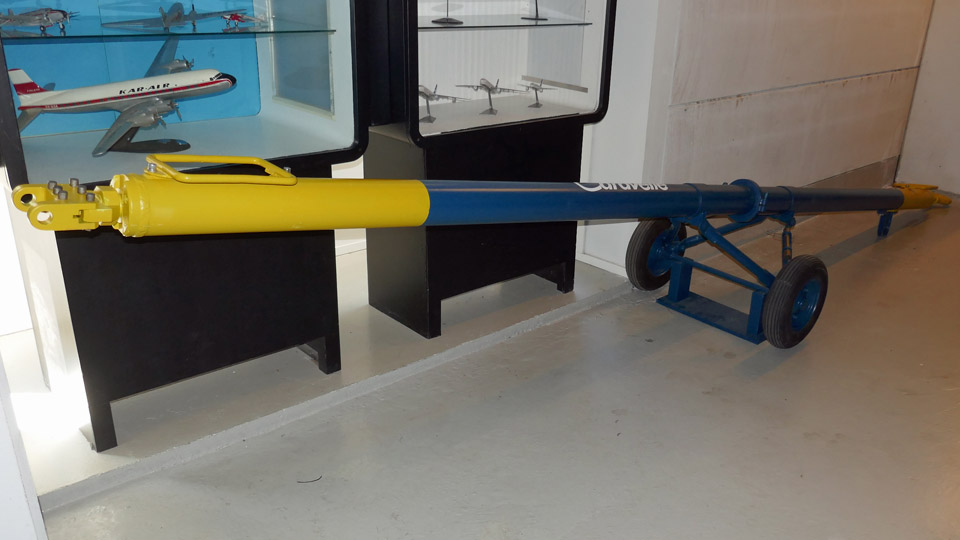
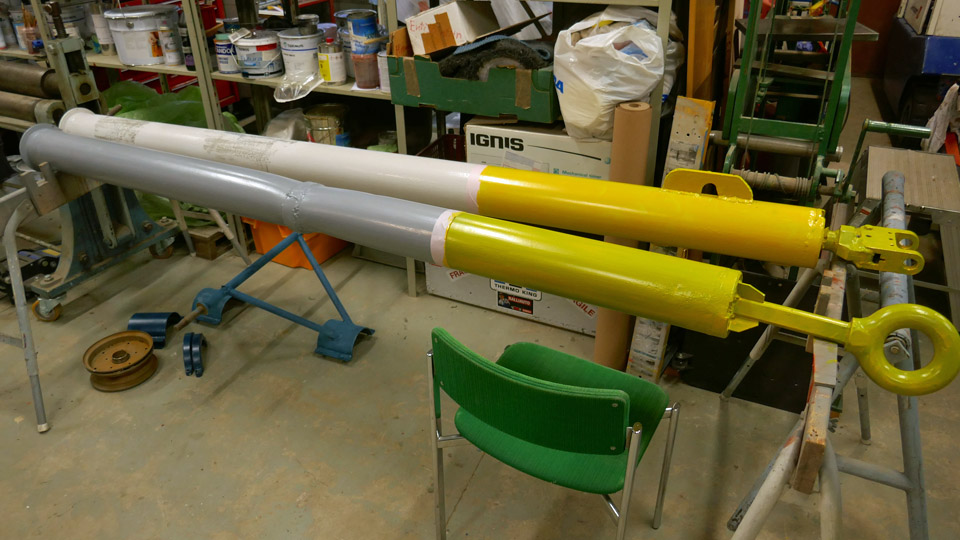
The towbar will be painted to the same paint scheme we used for the Finnair Super Caravelle towbar when it was restored last year. Just to refresh your memory, the towbar now under restoration was brought from Sweden together with the Sud Aviation Caravelle III (SE-DAF), which was acquired by Aviation Museum Society Finland. This towbar has been used by SAS, but we will restore it to Finnair colours. After restoration the towbar will be placed on display at Turku airport together with the Caravelle III, which will be restored to the Finnair 1963 paint scheme as OH-LEA “Sinilintu” (Bluebird).
The main colour on the towbar is the Finnair blue, with 50 cm of the towbar’s pull loop end and 73 cm of the aircraft towhead end painted yellow. The blue paint is Unica outdoor furniture paint NSC S 6030-B and the blue paint Unica outdoor furniture paint RAL 1023.
Photos by Juha Veijalainen.
The top coat painting was started from the smaller parts of the towbar. The towbar wheel rack with its fastening flange was the first part to be painted blue. The paint was applied with brushes. After the first layer we noticed that the covering wasn’t sufficient yet. The surfaces were sanded manually with sandpaper and painted with another layer of blue paint. The result was fairly good. We don’t think the wheel rack needs to be painted a third time.
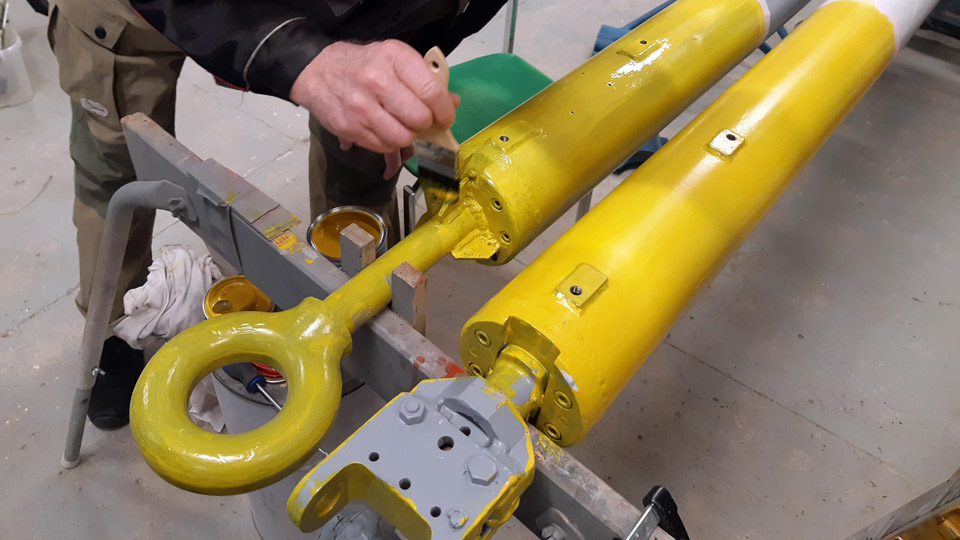
The bar section of the towbar had been dismantled into two parts. The painting with finishing paint was started with the yellow paint. It was soon noticed that already the first layer of yellow paint covered well the bar which had been painted with pale grey Isotrol primer. However, the yellow paint didn’t cover so well the other half of the bar which had been painted with dark grey Isotrol. It would have been better if both halves of the bar had been painted with the pale grey primer. Well, this means only that we will have to apply several yellow layers on the half which was painted with the dark grey. At this point two layers of yellow paint have been applied.
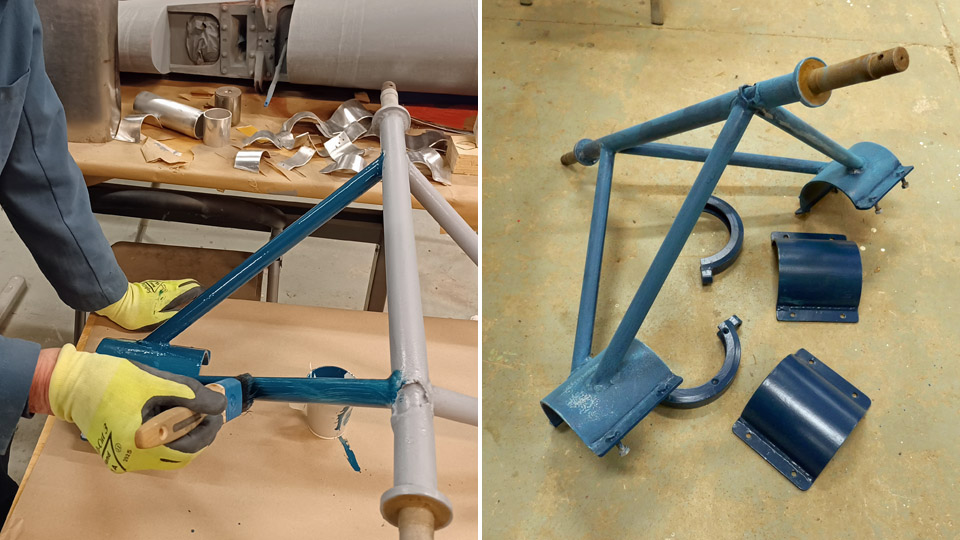
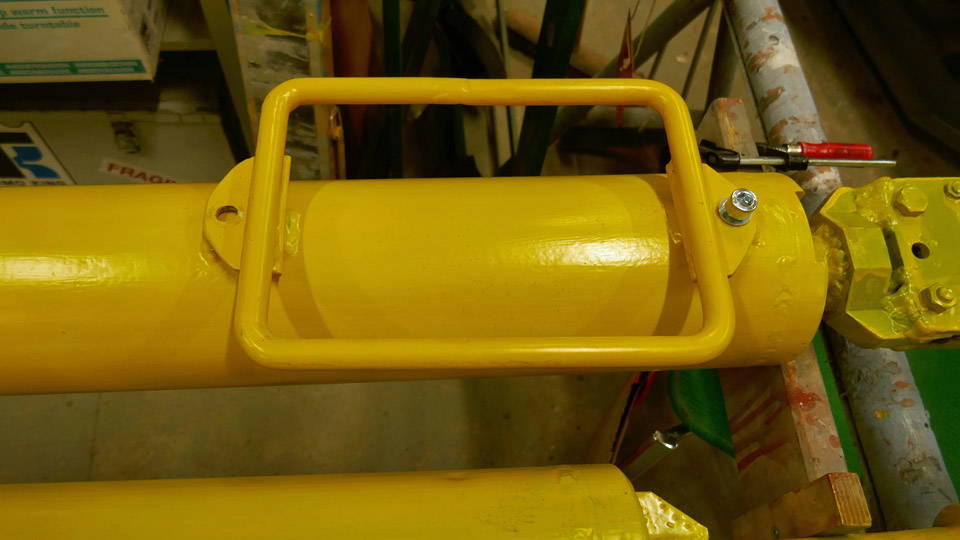
In addition to painting, also other restoration work has been done. Both ends of the towbar lack the rectangular handlebars made of round metal rods. The Super Caravelle towbar we restored earlier has similar handlebars. We unfastened one of them to use it as a model when building the missing handlebars for the Caravelle III towbar. This Caravelle III towbar is the first version of the towbars manufactured by Sud Aviation, its model number is S.09.107 and the Super Caravelle towbar we restored last year is the factory’s last and third towbar version with model number S.09.107 2.
First we started making the fastening plates for the handlebars, using the Super Caravelle towbar handle as a model. There is a fastener plate welded to both ends of the handlebar. There is a 10 mm hole in the plate for a bolt, which fastens the handle on the towbar.
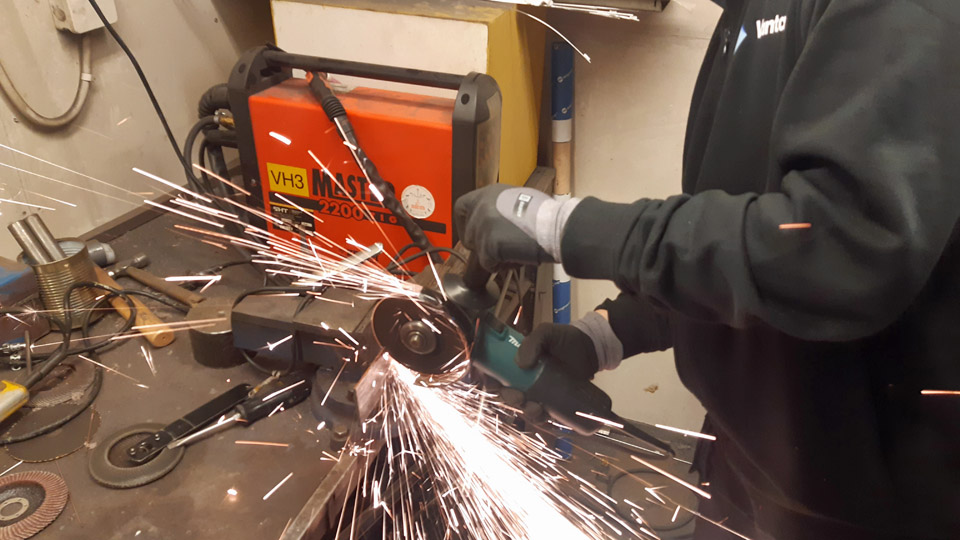
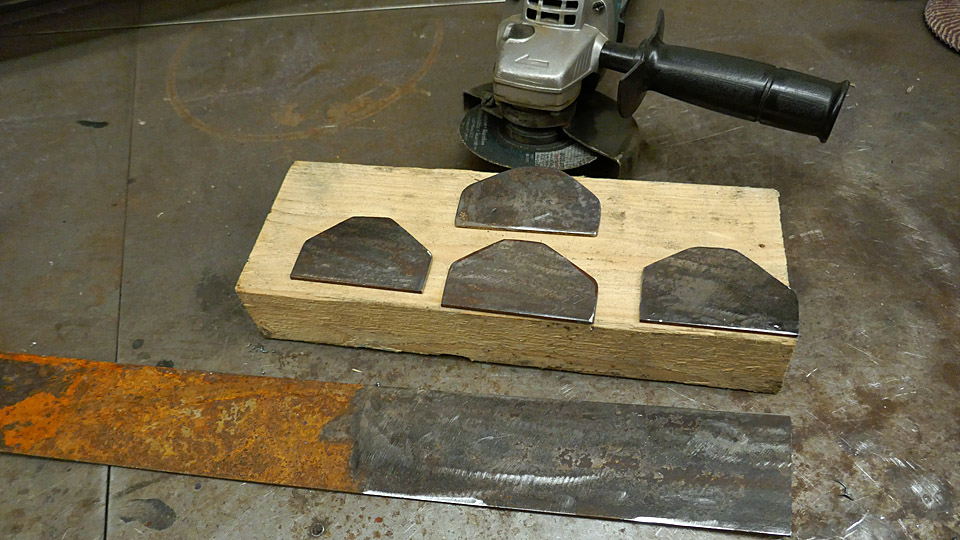
We found a suitable piece of 4 mm thick and 10 cm wide flat bar iron in the metal storage of the Finnish Aviation Museum’s hot work container. Rust was sanded off the flat bar iron and then four 8 cm pieces were cut from it with an angle grinder. The shape of the Super Caravelle towbar handle fastener was drawn on all of them. The extra material was cut off and their corners and edges were shaped round using an emery and an abrasive band. The fastener plates are now ready to be welded on the handlebar, but the holes for the bolts are missing. The following phase will be to make the actual handles for the handlebars.
On the surface of the Caravelle III towbar there are the remains of the broken handlebar fastening bolts. The bolts were drilled out, first using an 8 mm drill bit. Then a hole was made for a M10 bolt using a larger drill bit. A thread was made into the hole for a 10 mm hexagon head bolt, using a threading tap. The bolt holes are now ready for fastening the handlebars on the towbar. Translation by Erja Reinikainen. Photos by Lassi Karivalo except if othewise separately mentioned. |
|
Avainsanat: aviation history, restoration, Caravelle, SE-DAF, Sven Viking, Tuesday Club |
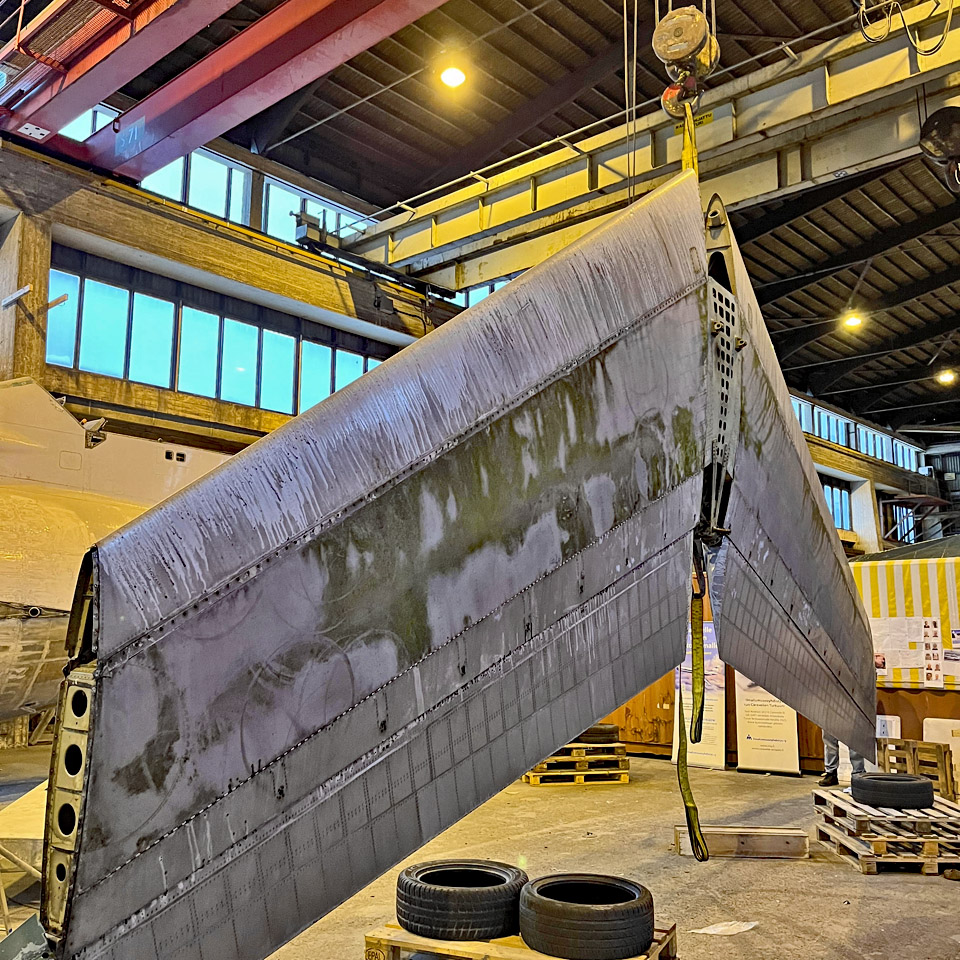
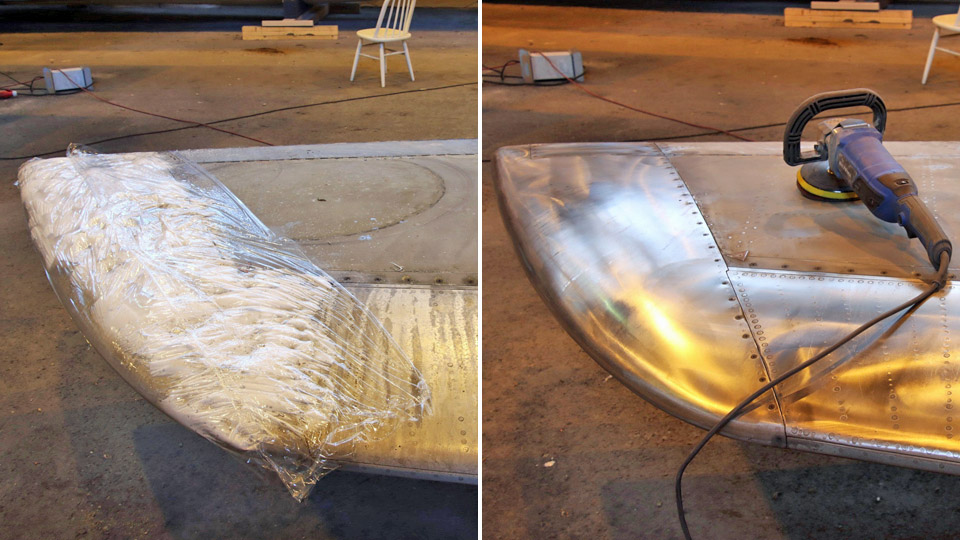
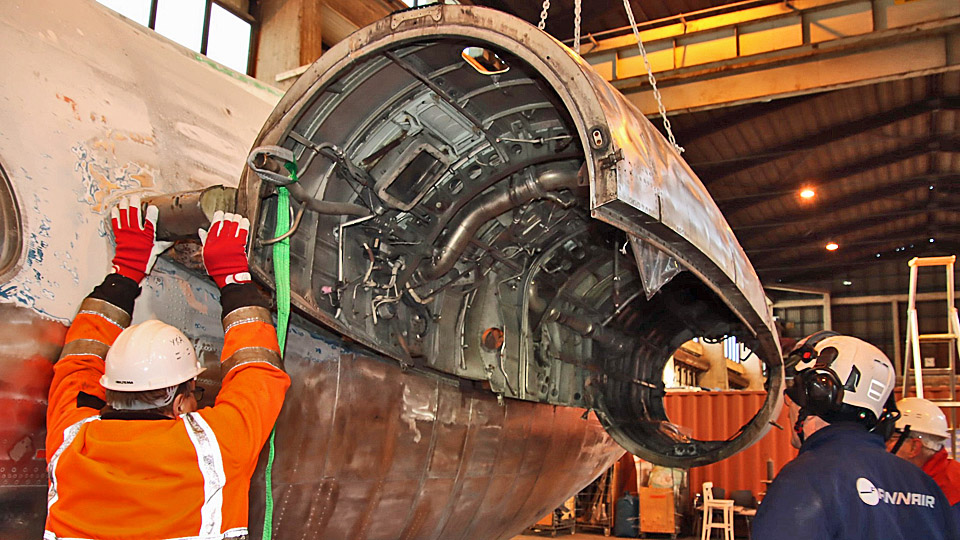
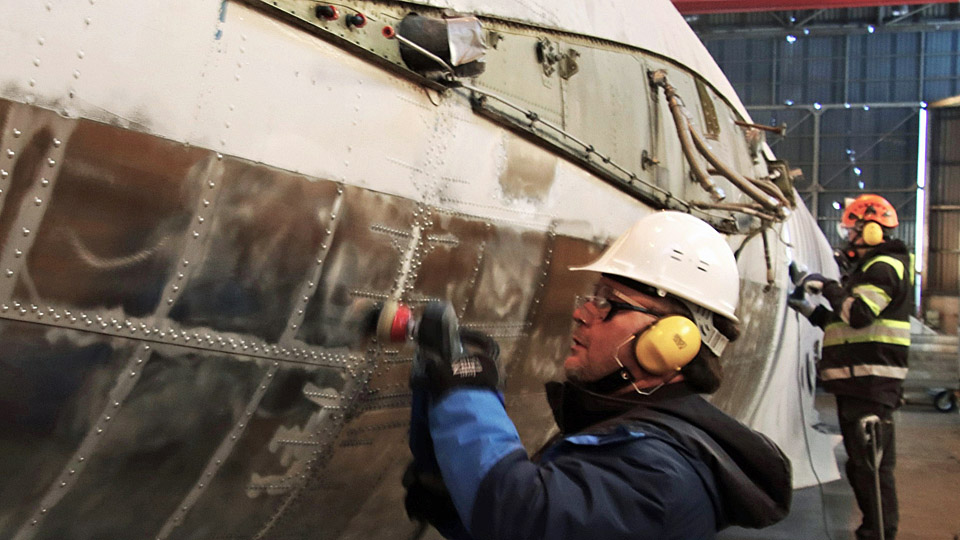
Caravelle restoration - a Week of LiftsLauantai 4.2.2023 - Ismo Matinlauri During last week we performed several lifts using the bridge cranes in the hall where the Caravelle III (SE-DAF) is under restoration. First we turned around the horizontal stabilizer and then we installed the left side engine nacelle. Finally we lifted the rudder to the working area.
The horizontal stabilizer was turned around because we completed the grinding work on the upper side, and it is now waiting for the temperature to rise to a level where polishing and painting is possible. After the turn we can now do the same work phases to the lower side as well. Then we will polish and paint it before the next lift and turn, after which we can polish and paint the upper side. Then the horizontal stabilizer is ready and the right side up for the installation work.
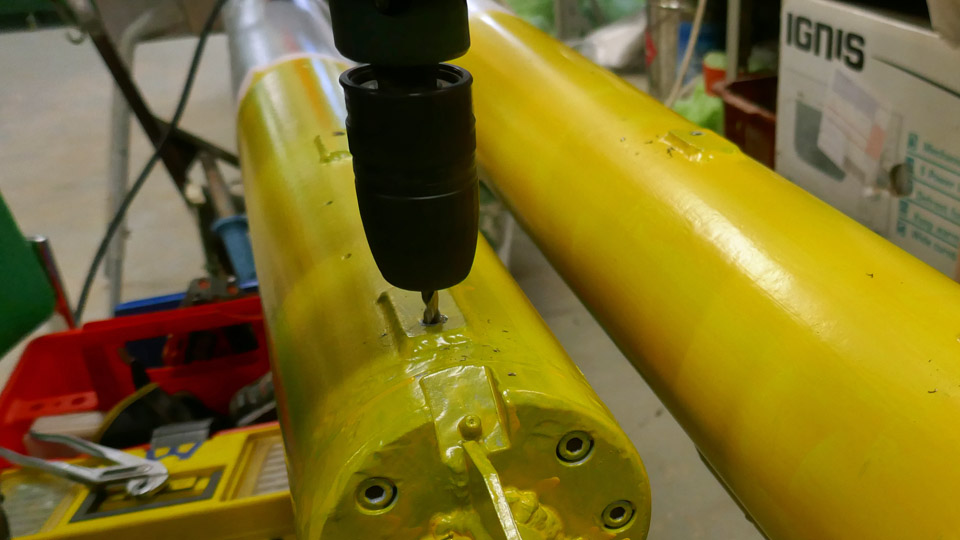
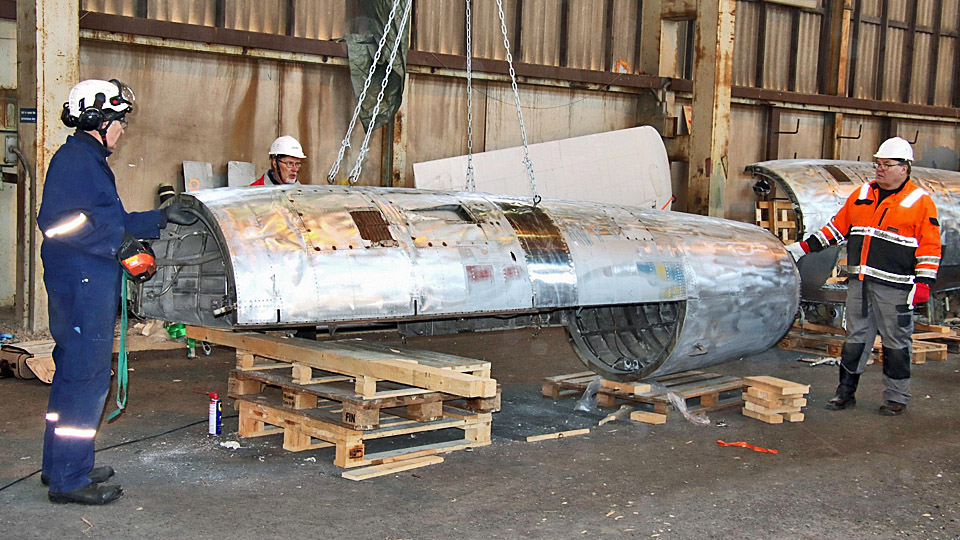
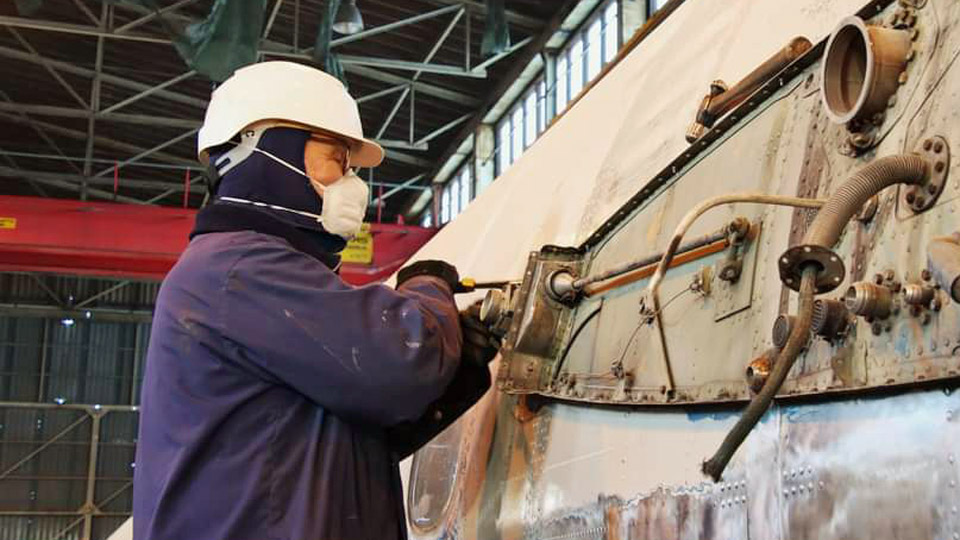
The engine nacelle required some sheet metal work before it could be installed. Some corroded plates needed to be changed or repaired. Time was also needed to fix some screw holes on the fuselage so that they would be ready when the nacelle was in place and the fairings are assembled into place. Finally the nacelles were ground on the outside, now they are ready for painting. Then everything was ready for the nacelle lift.
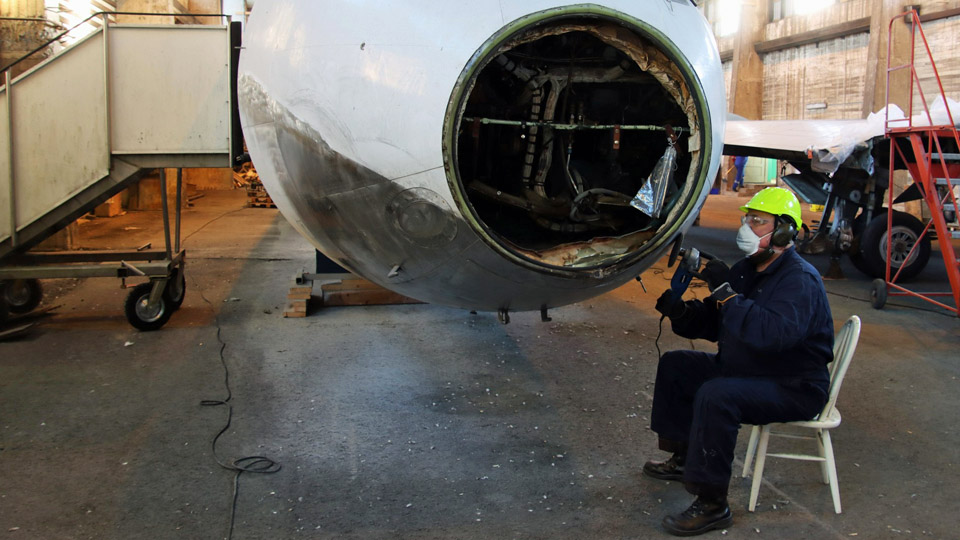
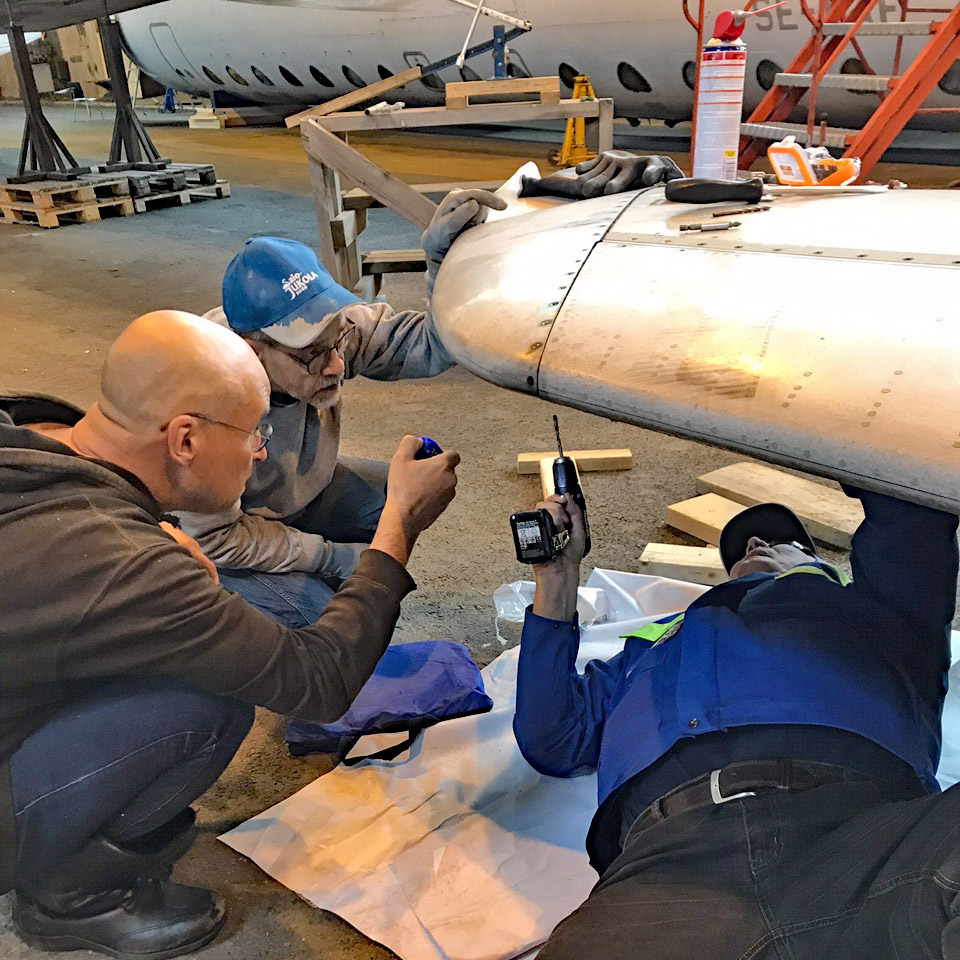
The left side engine nacelle was lifted back to its place under the supervision of Markku Ahokoski. We used lifting chains tailored for the purpose and connected to the original lifting holes on the nacelle. Fitting and tightening the nacelle’s four fastening bolts took more time than estimated but with some adjustments we managed to do it.
It has been decided that the engine nacelles will be painted with silver colour paint and not polished. This is because the surfaces are worn and there are marks of use. Polishing would lead to an uneven surface and would not look right. The other engine nacelle will be lifted to its place in about two weeks’ time, when the same preparation work as with first one has been completed. Photos by Jouko Tarponen Translation by Erja Reinikainen |
|
Avainsanat: aviation history, restoration, Caravelle, SE-DAF |
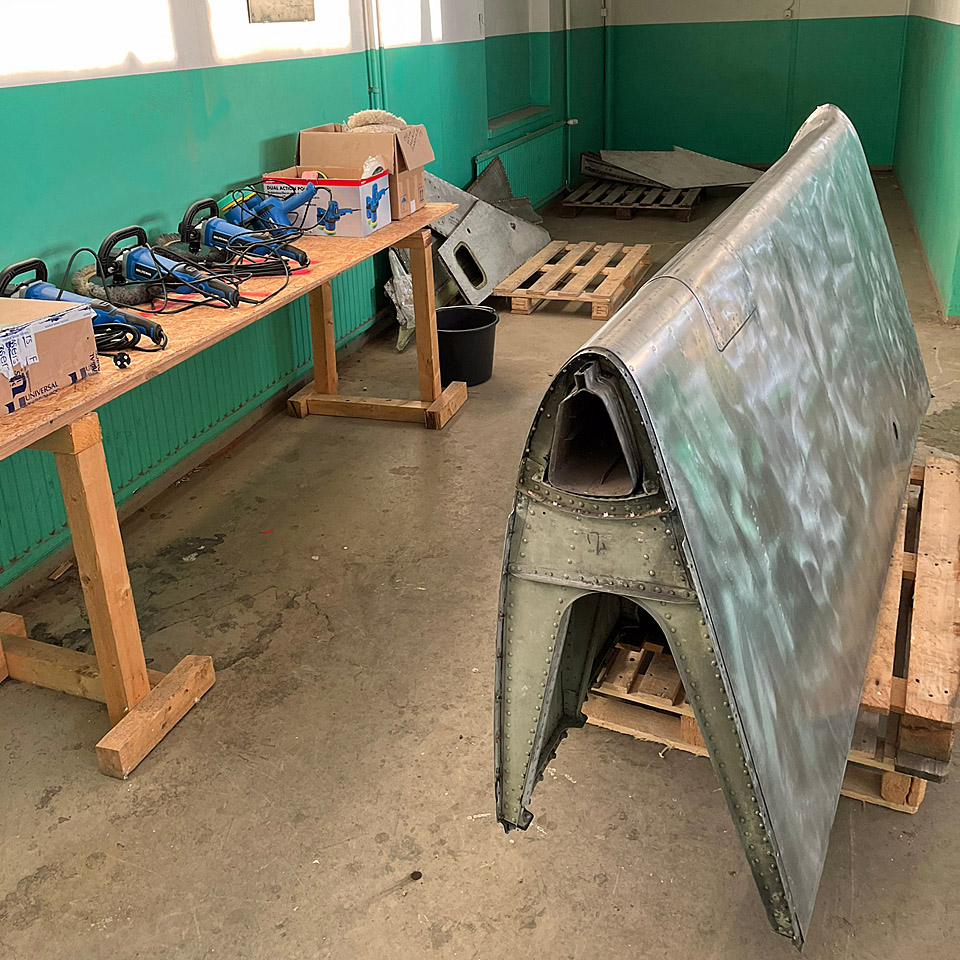
The repairs of the Caravelle radome are almost finishedLauantai 4.2.2023 - Tuesday Club member The repairs of the damaged parts of the Caravelle III (SE-DAF), which was brought to Finland from Sweden, have been continued at the Aviation Museum Society Finland’s Tuesday Club. The repairs of the radome, the bulkhead rim under the radome, the wing tips and the tip of the starboard side horizontal stabilizer are all under way.
Photos by Reijo Siirtola The collision damage, which made a hole in the radome, has been repaired. There was a hole of about 30 x 20 cm on the edge of the radome and this was covered with laminated fibreglass. The collision has occurred right at one of the radome’s three fastening bolts and the hatch above it. In the collision the bolt and its cover frame have been damaged beyond repair, but we managed to straighten the badly bent bolt hatch and it can be reused. The radome is fastened on the outer rim of the nose bulkhead with three bolts.
When the hole on the radome had been laminated and the radome’s crackled surface had been repaired, a base layer of black spray paint was applied. The surface was spackled and sanded to smooth the uneven areas. A final layer of paint will be added when the reparation of the damaged area has been completed.
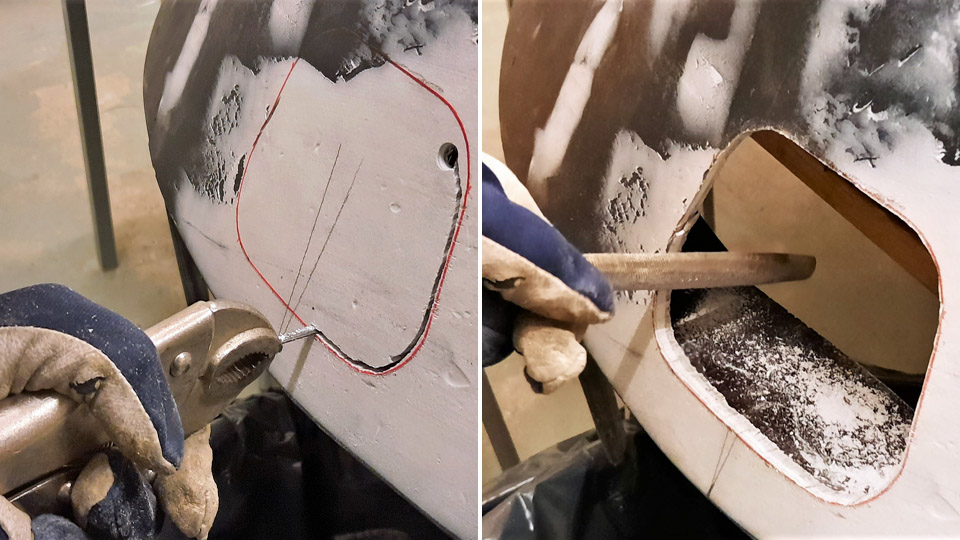
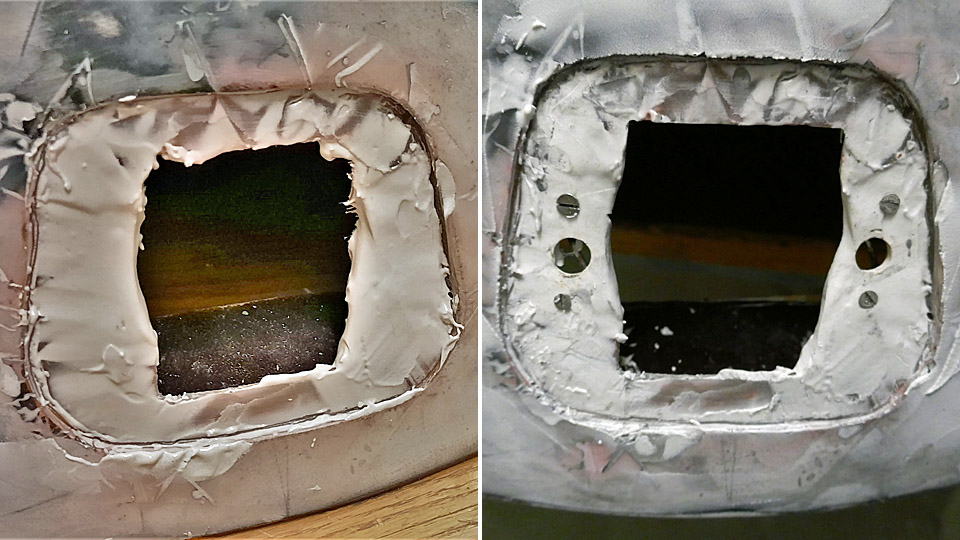
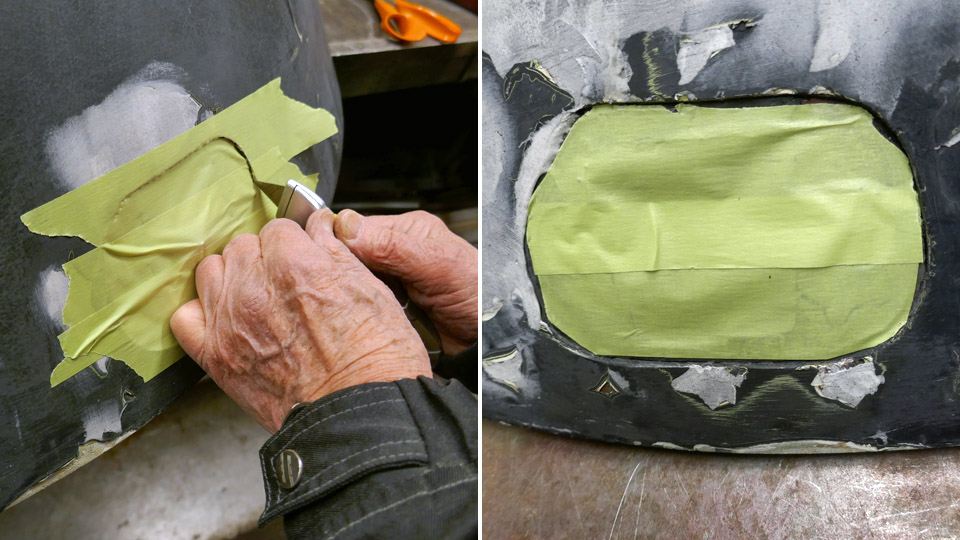
Photos by Reijo Siirtola Now it was time to make an opening on the radome for the fastening bolt’s hatch. The shape of the opening was drawn on the radome surface, using the original hatch as stencil. Then the opening was sawn along the drawn line, using a compass saw. The edges of the sawing line were ground smooth with a file. The opening edge needs also a collar against which the hatch is pressed, and which will have holes for the two quick-lock screws on the hatch. The locking springs of the two locking screws will be fastened inside the collar under the screw holes.
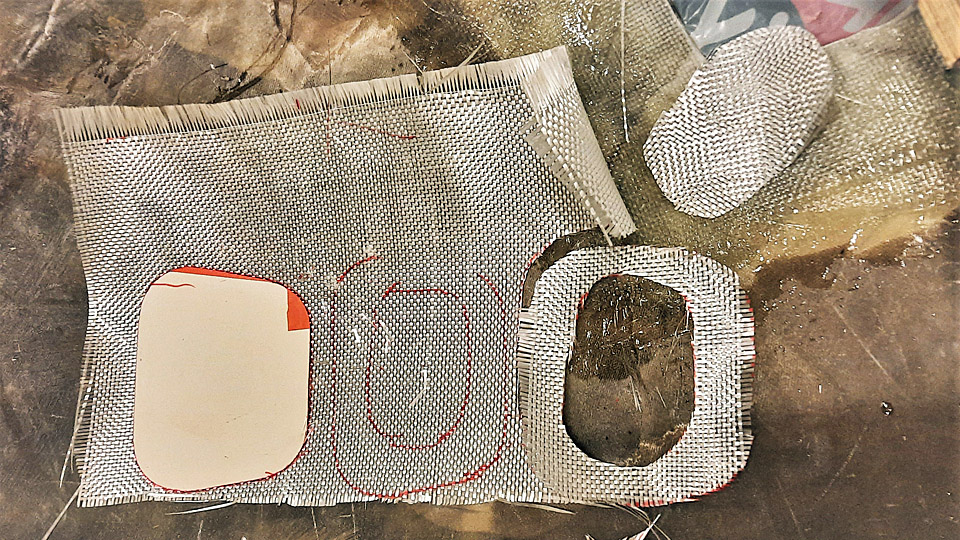
Photos by Reijo Siirtola The collar for the opening was made by laminating. Pieces of fibreglass mat were cut for the collar, with a hole in the middle. Then the bolt hatch was taped onto the edges of the opening and supported on it with two strips of plywood. The inner surface of the hatch was protected with plastic foil so that the hatch doesn’t get glued on the layers of fibreglass which are laminated under it. This way the hatch worked as a supporting wall for the laminating work. The fibreglass pieces were soaked in epoxy, and they were laminated with a roller, layer by layer, to cover the hatch opening.
Photo by Reijo Siirtola When the laminated area had dried, the hatch was unfastened and the opening with its collar could be seen. The edges of the collar opening were smoothed. Then the holes were drilled on the collar for the two fastener screws of the hatch. The original locking springs of the screws were fastened on the lower edge of the collar, under the holes.
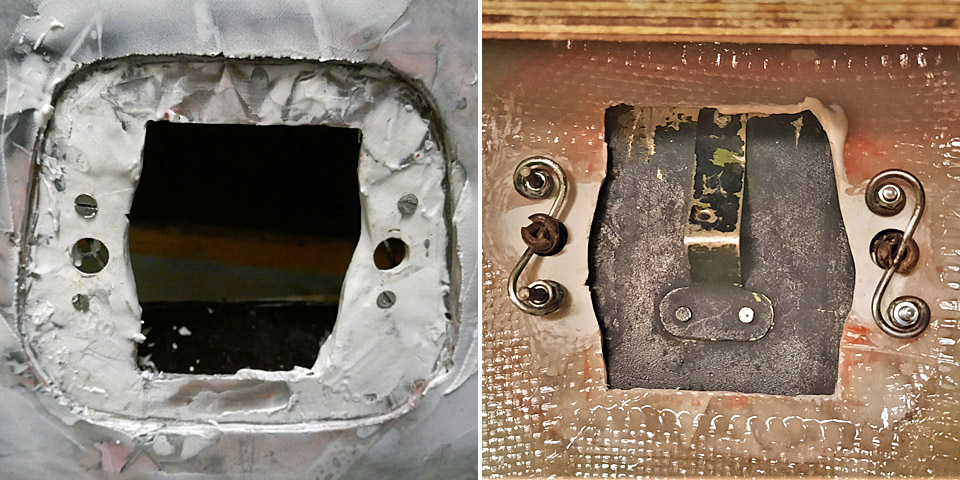
Left photo by Reijo Siirtola The functioning of the hatch was tested by pressing the hatch against the collar so that the lock screws were pushed into their holes. Then the hatch was locked by pressing the screws inwards and simultaneously turning them 90 degrees. The nick at the end of the screw locked on the spring under the collar. This functioned well so we had managed to assemble the hatch of the fastening bolt on the repaired radome.
Photos by Reijo Siirtola The following task will be to build a new bolt fastening into the damaged area so that the edge of the radome can be fastened on the rim of the Caravelle’s nose bulkhead below. The original bolt fastening was destroyed in the collision which hit the radome. Photos by Lassi Karivalo except if otherwise separately mentioned. Translation by Erja Reinikainen.
|
|
Avainsanat: aviation history, restoration, Caravelle, SE-DAF |
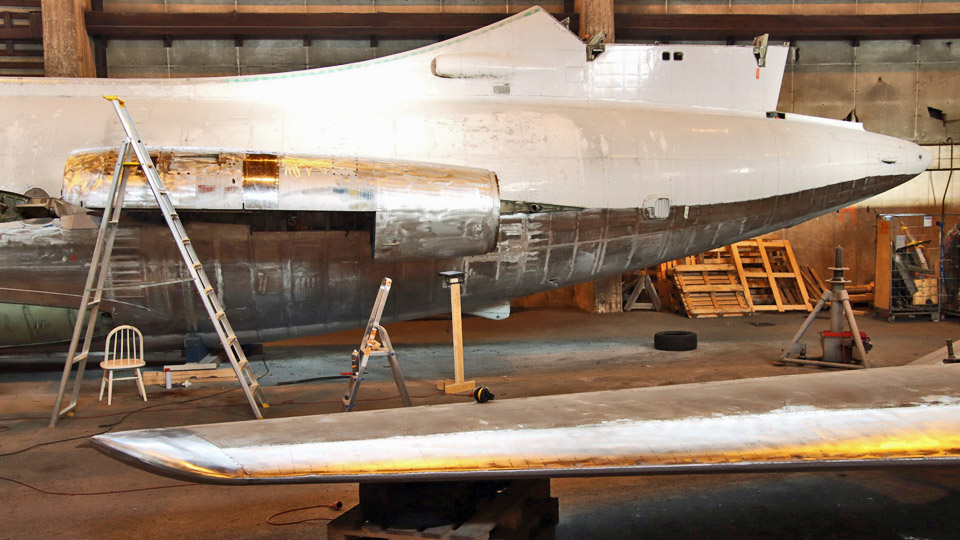
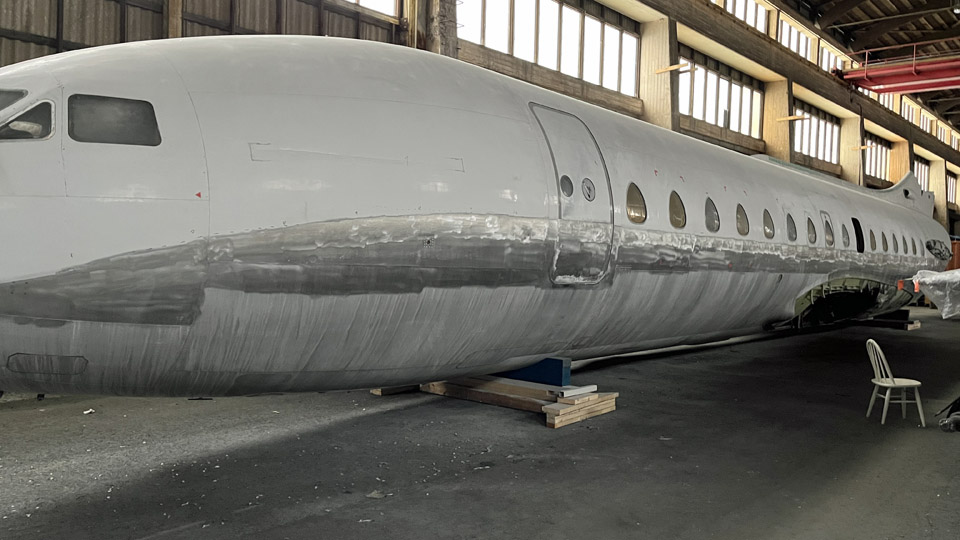
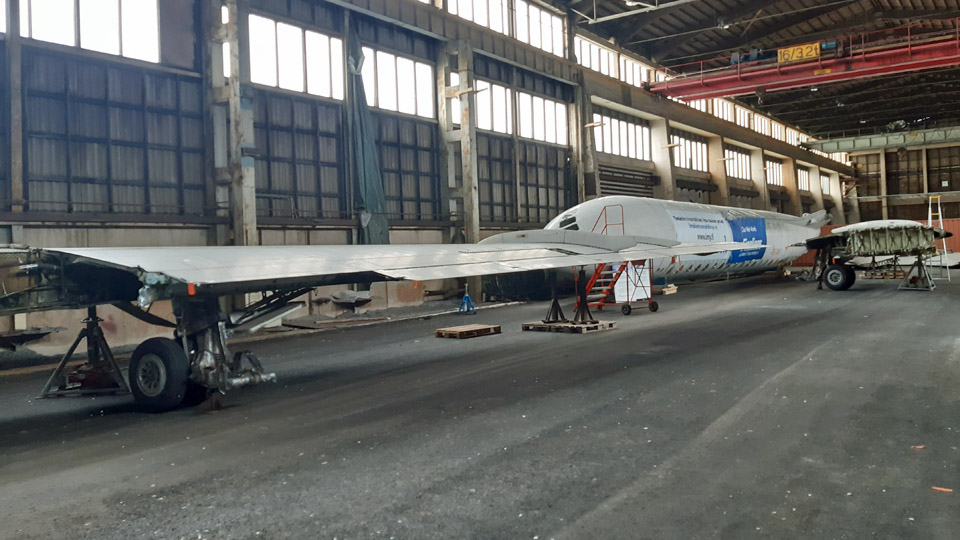
Caravelle's restoration work is continued in PansioPerjantai 20.1.2023 - Reino Myllymäki The restoration work of the Sud Aviation SE 210 Caravelle III SE-DAF continues in Pansio after the short Christmas break.
Photo by Ismo Matinlauri. A workshop has been established in the cold port hall’s heated staff rooms. Even the old shower room has now got a new purpose as a workspace.
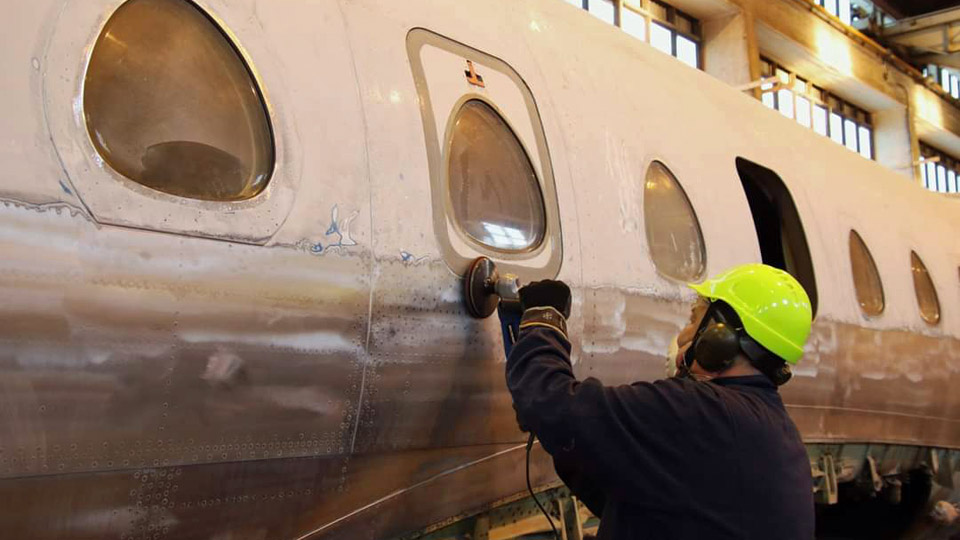
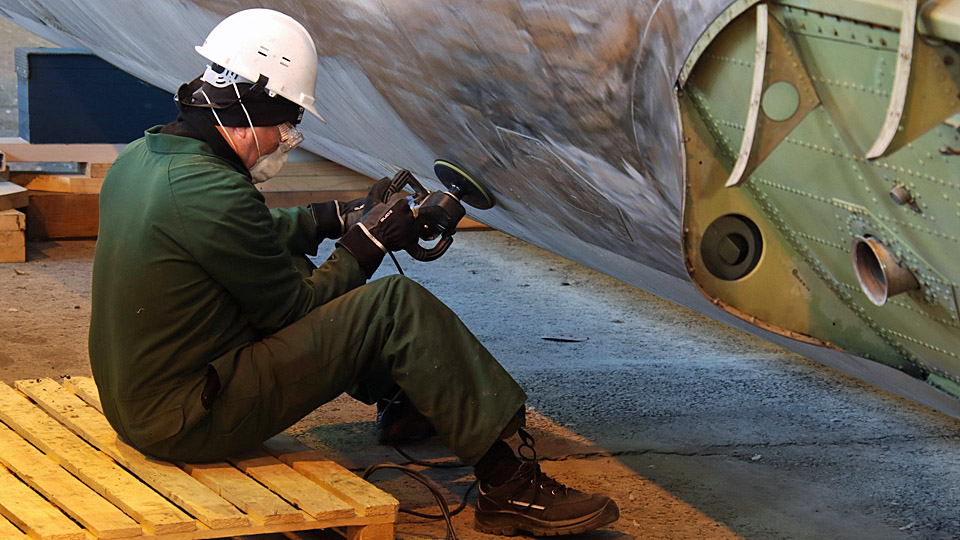
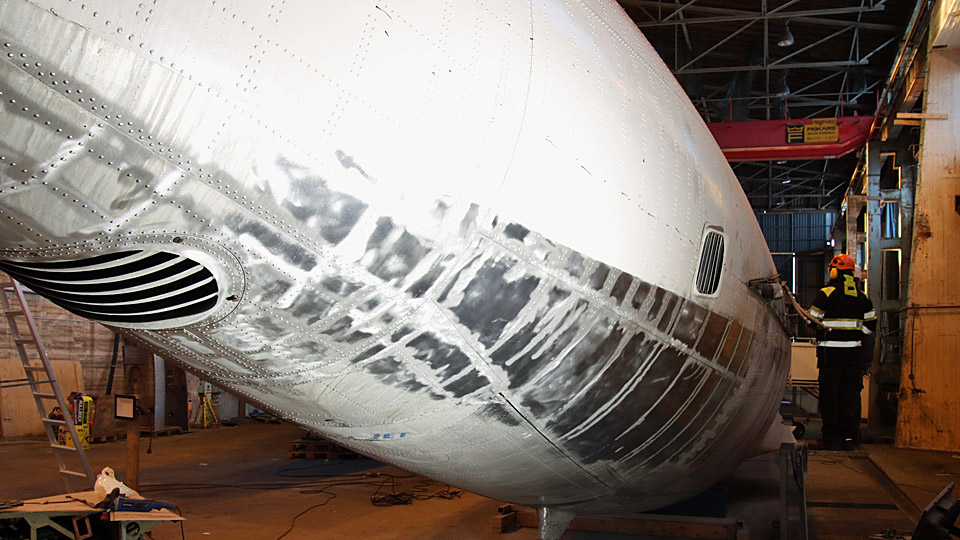
In the unheated large hall area some work can be done during the winter. Grinding and polishing of the aircraft fuselage is possible, but it can’t be painted during the cold season. Some grinding is necessary to remove a section of the white paint which in the former SAS paint scheme reaches down the sides of the fuselage. In the spring the aircraft will be painted to the Aero Oy paint scheme. The section which needs to be removed by grinding gets wider towards the tail of the aircraft.
Some dismantling and assembling will be done during the winter. The Pansio restoration teams aims to work every week on Mondays, Wednesdays and Fridays. Photos: Jouko Tarponen if not mentioned otherwise. |
|
Avainsanat: aviation history, restoration, Caravelle, SE-DAF |
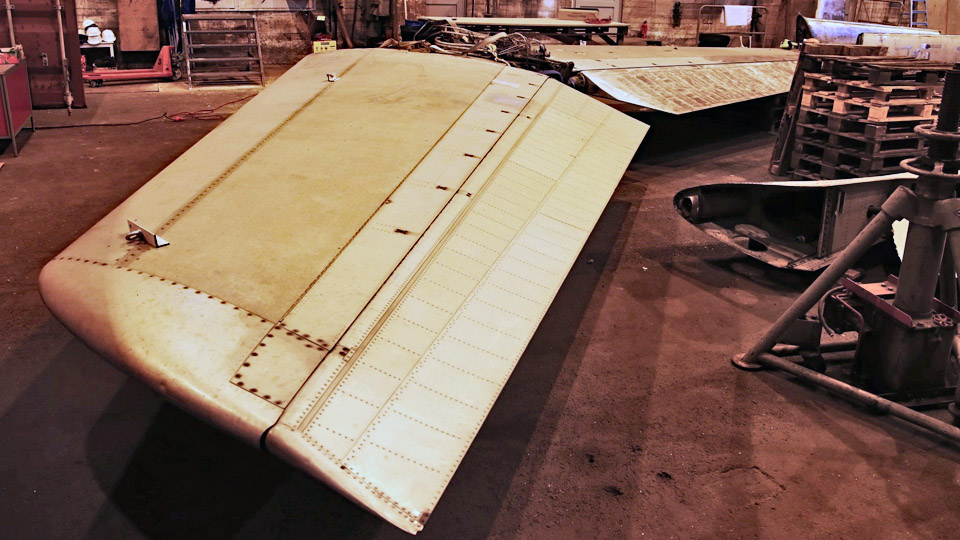
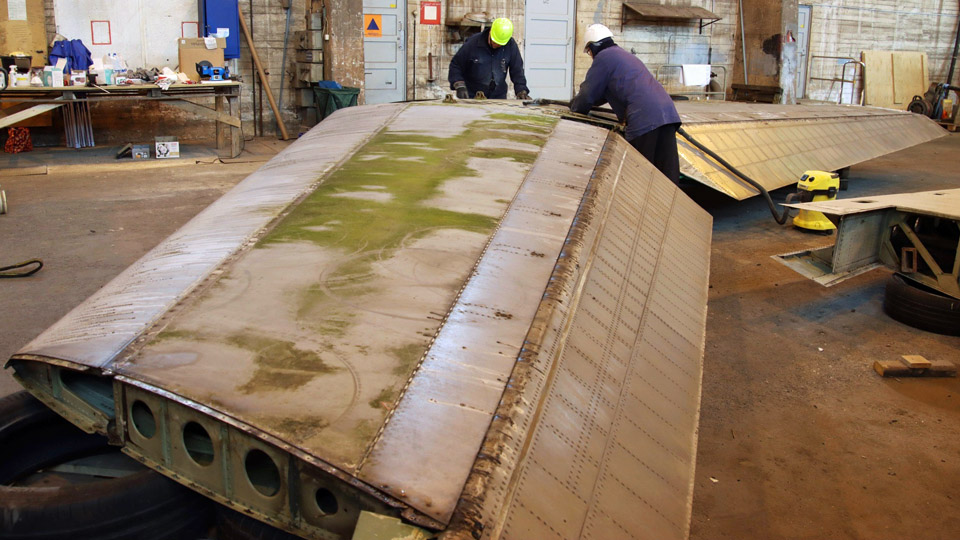
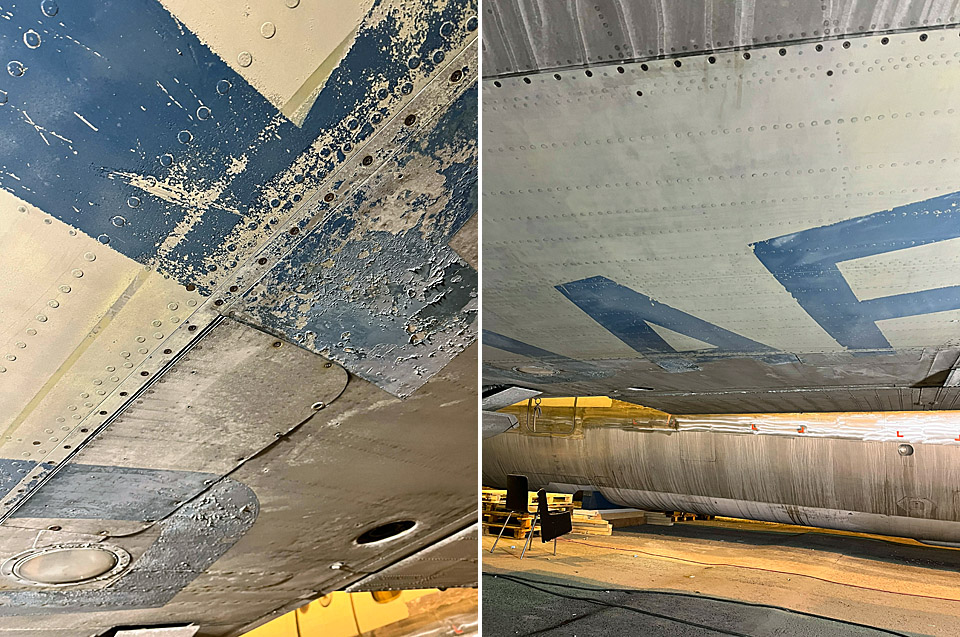
Caravelle - Dry-Ice in the AirTorstai 15.12.2022 - Ismo Matinlauri At the end of the restoration team’s autumn session we managed to clean the lower surfaces of the wings using dry-ice blasting method. This method was selected for cleaning the worst (i.e. dirtiest) areas fast, and in a safe and clean way. The achieved time saving was also considerable, shortening the overall project time. This means that when spring arrives, our volunteers can continue grinding and polishing the fuselage and wings, and we can also start installing the engine nacelles.
The dry-ice blasting was done professionally by Dry Ice Finland in a few days. The methodology in brief: Dry-ice (carbon dioxide) is pure carbon dioxide in solid form, the temperature is about -79 °C. In dry-ice blasting the dry-ice pellets are blown with high pressure to the surface to be cleaned. Once the pellets hit the surface, they evaporate (sublimate) into the air and the dirt removed will fall down for easy cleaning as needed. Dry-ice blasting is a totally dry, chemical-free and almost wasteless method.
The photos of the aircraft’s wing surface before and after cleaning show the results of dry-ice blasting.
While the dry-ice cleaning was going on, the Pansio volunteers managed to grind from one side of the fuselage under the windows an 18 cm wide belt of white paint, which originates from the SAS paint scheme. The aim is to follow Finnair’s OH-LEA paint instructions, and we shall polish the lower part of the fuselage, up to the lower edge of the windows. The other side will have to wait until the weather warms up – it is a good starting point when our work continues next spring. Photos: Ismo Matinlauri. |
|
Avainsanat: aviation history, restoration, Caravelle, SE-DAF |
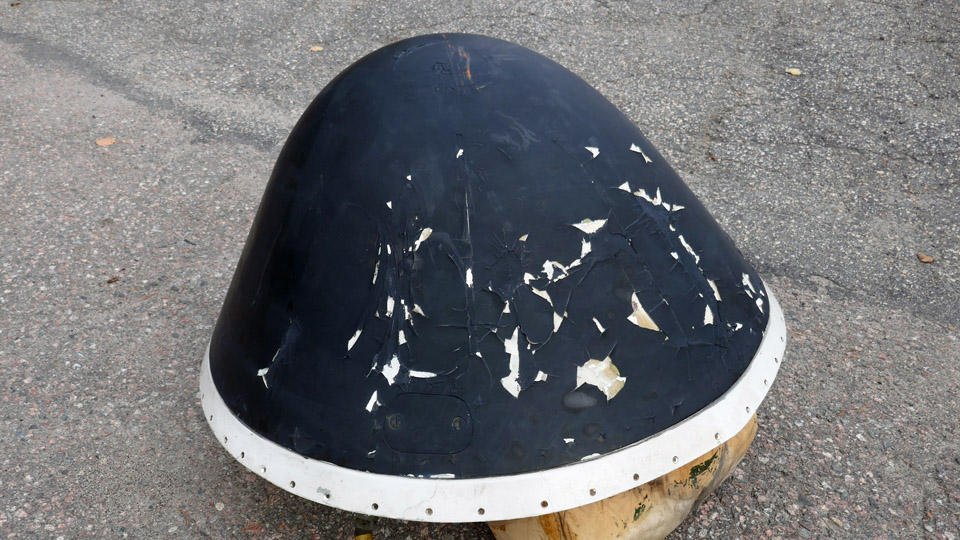
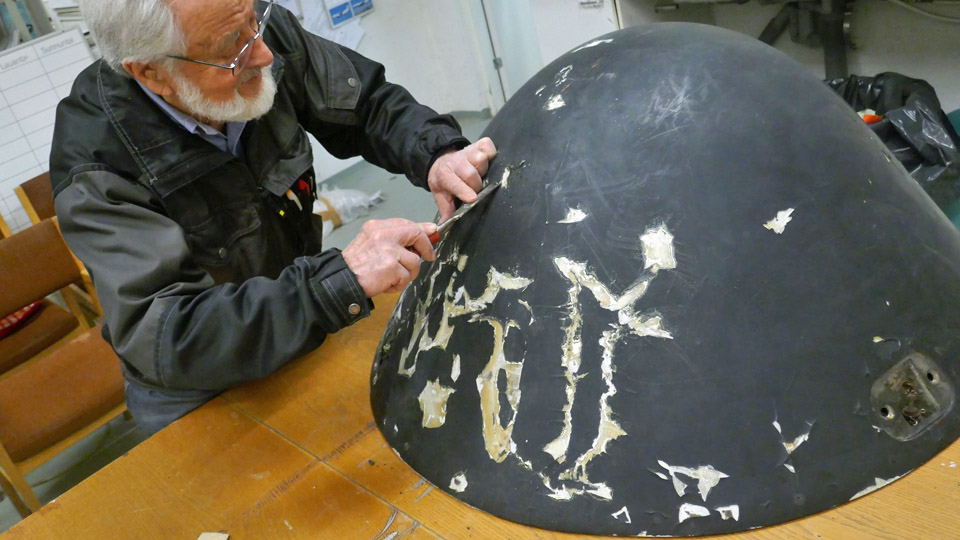
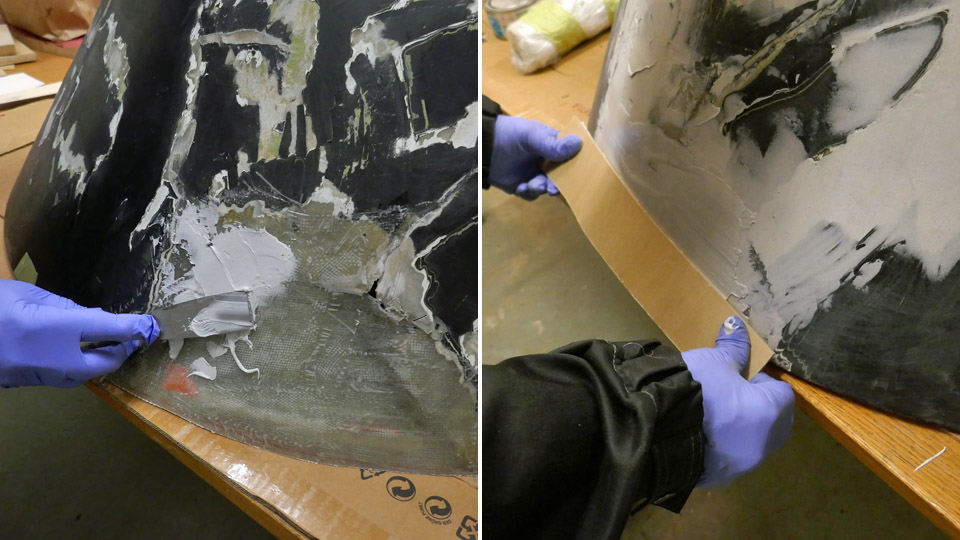
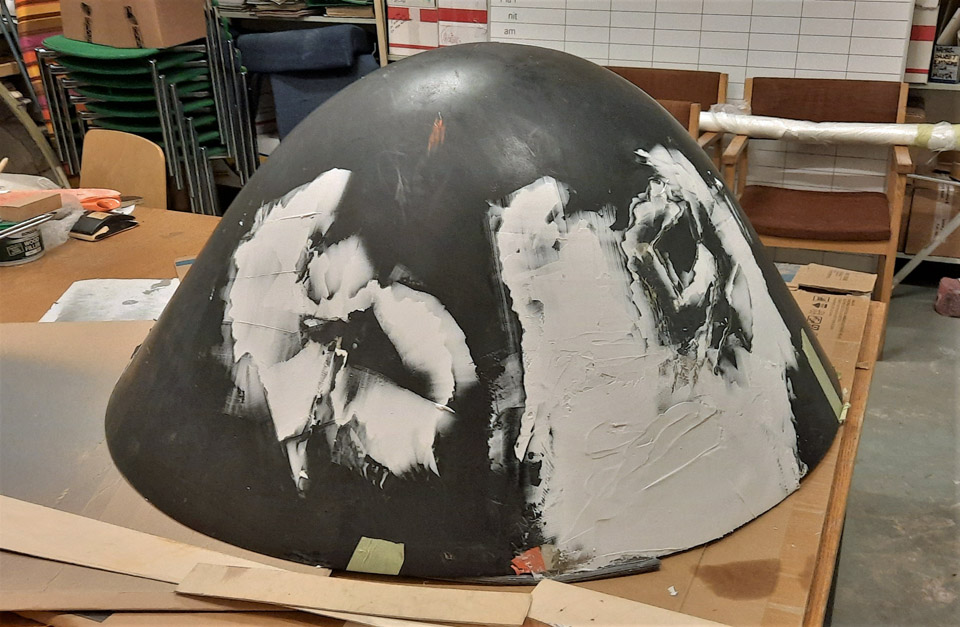
Caravelle's radome is repaired and repaintedKeskiviikko 7.12.2022 - Tuesday Club member The radome, disassembled from the nose of the Caravelle III (SE-DAF) which is now owned by Aviation Museum Society Finland, is being repaired at the Tuesday Club. Its painted surface has cracked, and it has been also badly damaged in a collision.
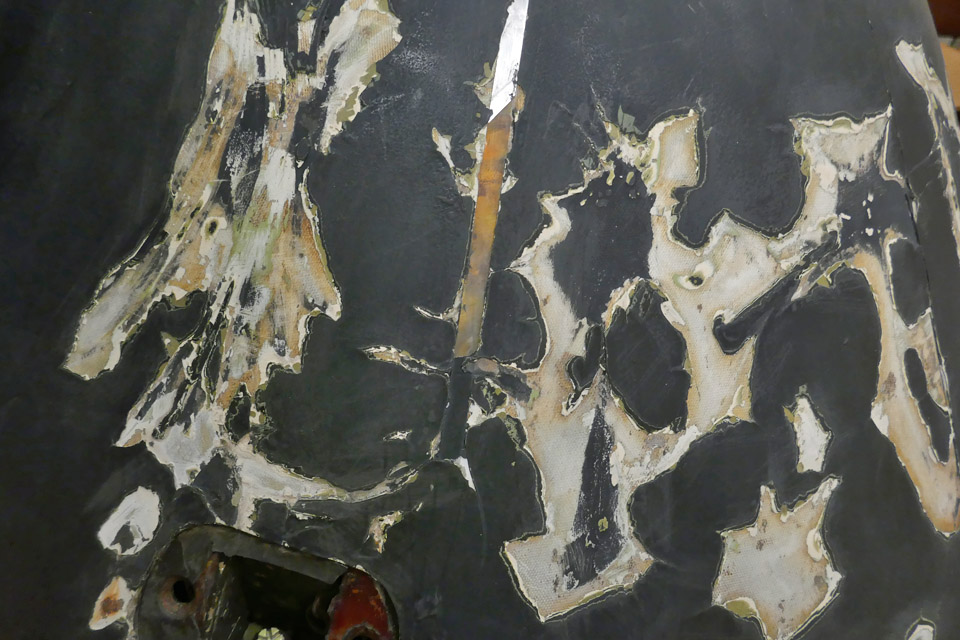
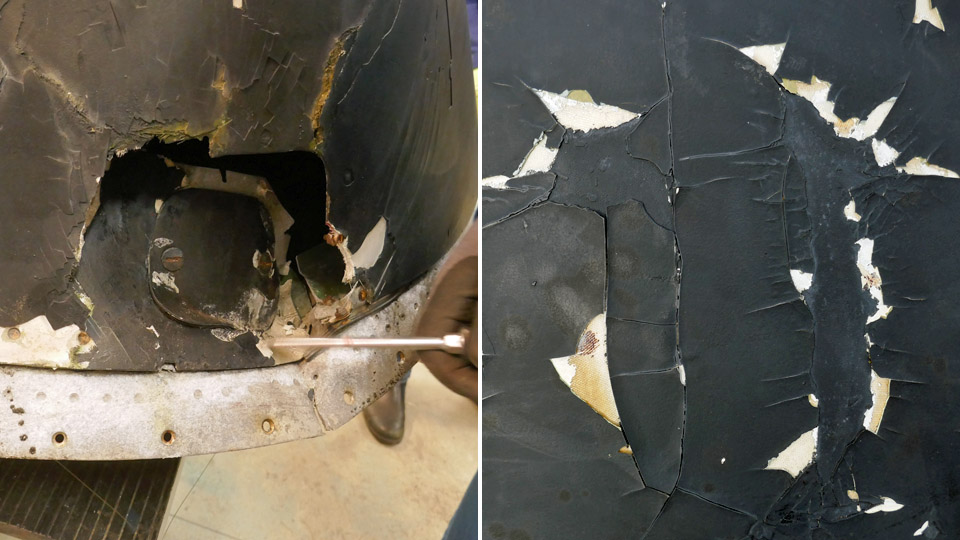
The radome is made of Kevlar and its surface has originally been puttied and painted with matt black paint. The black paint surface has cracked and peeled off in several places. The white putty and the Kevlar surface under it are visible in the damaged areas.
The cracked paint and the white putty on the radome surface were chiseled off down to the Kevlar surface. This caused grooves and holes on the radome’s surface. The Tuesday Club team decided to fill the grooves and holes with epoxy filler. This material was also a good choice for smoothing and levelling the radome’s damaged area which had been patched with glass fibre fabric.
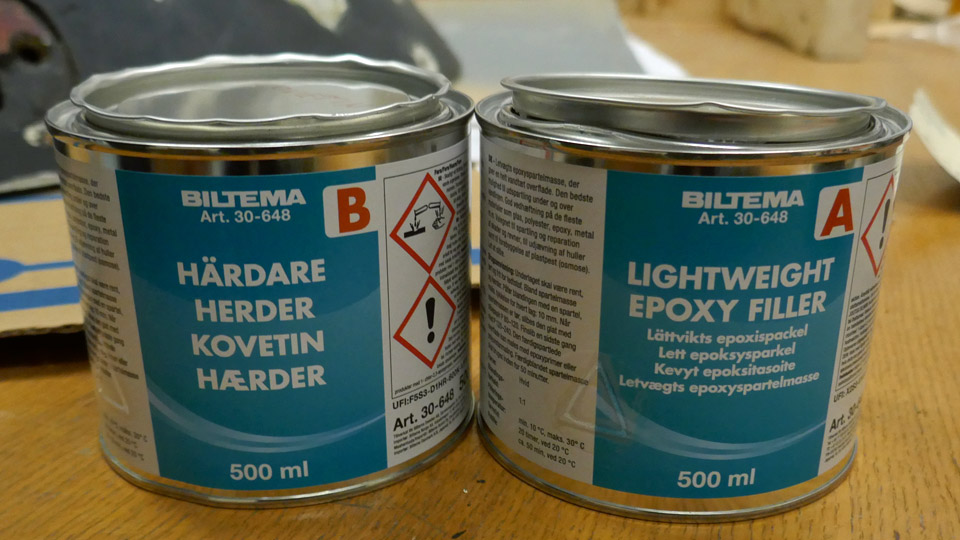
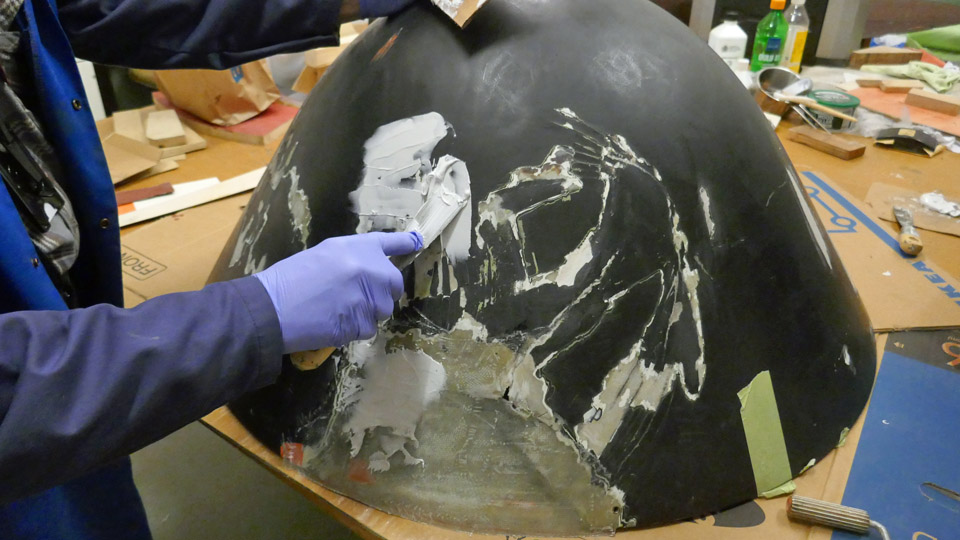
Light epoxy filler (Lightweight Epoxy Filler) and hardening agent were purchased from Biltema. Following the product instructions, a portion of filler was mixed. The filler was spread with metal spatulas on the holes on the radome’s surface and on the damaged area, which had been laminated with glass fibre fabric. A thin flexible plywood veneer was also used when spreading the filler, pulling it on the radome’s surface, following its curved shape. The filler followed well the curved shape of the radome. Several portions of filler had to be mixed before all the grooves had been filled and smoothed.
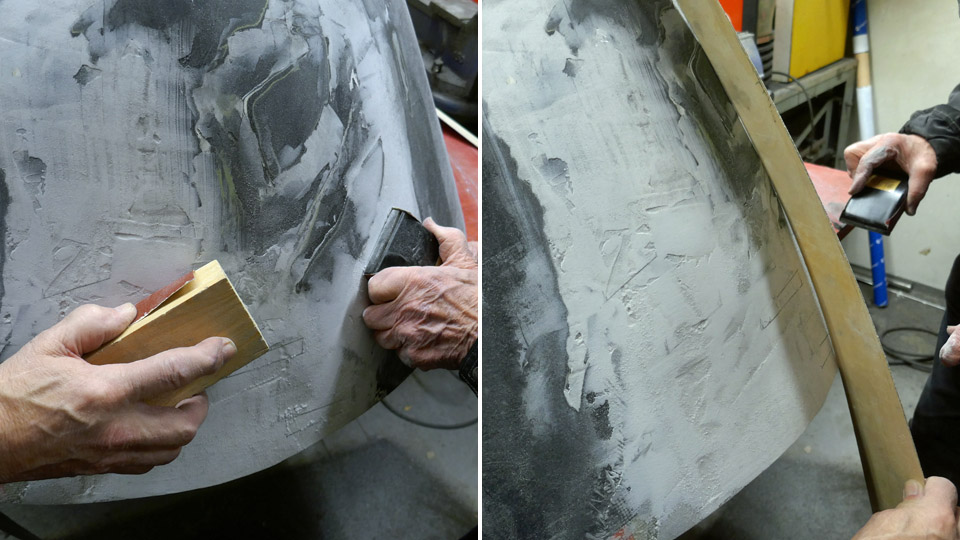
When the filler had dried, it was sanded, mainly manually. Sanding by hand gives a better touch on the radome’s curved surface than working with a grinder. After sanding the filler treatment was repeated and sanded again to get a smooth surface, matching the radome’s curved shape as accurately as possible.
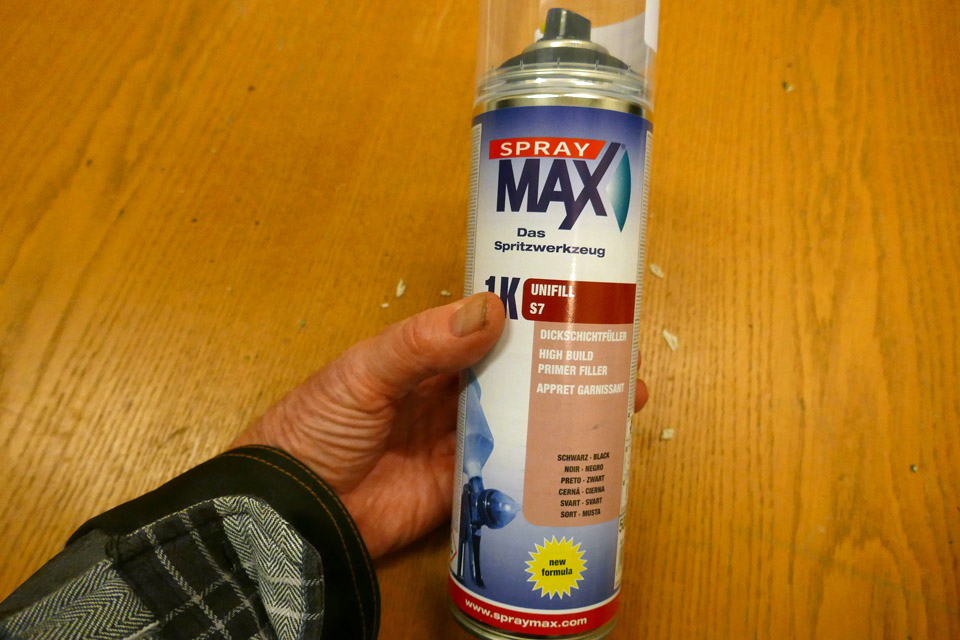
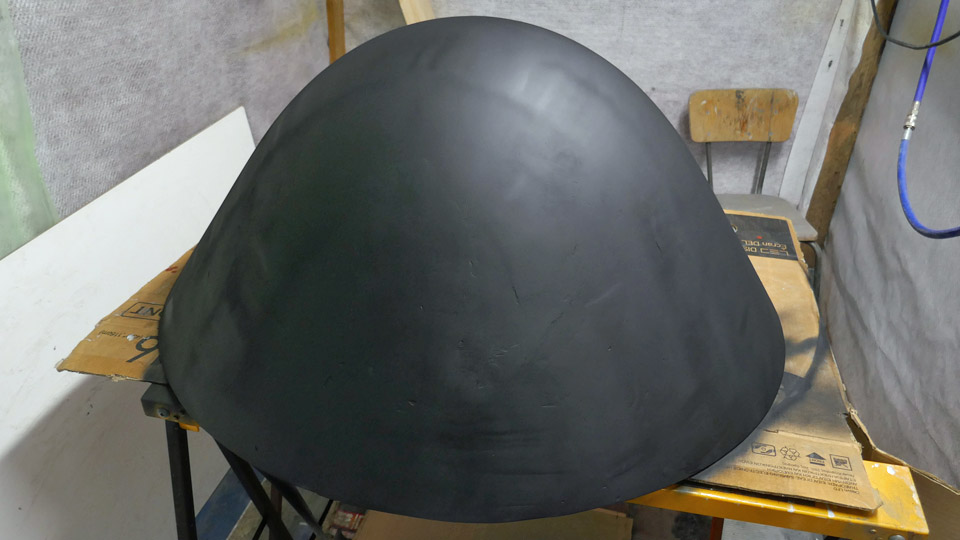
After two rounds of filling and sanding, the team decided to paint the surface with a primer. Spray MAX Primer filler was chosen, and it was purchased from the Pintaväri store. This primer fills well the small roughness on the sanded surface and it can be re-sanded and re-painted.
Two layers of Sprey primer were spread on the sanded radome surface. Before applying the paint, the cover holes of the radome’s fastening bolts were protected. Although the result after the primer paint looked quite good, the smooth mat black paint surface revealed some uneven areas, and we will still have to fill and sand the radome’s surface in some areas before it is completely smooth and ready for the finishing paint. Photos by Lassi Karivalo. Translation by Erja Reinikainen. |
|
Avainsanat: aviation history, restoration, Caravelle, Tuesday Club, SE-DAF |
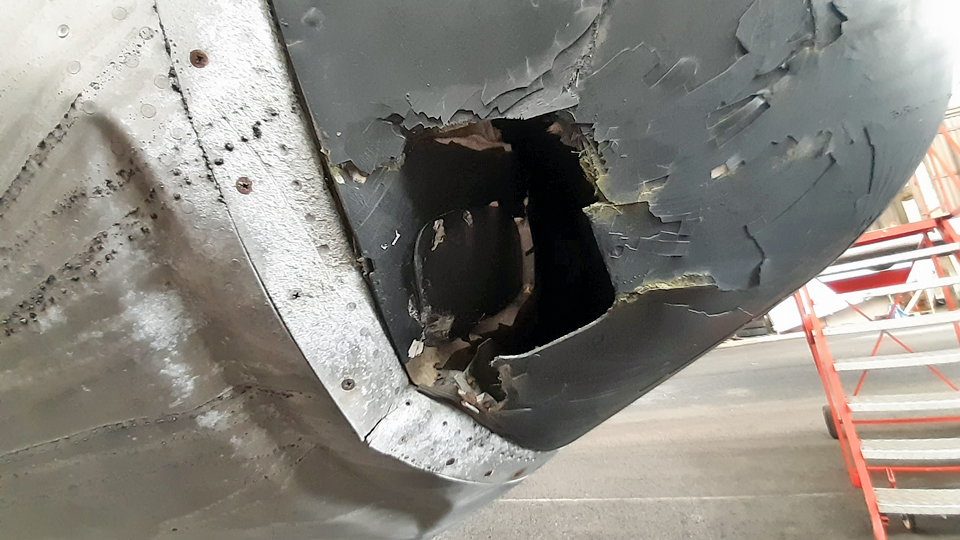
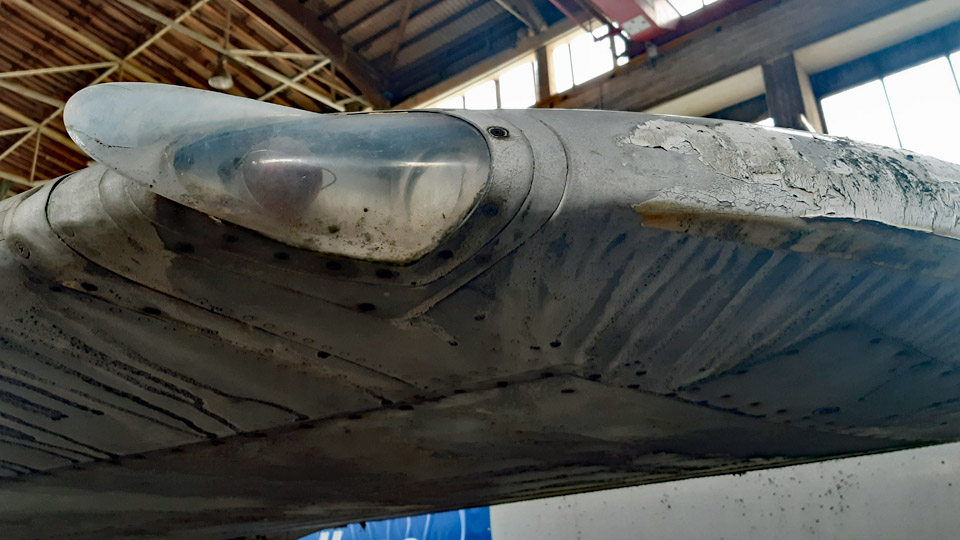
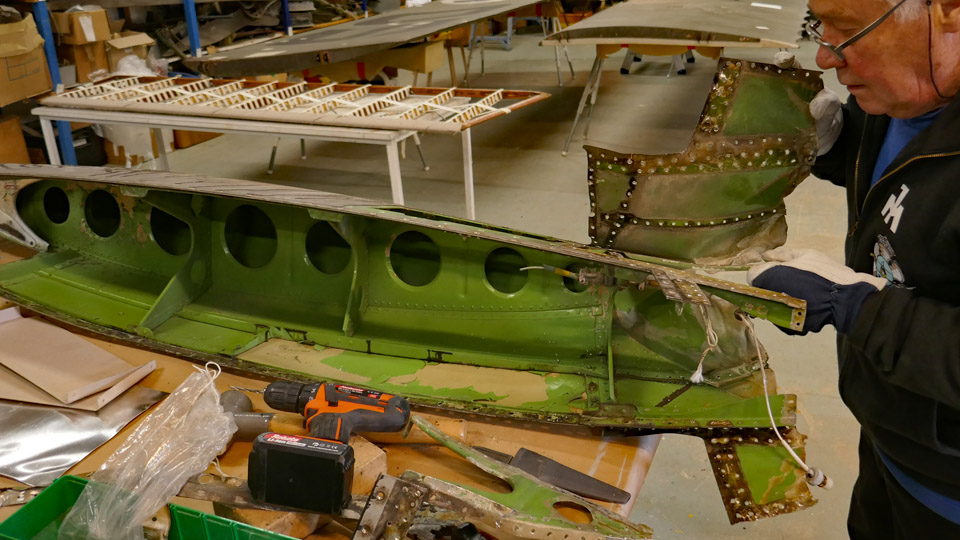
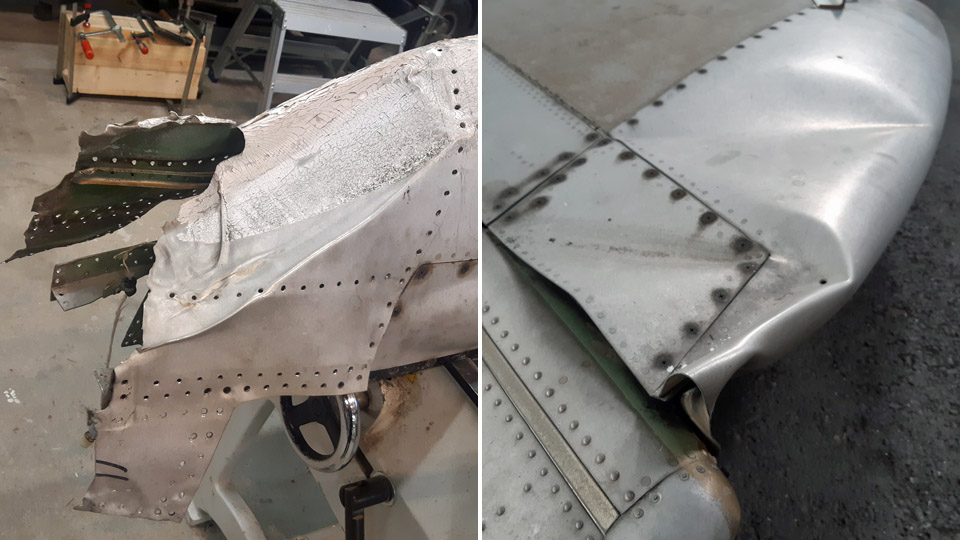
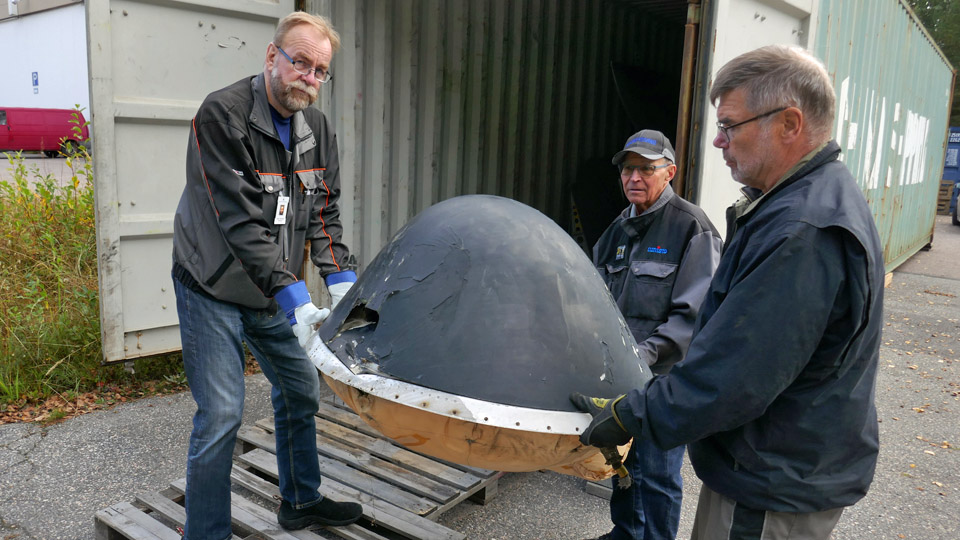
The repairing of the Caravelle's right wingtipMaanantai 21.11.2022 - Tuesday Club member The right wingtip of the Caravelle III (SE-DAF), which was acquired from Sweden by Aviation Museum Society Finland and is now in a hall in the Pansio port area in Turku, has been badly damaged at its leading edge. The damage has been caused by some airport vehicle which has hit the Caravelle’s wingtip during the decades when the aircraft stood on the side of the airfield. There is a dent also in the middle of the tip of the left wing. Furthermore, the trailing edge of the horizontal stabilizer tip and the radome at the nose of the aircraft have been damaged in collisions. The wings, the horizontal stabilizer and the radome will be repaired at the Tuesday Club.
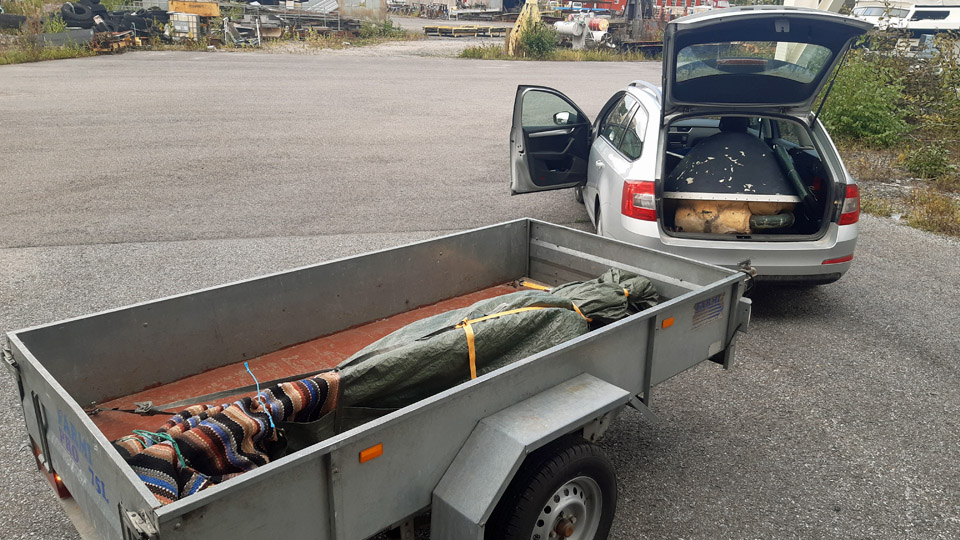
Fortunately, the tips of the Caravelle’s wings and the horizontal stabilizer can be detached. The Aviation Museum Society’s volunteer team in Turku detached the wing tips, the damaged tip of the horizontal stabilizer and the radome to be taken to Vantaa. These parts were brought from Pansio in the boot of a car and on a trailer to Vantaa, to be repaired at the Tuesday Club.
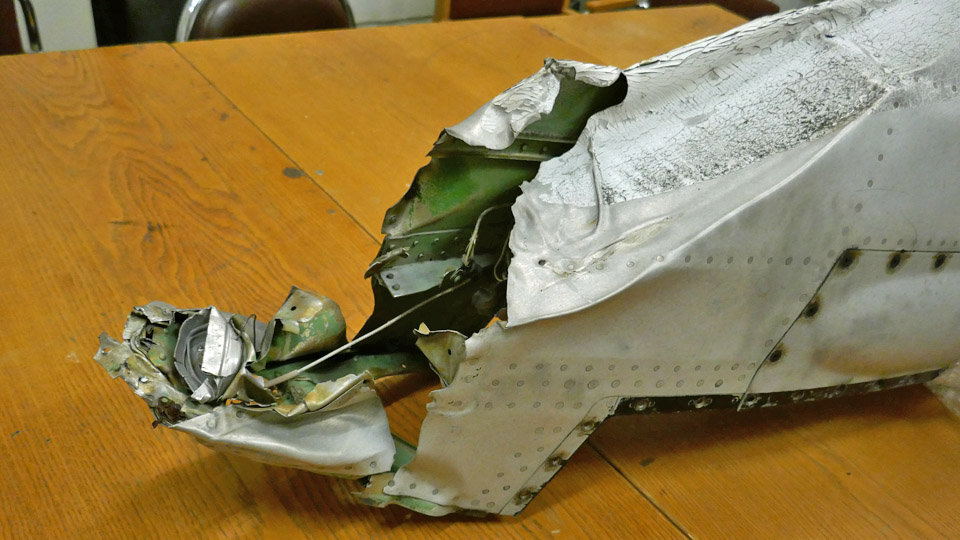
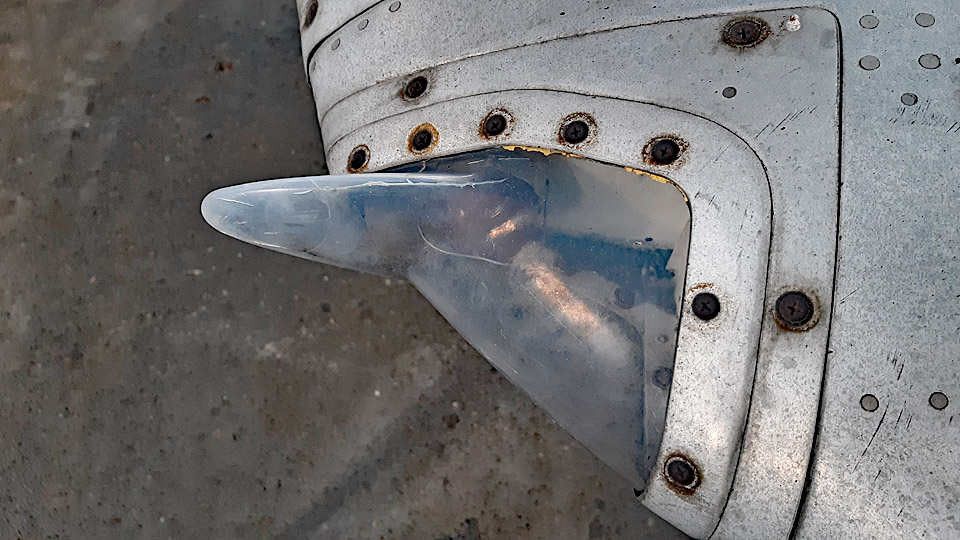
The leading edge of the right wingtip is broken along a distance of 40 cm. The navigation light and its uniquely shaped lamp shade are broken too. The navigation light shade on the left wing is unbroken. When repairing the right wingtip, the left wing will be used as a model.
The navigation light is badly broken. It may be possible to make a new lamp socket for the light bulb, but it will probably be impossible to make the navigation light shade which has a complicated shape. It can hardly be found as a spare part, either. Well, we can surely ask Le Caravelle Club in Sweden, they have restored a former SAS Caravelle.
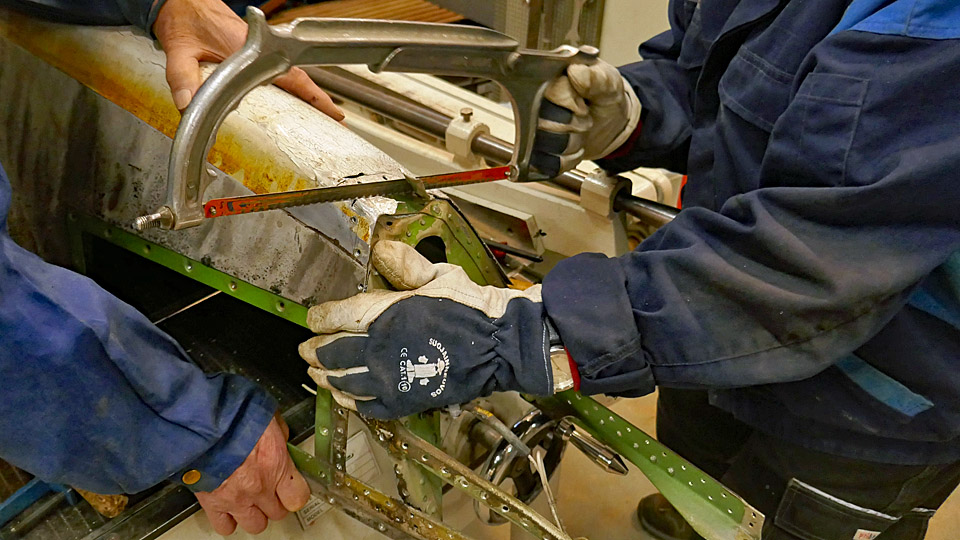
The repair of the right wingtip was started by drilling out the rivets which fastened the crumpled aluminium sheets on the wingtip. After this the sheets could be bent open, and we could get a better view of the damaged tip’s structure.
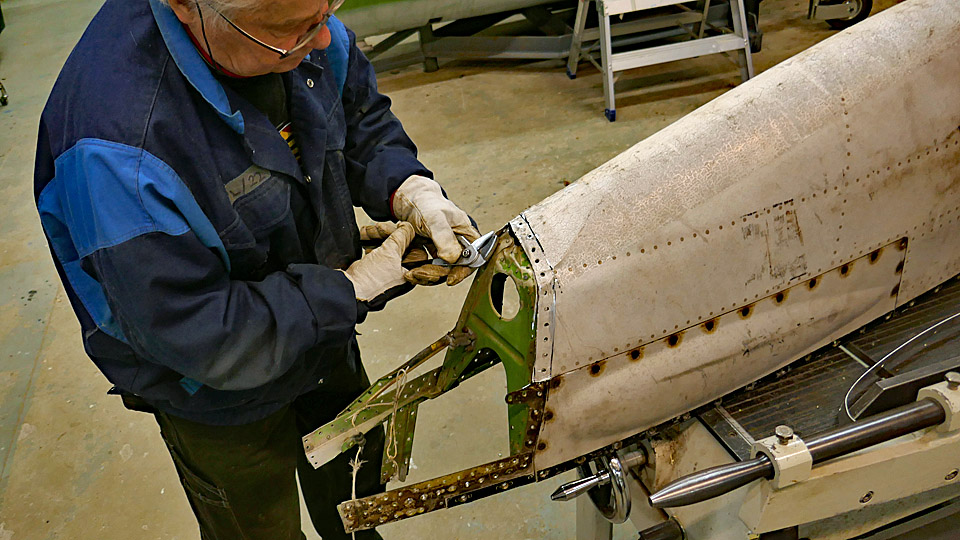
We tried to mould the damaged aluminium sheets and see if they could be bent into their original shape. However, the duralumin sheets on the wingtip are made of such hard aluminium that they broke when they were bent back into their original shape. We had to admit that the damaged wingtip can’t be repaired by using the original sheets. The wingtip and its supporting structures will have to be rebuilt from new aluminium sheets. Fortunately, we have the unbroken tip of the left wing to use as a model. We dismantled the whole damaged area of the right wingtip.
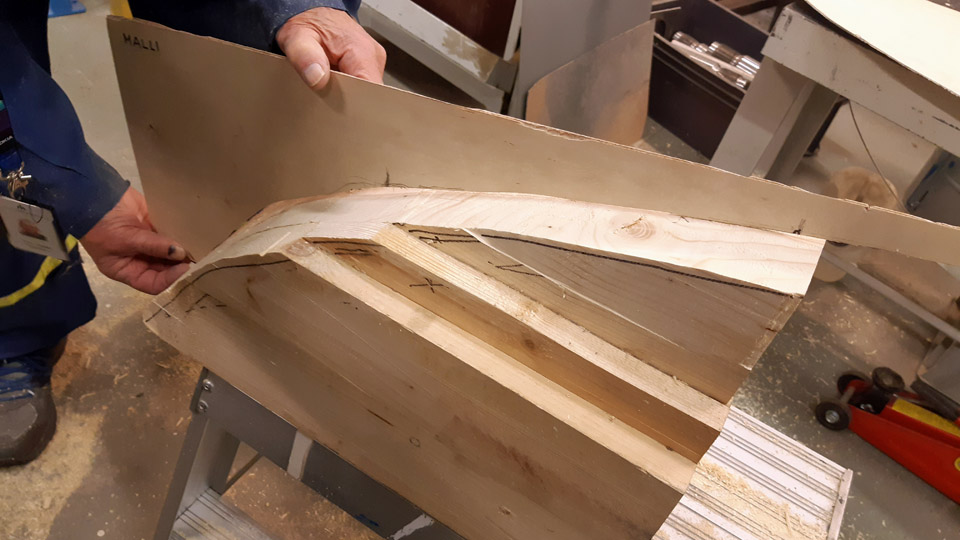
We analysed different alternatives for building the right wingtip and concluded that the broken part will be rebuilt from several sheets of aluminium, which are moulded into the shape of the wingtip and riveted together. For this purpose, a wooden last will be made, shaped as the unbroken left wingtip, but its mirror image. Each sheet of aluminium will be bent into shape against this last and then riveted to each other to form the new wingtip. Before riveting, a new supporting structure for the wingtip will have to be built.
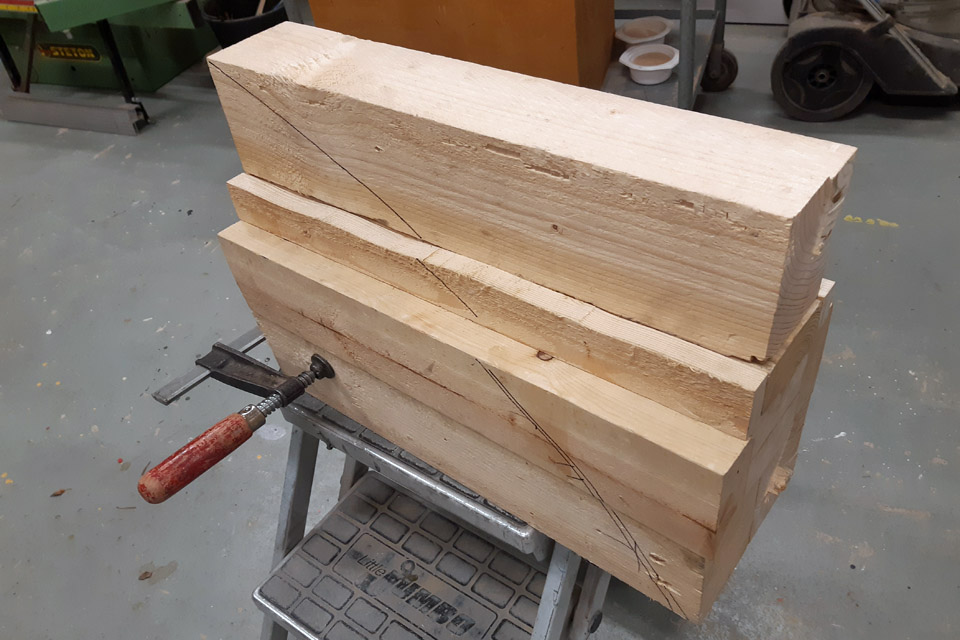
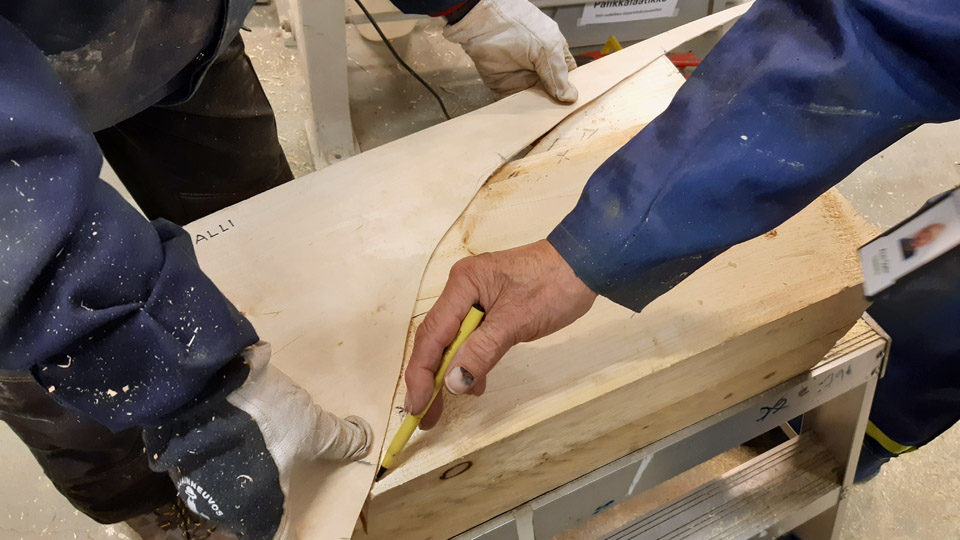
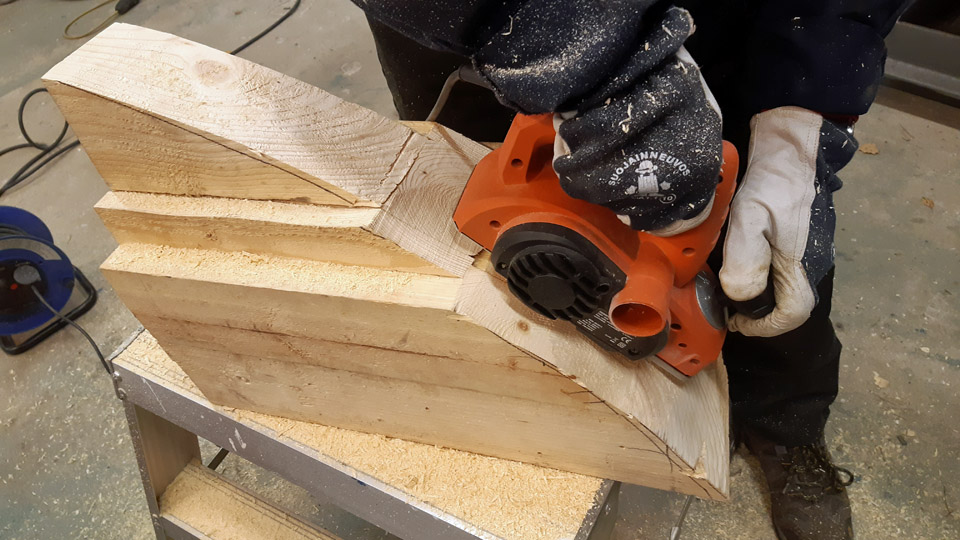
We started to build the wooden last by gluing together some pieces of plank to make a piece of wood, larger than the wingtip. This piece of wood will be gradually shaped by sawing, carving, planing, and grinding to match the shape of the wingtip’s leading edge. To make the piece of wood exactly match the shape of the wingtip, profile jigs, made of plywood and shaped as the unbroken wingtip, will be used. When the shaping progresses, the profile jigs will be used for testing where the wooden last still needs to be shaped.
When the glue had dried, we could start shaping the chunk of wood into the wooden last. First the curved side profile of the wingtip was drawn on the piece of wood. A band saw was used for sawing along the drawn line and almost one half of the piece of wood was cut off. Then the shaping continued with a hand milling machine and a plane. When the shaping work is continued, the shape of the last will be checked with the profile jigs. There is still a lot of work ahead before the wooden blank matches the shape of the wingtip’s leading edge and can be used as a last for moulding the aluminium sheets for the broken wing. Photos by Lassi Karivalo Translation by Erja Reinikainen. |
|
Avainsanat: aviation history, restoration, Caravelle, Tuesday Club, SE-DAF |
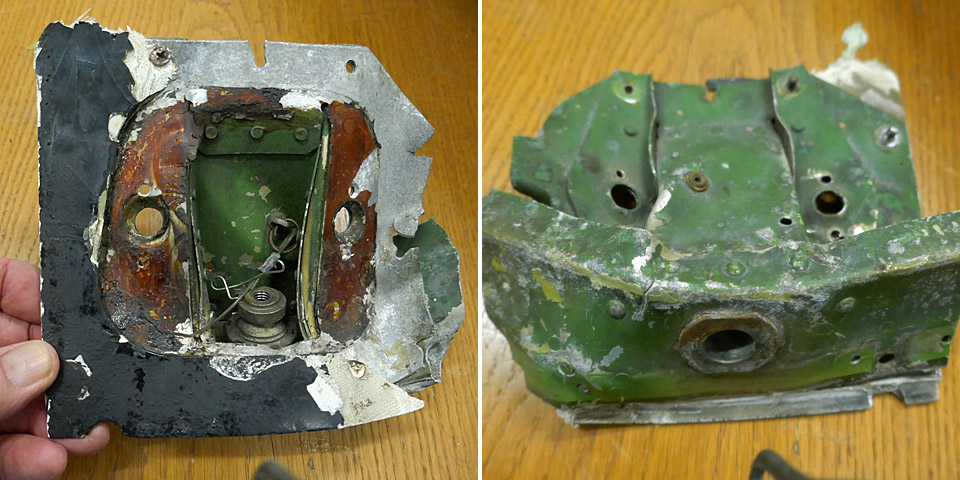
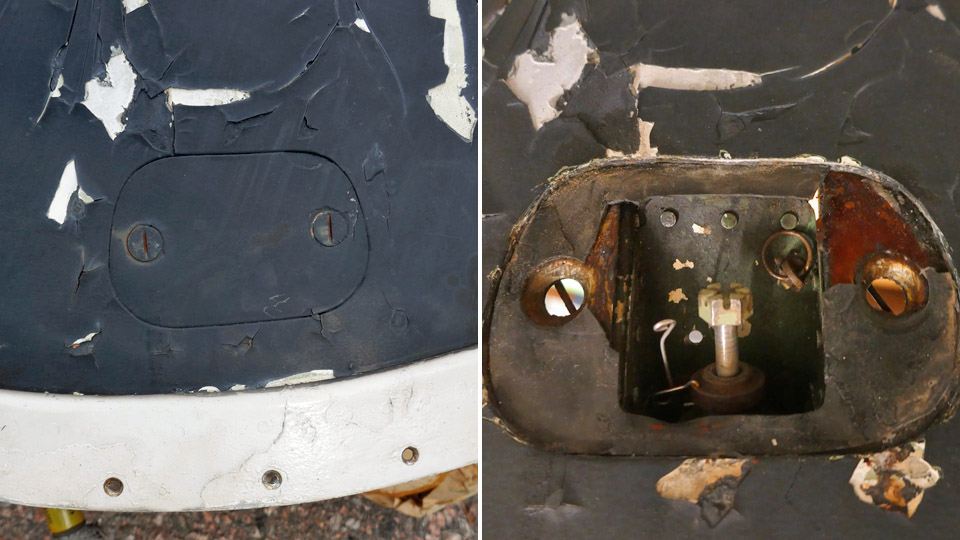
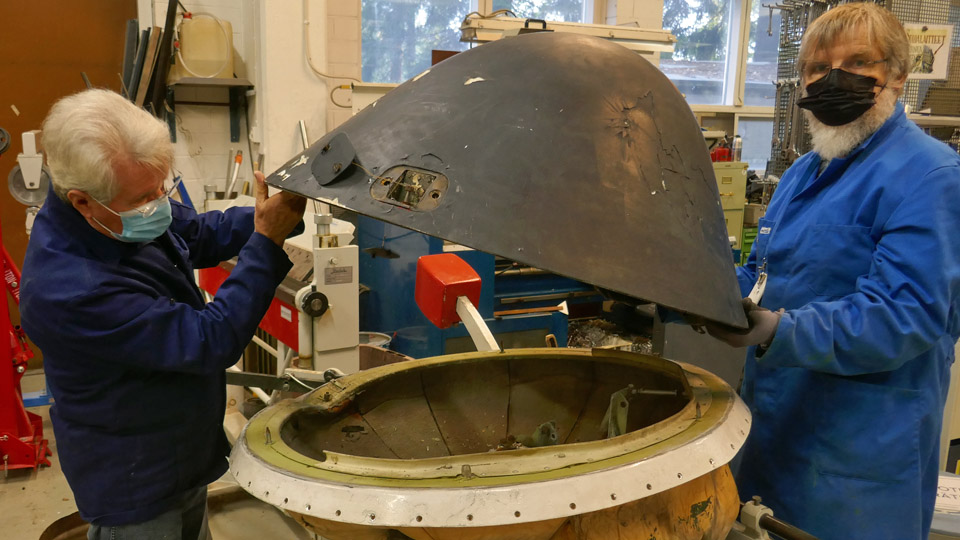
The repair of the Caravelle III (SE-DAF) radome has been startedLauantai 12.11.2022 - Tuesday Club member The Caravelle III, owned and brought from Sweden by Aviation Museum Society Finland, is stored in a hall in Pansio port area near Turku. There it is being restored before placing it on display at Turku airport. In Turku the local volunteer team is working on the restoration, which started with cleaning the aircraft’s surfaces before painting. The Tuesday Club has been given the task to repair the damages which have been caused on the aircraft during its long storage period. There is damage on e.g. the right wing-tip, the left tip of the horizontal stabilizer and the radome on the aircraft’s nose. We just can’t help wondering which airport vehicle at Arlanda has managed to bump into the Caravelle so many times.
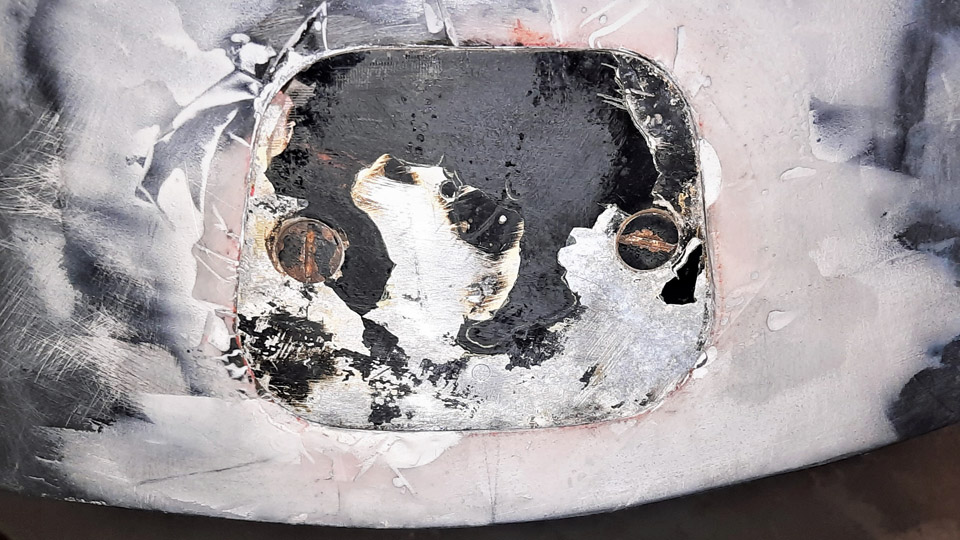
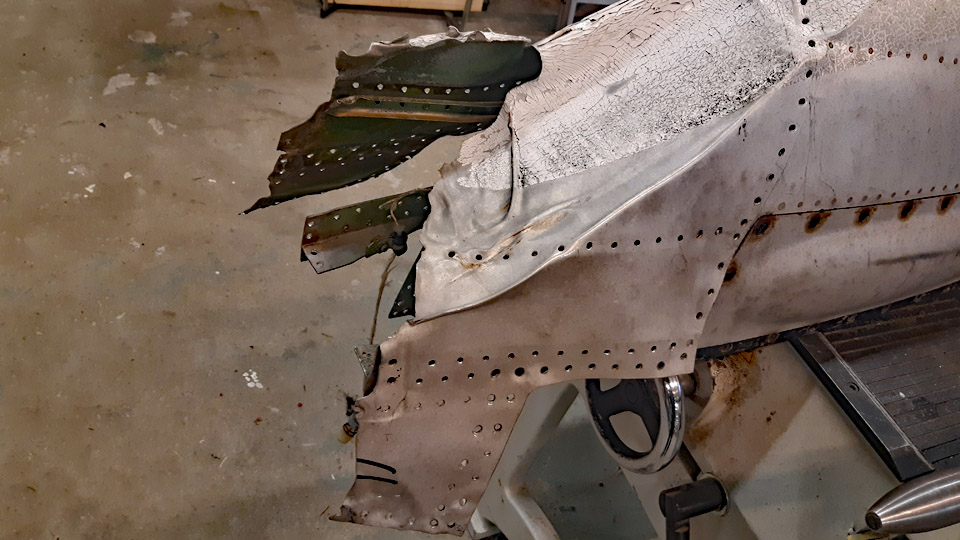
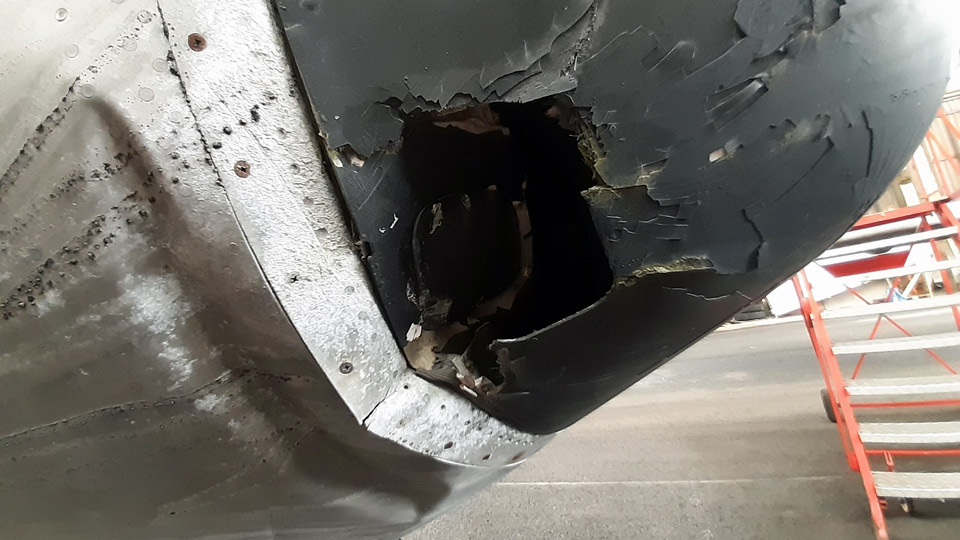
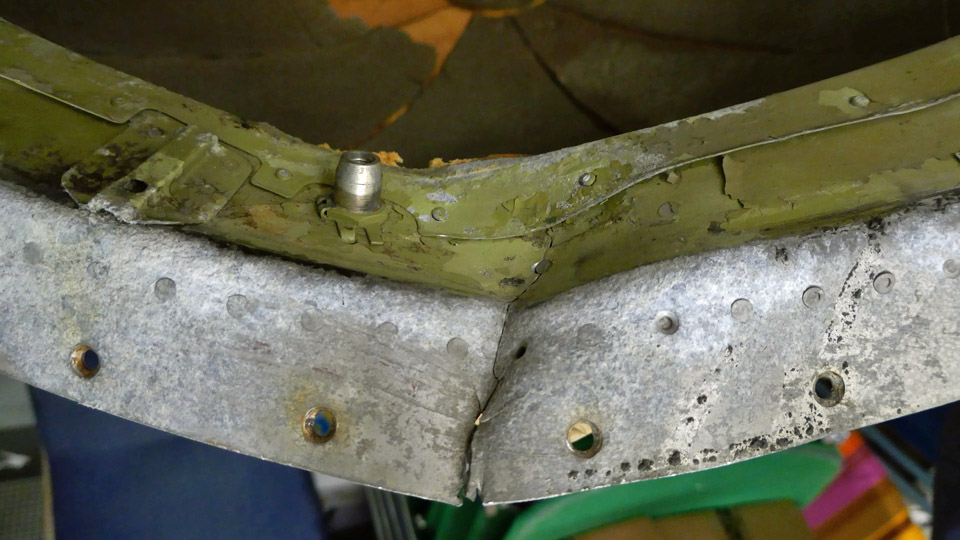
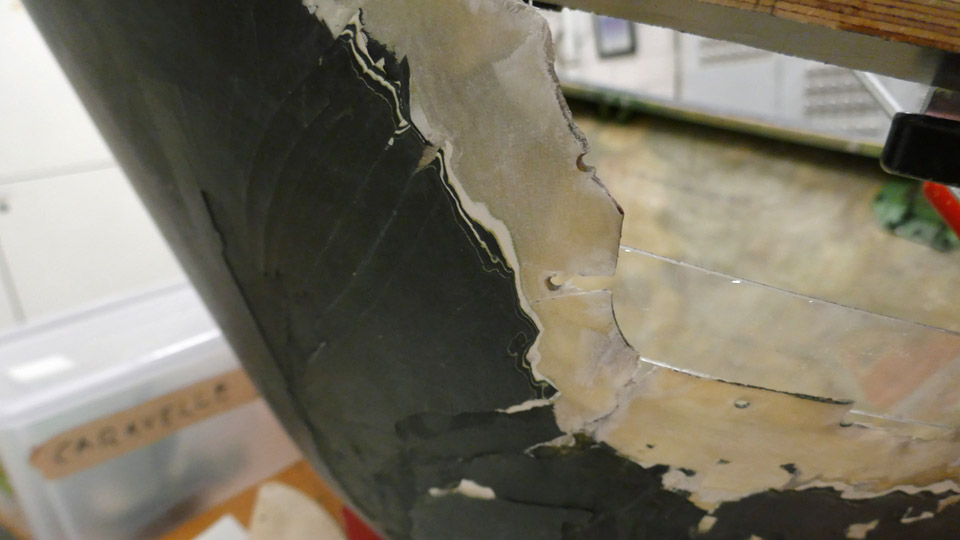
Annoyingly, the damage caused by the collision on the radome happens to be right on one of the hatches which cover the fastening bolts of the radome. The radome, made of glass fibre, has bent inwards at an area of about 20x15 cm. The collision has also broken the edge ring of the radome and damaged the rim of the bulkhead on the aircraft’s nose, under the radome. There is also damage on the aircraft’s nose under the bulkhead edge, the metal edge of the nose is bent, and the aluminium covering is creased. The painted surface of the glass fibre radome is also badly flaking.
The Turku team disassembled the damaged tips of the right wing and the left horizontal stabilizer and the nose bulkhead, with its radar and radome. We fetched the bulkhead and the tips of the wing and horizontal stabilizer from Pansio to be repaired at the Finnish Aviation Museum in Vantaa. The repair of the radome and the wing tip are well under way, the tip of the stabilizer will be repaired later.
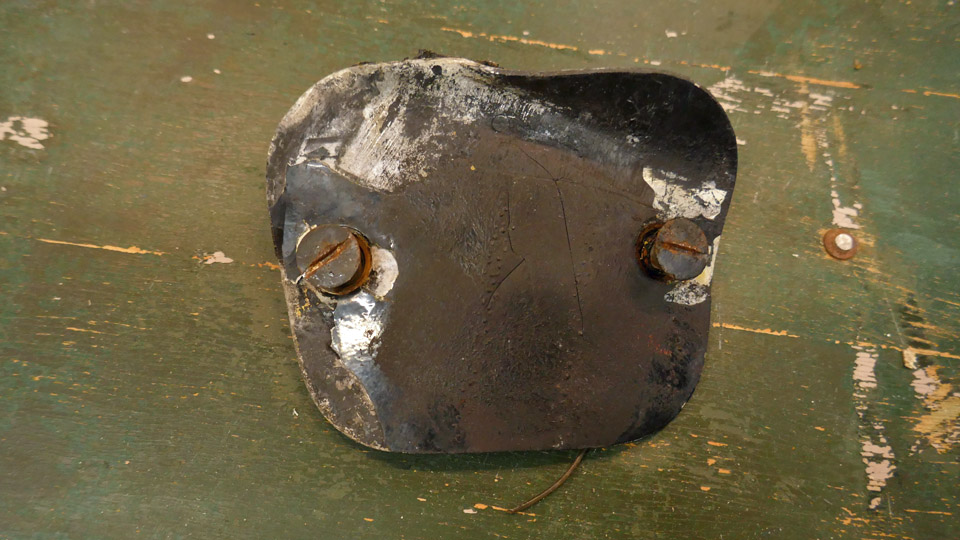
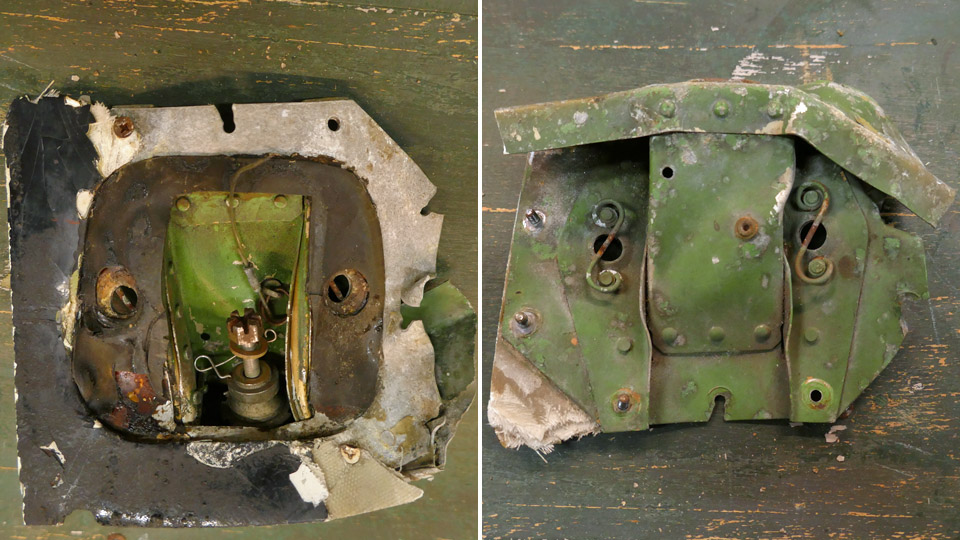
Before repairing the radome, it had to be disassembled from the nose bulkhead. The radome is fastened on the bulkhead rim with three fastening bolts and three guide pins. The bolts can be seen when the hatches on the radome, one above each bolt, are opened. First the hatches above the two unbroken fastening bolts were opened. Under each hatch a supporting frame could be seen, it is fastened on the radome glass fibre and on the radome’s metal edge. There is a crown-headed fastening bolt in the middle of the frame. The two bolts on the edge could be easily opened and unfastened from the threaded sleeve on the metal rim of the bulkhead. Fortunately also the bolt under the damaged hatch could be opened and after this the radome could be lifted from the bulkhead. We could now see that the radar space under the radome was empty. The radar had been disassembled at some point during the Caravelle’s storing period, but obviously before the radome was damaged.
When the radome had been disassembled, we could see the damage on the bulkhead’s metal rim, under the radome’s edge. The bulkhead rim is badly bent inwards and broken. It must be repaired before the radome can be assembled back into its place after repair.
Photo: Reijo Siirtola
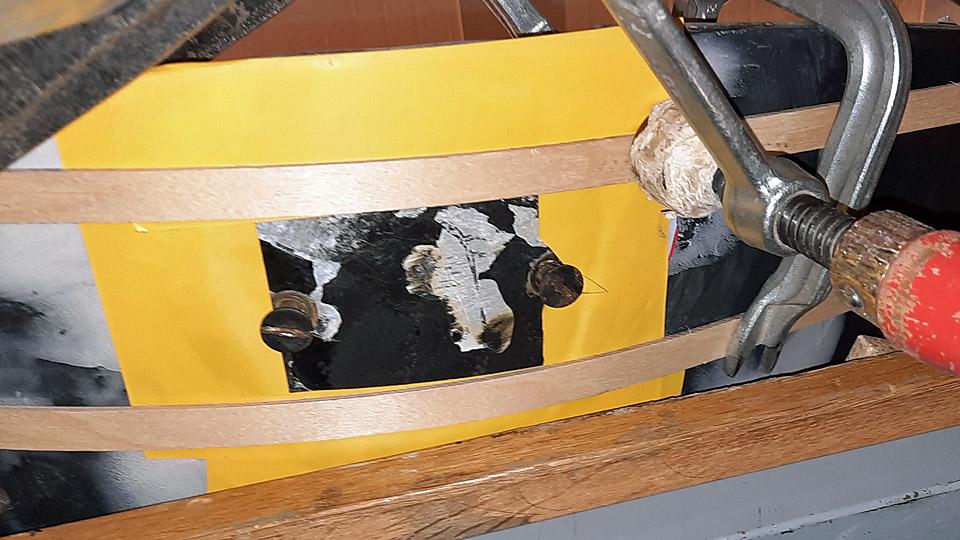
As a preparatory task before repairing the glass fibre radome, the damaged metal frame of the fastening bolt was disassembled. The metal frame has been tightly riveted on the damaged edge of the radome, we didn’t even try to unfasten it in other ways than just by cutting through the radome’s metal edge on either side of the bolt’s frame. The broken area of the radome could now be removed together with the bolt frame.
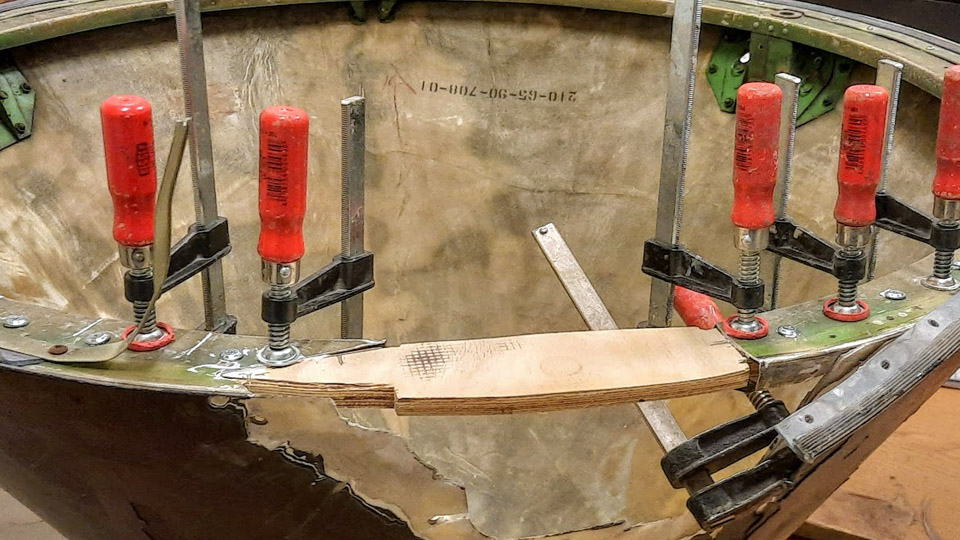
Photo: Reijo Siirtola. The repair plan is to first build a replacing piece for the removed section of the radome’s metal edge. The broken metal frame for the bolt can’t be used any more, so we came up with a solution where a bridge between the radome’s cut edges will be made from strong plywood. The third radome bolt can be fastened on the threaded sleeve on the bulkhead’s rim through the plywood bridge. A metal collar for the bolt will be inserted on the hole on the plywood. This repaired joint of the third bolt will not be as strong as the original, but it will be quite ok for the radome of a non-flying display aircraft. From outside the difference won’t be seen.
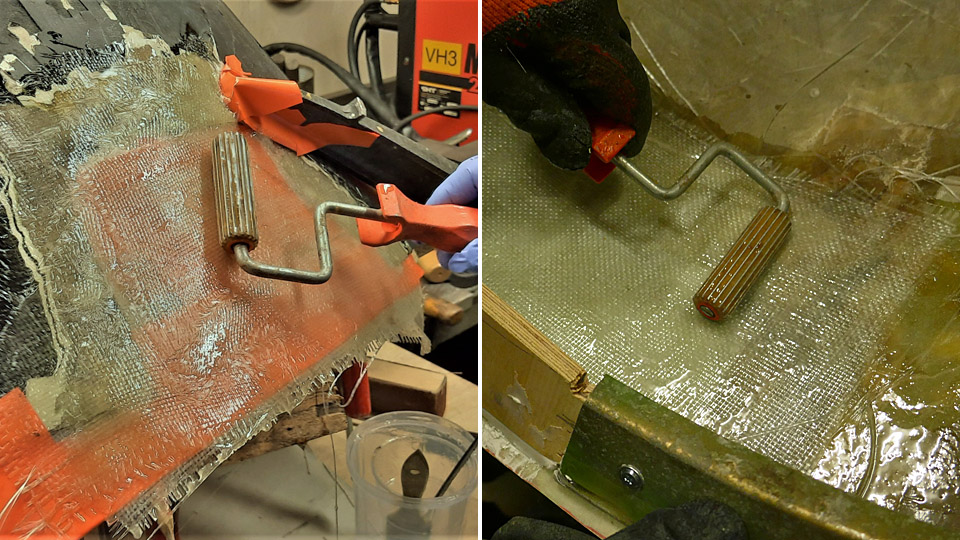
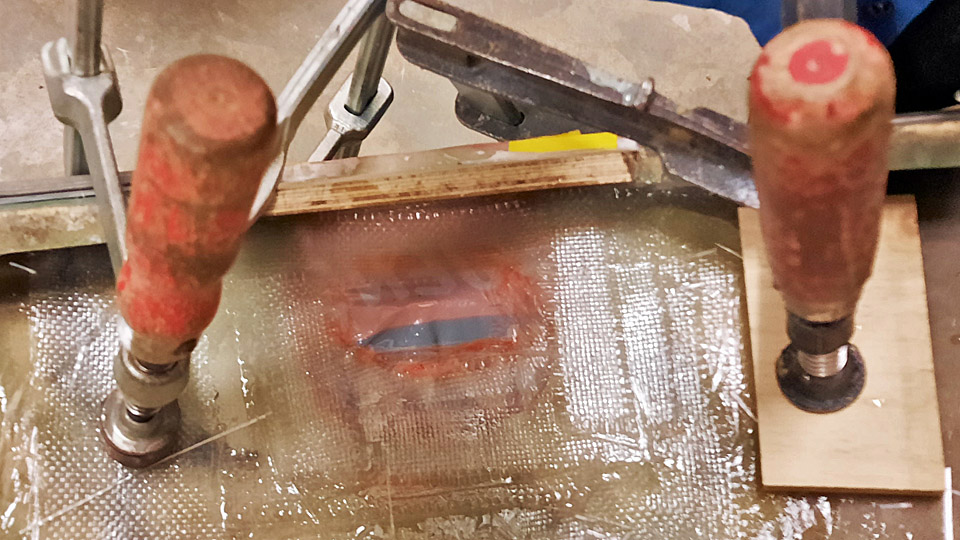
Photo: Reijo Siirtola. When the radome’s cut edge has been repaired in the way described above, a sufficient number of glass fibre fabric layers will be laminated with epoxy resin on the collision hole on the radome. The laminated area will be ground to match the level of the dome’s original surface. A hole for the bolt hatch will be made into the laminated surface.
We started to build the piece missing from the radome’s metal edge. A piece of strong plywood was cut, imitating the shape of the missing edge piece. The piece of plywood was glued with epoxy glue as a bridge between the ends of the metal edge. There is still some work needed before the bridge is ready. After that we will laminate the hole in the radome. The edges of the damaged area in the glass fibre dome have already been ground thin for the laminating work. Photos by Lassi Karivalo except if otherwise mentioned. Translation by Erja Reinikainen. |
|
Avainsanat: aviation history, restoration, Caravelle, Tuesday Club, SE-DAF |
Ilmailumuseot.fi - Aviationmuseums.fi