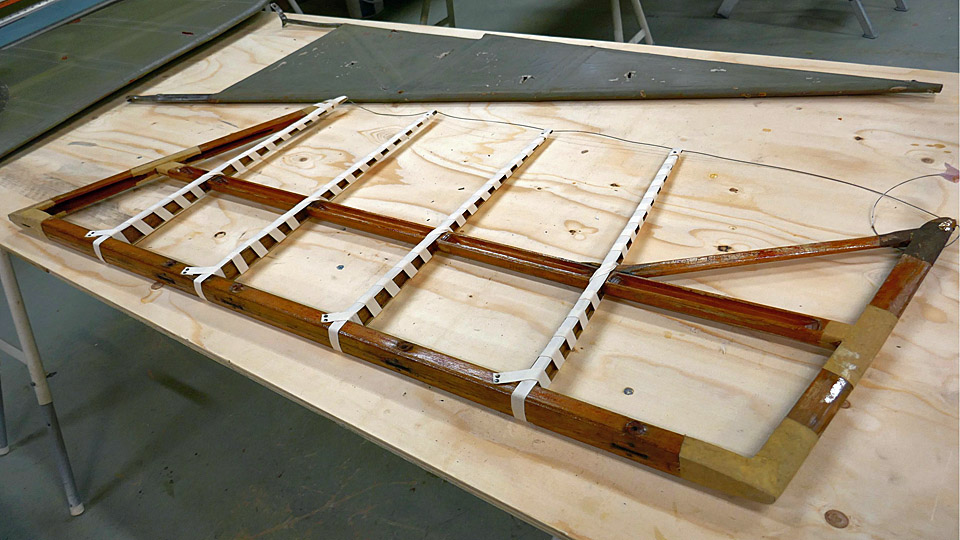
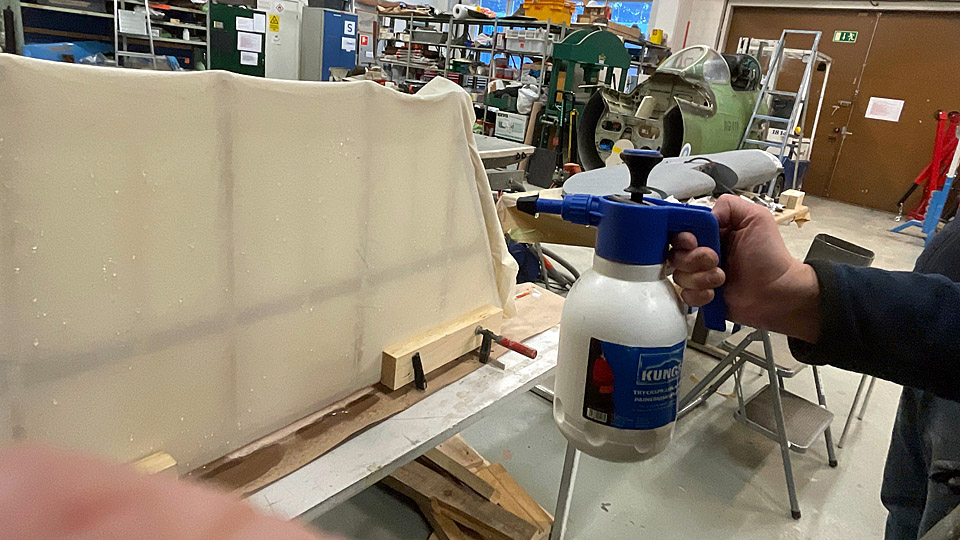
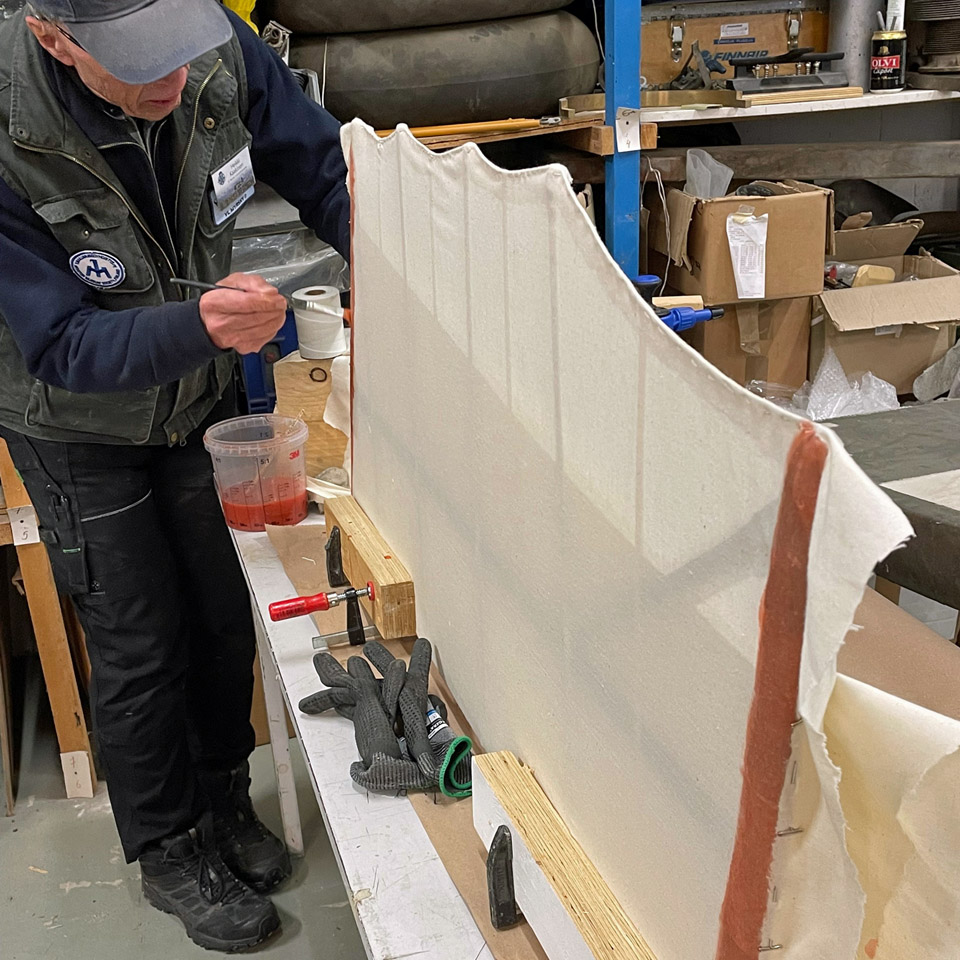
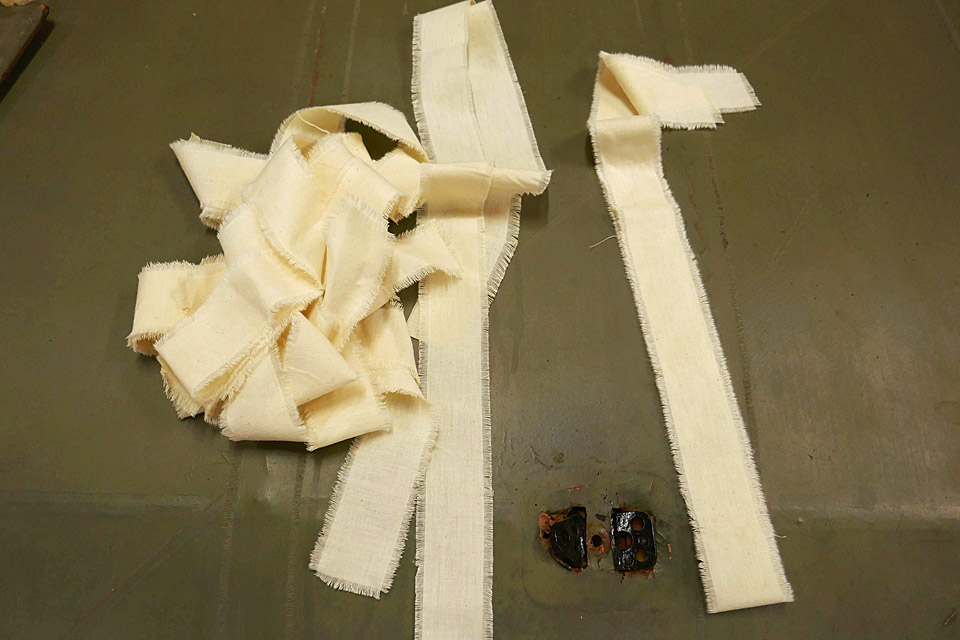
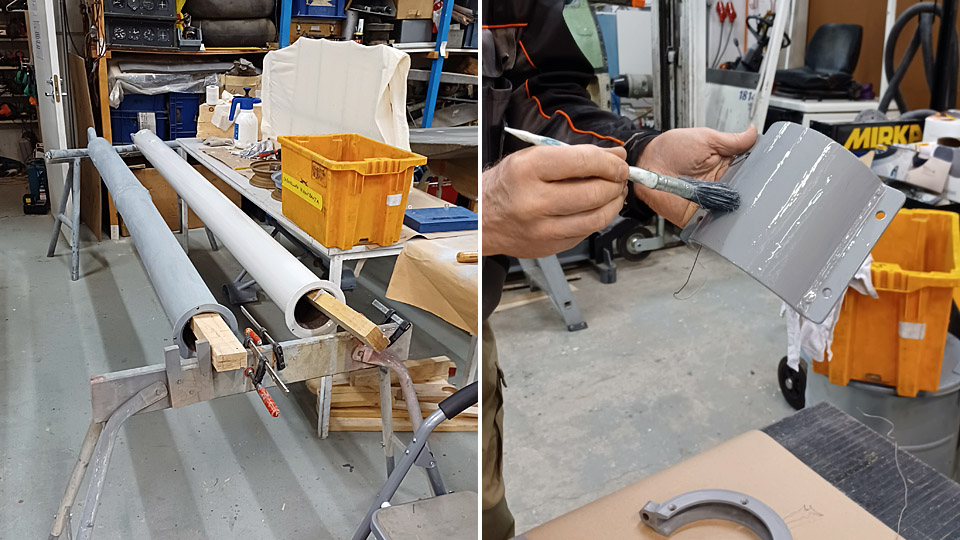
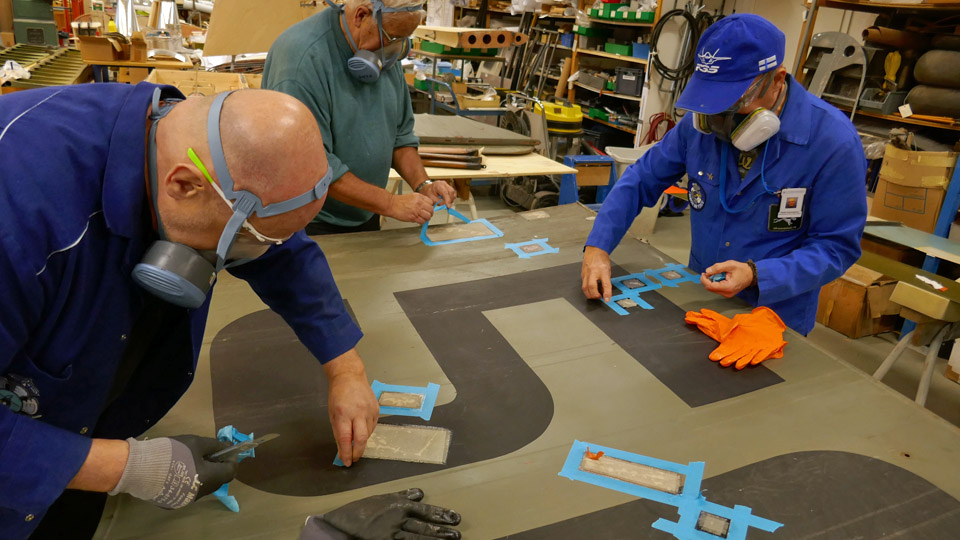
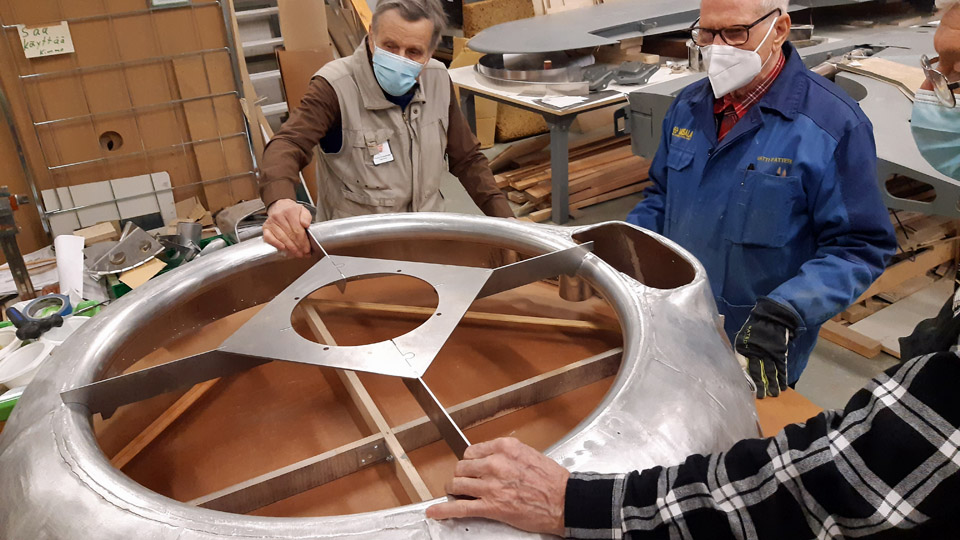
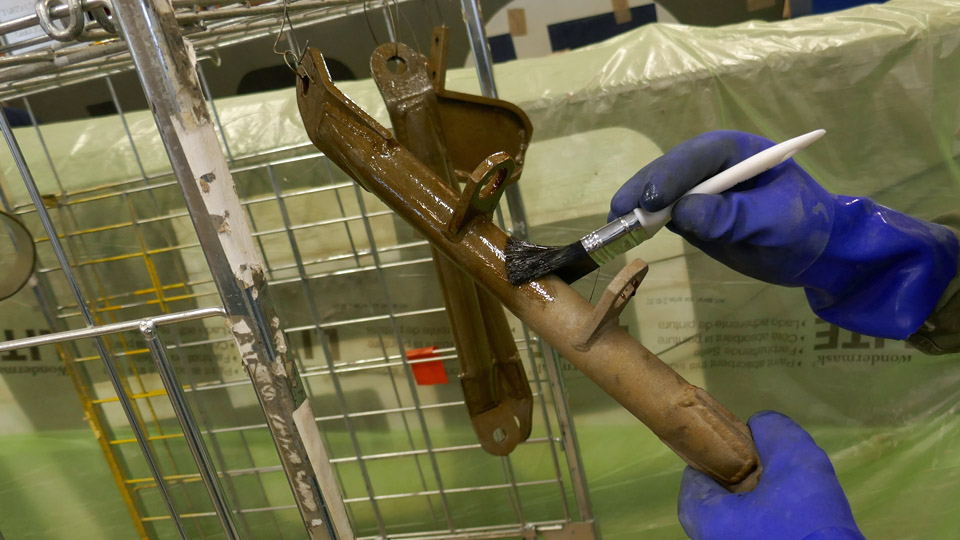
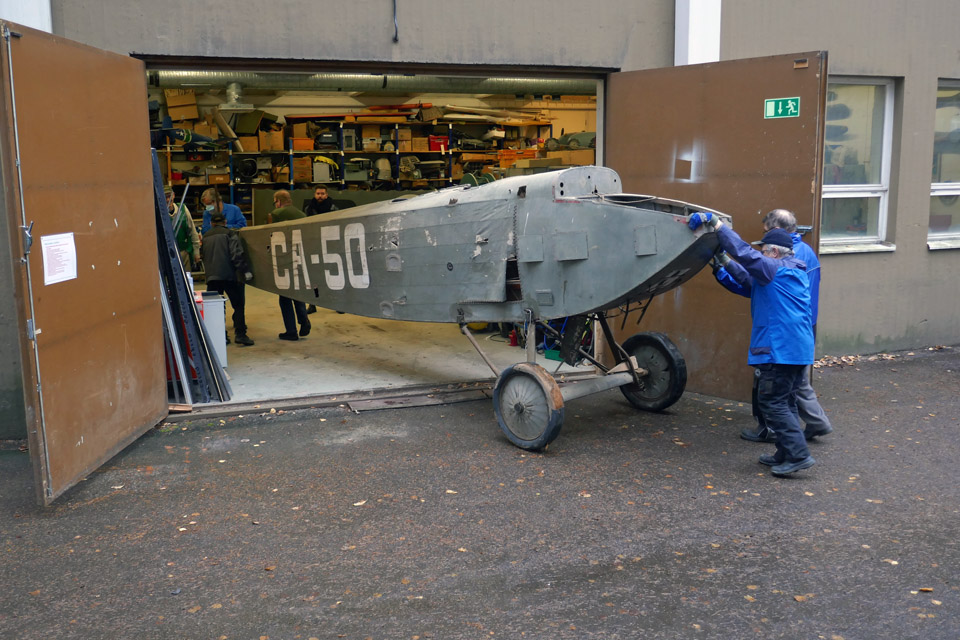
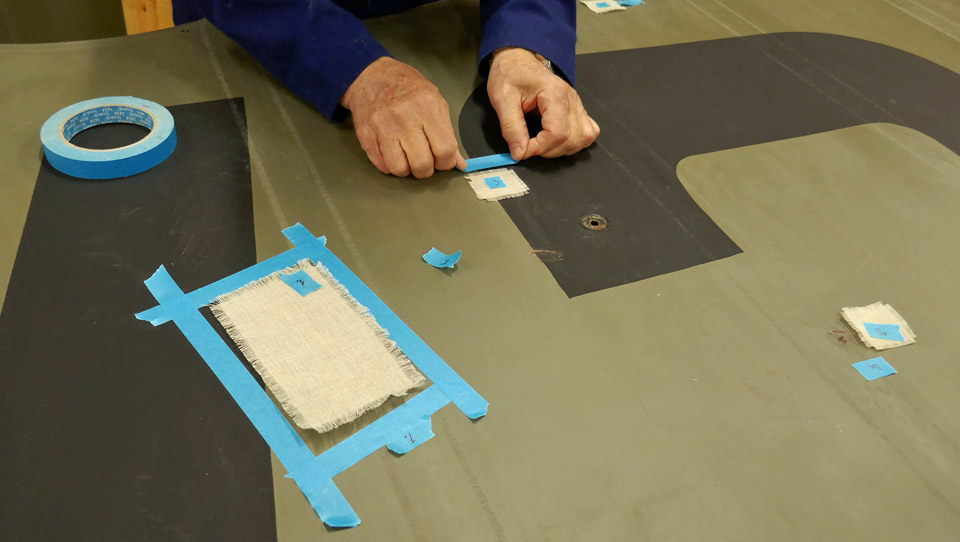
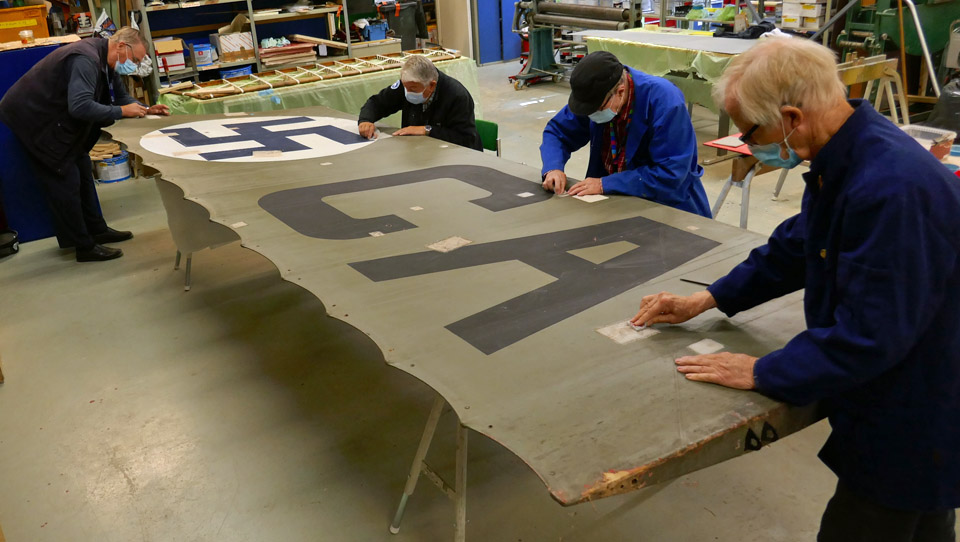
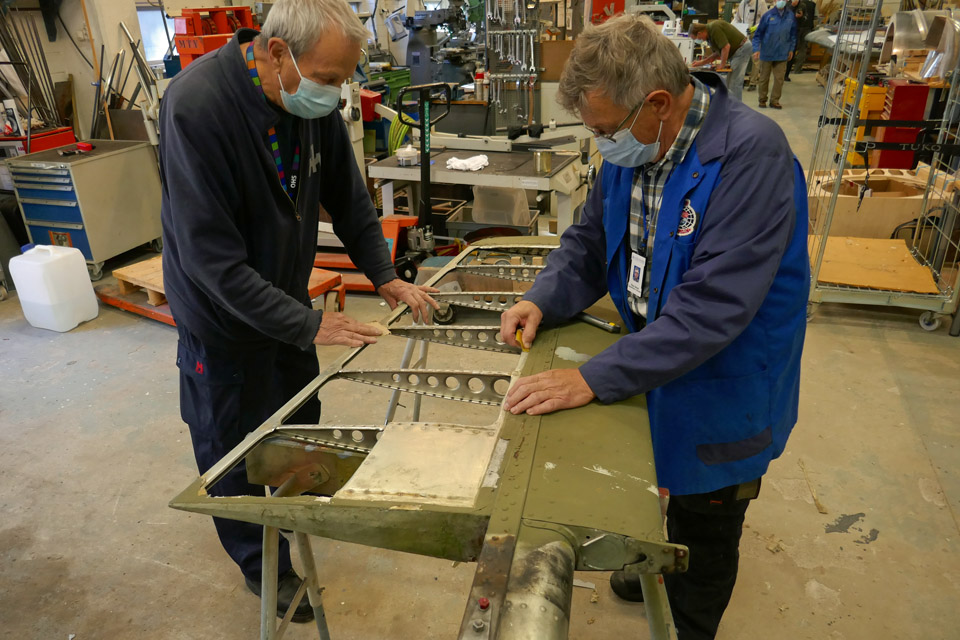
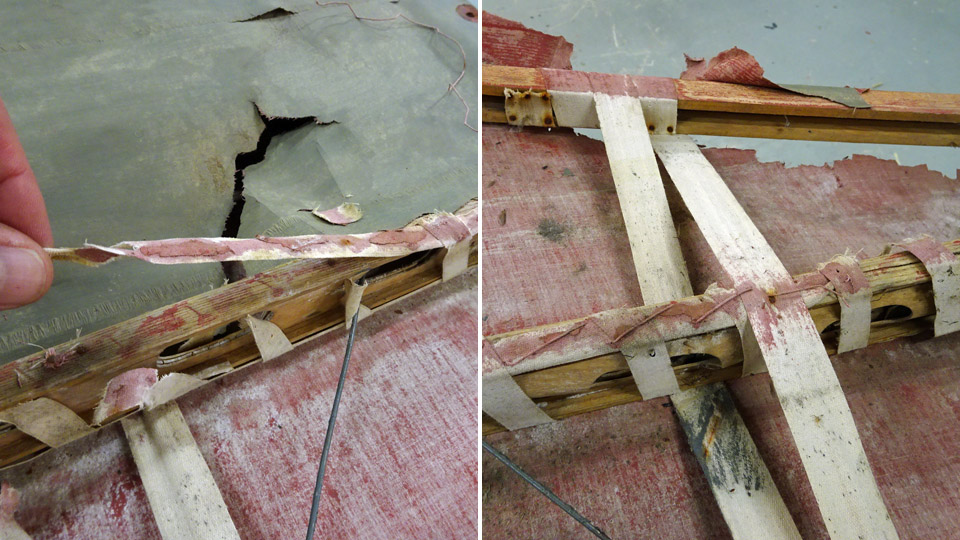
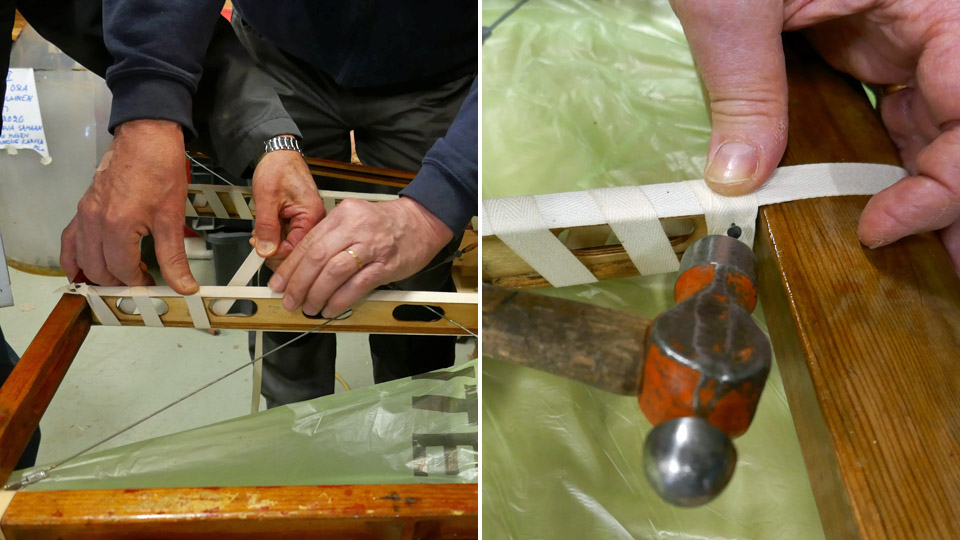
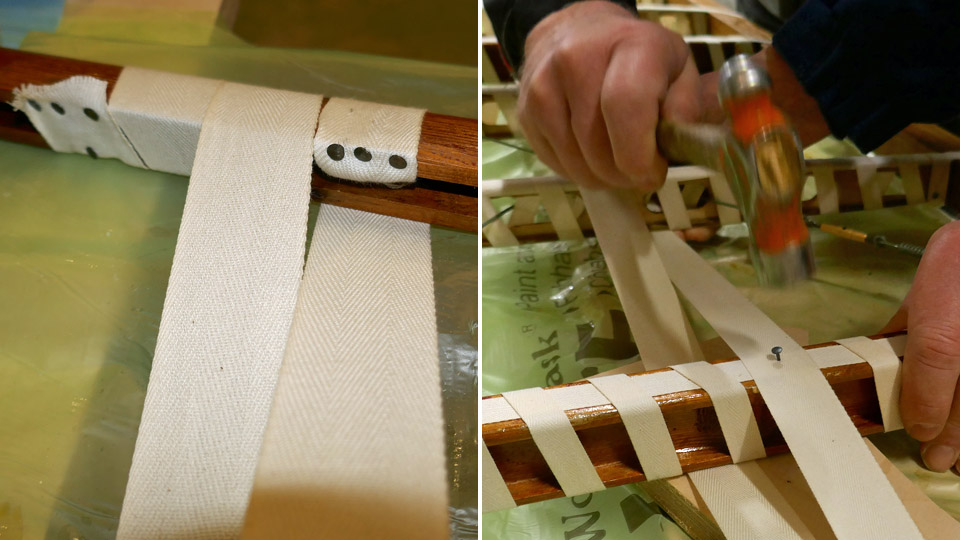
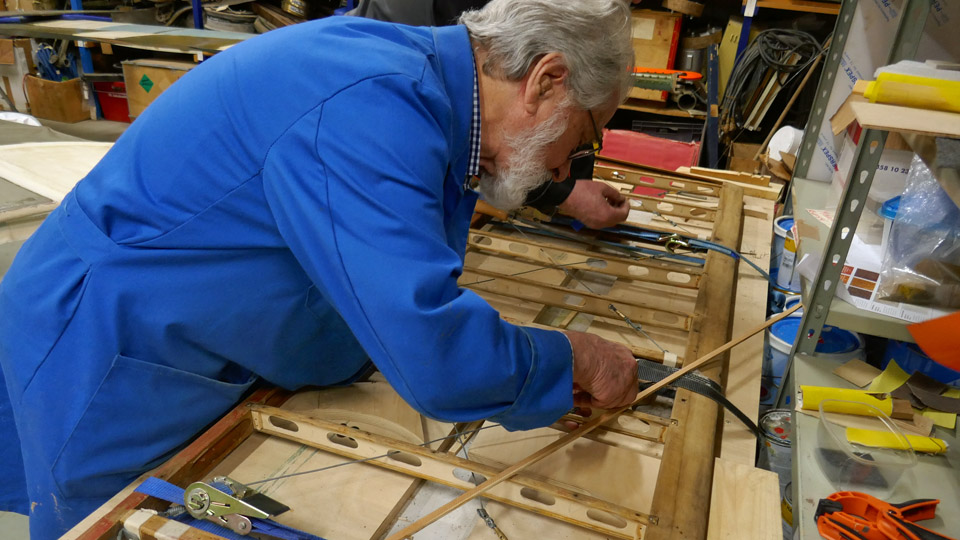
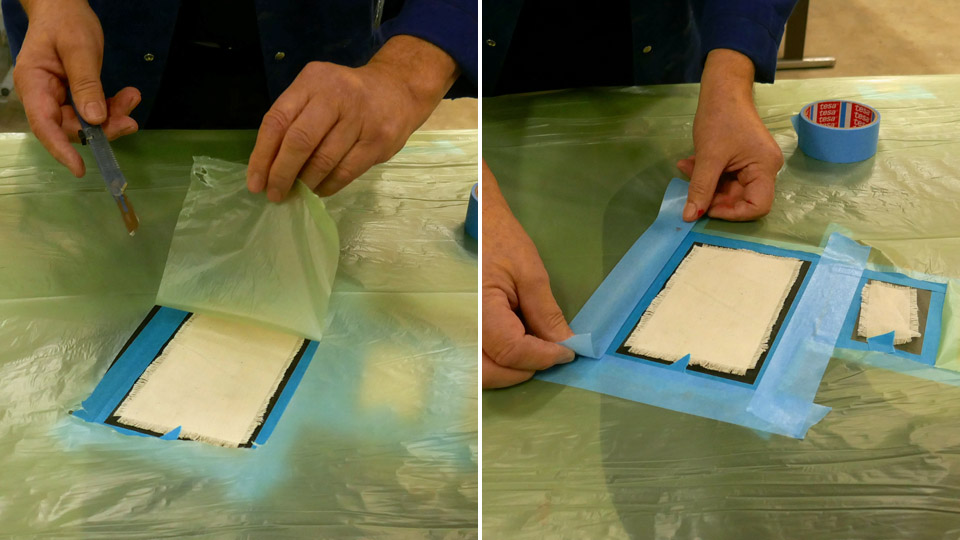
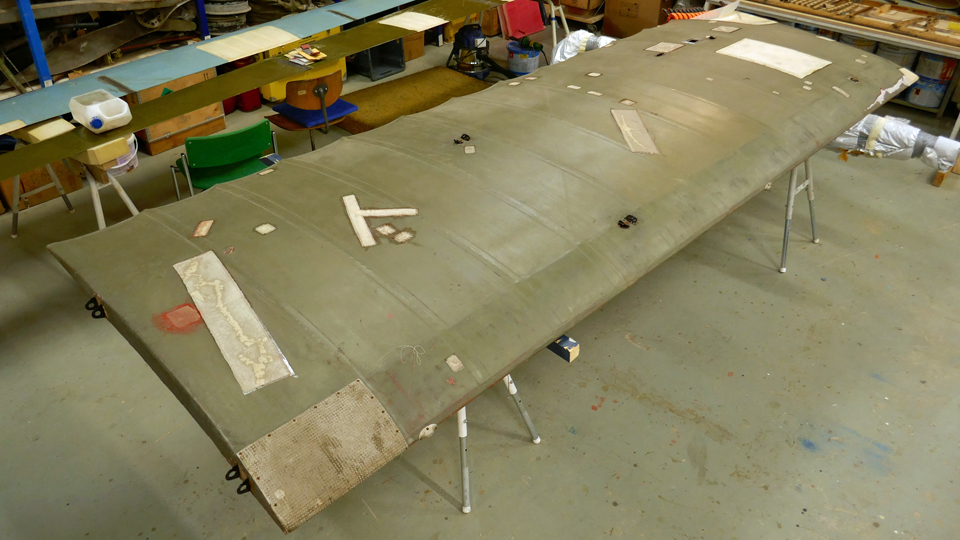
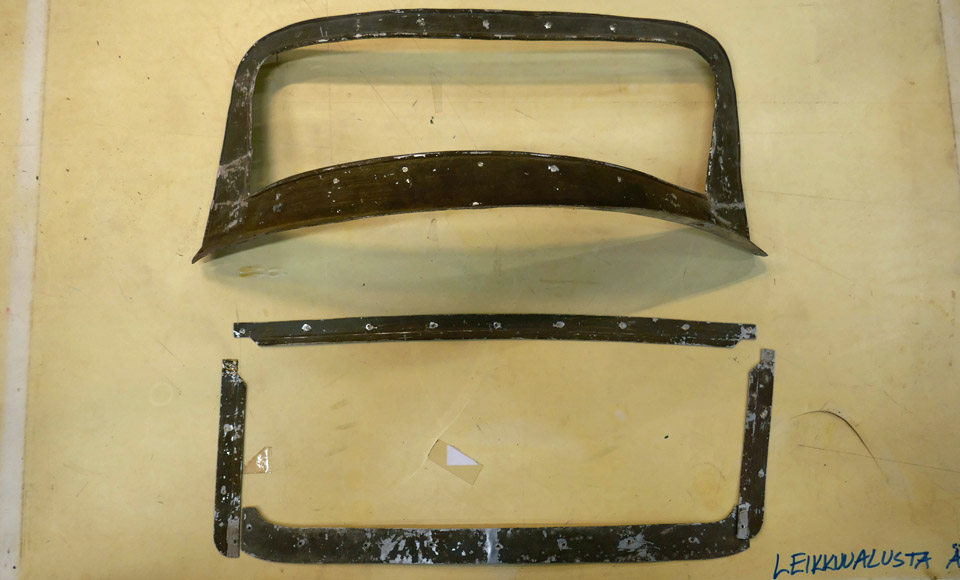
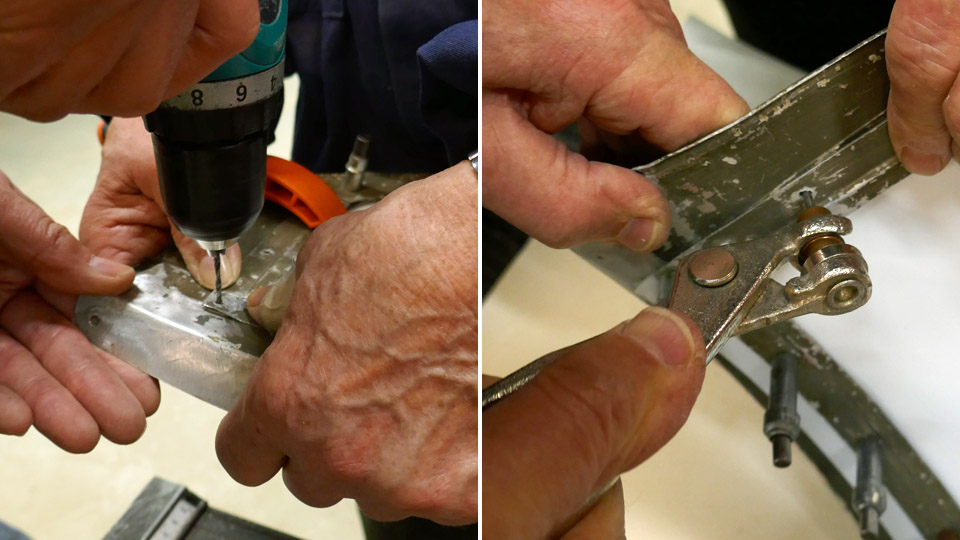
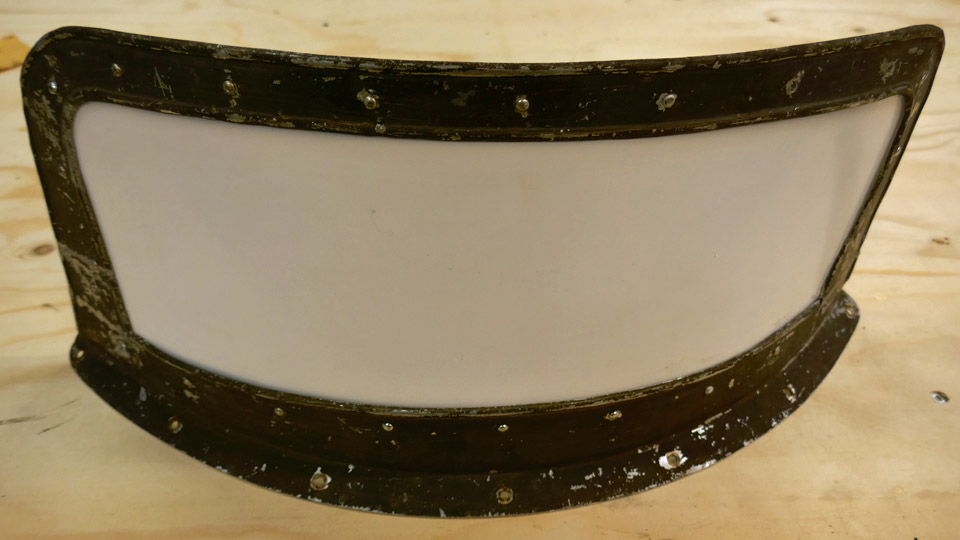
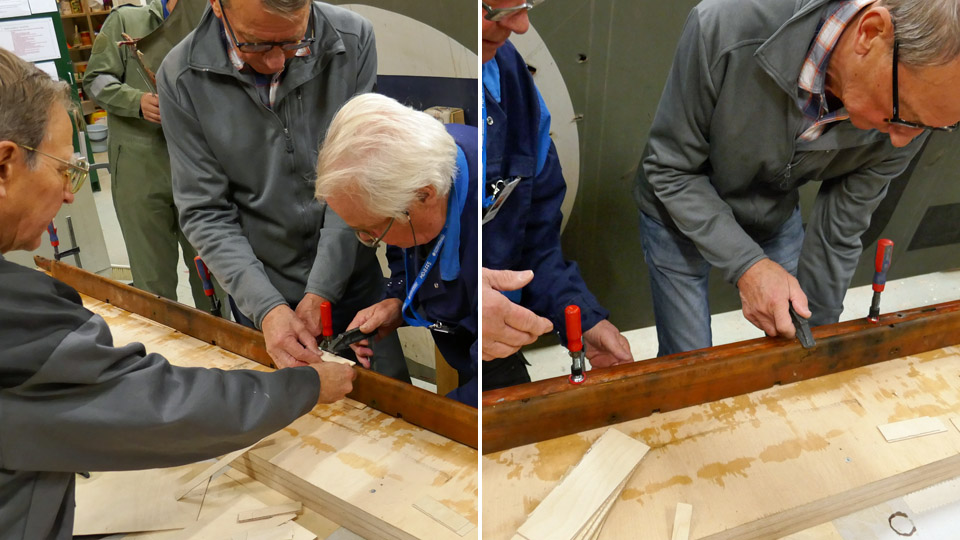
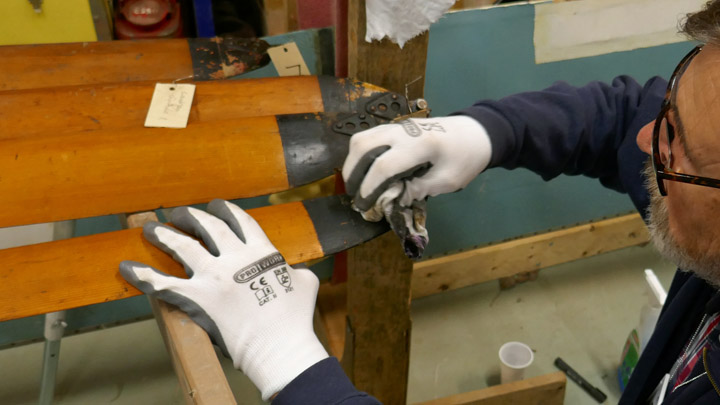
Caudron C.59 advanced trainer; covering of the horizontal stabilizerTiistai 14.5.2024 - Tuesday Club member Caudron C.59 was an advanced trainer used by the Finnish Air Force in the 1920s. The restoration of the individual aircraft CA-50 was commenced at the Tuesday Club in 2019. The work has advanced in stages. After the Finnish Aviation Museum acquired from abroad cotton fabric designated to covering aircraft, we could start covering the horizontal stabilizer of the Caudron, which had been waiting for some time. We had earlier refurbished the Caudron’s horizontal stabilizer, which had been in very poor condition, by taking it apart and reassembling it for covering.
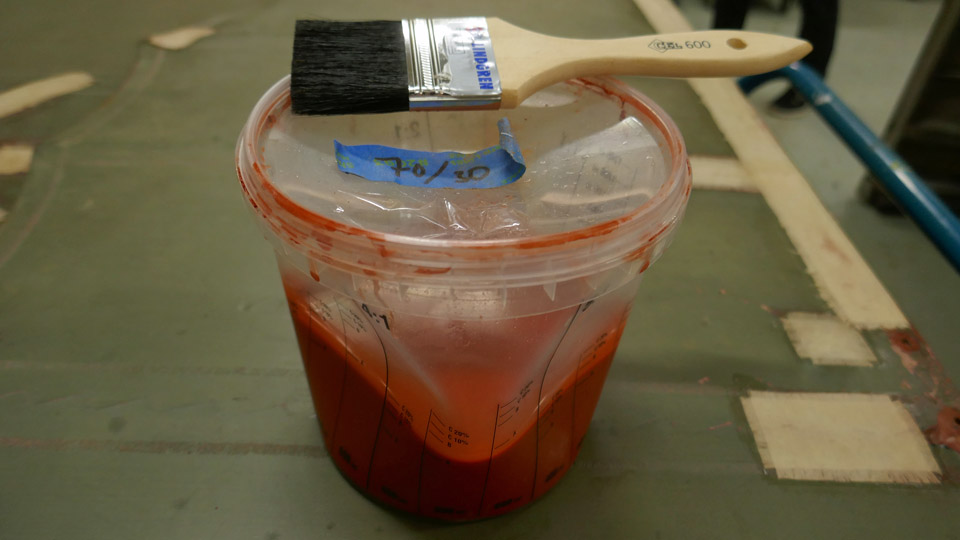
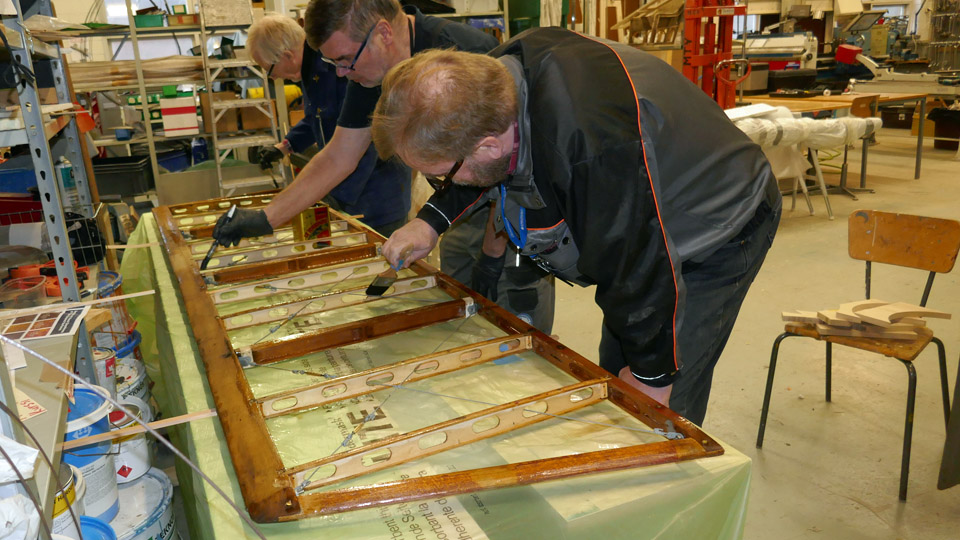
Prior to the covering, it was decided to lacquer with nitro cellulose lacquer the fabric strip covering, wound around the leading edge of the stabilizer. It was made of 50 mm wide linen band according to the original. By lacquering the band covering, the gluing of the covering fabric will be enhanced on the surface of the leading edge of the stabilizer.
Photo by Jukka Köresaar.
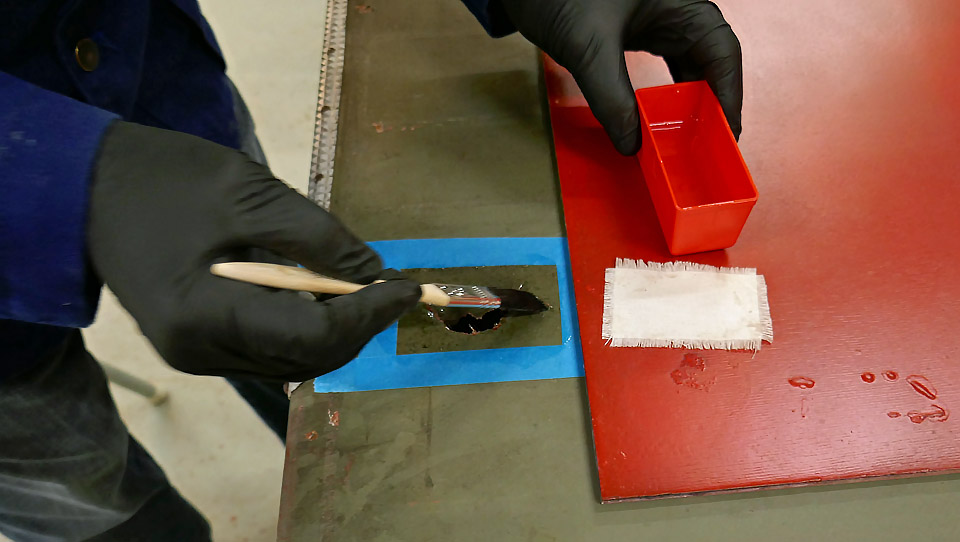
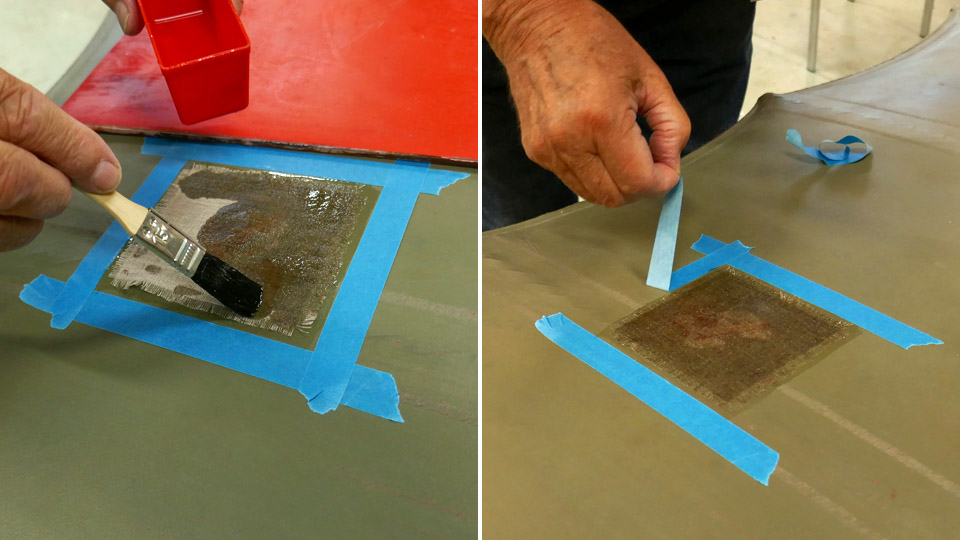
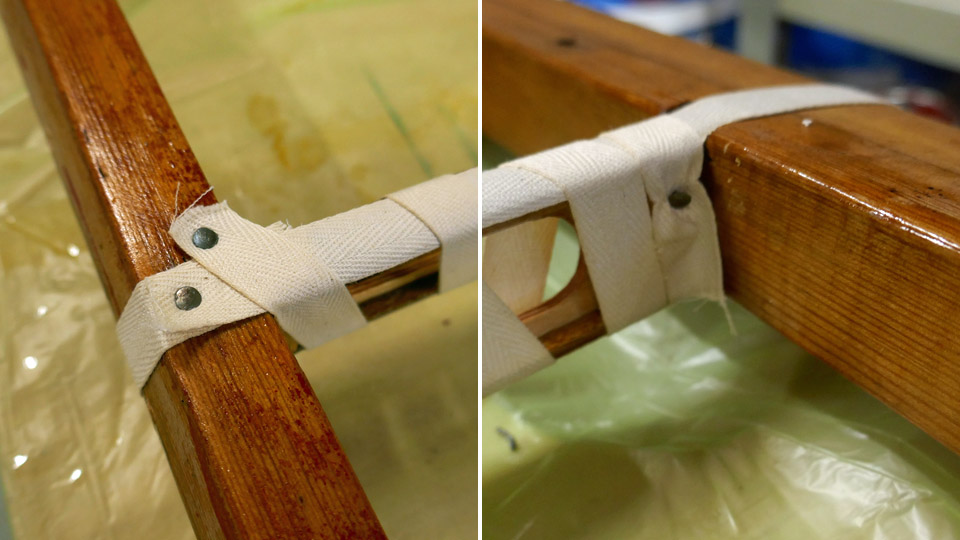
The linen band covering wound on the leading edge of the horizontal stabilizer was lacquered with 75% nitrocellulose lacquer. As lacquer we used NC Speed nitrocellulose lacquer, and it was tinted red with iron oxide powder. After the lacquer had dried, the edges of the linen band had, as we expected, risen as well as the fabric fuzz. So the band covering was sanded smooth, and another layer of lacquer was applied. Even after the re-lacquering, the leading edge band was uneven and the band had to be sanded once more, after which it was lacquered with 100% nitrocellulose lacquer. So the linen band wound around the leading edge had been smoothed, and we could start covering the horizontal stabilizer.
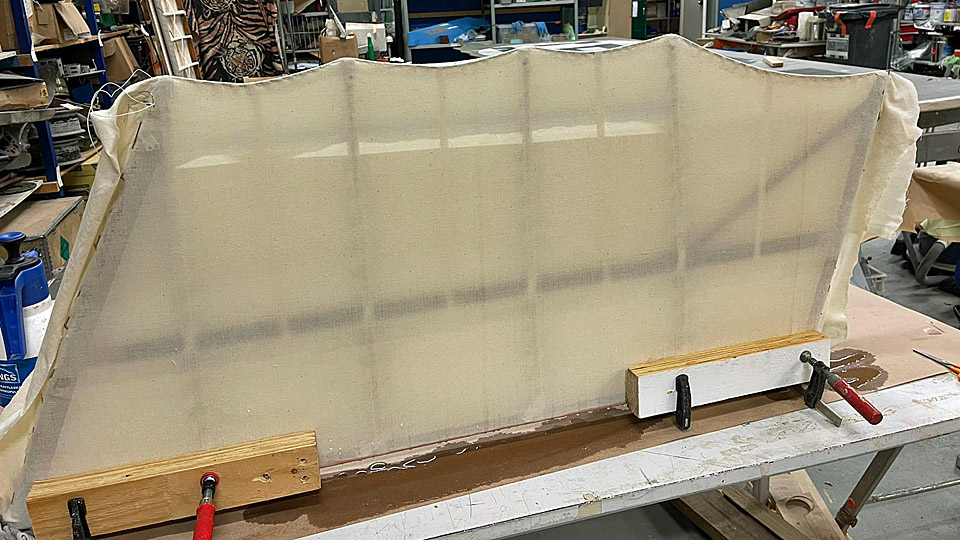
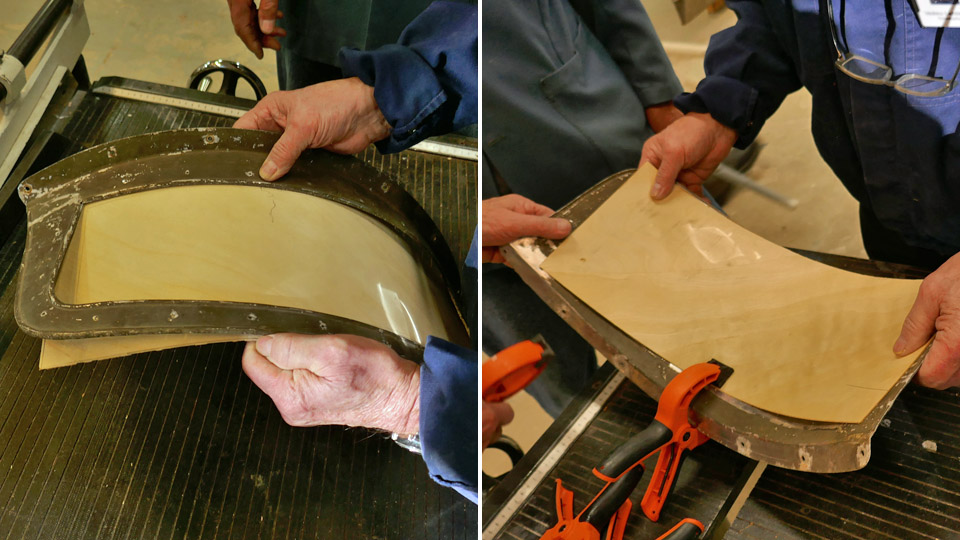
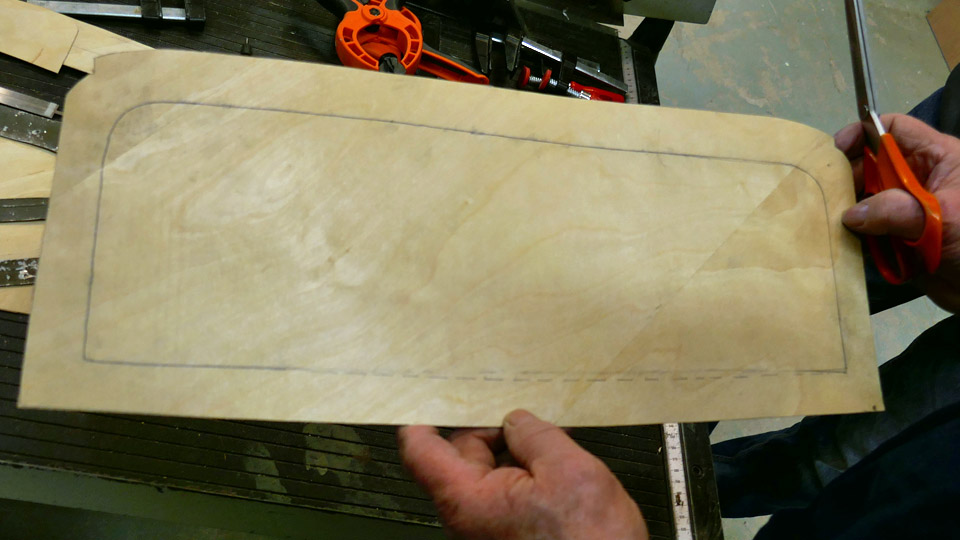
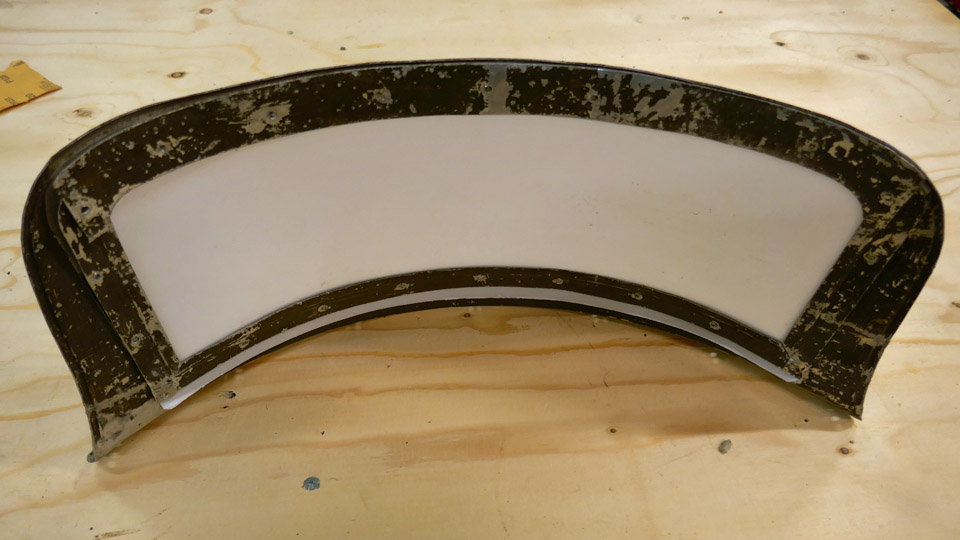
The width of the horizontal stabilizer is 60 cm and its length 120 cm, so a 130 cm wide piece was cut from the 140 cm wide cotton fabric. This way the fabric has enough working allowance to work both in length and width way. The fabric was wound around the stabilizer, which was laid the table, so that the lapels of the fabric reached past the horizontal stabilizer’s trailing edge. We meant to make a bag out of the fabric, which would be open at the trailing edge.
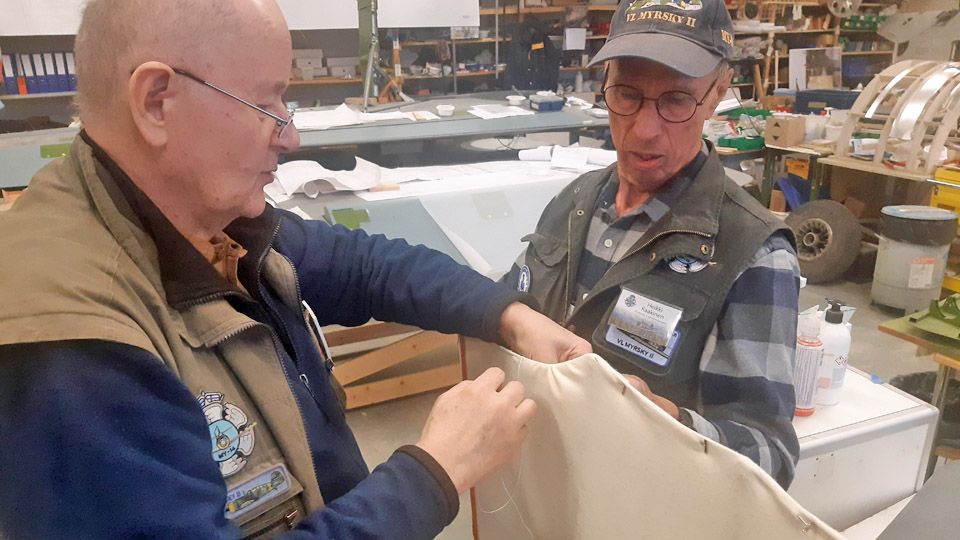
To achieve this, at both ends of the stabilizer the lapels were joined with pins. The lapels were then sewn together with a sewing machine, along the line of the pins. So the fabric was formed to be a bag, open at the trailing edge. When the ends had been sewn, the fabric was turned inside out, leaving the sewing seams of the lapels inside the fabric bag.
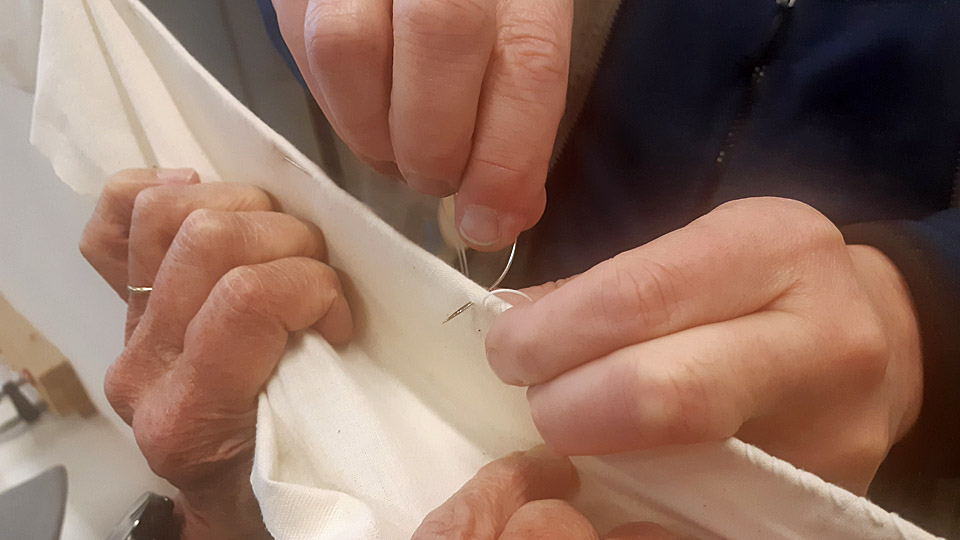
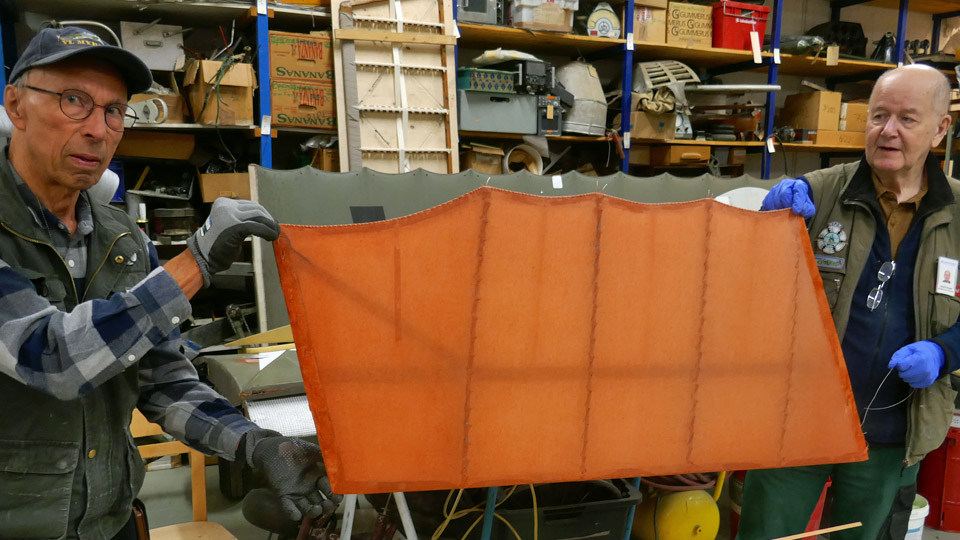
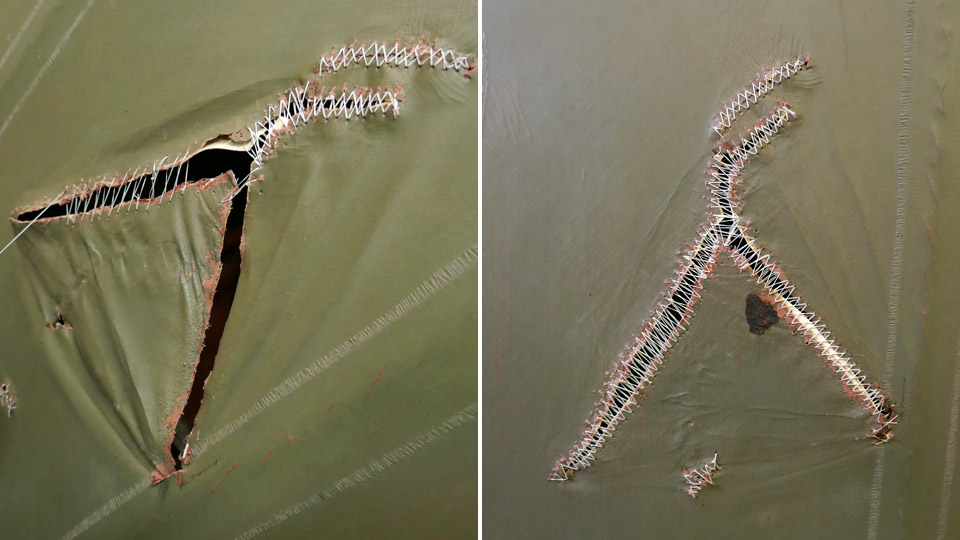
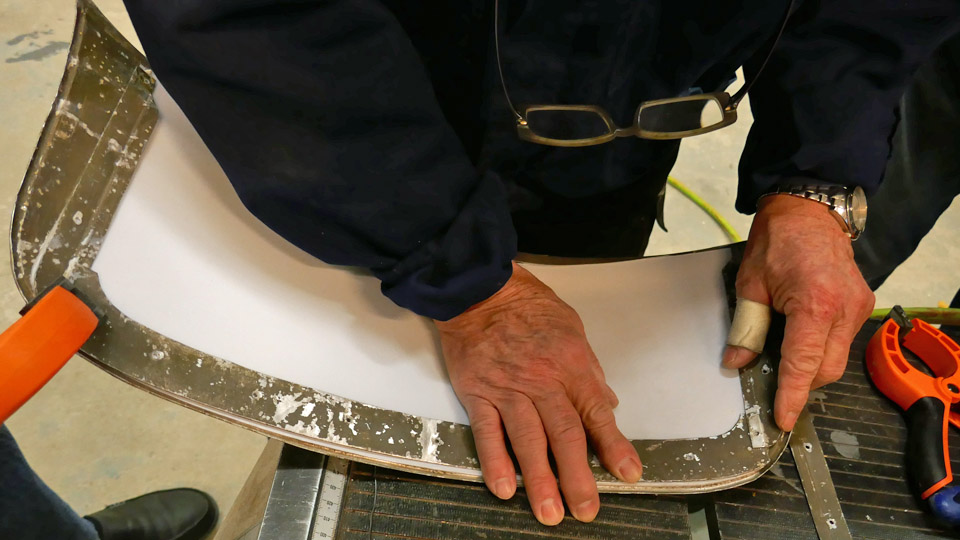
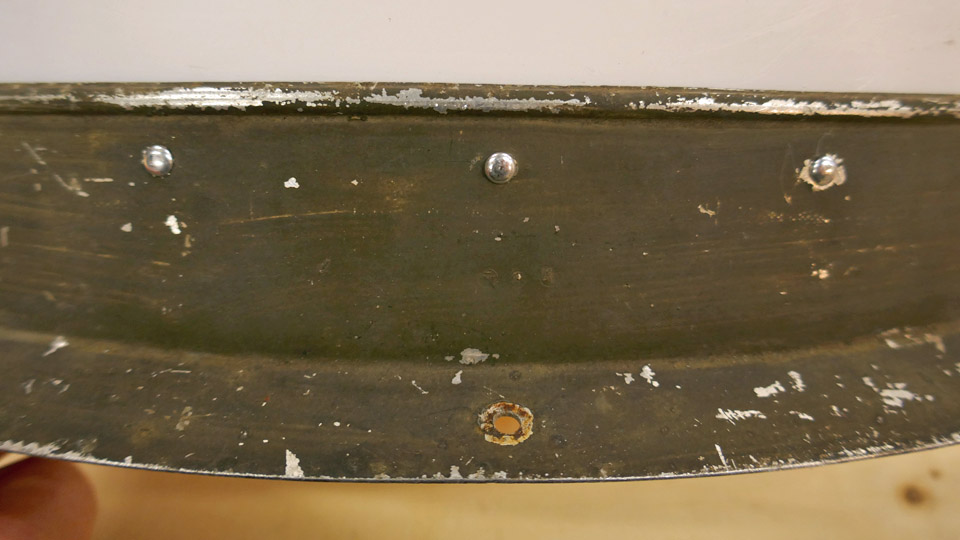
The fabric bag, open at the trailing edge, was drawn on the horizonal stabilizer. The sewing of the fabric was very successful, because the fabric bag had become tight, or rather “skin-tight” on the horizontal stabilizer. Now it was time to sew together the still open trailing edge fabric lapels. For the sewing extra parts of the lapels were cut off, so that the lapels met at the outer edge of the trailing edge batten.
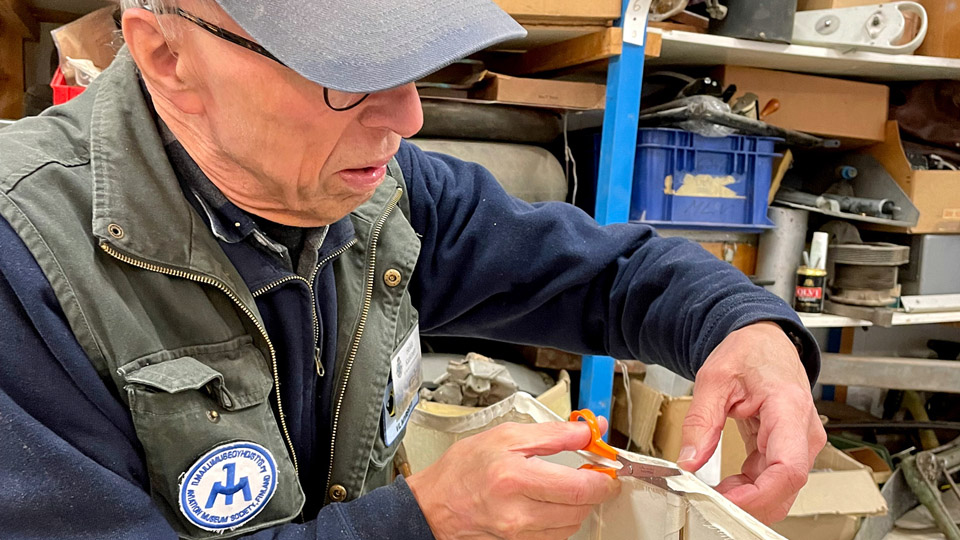
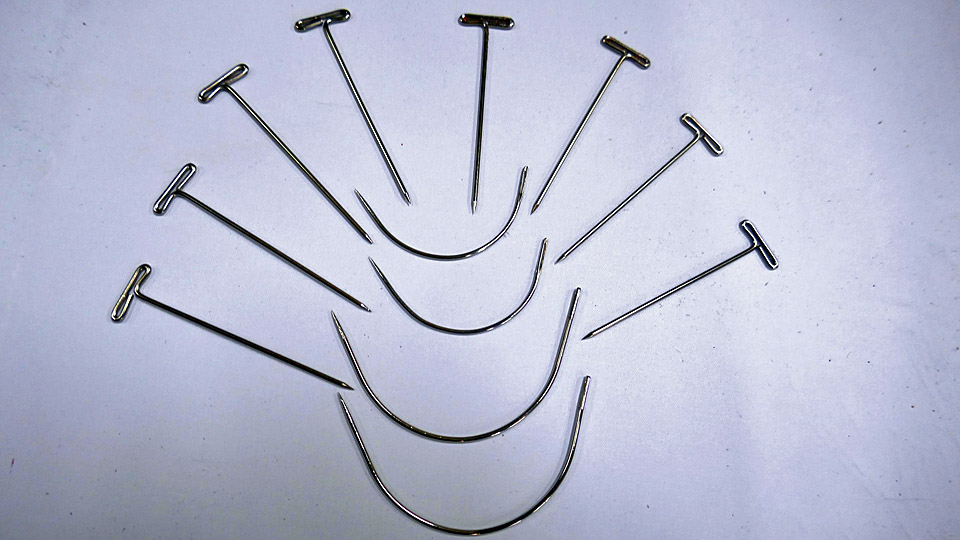
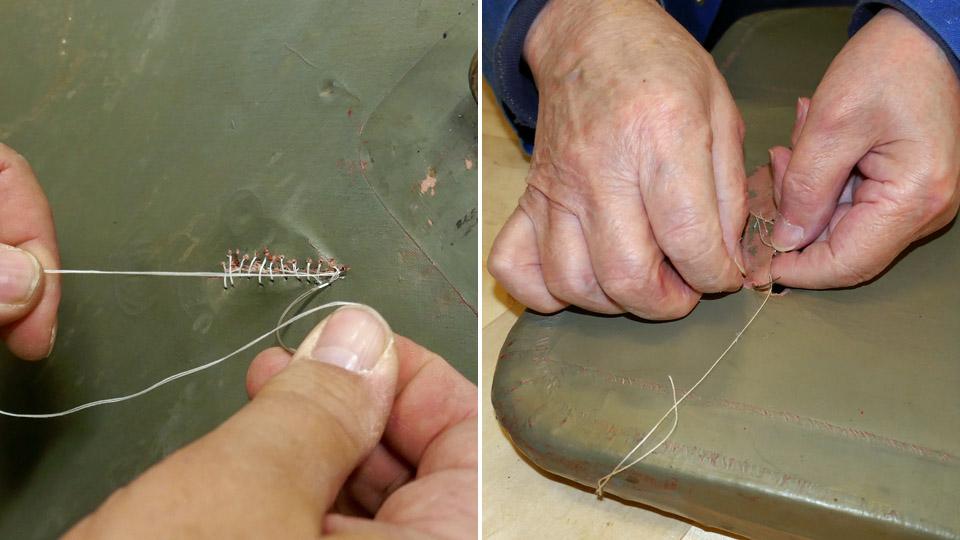
To keep the lapels of the fabric in place when they were sewn together, the fabric was fastened with staples from a stapler at the side of the trailing edge batten. The lapels of the fabric were sewn together with a thin double yarn cotton thread. As a needle we used a curved needle, which was handy for this kind of sewing.
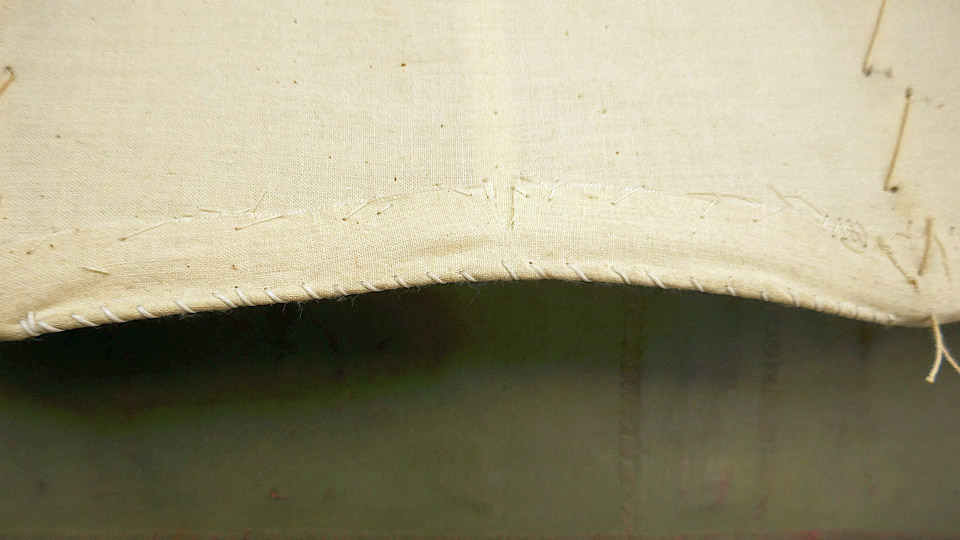
Photo by Antti Laukkanen. The sewing of the covering fabric lapels was done so that the seam formed a continuous serrated shape. When the lapels had been sewn, the covering fabric formed a closed bag over the horizontal stabilizer.
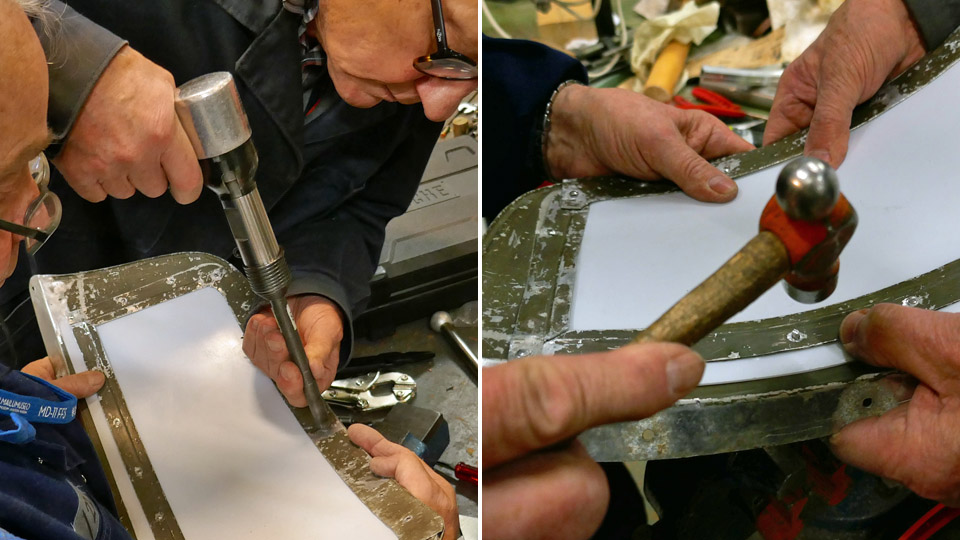
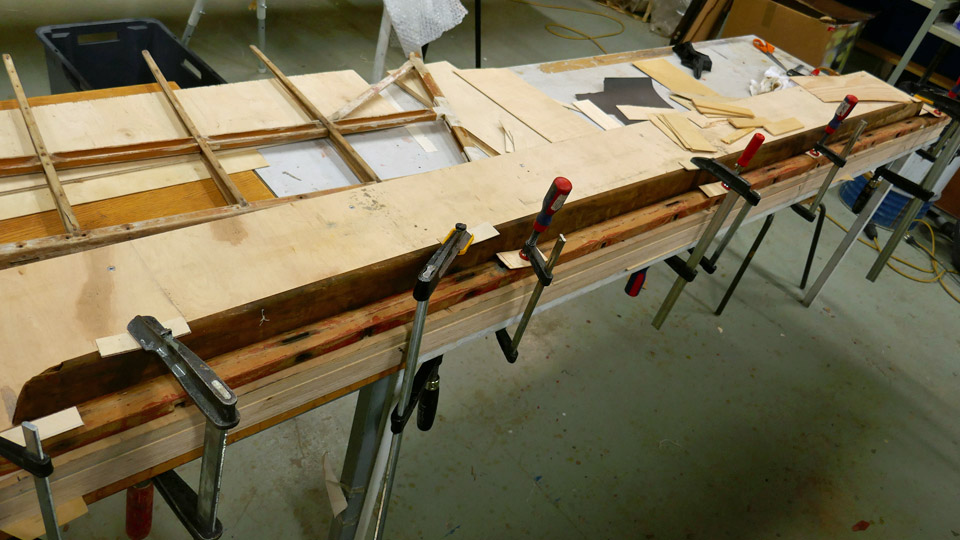
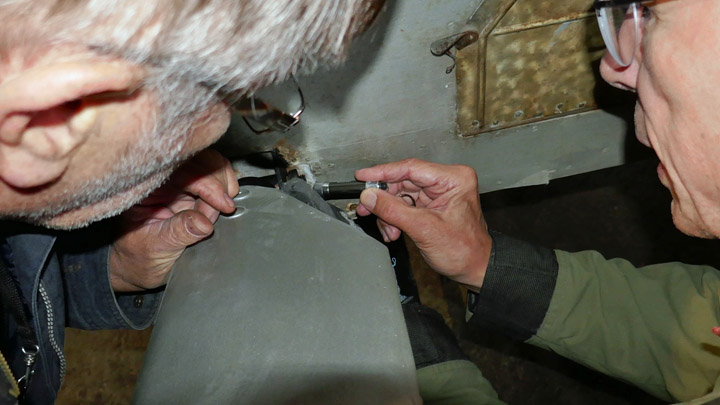
Photo by Antti Laukkanen. The next phase in the work was the water-tightening of the fabric. The stabilizer covering fabric was soaked with boiled, but cooled water, and was left to dry. With water-tightening, the fabric is pre-tightened, because when dried the covering fabric has already tightened a few percent on the stabilizer.
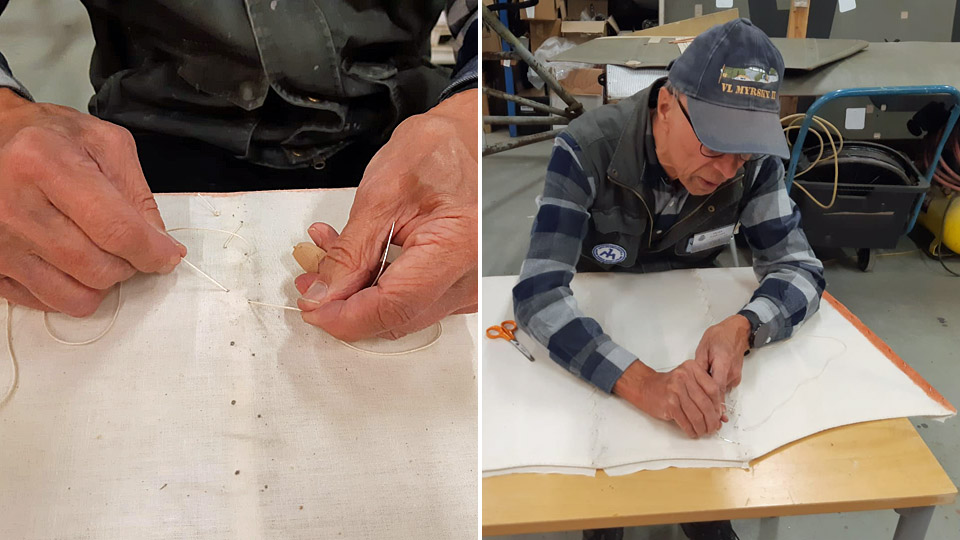
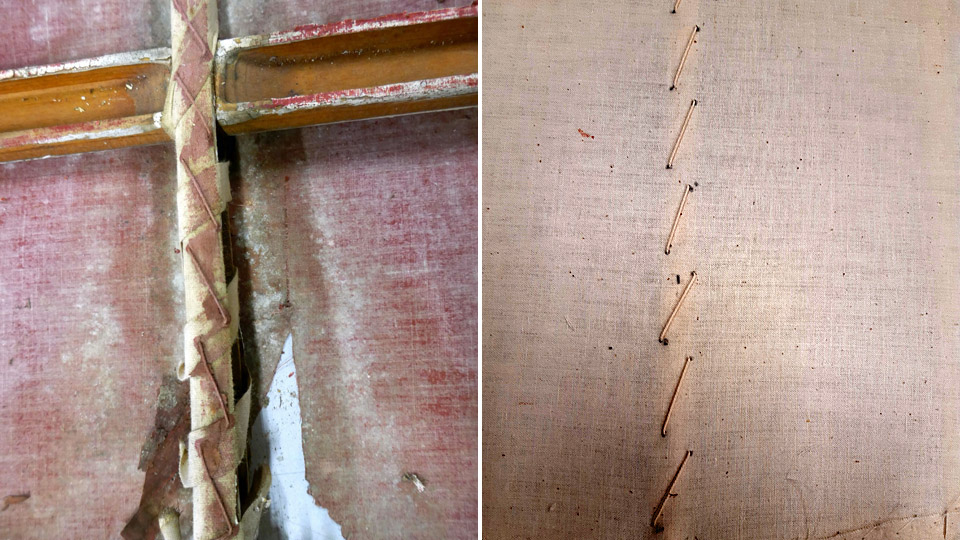
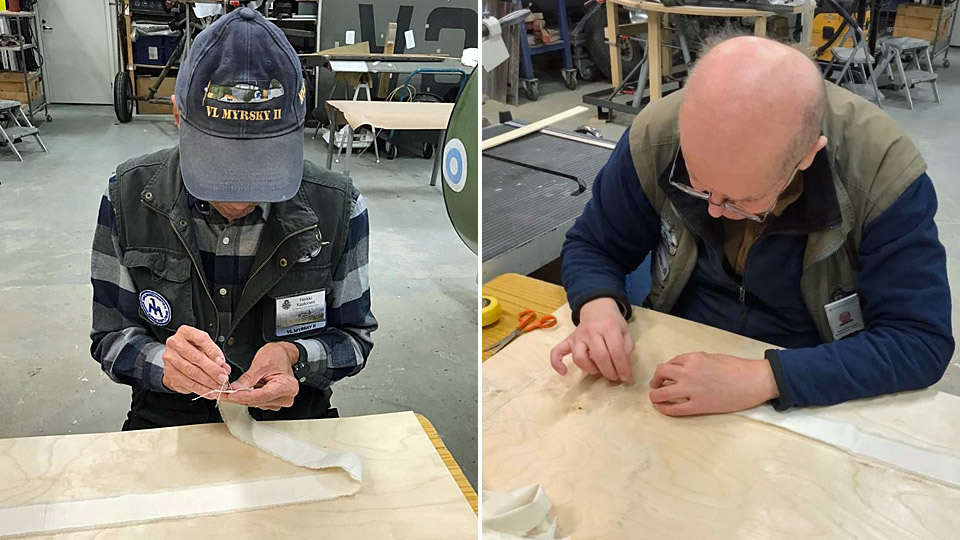
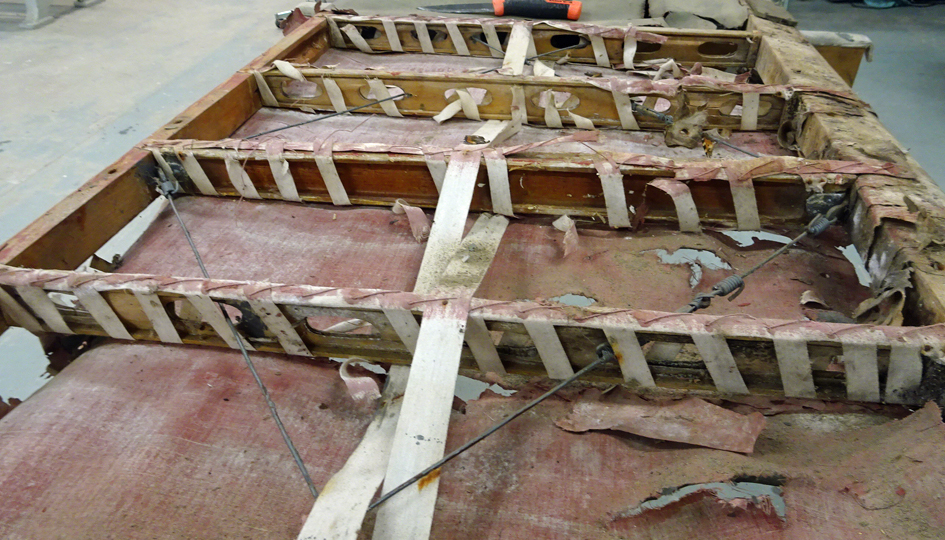
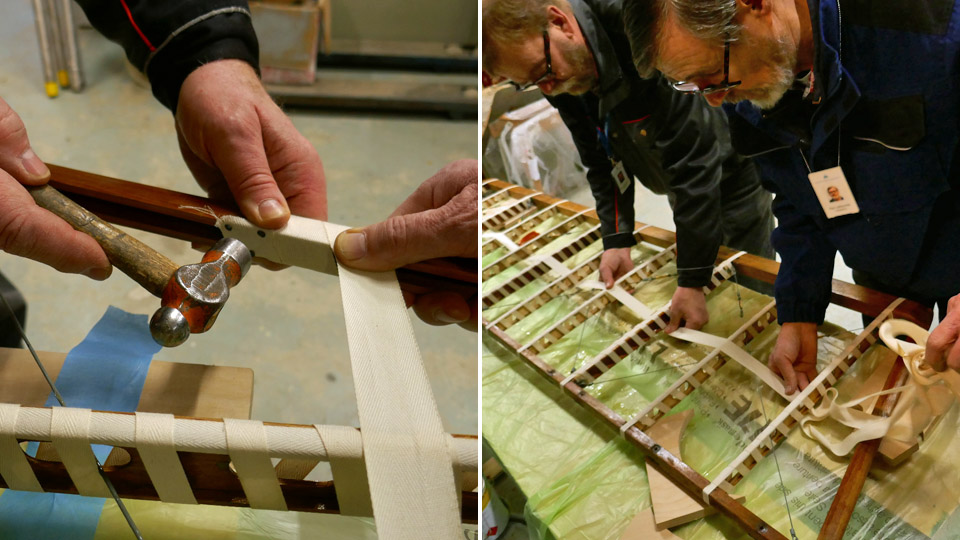
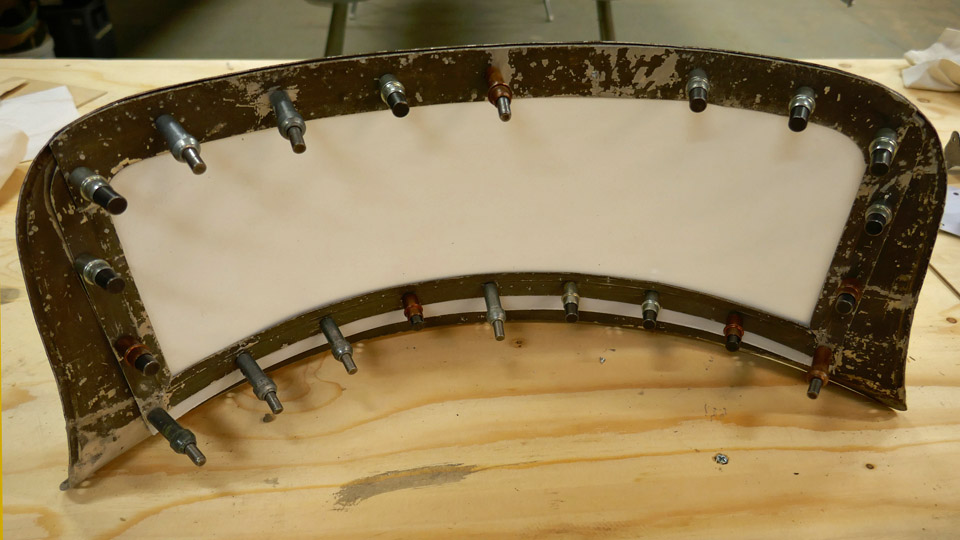
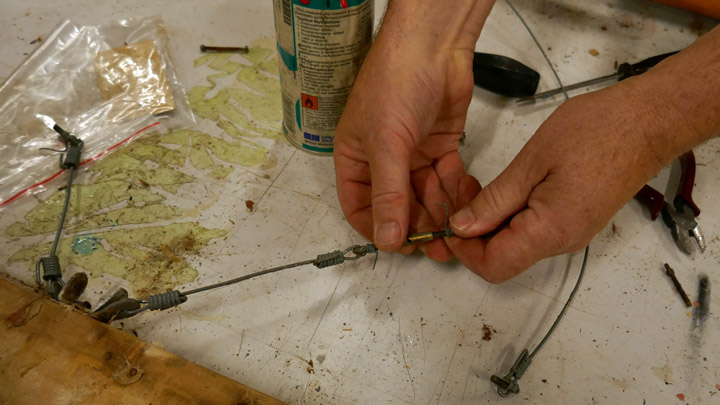
Photo by Antti Laukkanen. The proper tightening of the covering fabric to resemble a drum head, will be made with nitrocellulose lacquer. Before tightening the covering the fabric needs to be sewn on the stabilizer ribs. The sewing will be done by following the original 1920s Caudron stabilizer sewing method. This way of sewing was documented, when the decayed covering fabric was stripped off the Caudron’s stabilizer. According to that, the covering fabric was sewn onto the fabric strips, which were fastened to the stabilizer ribs, with tacking interval of about 3 cm. The fabric strip was for its part tied to the rib’s surface with an edging ribbon. We had done similarly, when refurbishing the stabilizer.
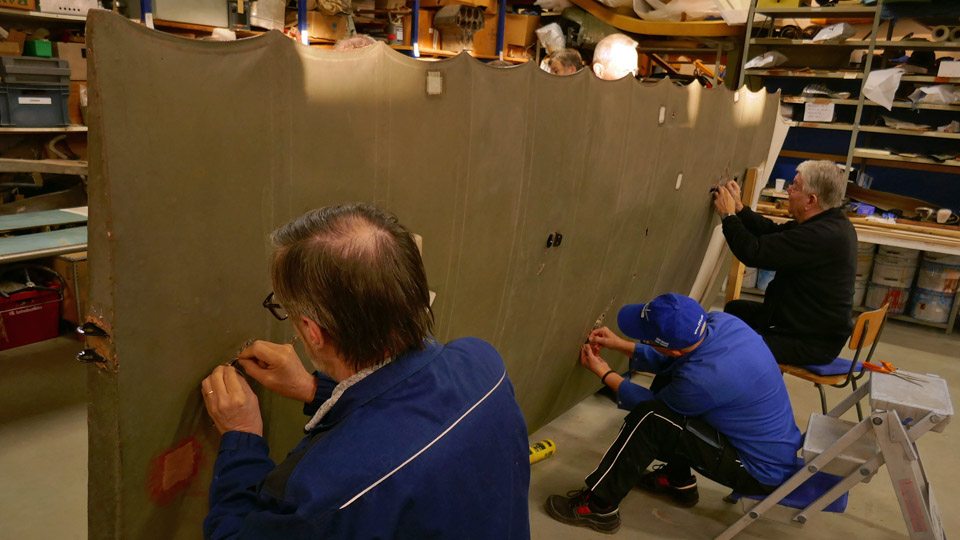
The places of the stitches were marked at each rib on the surface of the covering fabric, using a thin template made of plywood. The stitching places of the sewing needle were marked on the fabric surface with a thin felt pen, through the template holes. Using a curved needle and double yarn thin sewing thread, the covering fabric was sewn stitch by stitch to the edging ribbons that ran along the ribs. A regular space between the stitches made it possible that the needle occasionally pierced the edging ribbon which tied the fabric strip to the rib. When the sewing had been done, the staples could be removed from the fabric surface.
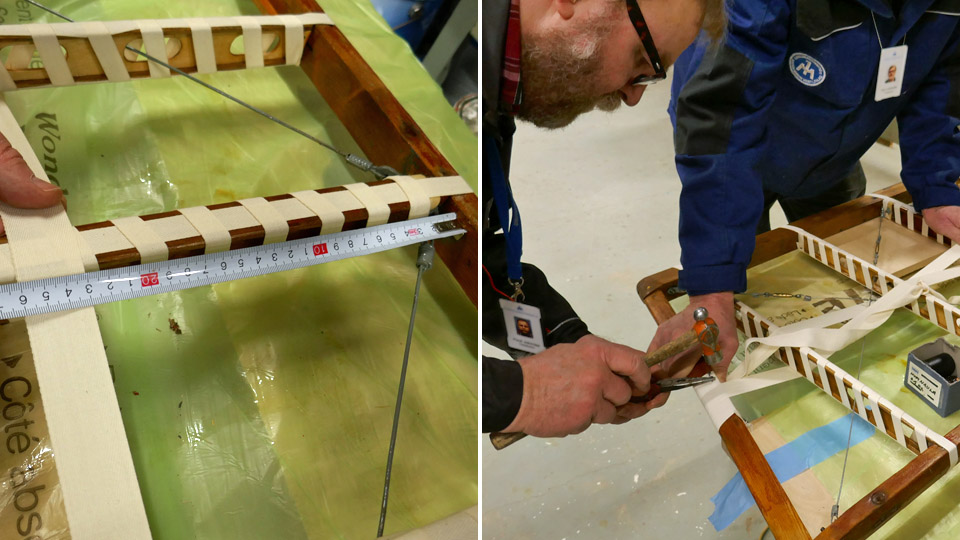
The covering fabric was now sewn to the horizontal stabilizers’ ribs, both on the upper and the bottom surface, so it’s time to move on the next phase of the covering. There the horizontal stabilizer’s covering fabric will be tightened to drum head tightness with nitrocellulose lacquer. As lacquer we use NC Speed nitro cellulose lacquer. Applying the lacquer is started with 25 % thinned lacquer, and from there in stages to the full 100% nitrocellulose lacquer. Photos by Lassi Karivalo except if otherwise mentioned. Translation by Matti Liuskallio. |
|
Avainsanat: aviation history, restoration, Caudron C.59, CA-50, Tuesday Club |
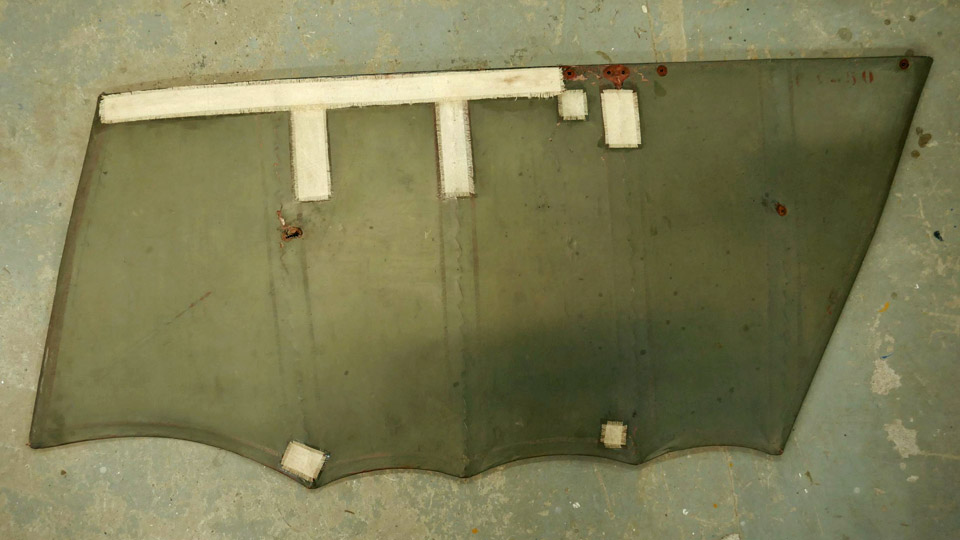
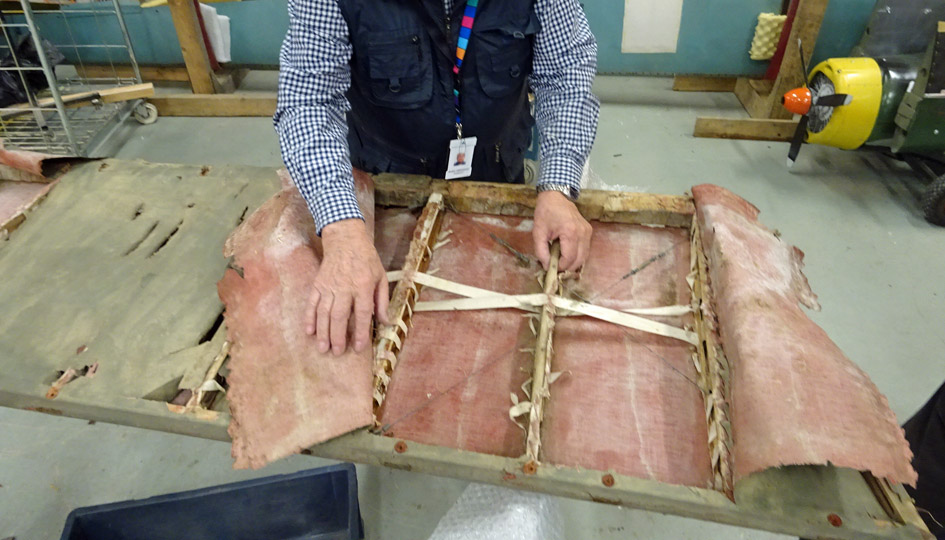
Covering the Caudron elevator got under wayPerjantai 3.3.2023 - Tuesday Club member The Caudron C.59 advanced trainer’s starboard elevator, which had been completely stripped of the covering fabric, had already been waiting for a few years to be covered. On the ribs, strips of linen fabric had already been tied, onto which the covering fabric will be sewn. The Caudron’s port elevator 1920’s original fabric covering was still in such good condition that it wasn’t seen necessary to be renewed, patching a few holes was sufficient enough.
For the covering fabric was chosen the 165 g/m2 linen fabric called “Kesäyö (summer night)”, bought at Eurokangas. This same fabric was used to covering the elevators and rudder of the VL Myrsky II (MY-14), which is under restoration, although the tightening of the fabric with nitro cellulose lacquer posed its own problems.
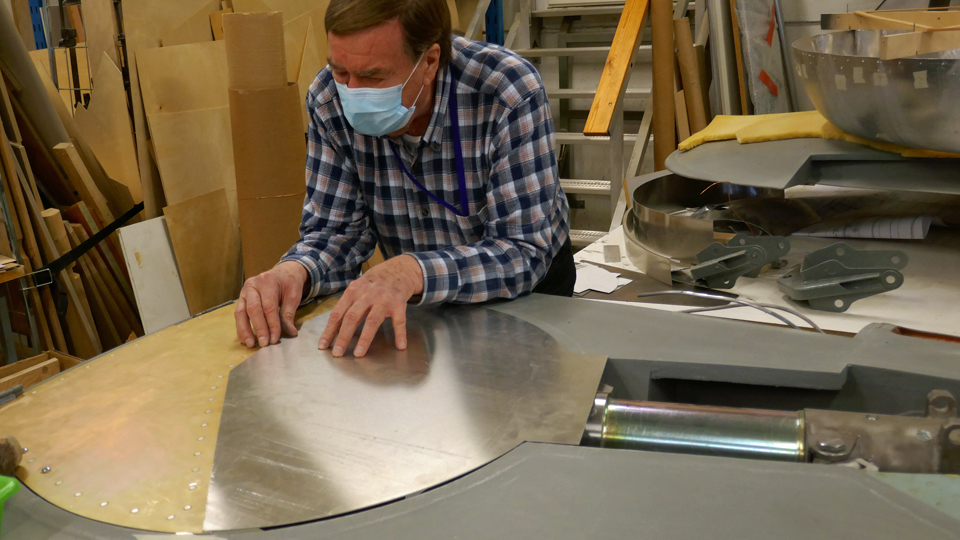
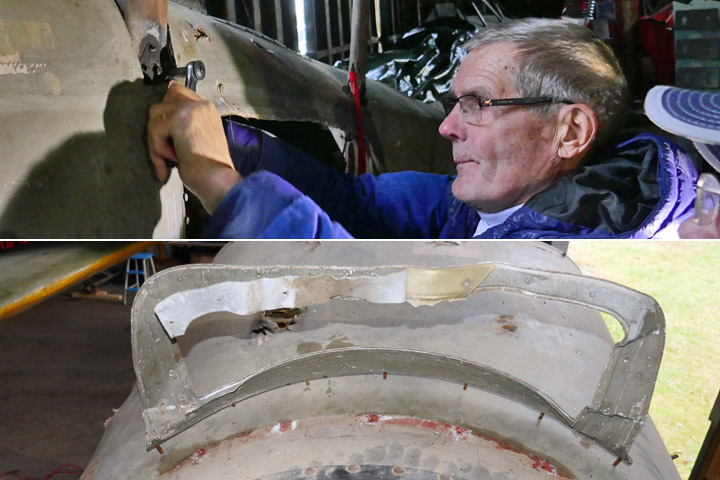
Photo by Jukka Köresaar. The covering was started by cutting a piece of fabric that completely covered the whole of the elevator. The fabric was glued with nitro cellulose lacquer to the leading edge or the hinge side of the elevator. After this the fabric on one side of the elevator was stretched towards the trailing edge and the edge of the fabric was preliminarily attached with sturdy T-headed pins to the steel wire acting as the trailing edge. The extra fabric was cut off.
Photos by Heikki Kaakinen. The stretched fabric was sprayed wet with boiled water. The meaning of this was the pre- tightening or pre-shrinking of the fabric. The fabric turned translucent when wet. After the fabric had dried, its edge was sewn with linen thread to the trailing edge steel wire. The proper tightening of the covering fabric is done with nitro cellulose lacquer, when the fabric covering of the elevator tightens and resembles a drum skin.
Next, the fabric on the other side of the elevator was stretched and pre-tightened in a similar manner. After pre-tightening the edge of the fabric was folded over the steel wire acting as trailing edge, over the already sewn seam of the fabric covering the other side and was sewn on the wire. The lapel of a few centimetres going over the trailing edge wire was tacked to the covering fabric beneath. A protecting strip of fabric over the stitches of the trailing edge wire will be glued over the stitches with tightening lacquer.
Photo by Jukka Köresaar. Before the covering fabric was sewn on the strips attached to the ribs, the covering fabric’s lateral lapels were glued to both ends of the elevator. The elevator’s end is a wooden batten 4 centimetres wide. The covering fabric was glued on the end batten with tightening lacquer. The end batten will also be wholly covered with a protective strip of linen fabric.
Photos by Jukka Köresaar.
When covering an aircraft’s wings or control surfaces with fabric, the covering fabric is sewn into the underlying fabric strips on the ribs. When sewing the elevator covering fabric into the Caudron elevator’s underlying strips, which were on the ribs, a curved needle was used. It could be deftly slid through the covering fabric and the underlying strip. The sewing was done by oblique tacking, in which we used the same form of tacking as was used in the elevator’s original dismantled covering. The original model for oblique tacking came to light when dismantling the elevator’s covering and it was documented for future re-covering of the elevator.
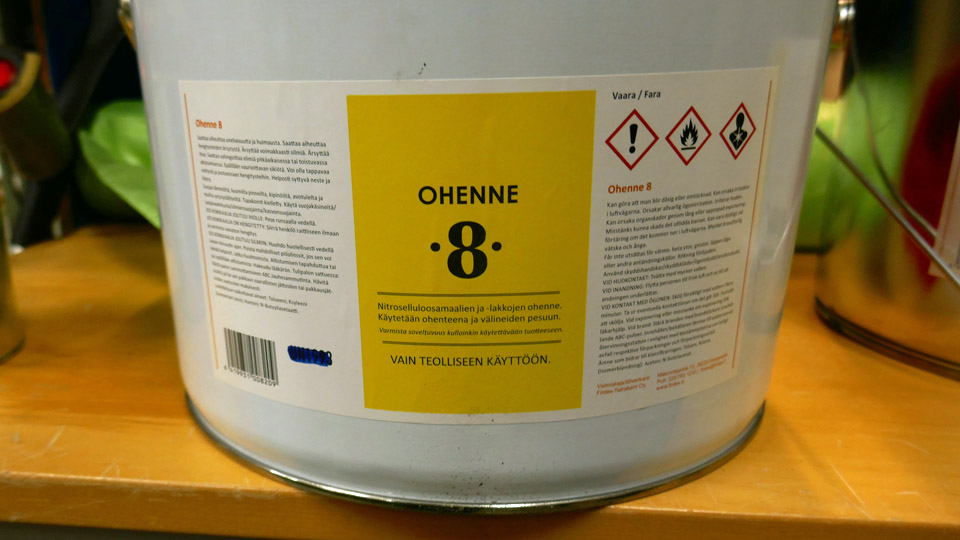
When the covering fabric had been sewn into the ribs, the tightening of the fabric could be commenced with nitro cellulose lacquer. We used the NC-SPEED nitro cellulose lacquer. The tightening varnishing of the fabric is done by stages. The varnishing is usually started with nitro cellulose lacquer thinned to 25 %, from which we move on to 50% and 75% lacquer and after that to unthinned 100% lacquer. It usually takes five to seven layers of varnishing before the fabric is tight enough. As thinner we used the Ohenne 8 (thinner 8). Furthermore, the tightening lacquer is dyed red with iron oxide. The dyeing is done to see clearly when varnishing the covering fabric, which parts of the fabric have or haven’t already been varnished.
The Caudron C.59 elevator’s new covering fabric was varnished first with 25% nitro cellulose lacquer. It was applied with a paintbrush. After the lacquer had dried, the surface of the fabric was sanded with a Super Fine sanding pad. By sanding the fuzz sticking out of the surface of the fabric was removed. With the 25% lacquer the fabric tightened only slightly. In the next phase the fabric will be varnished with 50% NC-SPEED nitro cellulose lacquer and as the fabric tightens, with ever stronger lacquer up to unthinned NC-SPEED lacquer.
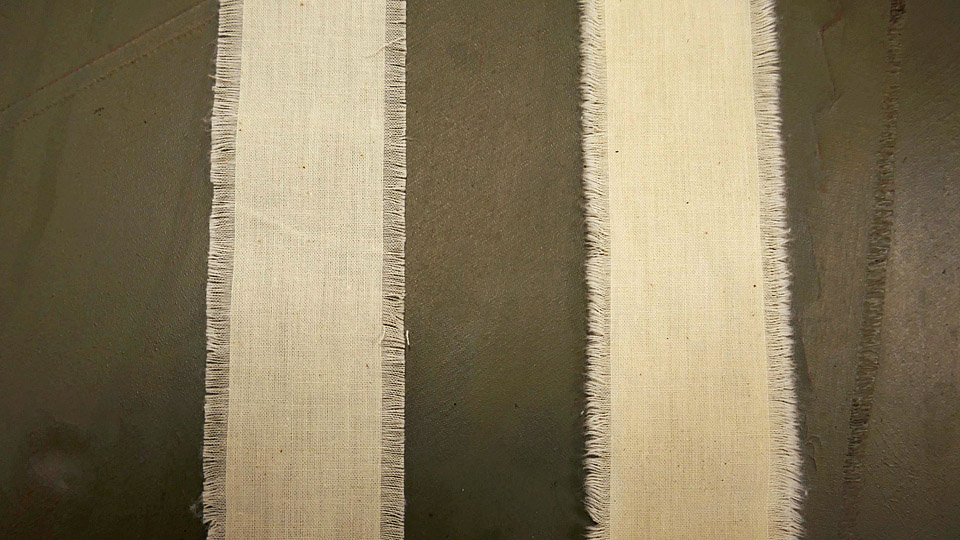
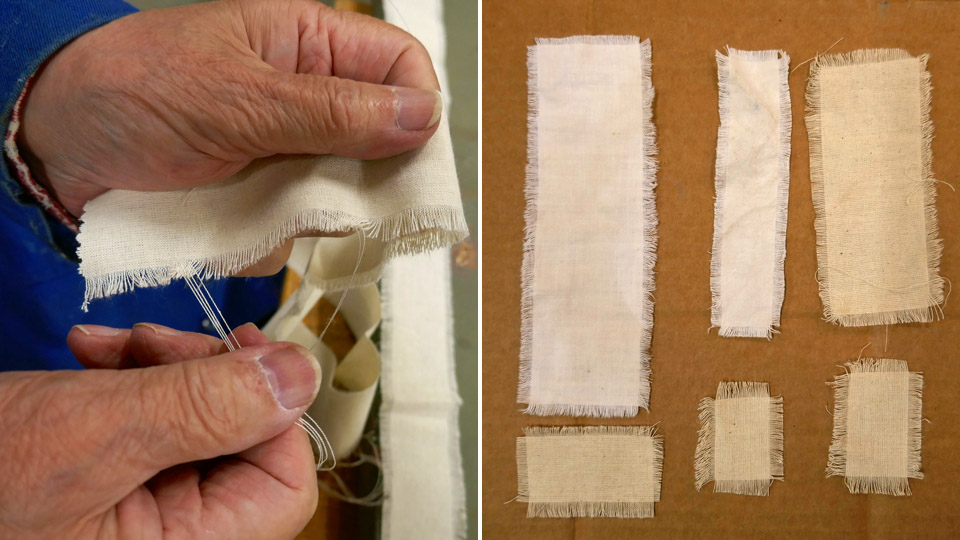
Simultaneously with the varnishing, the protective strips for the seams, leading edge, trailing edge and the end battens were being made. The strips were made of the same “Kesäyö” linen fabric, which was used to cover the elevator. The fabric was cut into 5cm wide strips. The edges were fringed. It means that the warp was unfurled from the edges about 5 mm. Fringing of the edges of the protective strips enhances the gluing of the strips on the seams of the covering fabric. Fringing of the covering fabric edges was typical in the covering of aircraft in the 1920’s. Later it was changed into a saw-toothed pattern in the edges of protective strips, which was made by using ”zig-zag-scissors”. Photos by Lassi Karivalo except if otherwise separately mentioned. Translation by Matti Liuskallio. |
|
Avainsanat: aviation history, restoration, Tuesday Club, Caudron C.59;CA-50 |
The spring season 2023 for the Tuesday Club got startedLauantai 21.1.2023 - Tuesday Club member After a well-earned Christmas break work continued on January 10th, 2023 from where it was left on going for the break.
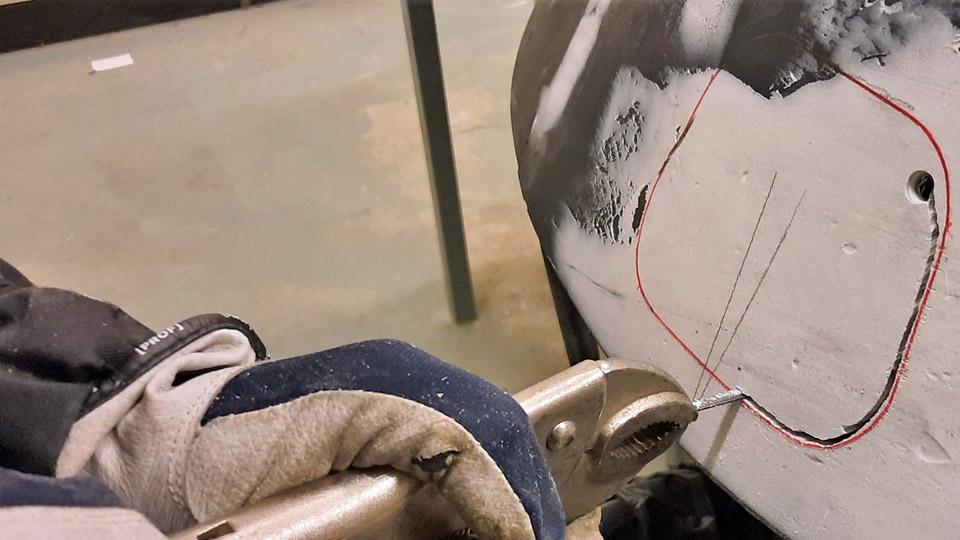
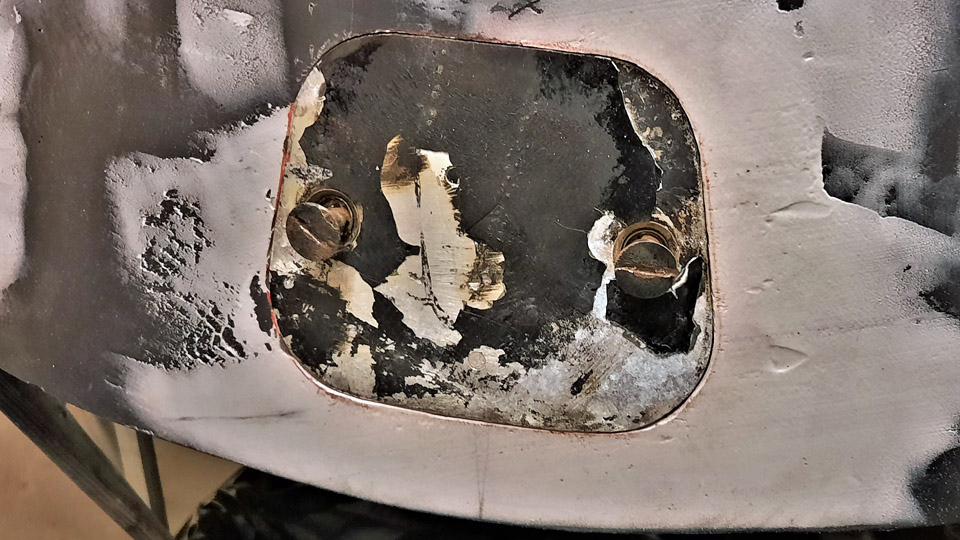
Photos by Reijo Siirtola The repair of the Caravelle III (DAF) nose radome damage was started by making an opening for the cover for the attachment bolt in the damage point, which was laminated over. An opening was sawn according to the measurements of the cover with a keyhole saw, after which a rabbet was laminated along the edges of the opening, against which the cover will be pressed and locked to the frame of the attachment bolt. Simultaneously the straightening of the damage to the nose pressure bulkhead outer circle was started. The crushed bulkhead circle has to be straightened in order to get the radome edge to be pressed tightly against the bulkhead circle and locked in place with three bolts.
Photo by Heikki Kaakinen By the beginning of the summer the starboard wingtip and the starboard horizontal stabilizer damages have to be repaired, so that everything will be ready when the Caravelle III (OH-LEA , ex SE-DAF) ) called “Bluebird” in Finnair colours will be transferred from the Pansio hall in Turku to close proximity of the Turku Airport terminal.
Photos by Juha Veijalainen The surface handling of the parts of the Caravelle towbar, which was brought along with the Caravelle III from Arlanda, is underway. The towbar used by SAS will be restored to the livery of the towbars used by Finnair. The sandblasted parts of the towbar are being painted with the grey Isotrol primer. The surface colour will be “Finnair blue”, apart from the towbar ends, which will be painted with yellow high visibility paint.
Photo by Antti Laukkanen
Photos by Juha Veijalainen
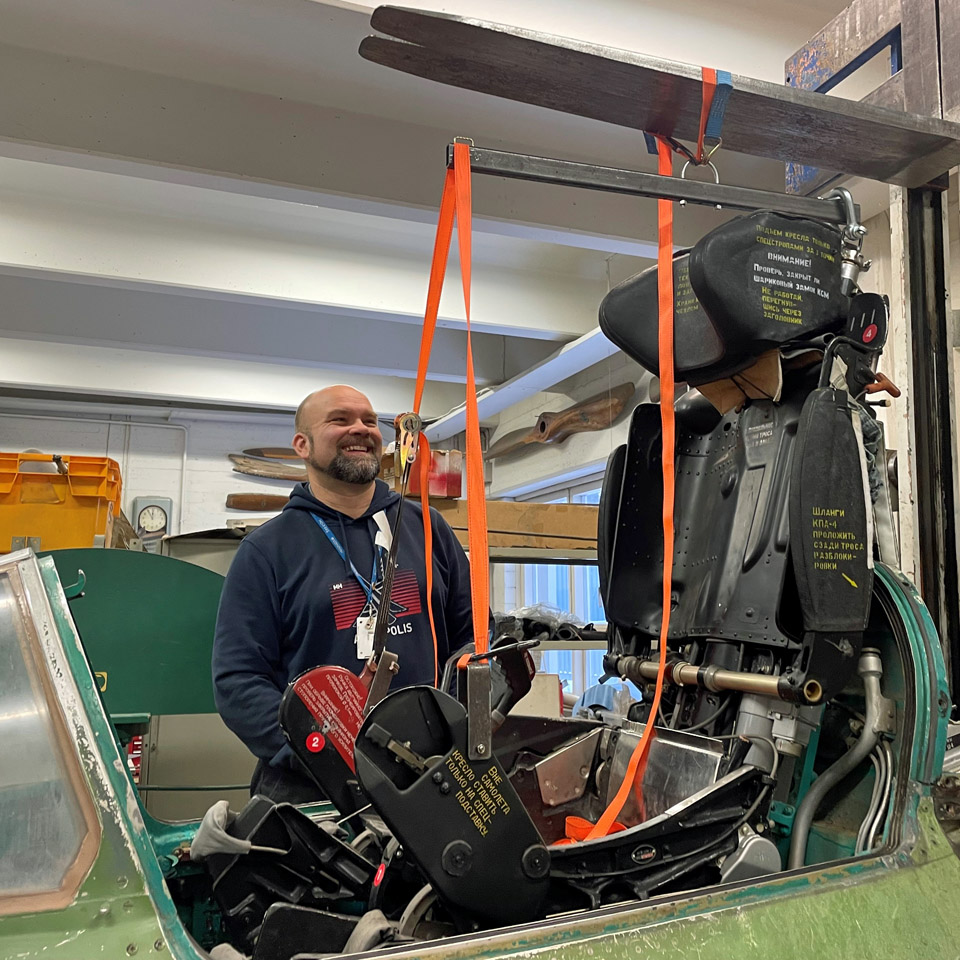
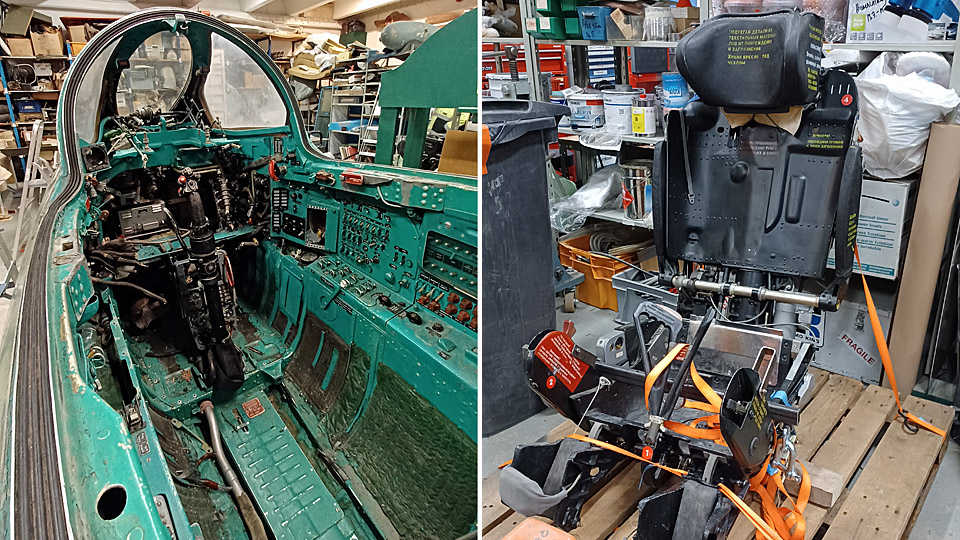
Photo by Osmo Väisänen We finally managed to dislocate the pilot’s seat from the cockpit of the MiG 21 BIS (MG-111), which will be transformed to a cockpit simulator. The dislocation was made possible by a dislocation bar, instructions and a manual received from the Guild of the Karelian Wing. Lots of original wiring still needs to be removed from the cockpit, before we can have access there to install the actual simulator equipment. The covering of the engine air intake duct openings in the cockpit rear and front bulkheads with plexiglass is underway.
Photo by Heikki Kaakinen Work continues with the Caudron C.50 (CA-50) aircraft. The re-covering of the fully restored port elevator with linen fabric was started and the unsatisfactorily tightened patches on lower wings were continued to be replaced with modern Oratex-material. The winter season barely allows any work on the interior of the DC-3 (DO-5) fuselage owned by Aviation Museum Society Finland. Work will continue with the warmer spring weather. Well, we have achieved something; the door between the cockpit and the cargo hold has received a new coat of paint. Translation by Matti Liuskallio. |
|
Avainsanat: aviation history, restoration, MY-14, VL Myrsky, Caudron C.59, CA-50, MiG-21BIS;MG-111 |
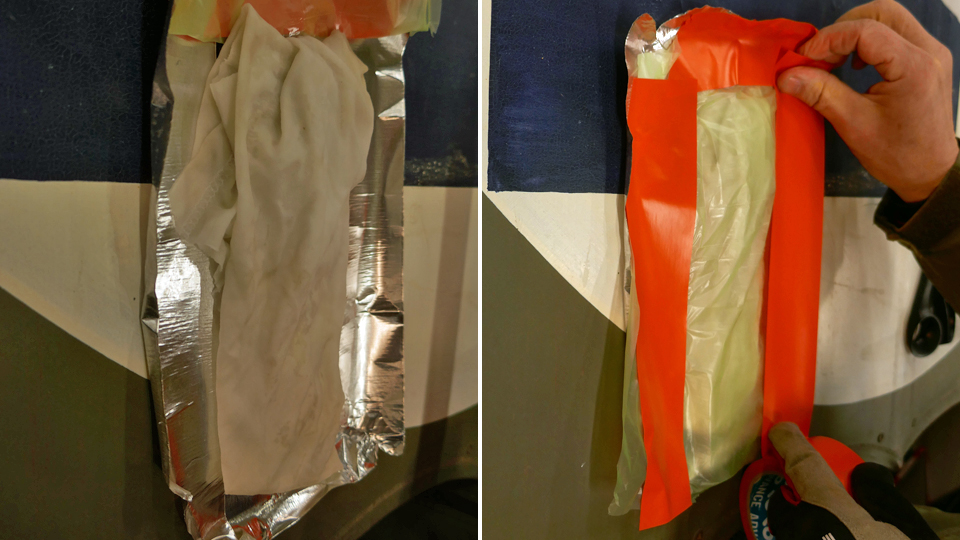
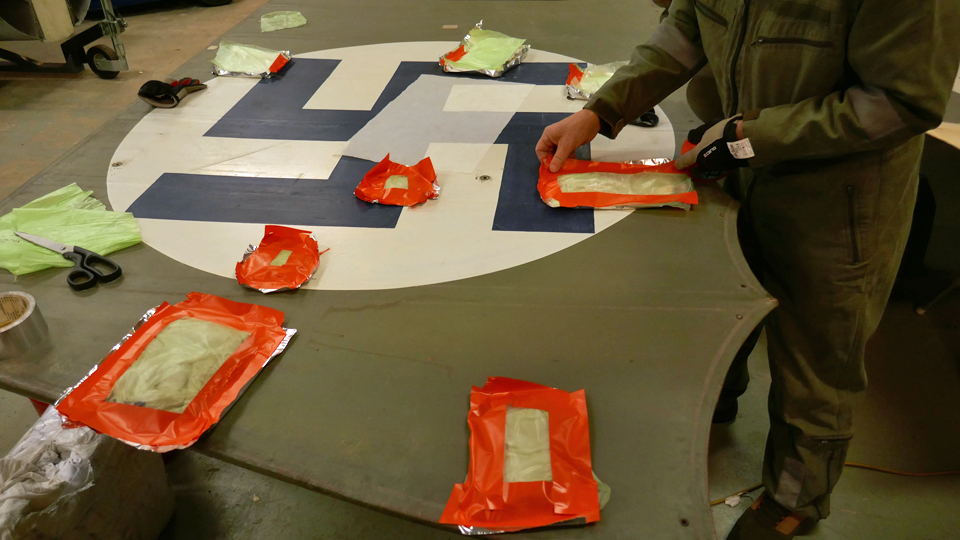
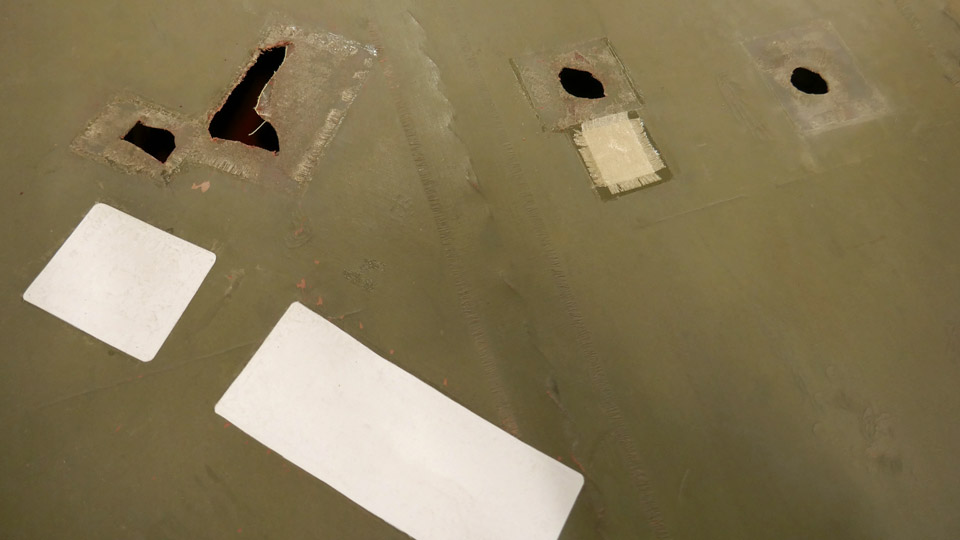
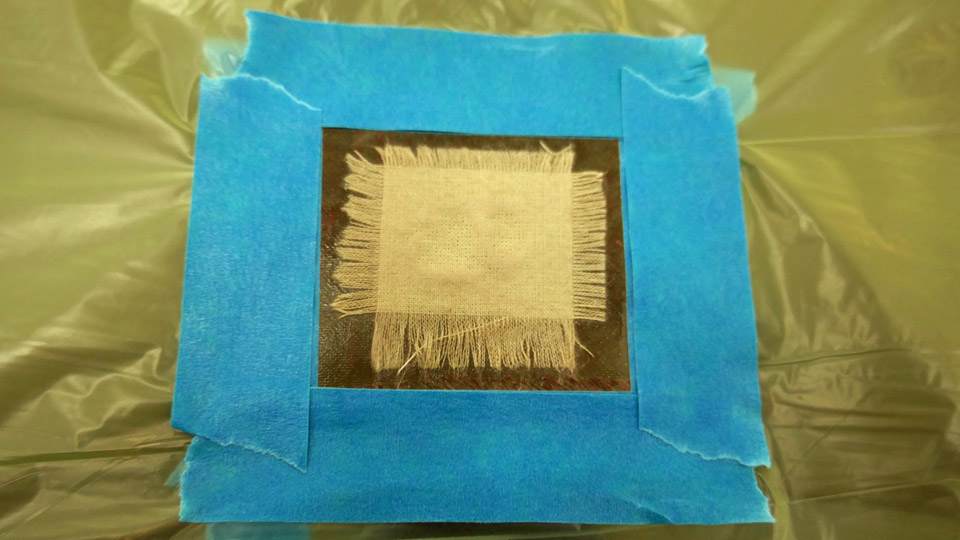
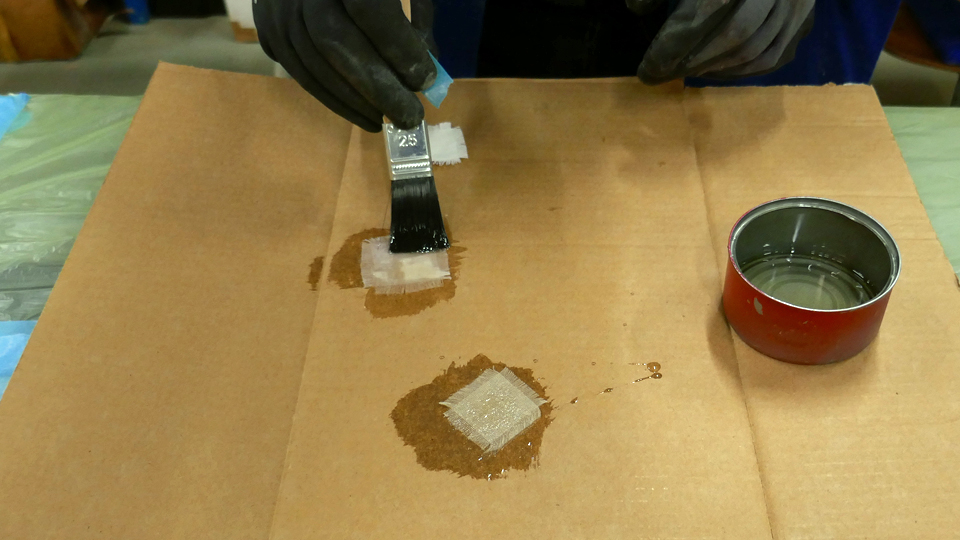
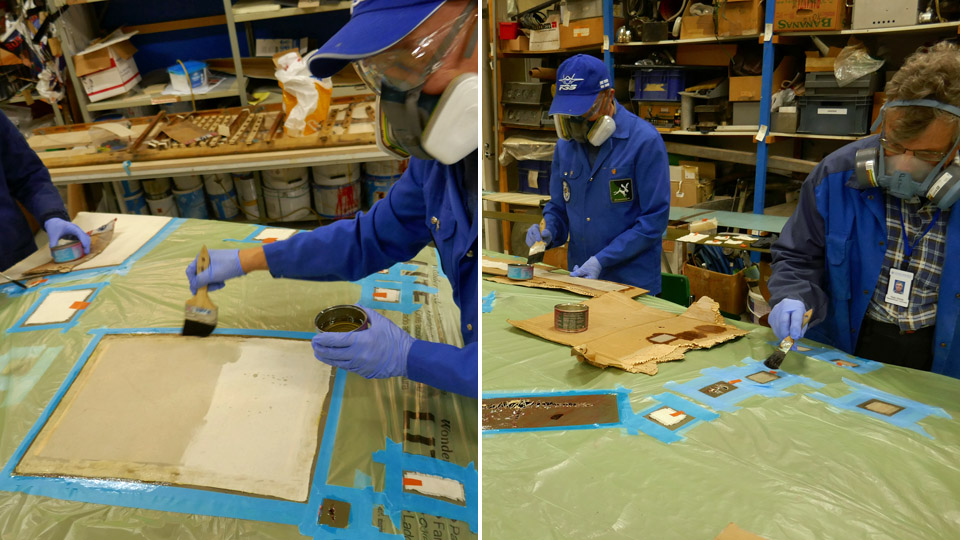
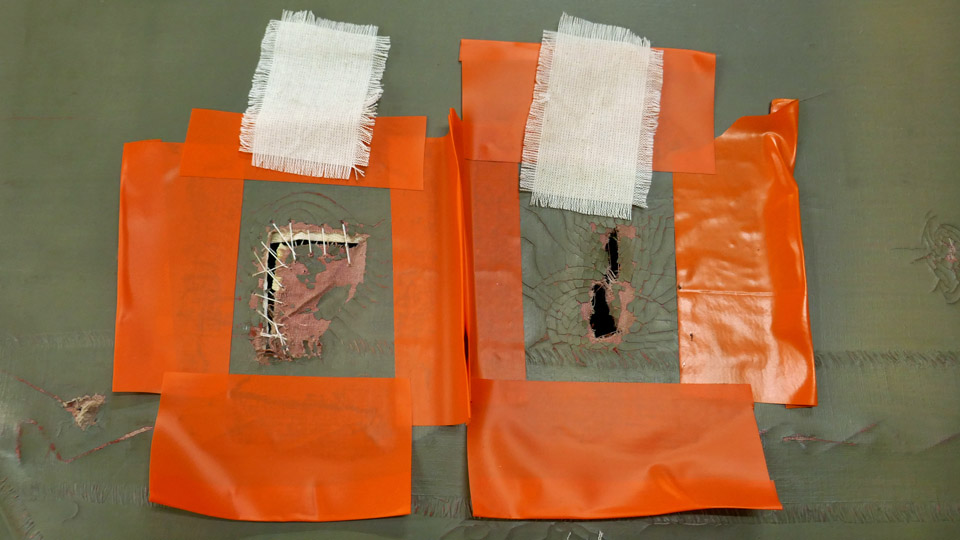
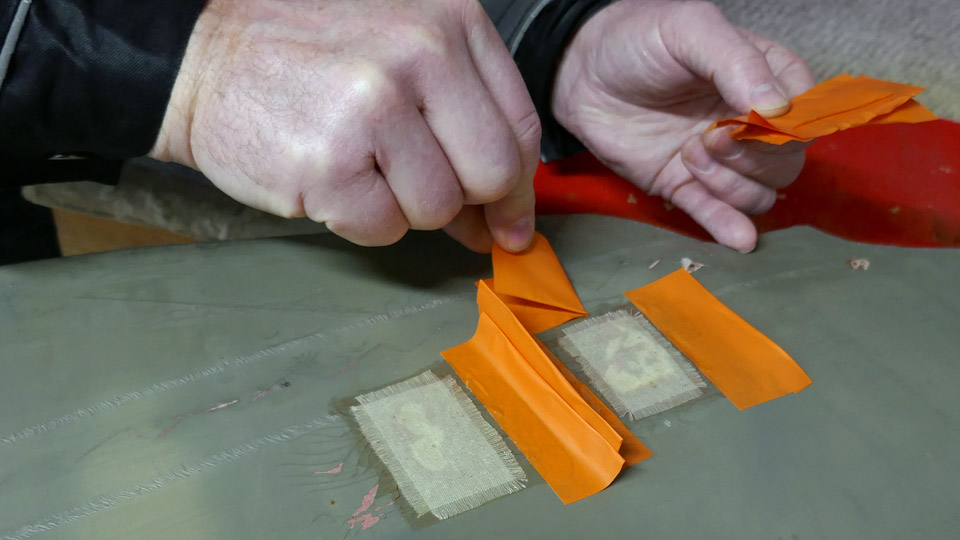
Changing the patches on lower wings of the Caudron to a modern patching materialMaanantai 26.12.2022 - Tuesday Club member The patching of the holes on the lower wings of the Caudron C.59 CA-50), the advanced trainer from the 1920’s, was finished in 2021. More than a hundred holes of various sizes could be found on both wings. To patch the holes on the lower wings we had used first cotton and then linen fabric. We had sewn together the tattered edges of big holes before gluing the patches on them. The patches had been fringed on their edges in the manner of the 1920’s, and they were glued on the holes using nitrocellulose lacquer, i.e. the tightening lacquer for the covering fabric.
In the autumn of 2022 we started the changing of the fabric patches on the lower wings with the Finnish Aviation Museum’s staff supervising the work. The reason for this was that the larger patches of fabric, and especially the linen patches, hadn’t properly tightened. There were also problems with those patches, where the edges of the holes had been sewn together. In these places the stitches had remained lumpy under the patches in a disturbing manner, probably because the fabric hadn’t tightened enough on the stitches. Patches on the wings have to be smooth at least for aerodynamic reasons.
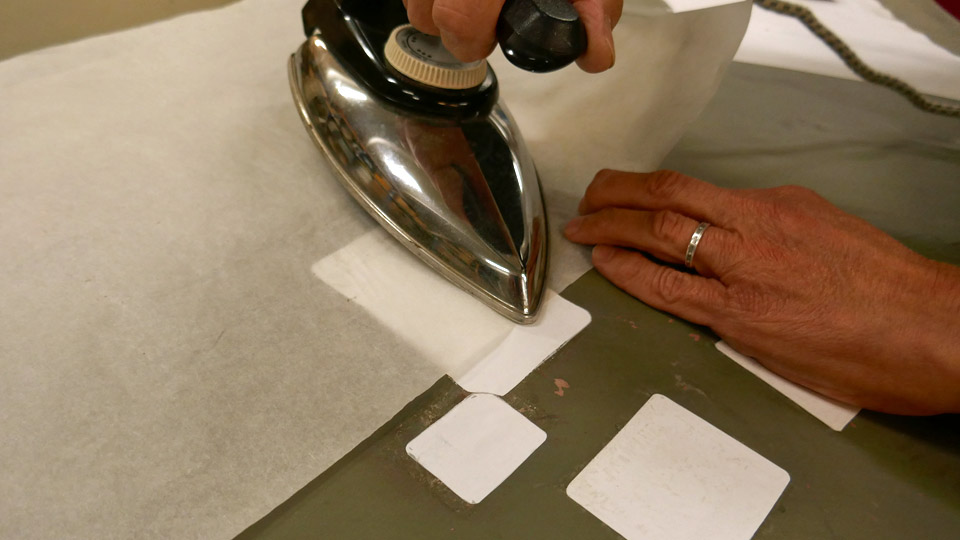
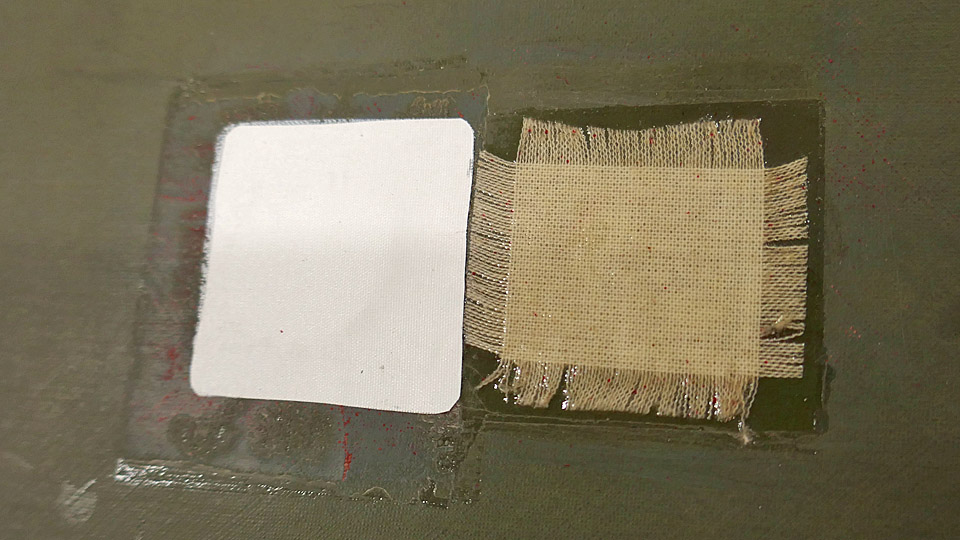
The Museum decided to have the inadequately tightened linen patches and the fabric patches containing stitches to be changed to a new material. As the new material the modern heat-tightening Oratex- material, resembling the 1920s style, was chosen. Patches made of thin Oratex-material, painted in the patinated greyish green hue, produced inconspicuous and at the same time aerodynamically extremely smooth patches, compared with the fabric ones made with tightening lacquer.
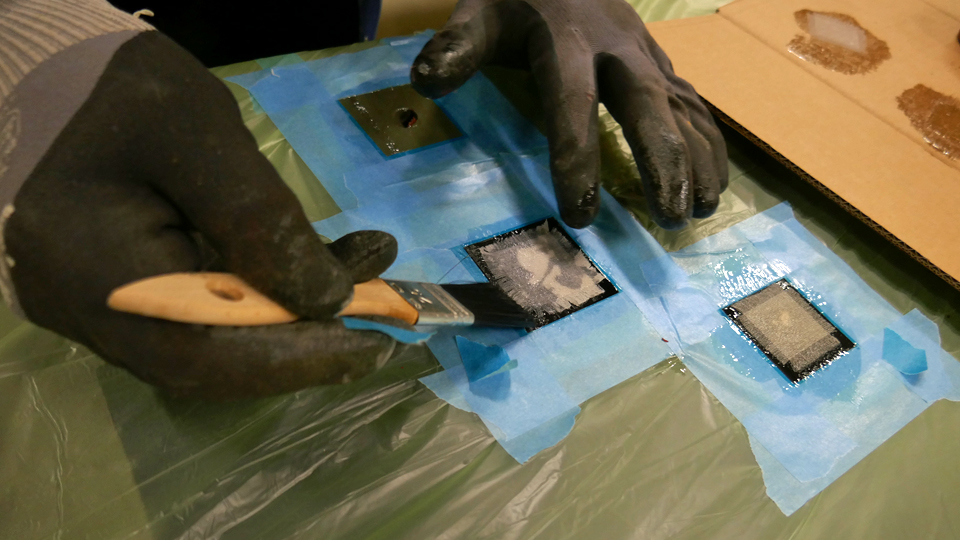
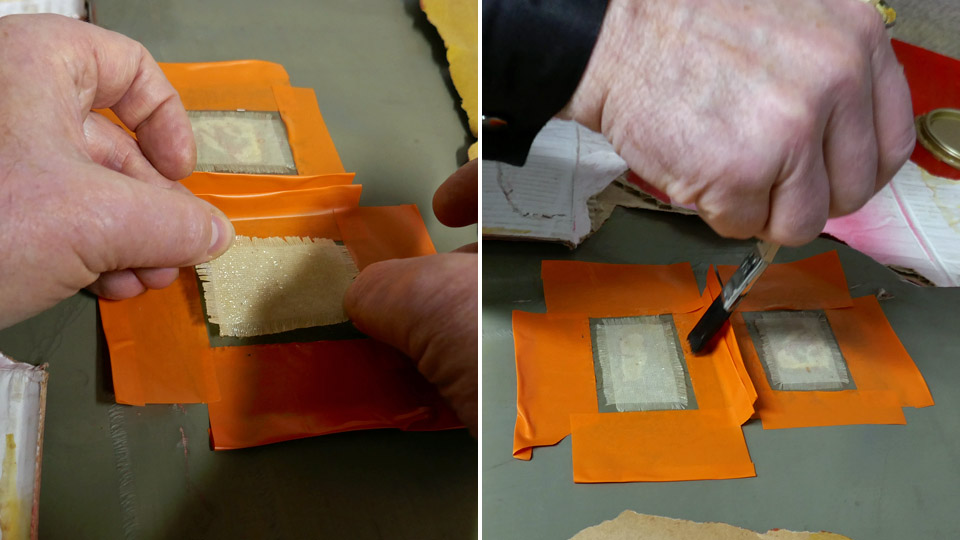
To replace the patching material the fabric patches were loosened using thinner for nitro cellulose lacquer (Thinner 8). The patch was surrounded with aluminium tape, so that the thinner wouldn’t damage the 1920s covering fabric. After this a thoroughly Thinner 8 soaked fabric, which was covered with a sheet of plastic foil, was placed on the patch. The foil was taped tightly on the edges to keep the fabric wet and to prevent the thinner from evaporating. After a few hours “the package” was opened and the cotton or linen patch, glued with nitro cellulose lacquer, could be neatly detached. After this the edges of the holes without a patch were cut clean. Patches, with tattered edges sewn together, were cut completely open. Holes with tattered edges will not be sewn anew.
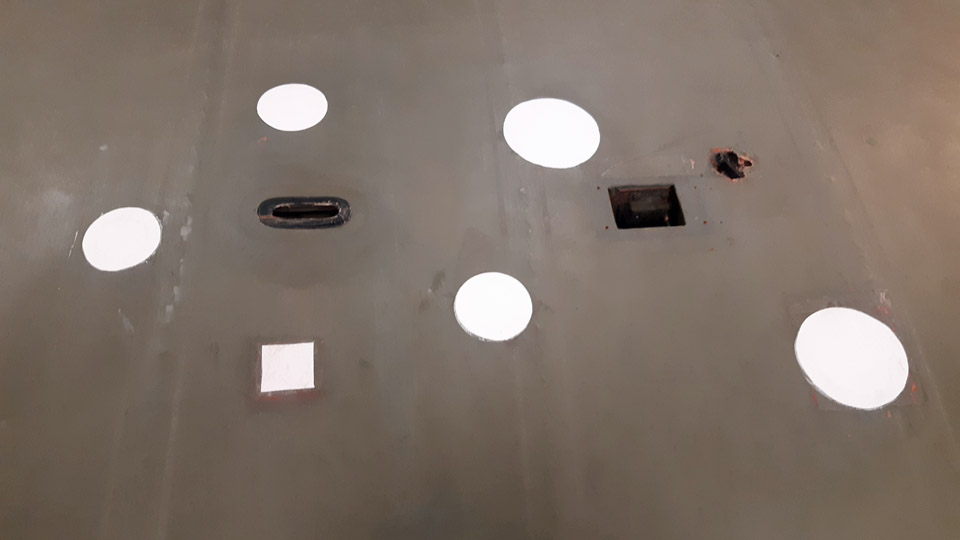
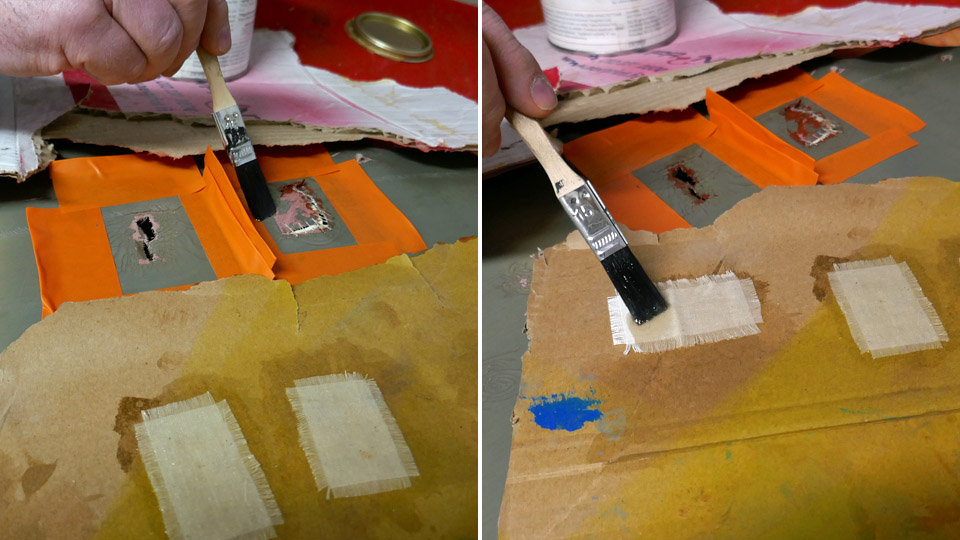
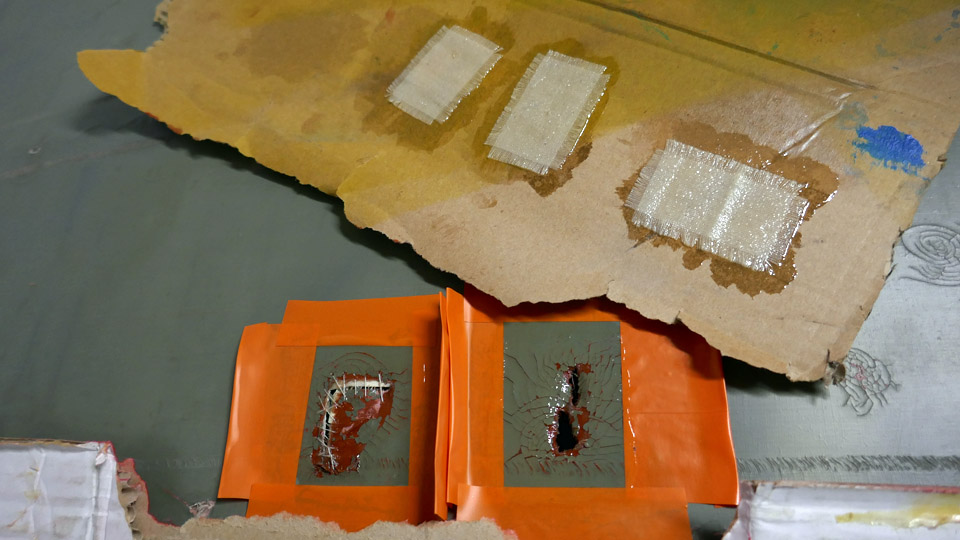
Now the patching of the cleaned holes could be started with Oratex-material. For each hole a larger round or rectangular piece was now cut out of the Oratex-material. After that the patch was glued and tightened on the hole by heating the patch with an iron, which was pre-heated to a suitable temperature, using a protective paper. The heating melts the glue from the underside of the patching material, fastening the patch to its place and tightening the fabric smooth.
This modern material is really handy to use and the patches turned out to be very smooth and tidy. There’s also the extra bonus of not having to protect oneself against the toxic fumes of the nitrocellulose lacquer. The appearance of Ortex- patches differs, however, from the traditional fabric patches with fringed edges from the 1920s. The work will continue in the spring season of 2023. Photos by Lassi Karivalo. Translation by Matti Liuskallio. |
|
Avainsanat: aviation history, restoration, Tuesday Club, Caudron C.59;CA-50 |
Tuesday Club started its spring season with full capacityTiistai 1.3.2022 - Tuesday Club member Suomeksi The Tuesday Club was not able to start its spring season in January because the amount of people allowed to work in the restoration workshop of the Finnish Aviation Museum was still limited due to the Covid-19 pandemic. Only the restoration work on the Myrsky MY-14 could be continued in January. Only half a dozen Tuesday Club members could work at a time, wearing masks. In the beginning of this year the Myrsky project has concentrated on the NACA-ring and the port wing landing gear doors, as well as finishing the Myrsky demo-wing before the Myrsky restoration exhibition will be opened.
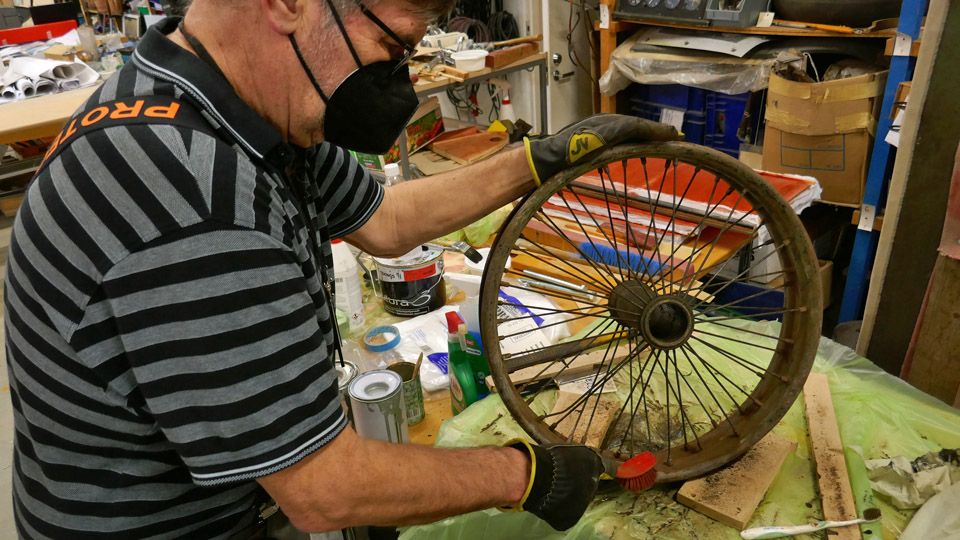
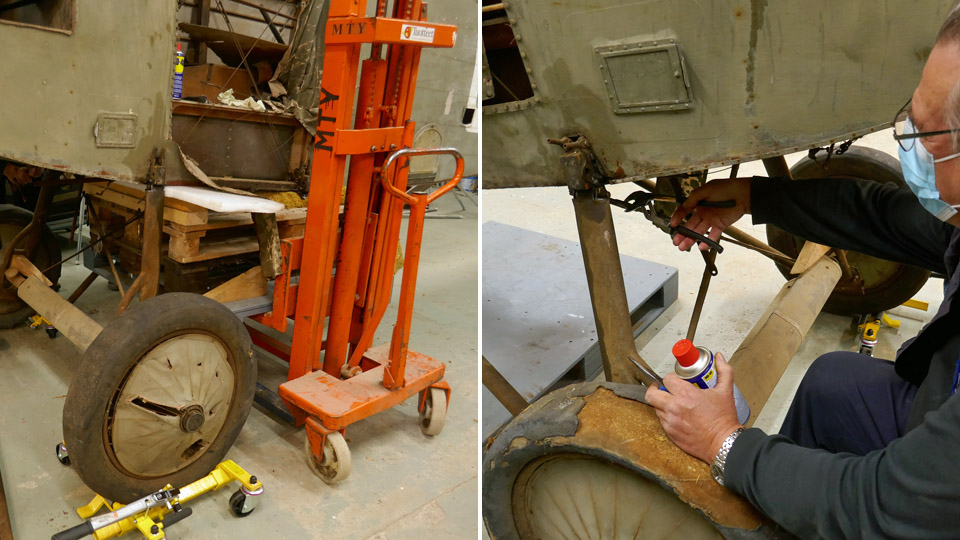
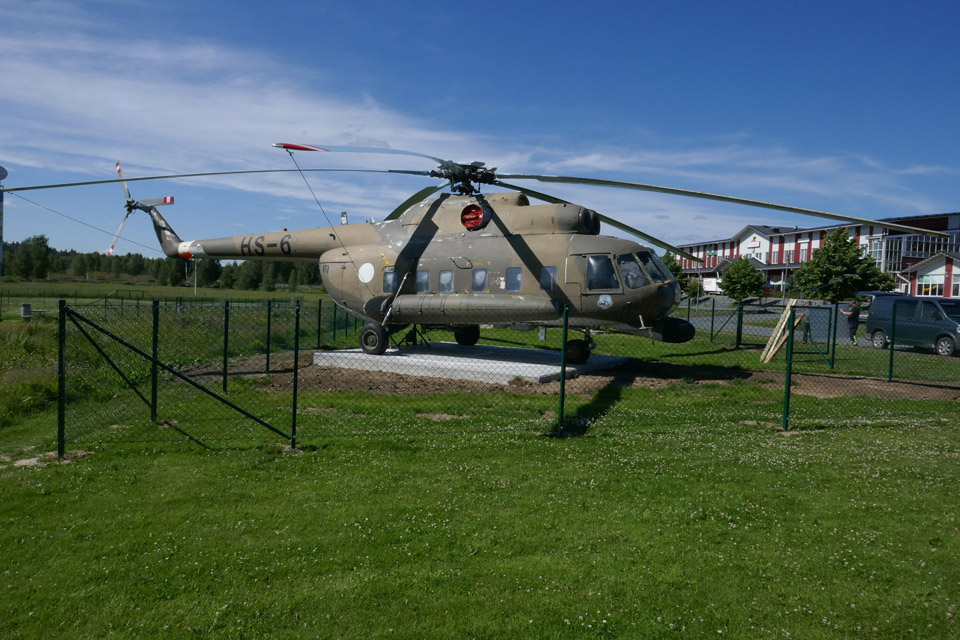
Along with the Myrsky restoration work, a couple of Tuesday Club members have been working to finish the painting of the Mil Mi-8P (HS-6) helicopter tail boom stabilizers and to take the large parts of the Super Caravelle towbar to be sandblasted. The tyres of two 1920s aircraft wheels have also been dismantled so that the wheels can be repaired. These wheels have been received from the Finnish Air Force Museum to be assembled on the Caudron C.50 (CA-50) aircraft.
As the national Covid-19 restrictions have been lifted due to the decreased health risks caused by the pandemic, it was agreed with the Finnish Aviation Museum that the number of people working in the restoration workshop can be increased. This enables us to launch other Tuesday Club activities in addition to the Myrsky work. On February 23rd we continued from where we stopped before Christmas, particularly with the Caudron C.59 conservation and the Super Caravelle towbar restoration. We still work in two groups of 10 Club members, one group on Tuesdays and the other on Wednesdays. The Myrsky team, with less than 10 members, is working on Tuesdays, Wednesdays and Thursdays.
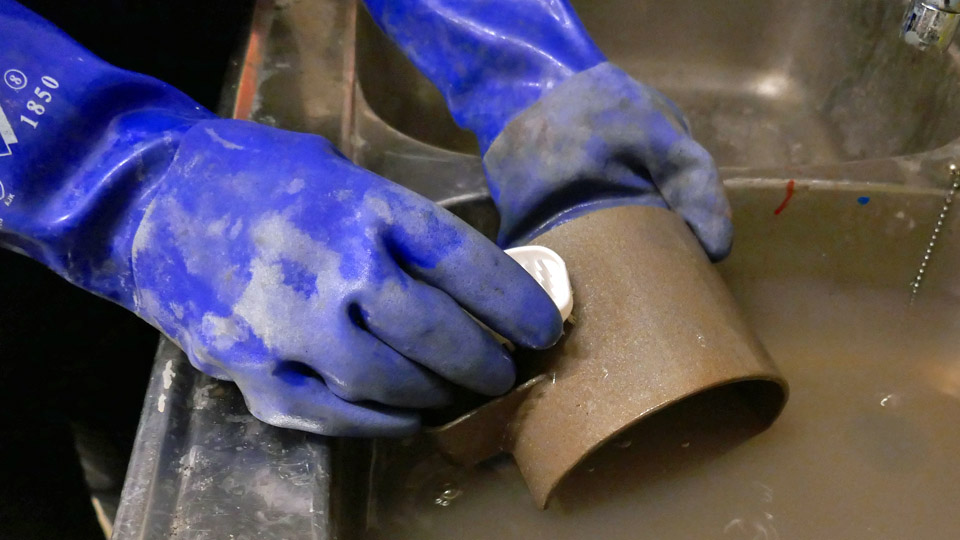
The coming weeks will be spent in cleaning the parts which were dismantled from the Caudron’s fuselage, and after that the parts will be painted. Two landing gear wheels were received from the Finnish Air Force Museum for the Caudron. The wheels and spokes are cleaned from dirt, grease and rust. Mechanical and chemical methods are applied.
The Caravelle towbar has been dismantled and all dismantled parts have been cleaned of rust, either with phosphoric acid or by sandblasting, and the painting work can be started. Before painting, the sandblasted parts were washed to remove the sand dust, which remained on the surface. Then the parts were carefully dried, using compressed air. Some parts have already been painted with clear Isotrol varnish which will prevent rust. Photos: Lassi Karivalo Translation: Erja Reinikainen. |
|
Avainsanat: aviation history, restoration, VL Myrsky, MY-14, Caudron C.59, CA-50, Mil Mi-8P, HS-6, Super Caravelle |
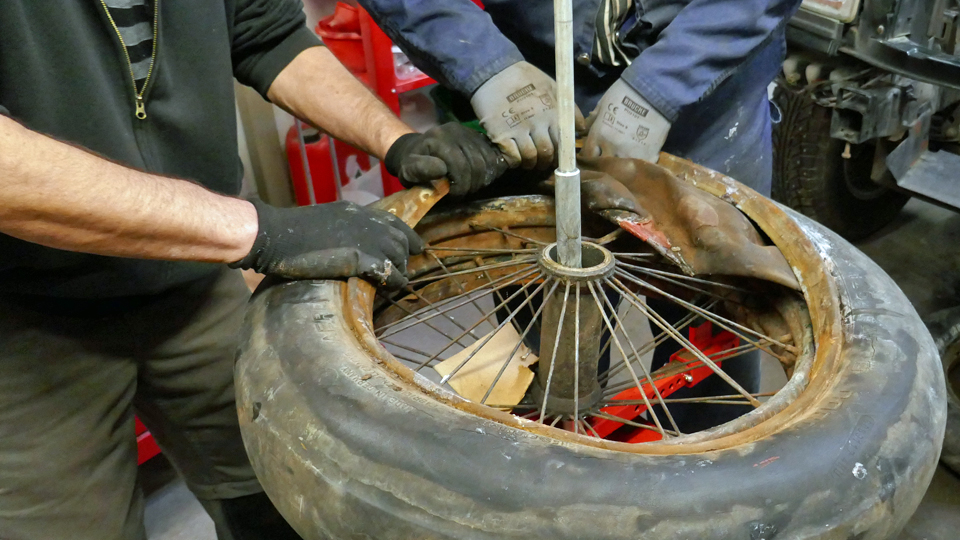
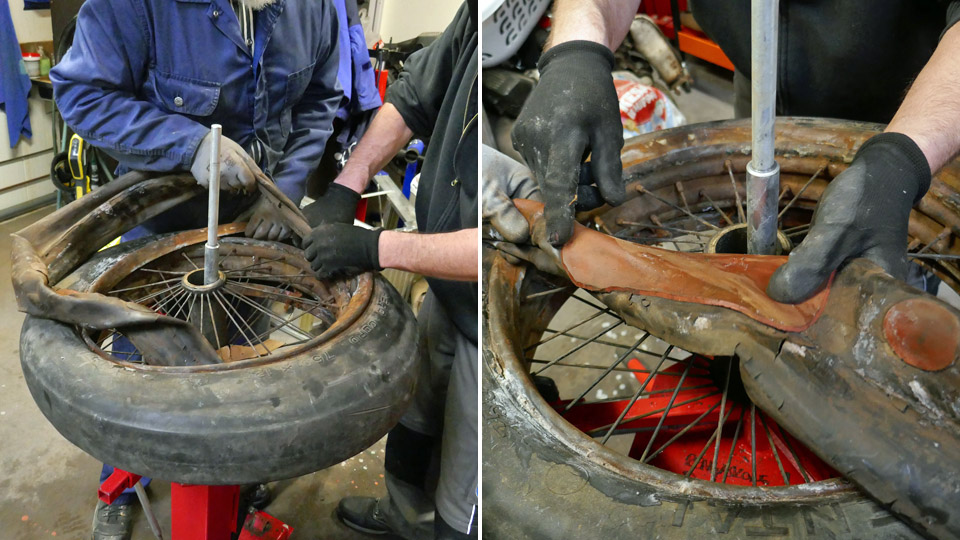
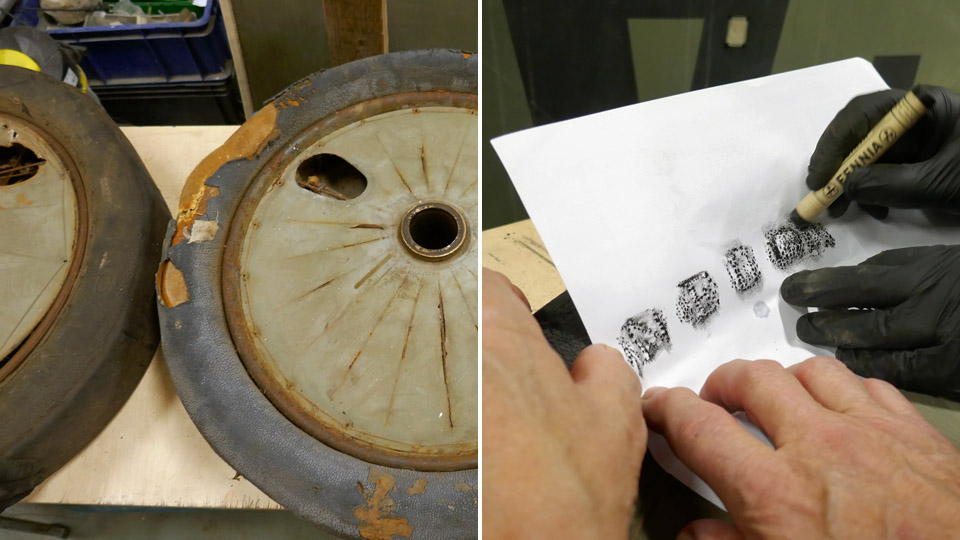
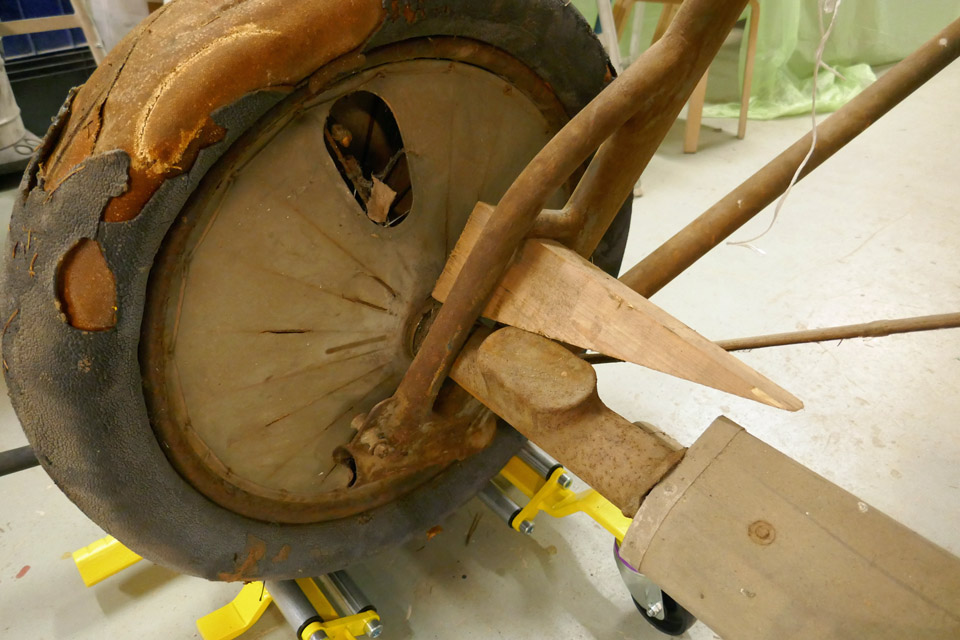
About the wheels of Caudron C.59 (CA-50)Lauantai 5.2.2022 - Tuesday Club member The Finnish Aviation Museum and the Tuesday Club have a common subject for conservation; The Caudron C.59 advanced trainer, serial no CA-50, which was in service with The Finnish Air Force. The last flight of the type was in October 1929.
Brought from the Päijänne-Tavastia Aviation Museum in Vesivehmaa to Vantaa for conservation, the Caudron landing gear has genuine 1920’s wheels and tyres. The landing gear has already been taken apart, cleaned of rust and the surface finishing of the parts is under way by the Tuesday Club.
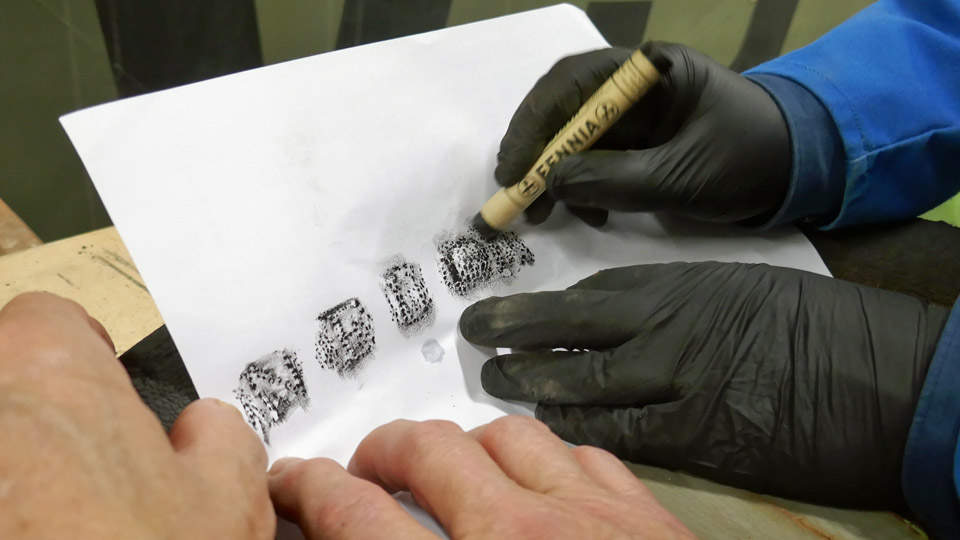
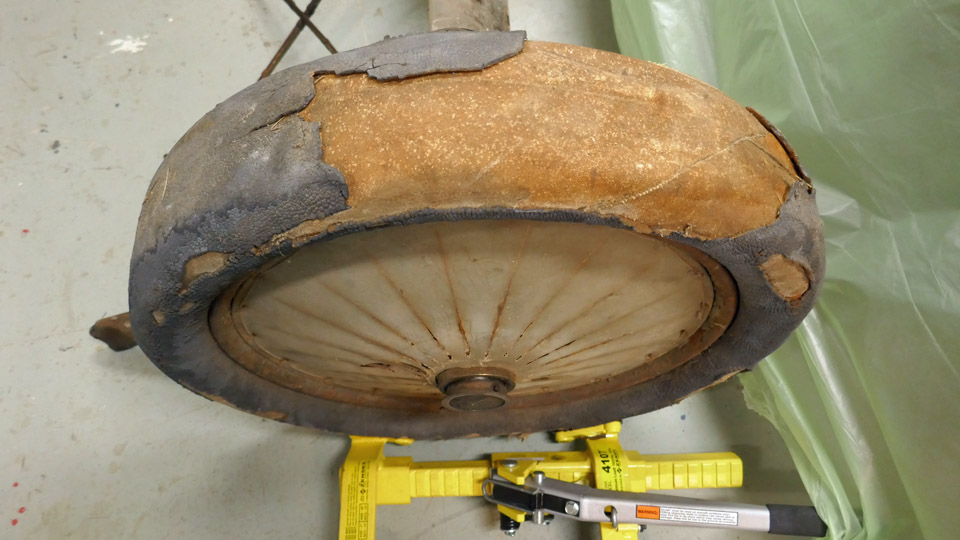
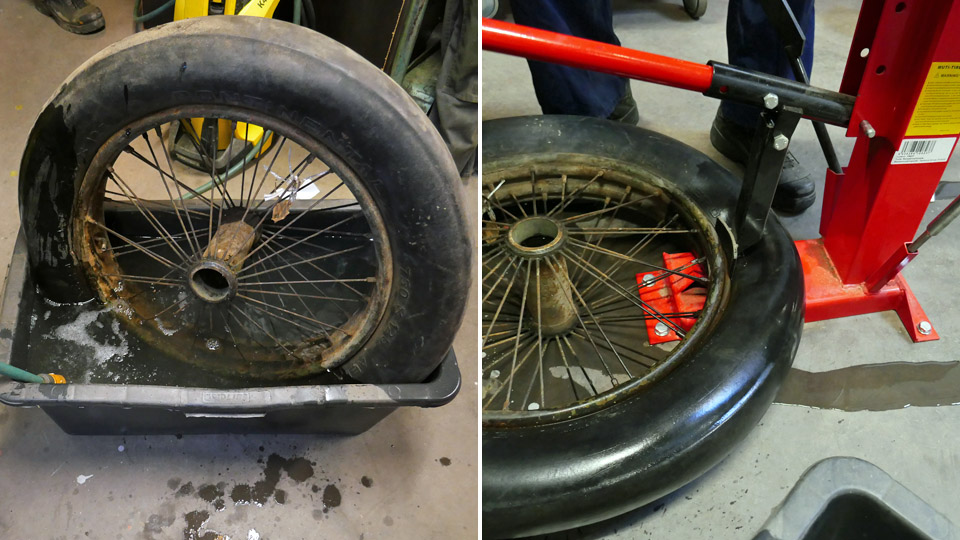
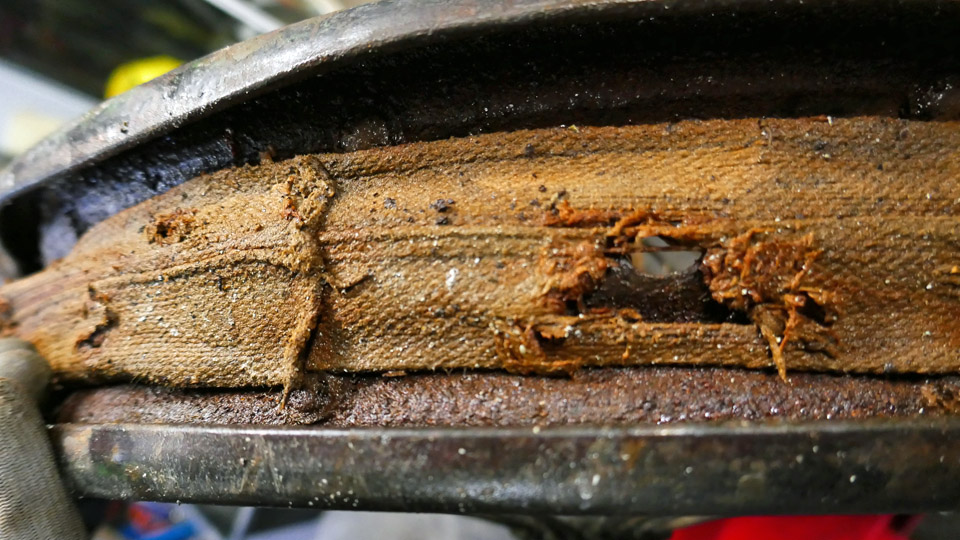
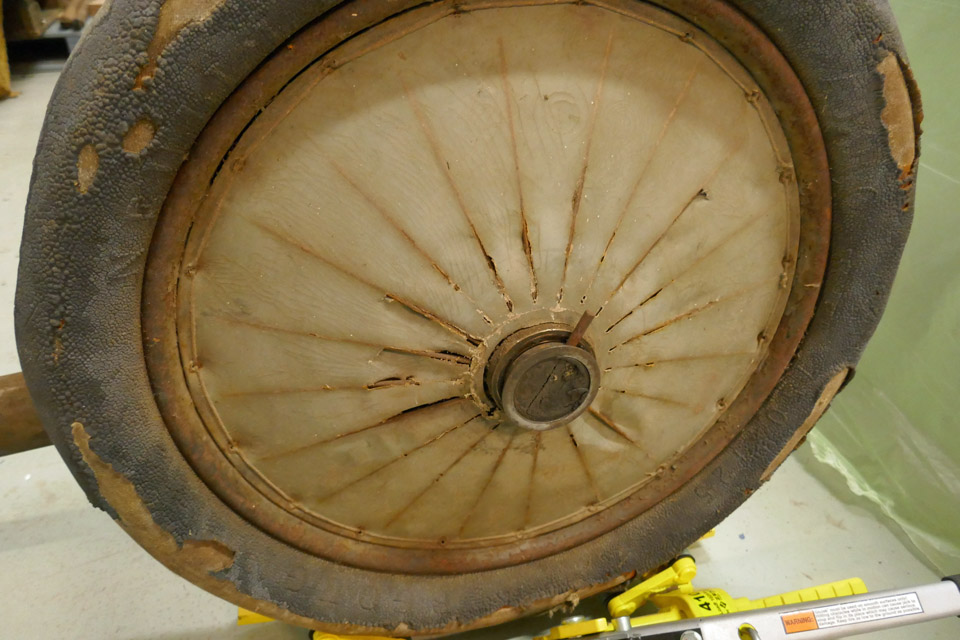
The CA-50 wheels are an odd pair, and the rims and spokes differ from each other. Otherwise the wheels and tyres are of the same size. One wheel turned out to be French with a NEUILLY-AVIATION-AERO 750-125 tyre. The markings on a very dilapidated tyre could only be read with the help of paper and a black grease pen. The tread of the NEUILLY-AVIATION-AERO tyre has been largely peeled off, exposing the canvas under it. The other was a British wheel. Its tyre is a PALMER CORD AERO TYPE 750x125, and it’s hardly in a better shape than the French one, which is probably an original Caudron wheel. For some reason it had been mated with a British wheel. Is it possible that it had belonged to a Martinsyde F.4 Buzzard fighter, which was in service with The Air Force in the 1920’s, as the Caudron was.
Both the inner tyres have been at some point filled with polyurethane filler mass, squeezed in through the valve. This way the tyres have been made to resemble ”solid rubber” when the fuselage was standing on the landing gear on show in the Päijänne-Tavastia Aviation Museum hall.
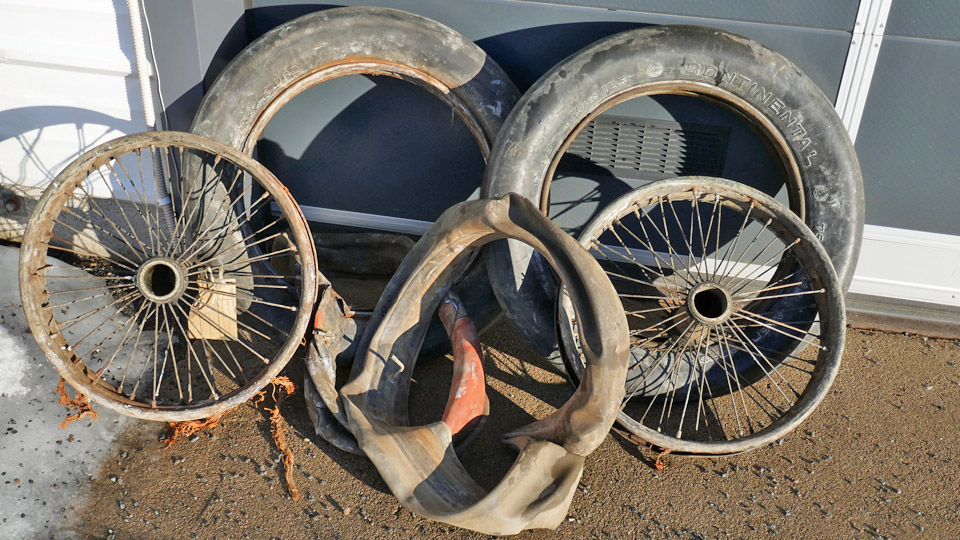
The restoration of these wheels to their original condition was not possible without breaking them because of the polyurethane inside the tyres. So the question arose whether The Air Force Museum at Tikkakoski might have similar, but better 1920’s wheels to install on the CA-50. There was a suitable pair of wheels in Tikkakoski which fitted the Caudron’s axles, with Continental 750x125 AERO CORD tyres and clearly in a better shape. Although they weren’t French. The Finnish Air Force Museum gave the wheels to be fitted to CA-50, so we fetched them from Tikkakoski to Vantaa.
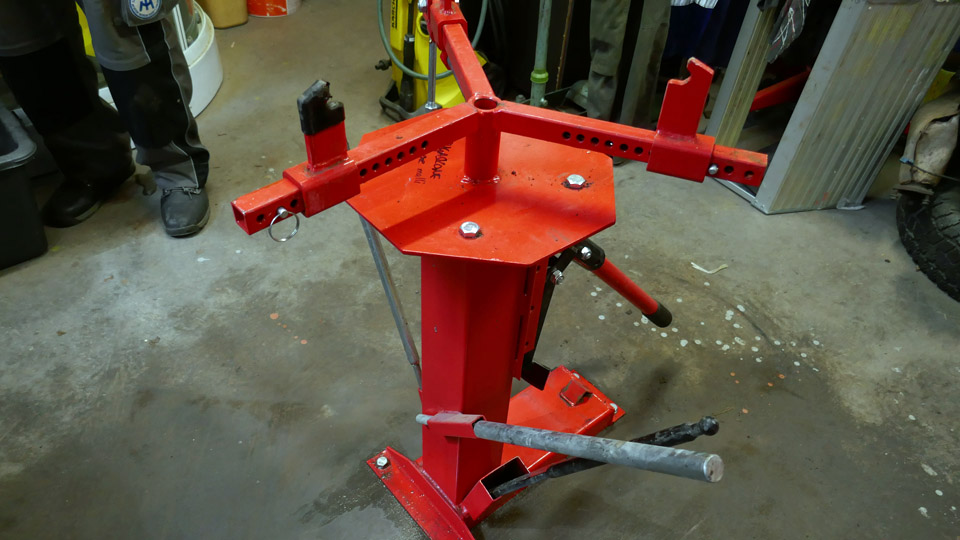
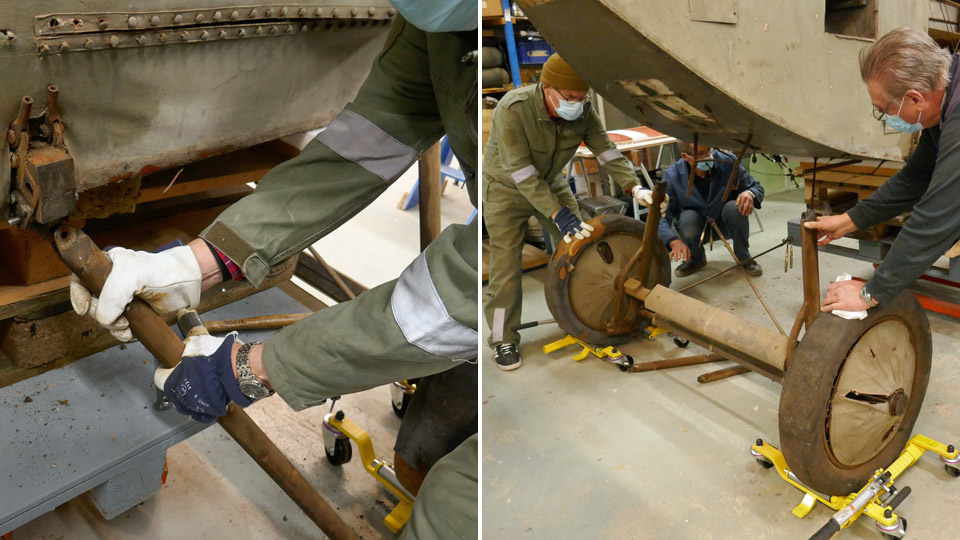
The rims of the wheels with the Continental tyres were covered with a thick layer of rust, so the tyres had to come off. We didn’t take them to a tyre repair shop to be taken off the rims, instead we decided to take them off carefully in a manual tyre working bench in the garage of a Tuesday Club member.
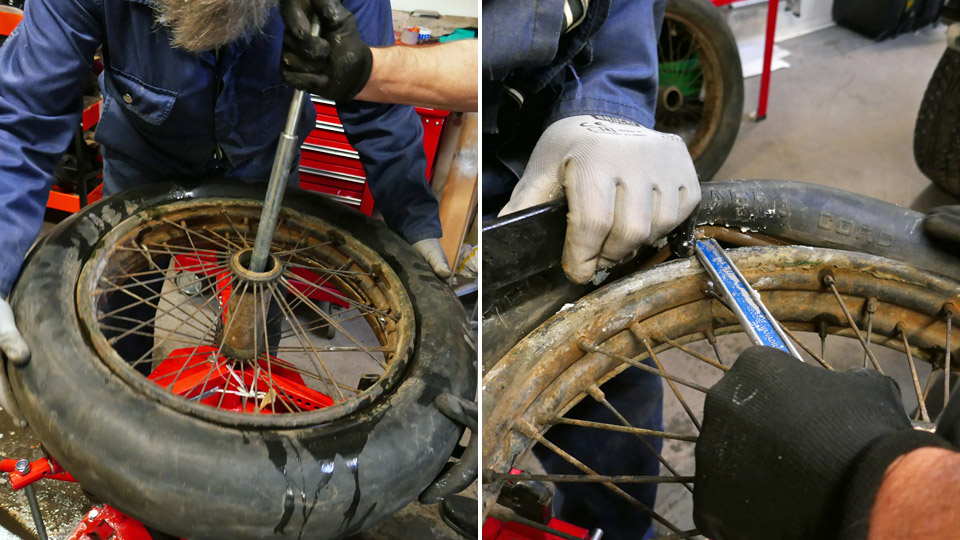
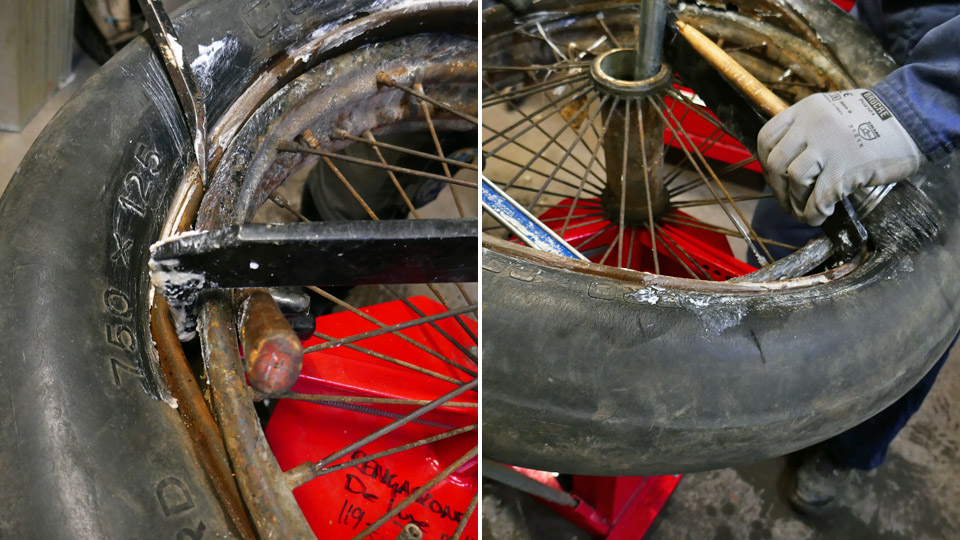
Before starting to detach thy tyre, we warmed the tyre in hot water to make it softer. After a while we took the wheel out of the bath and started the tyre work. First we pressed the edge of the tyre free from the inner edge of the rim where it had got stuck over the period of 90 years of storage. The parting of the tyre edge from the rim was done with a lever in the bench. With the aid of a metal plate in the lever it was possible to free the edge bit by bit and so free it from the rim. In this way both edges of the tyre were freed from the inner edge of the rim.
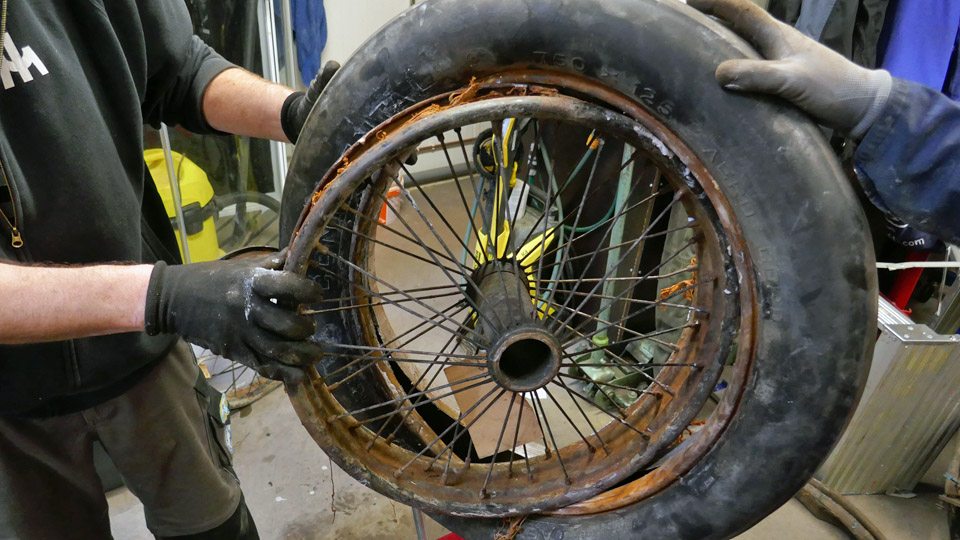
It was time to separate the tyre. The wheel was lifted on bench and locked there with a metal peg and clasps attached to the wheel rims. With the help of a tyre bar, we opened carefully an opening between the tyre and the wheel rim. Into this opening we pushed a metal rod with a down pointing ball-headed peg at the other end. Propping the metal rod against the metal peg in the middle of the bench and swivelled the ball-headed rod in the opening between the tyre and the rim counter-clockwise. This way the edge of the tyre was managed gradually on top of the rim. Simultaneously we applied lubricant on the edge of the tyre to facilitate the moving of the ball-headed rod between the tyre and the rim.
When the other edge of the tyre was on the rim the whole way, we pulled out the inner tube from the inside of the tyre. We noticed that the tube was a veritable patching wonder, because a large part of the tube was covered with patches. It was obvious that there was a shortage of tubes in the 1920’s, because the tube had been so diligently patched time after time.
We turned the wheel on the bench the other way round and in the method described earlier we lifted the other edge of the tyre on the rim with the ball-headed rod. Now we were able to pull the rim apart from the tyre.
These Continental tyres seemed good enough to withhold the air pressure, together with new inner tubes. That being the case, they could be used when moving Caudron CA-50 around. Naturally this must be carefully looked into and tested. When being on show, trestles will be put under the landing gear axles in any case, so the aircraft won’t rest on its tyres.
The next phase will be removing the rust from the inner and outer sides of the rims before painting the rims. This will be done by immersing the rim for 24 hours in 33% phosphoric acid bath. Photos: Lassi Karivalo Translation: Matti Liuskallio. |
|
Avainsanat: aviation history, restoration, Caudron C.59, CA-50 |
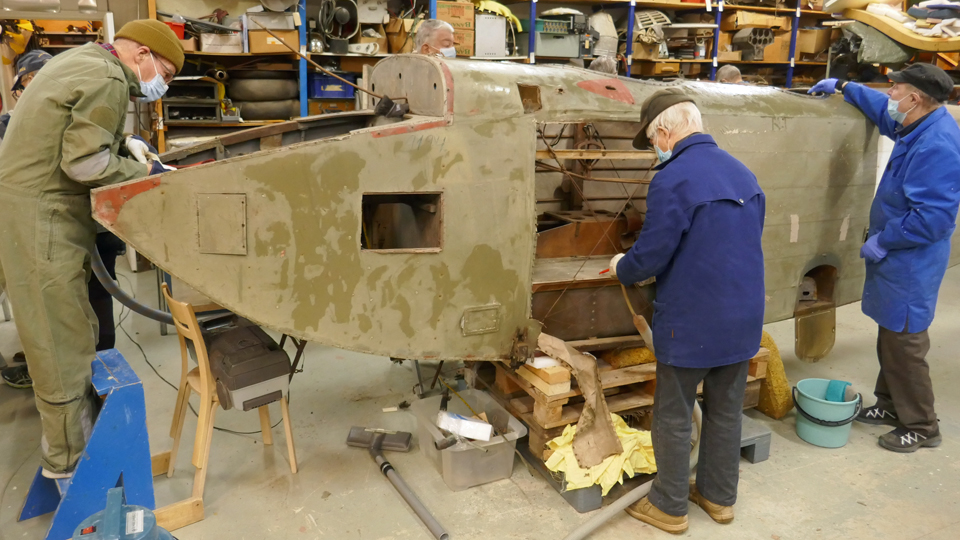
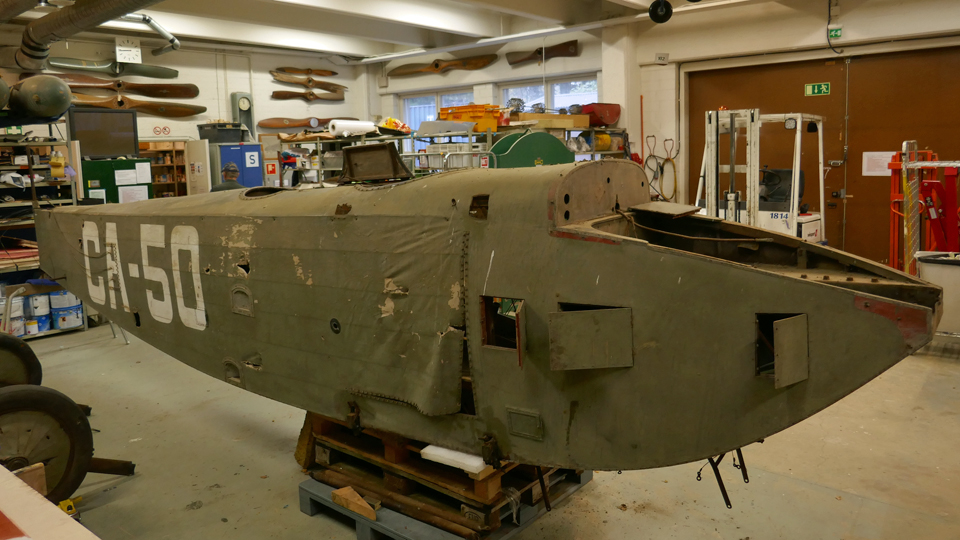
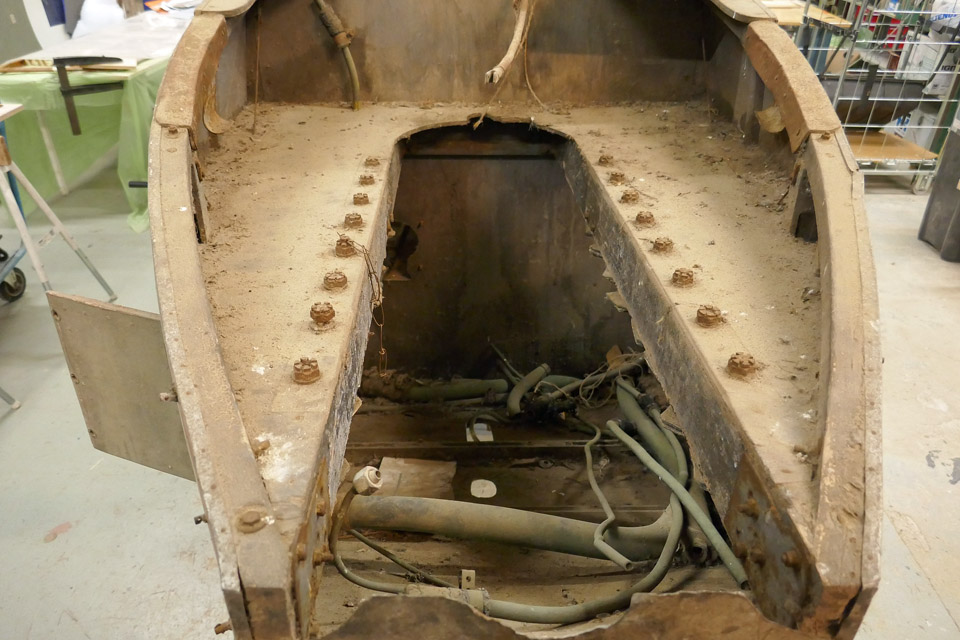
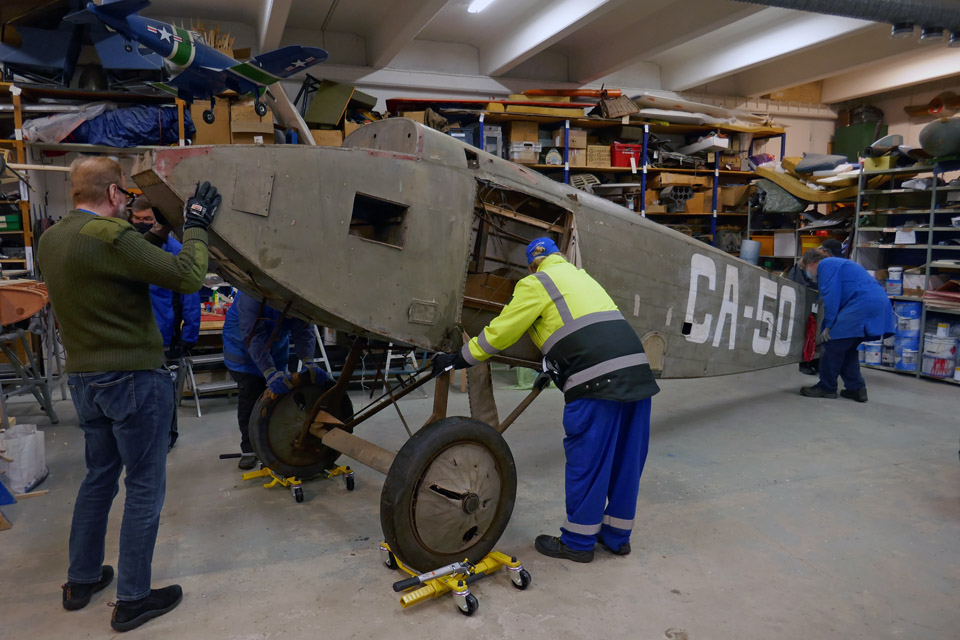
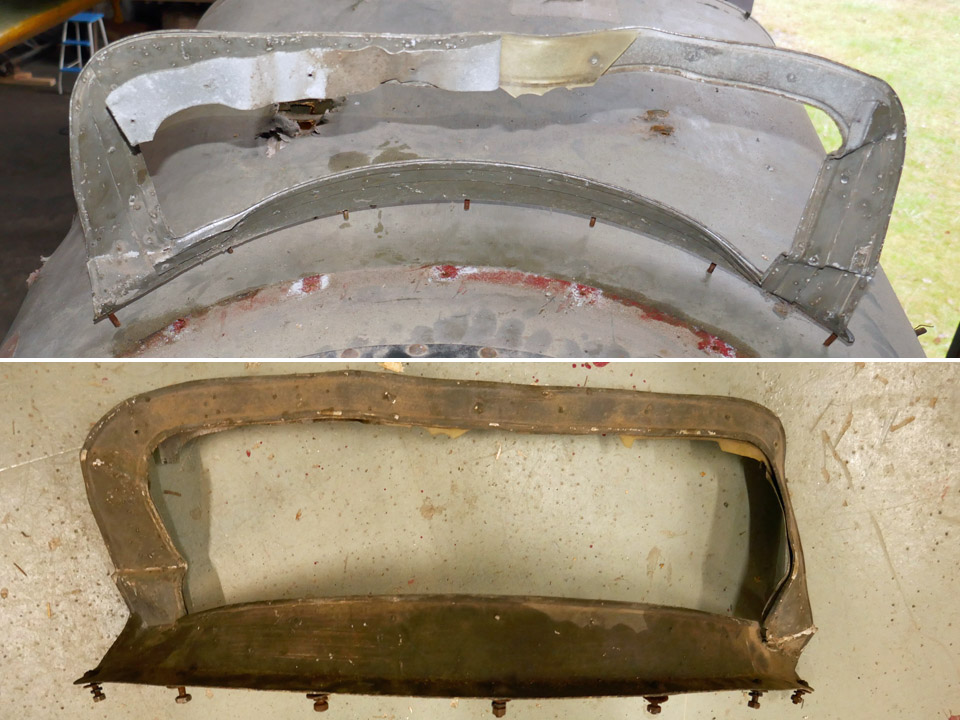
Cleaning Caudron fuselage and removing partsMaanantai 22.11.2021 - Tuesday Club member Preparations for the conservation of the Caudron C.59 CA-50 fuselage are under way at the restoration workshop of the Finnish Aviation Museum. Conservation of the fuselage means that rusting of the metal parts is halted as well as rotting of the wooden parts. The dirty plywood parts of the fuselage will be cleaned, and the badly cracked paint surfaces are being attempted to be revived. The damaged parts of the fuselage will be repaired. The CA-50 fuselage will therefore not be restored to its airworthy condition from the late 1920’s.
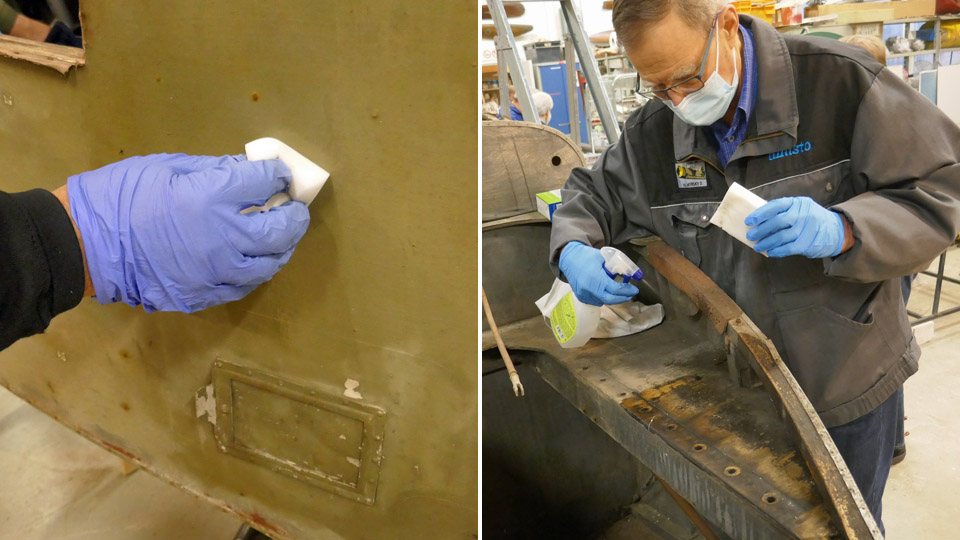
The first task was the cleaning of the plywood surfaces of the fuselage and the empty engine bay. The cracked fabric surfaces will not be touched. At first the surfaces were vacuum cleaned, after that the cleaning went on with a damp wonder sponge, which is well suited for cleaning dirty plywood surfaces. It’s surprisingly efficient and gentle. The engine bay plywood surfaces were so grimy that the wonder sponge treatment had to be renewed a few times. To help in cleaning the surfaces, a solution of water and Sinol was used, administered from a spray bottle.
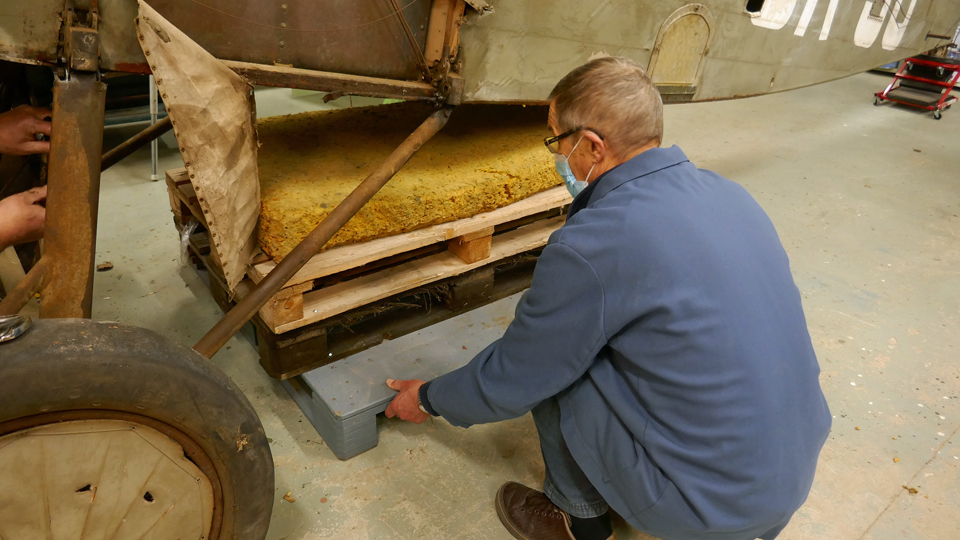
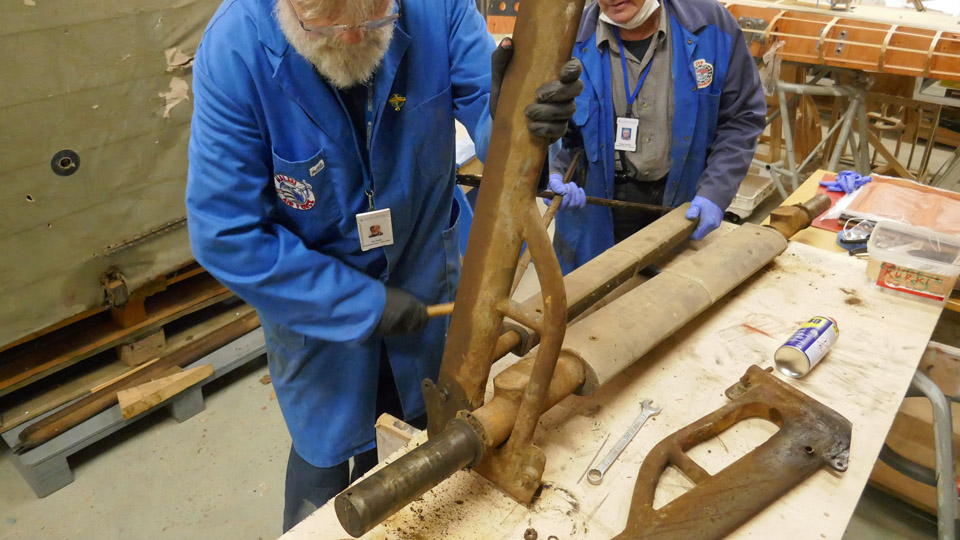
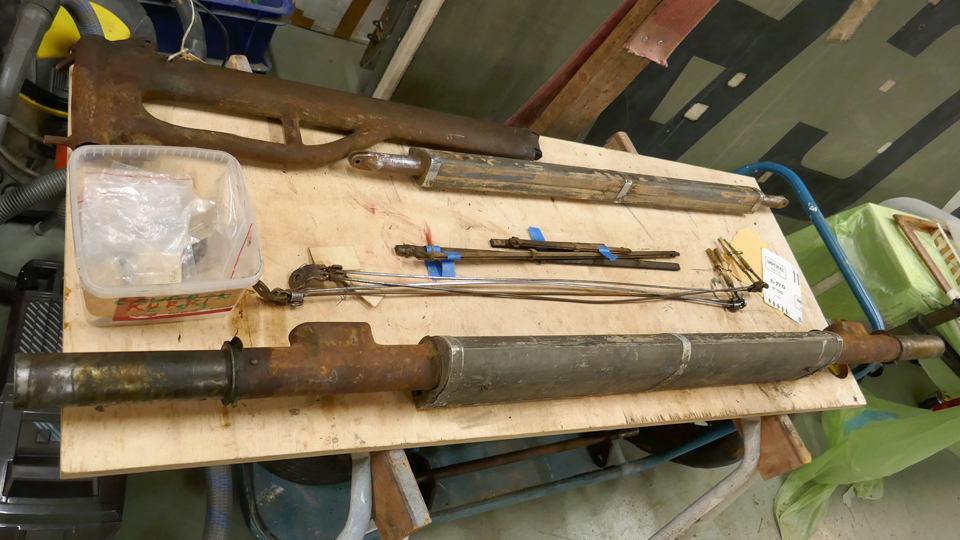
The dissembling of the fuselage parts was started from the landing gear. For that purpose the fuselage had to be lifted on a trestle, so that the landing gear could be removed from under the nose. For the lifting a supporting bed was built from three padded wooden pallets. The trestle was pushed under the fuselage below the cockpit. After this the forks of a stacker were pushed under the supporting bed and the fuselage was lifted on to the supporting bed in order to remove the landing gear.
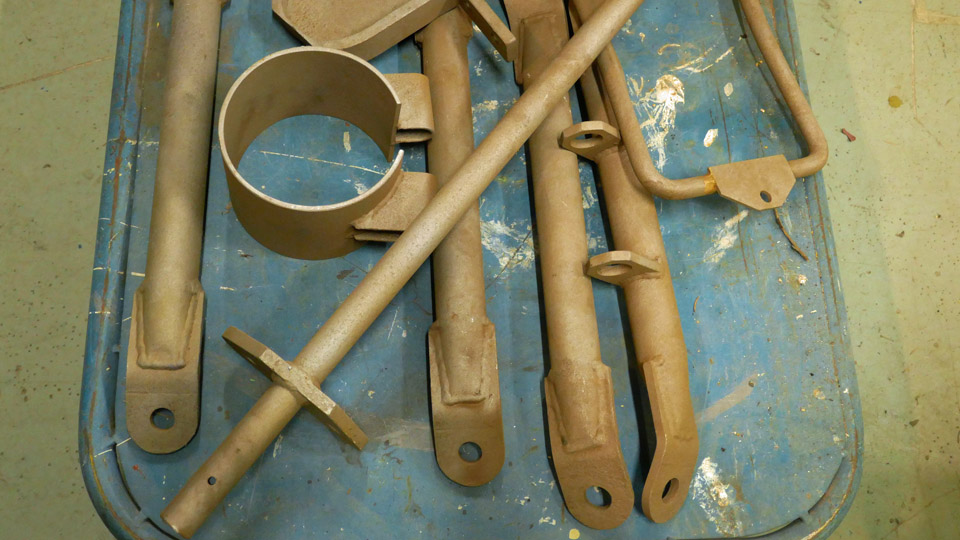
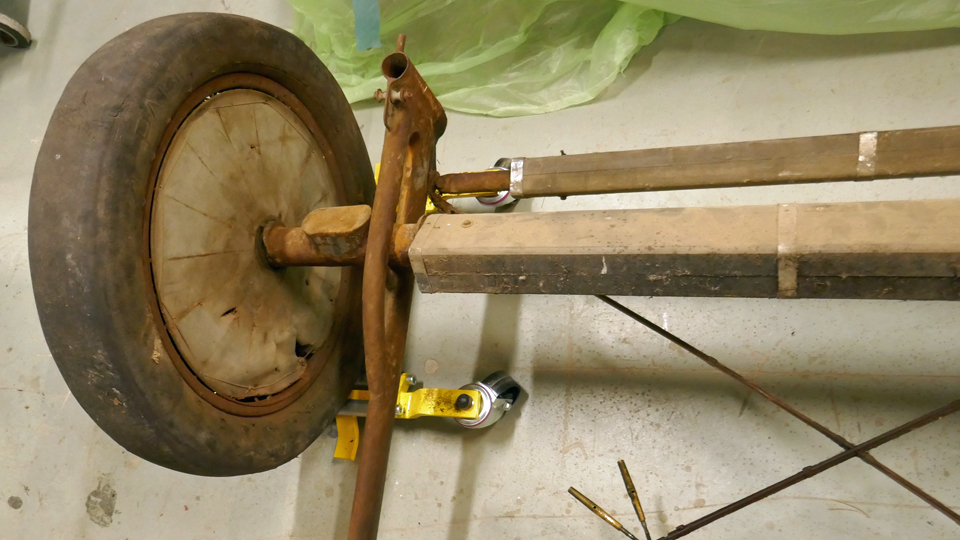
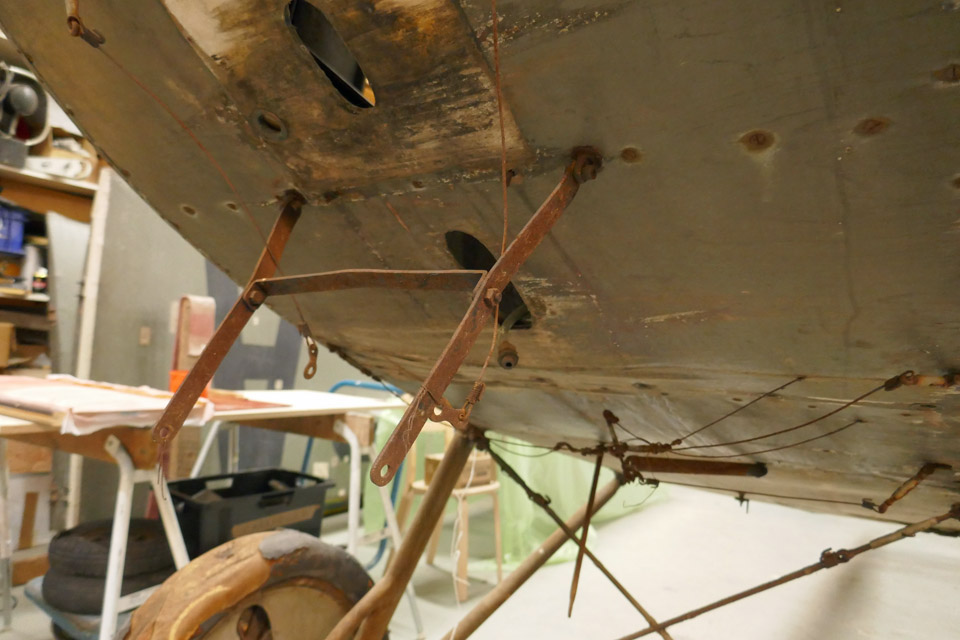
The landing gear diagonal struts were removed next. Although the nuts at the ends of the attachment bolts were thickly coated with rust, they opened surprisingly easily. Even after the Caudron’s 93 years of storage. After the ends of the diagonal strut and the bracing grid had been removed from the fuselage, the landing gear now resting on auxiliary wheels was pushed away from under the nose of the Caudron. The fuselage was then lowered to rest on the supporting bed.
The landing gear was then continued to be taken apart for easier rust removal. First the wheels were detached. Both of them were in a really bad shape. Furthermore, the tyres had been filled with polyurethane at some point. With the help of paper and felt pen the markings on the surface of the tyres were worked out. One of them was found to be French and the other British.
The landing gear wheels were covered in the 1920-1930’s fashion with doped canvas
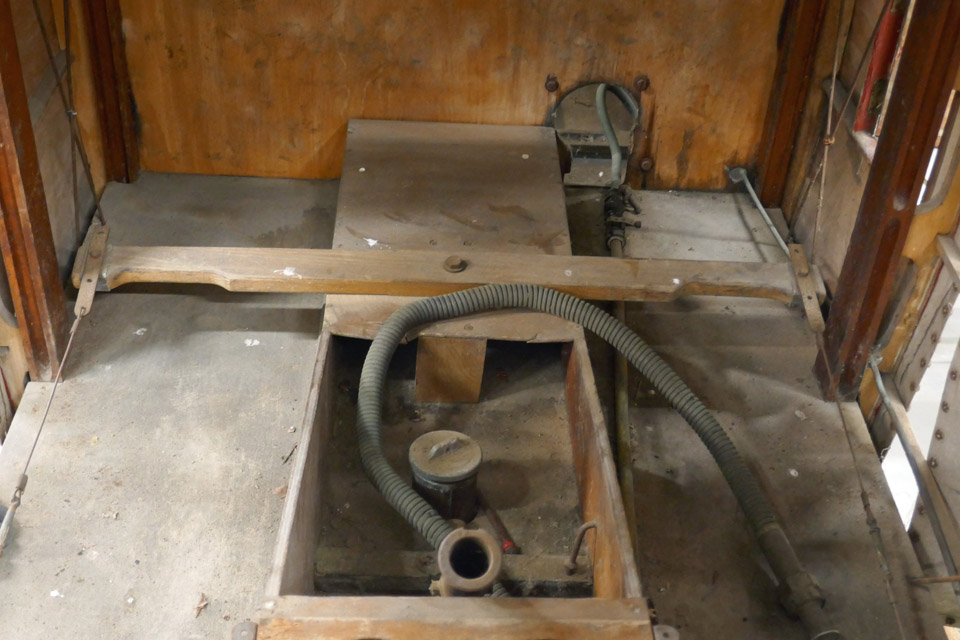
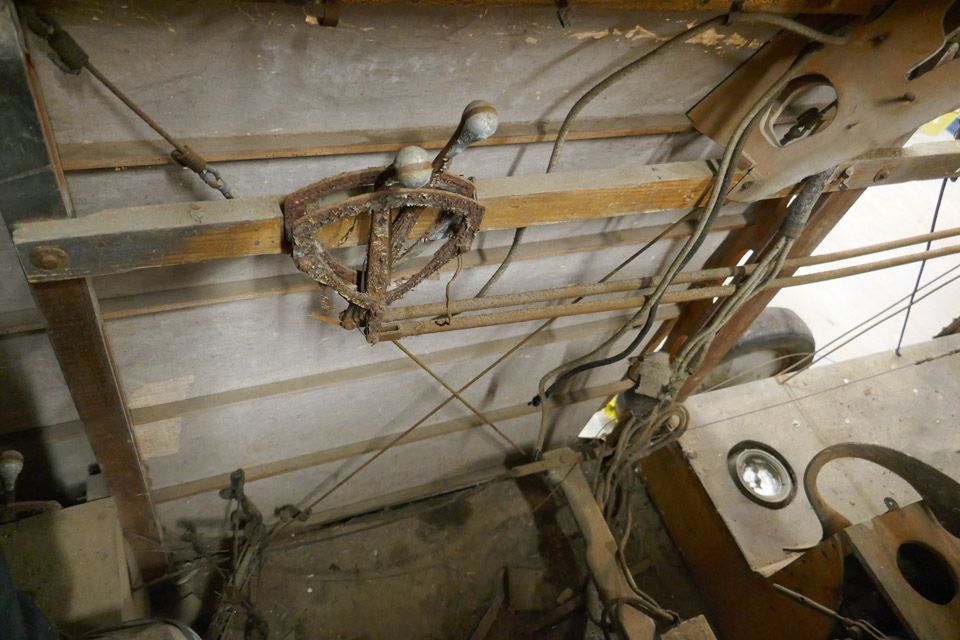
After detaching the landing gear, the Caudron’s cockpit was taken under work. After vacuum cleaning and Sinol-water treatment of the cockpit surfaces the seat belts were removed. On the port side of the front and rear cockpits there are the throttle and mixture levers. They are fastened on the throttle quadrant.
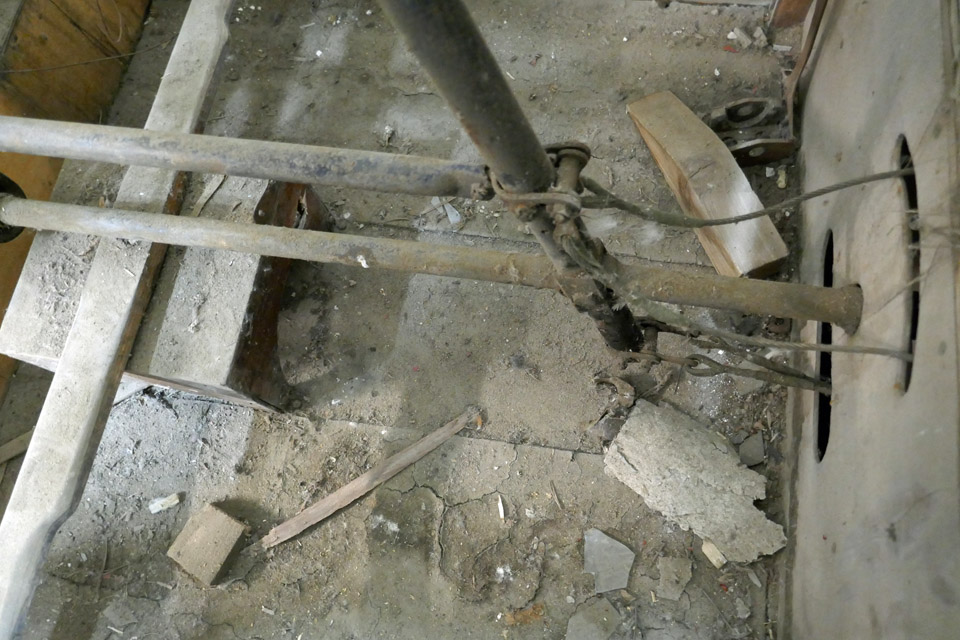
The rear and front cockpit levers are connected with push rods. This was after all a trainer. The throttle and mixture levers were thickly coated with rust. They were taken apart with their push rods to be cleaned from rust. It was noticed, taking the levers apart, that there were traces of nickel plating on the surfaces. Both of the levers and their quadrant have originally been nickeled on the surface. Still to be dismantled from the cockpits are for instance the control columns with their connecting rods and the pilot’s seat in the rear cockpit.
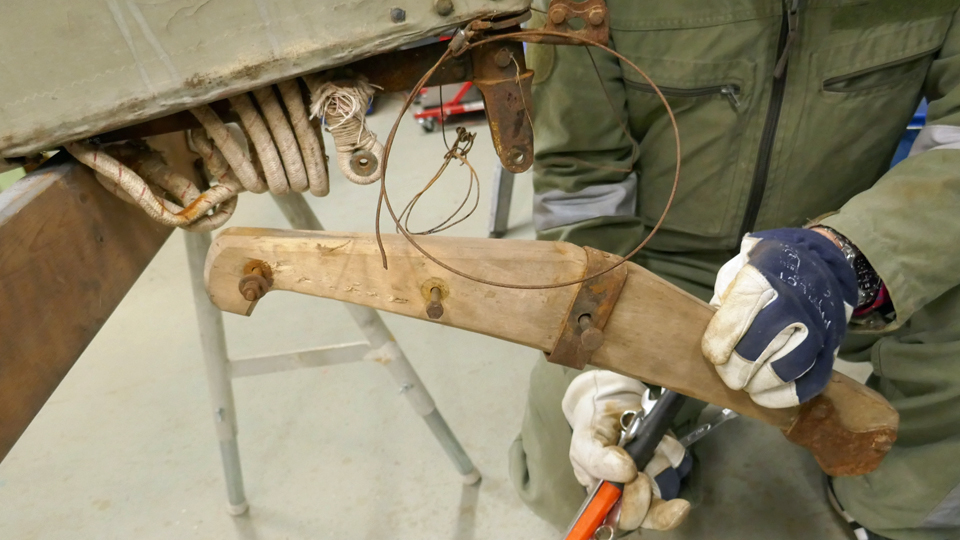
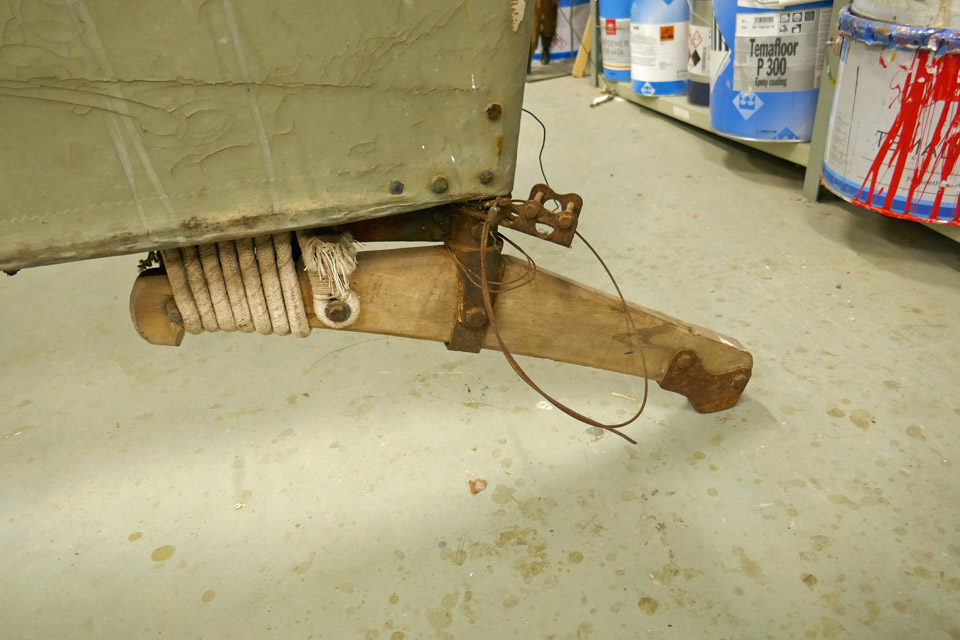
The Caudron has a wooden tailskid. In its rear end there is a metal strengthening to prevent wearing. In the middle of the tailskid there is a bolt which was detached. It fastens the tailskid to the fuselage. The tailskid pivots around this bolt. A length of bungee cord tied around the tailskid and its support in the fuselage acts as suspension for the tailskid. The bungee cord was also detached, so the tailskid has been completely dismantled for further work. Photos: Lassi Karivalo. Translation: Matti Liuskallio. |
|
Avainsanat: aviation history, restoration, Caudron C.59, CA-50 |
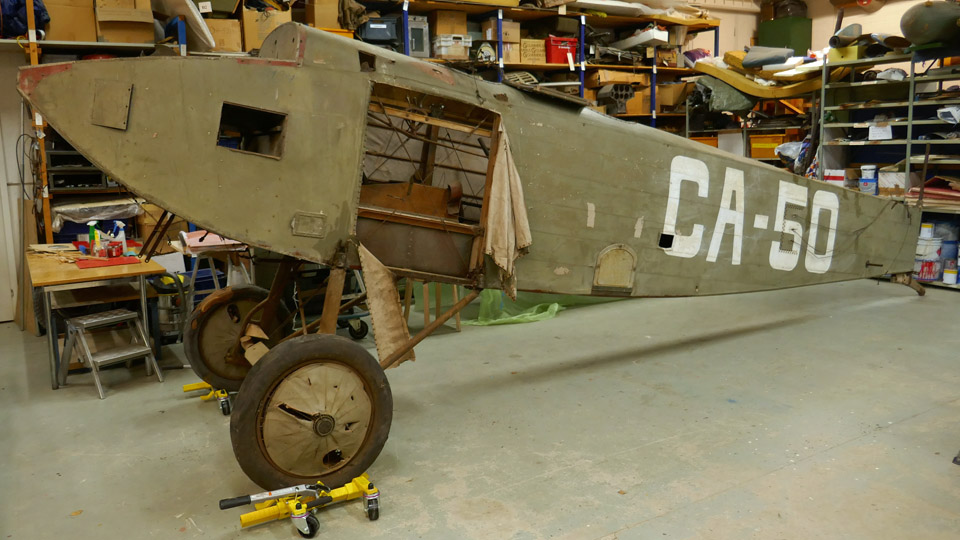
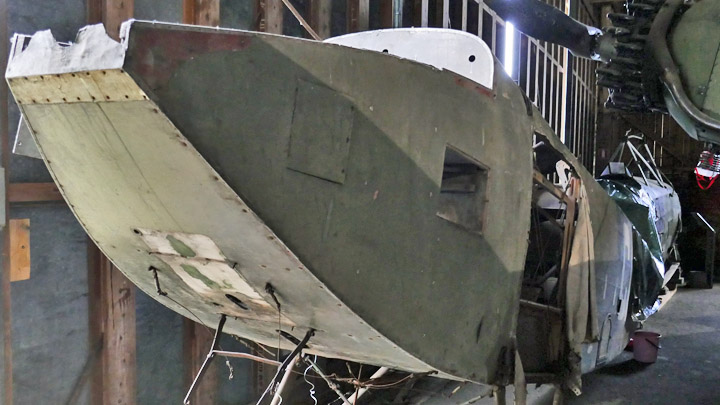
Status of Caudron C.59 (CA-50) after 93 years of storageTiistai 16.11.2021 - Tuesday Club member With the marking CA-50 flown fighter trainer Caudron C.59 was removed from service in the Finnish Air Force in December 1928. The aircraft was stored in Santahamina to wait for restoration. In 1948 CA-50 was transferred to the hangar of Vesivehmaa airport together with many other written off Air Force types. The storage hall like hangar developed into the Päijänne-Tavastia Aviation Museum at Vesivehmaa, when a civilian organization called the Lahti Airlift took charge of it as a museum in 2006. About twenty aircraft, all of them in poor condition have been removed to be restored. Most of them are on display in Finnish aviation Museums and elsewhere, too. Of the aircraft restored by the Tuesday club the I.V.L D. 26 Haukka I and I.V.L K .1 Kurki have been returned back to the Päijänne-Tavastia Aviation Museum.
At Vesivehmaa only the fuselage of the C.59 CA-50 has been on display. It lacks the Hispano Suiza-engine. The wings were stored at first in the nearby former Brewster maintenance space, afterwards in a sea container beside the hall. The Caudron’s lower wings and parts of the tail assembly have been under restoration at the Tuesday Club since the spring of 2019.
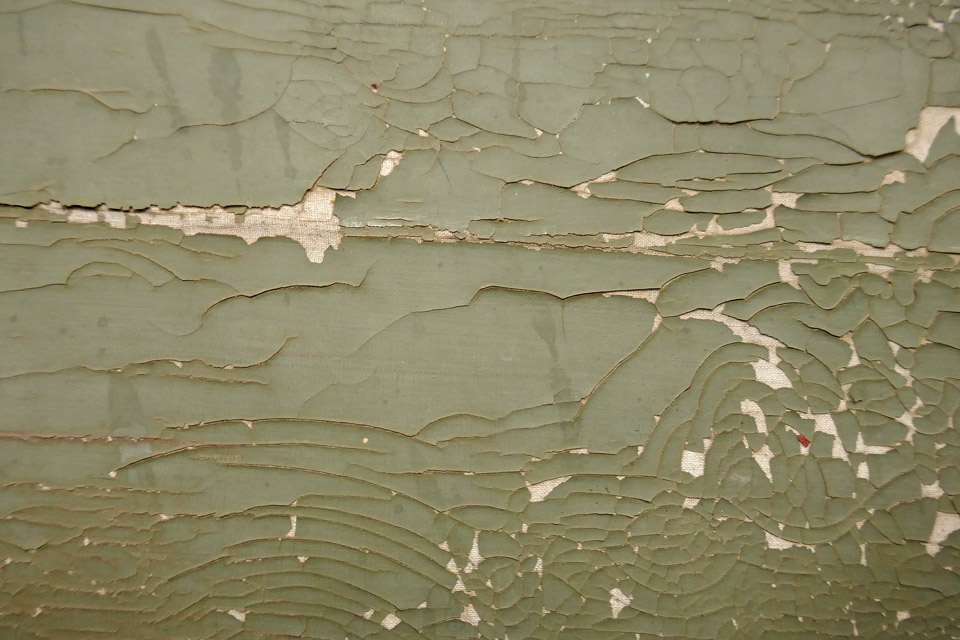
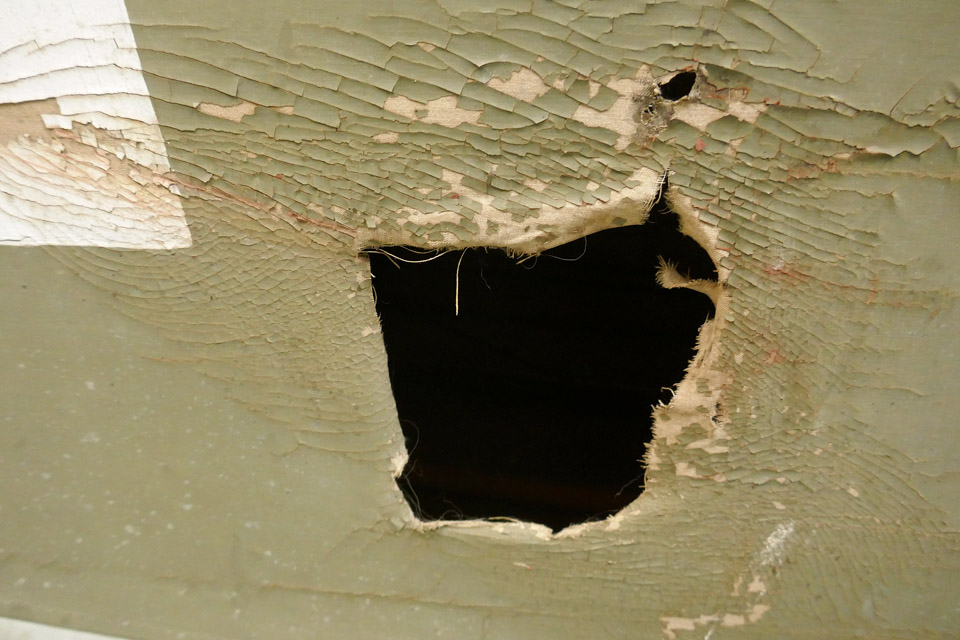
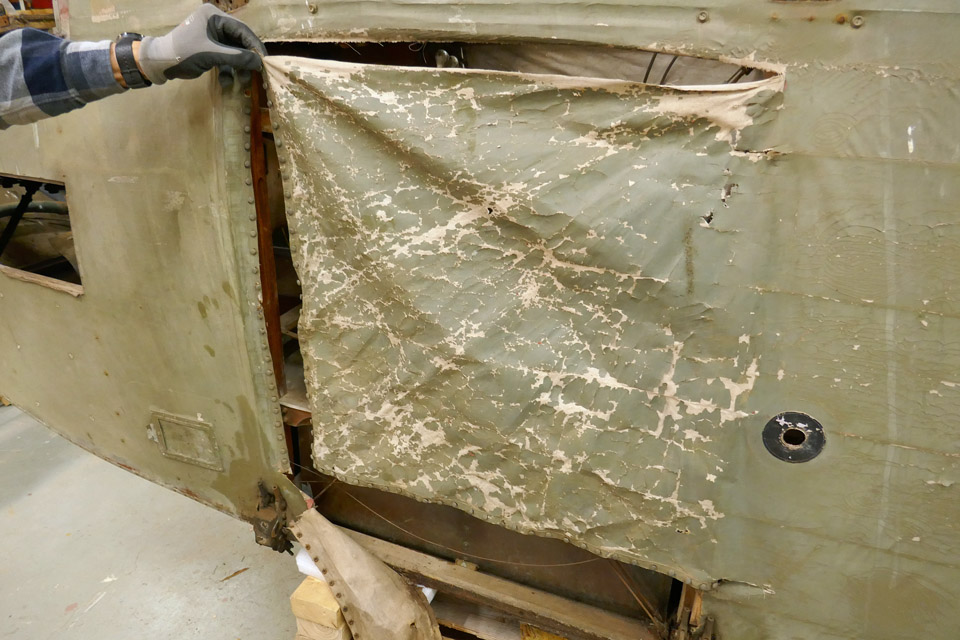
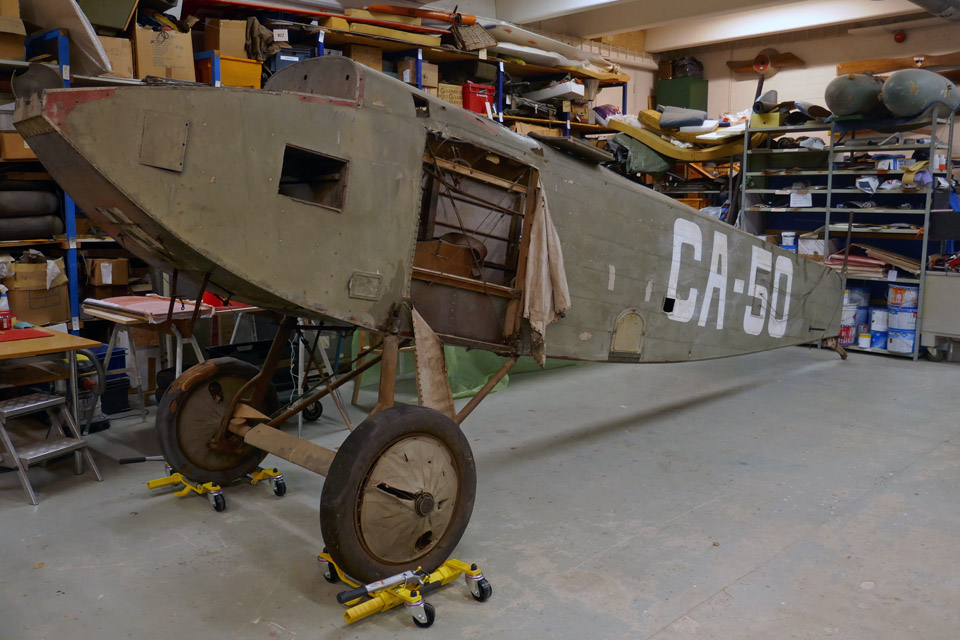
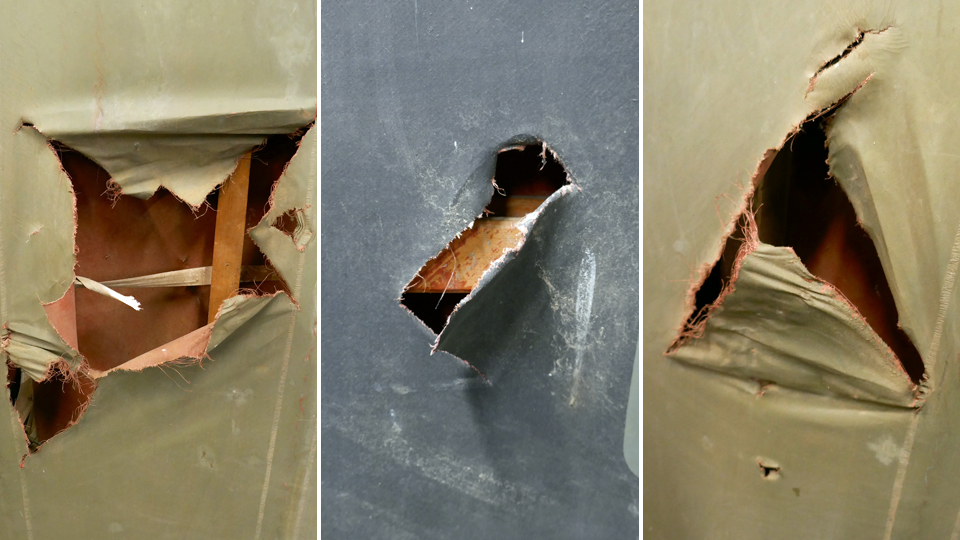
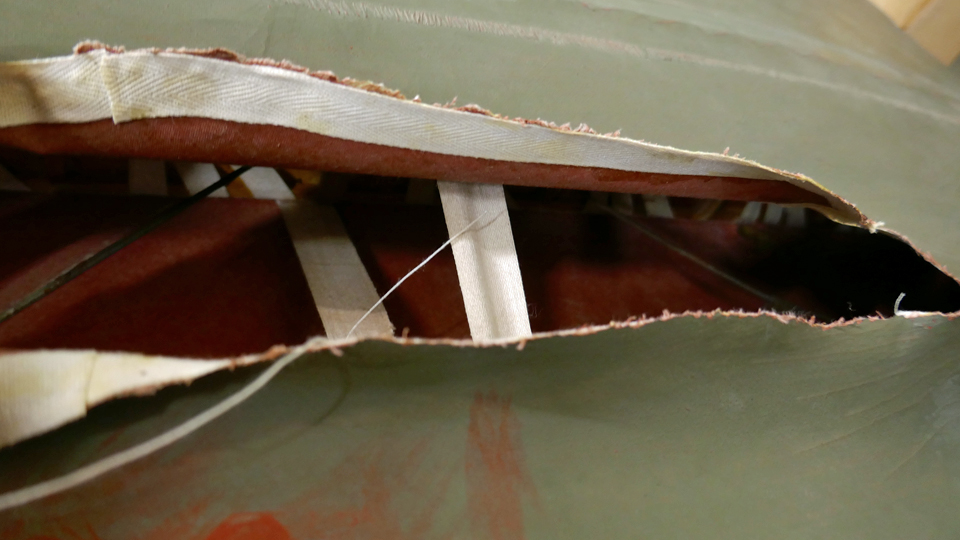
The Caudron CA-50 has been through rough times and even malicious damage during its 93 years of storage. The fuselage of CA-50 when brought to the Finnish Aviation Museum is in a depressing state. All the metal parts are covered with thick rust. The plywood surfaces of the forward fuselage are soiled. In July 1928 the fuselage was totally rebuilt by the State Aircraft factory Santahamina branch. The paint surface has been badly damaged. During the long storage it has badly cracked. There are also many holes and tears in the fabric. On the port side of the fuselage by the cockpit the fabric has been torn open and the paint has badly flaked.
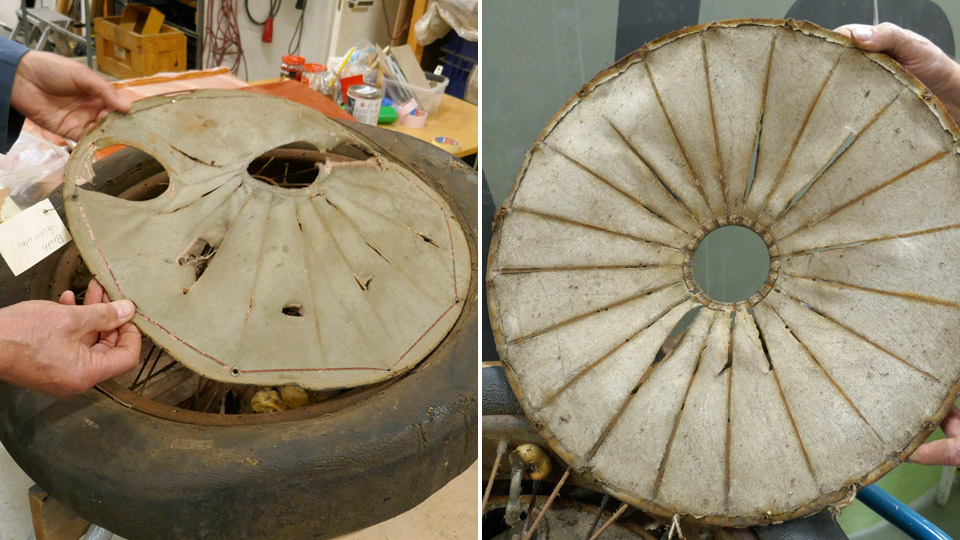
The landing gear which is covered in thick rust is without the suspension bungee cords. The starboard side wheel is French. The tyre bears the text NEUILLY-AVIATION-AERO 750-125. The wheel must therefore be an original Caudron wheel. Part of the rubber surface has been peeled off. On the port side of the landing gear is a British wheel PALMER CORD AERO TYPE 750x125. The fabric spoke covers of both wheels are on the brink on disintegration, because the rusty spokes have caused the fabric touching them to rot away. The tail wheel is structurally sound. The metal parts are covered with rust, but the bungee cord still remains.
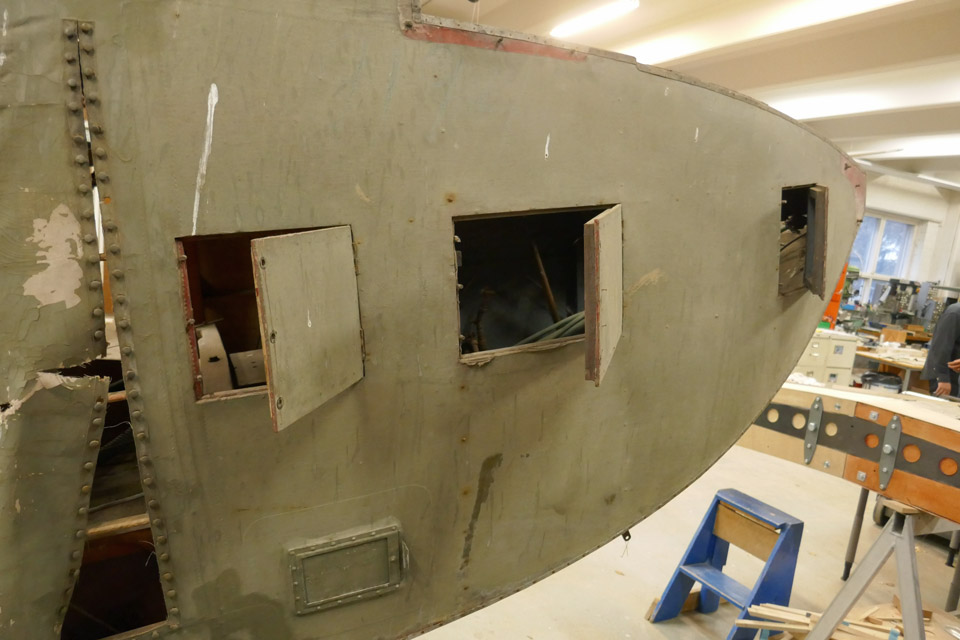
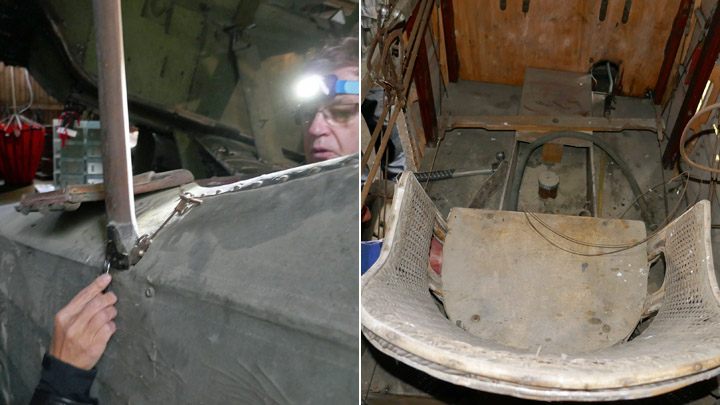
The Caudron fuselage is without its Hispano-Suiza 8A engine. In the engine bay are the rows of bolts with their nuts for assembling the engine. The engine bay plywood surfaces are covered with thick dust and dirt. Outside, underneath the engine bay is the rusted assembly frame of the Lamblin radiator. The radiator is missing. On both sides of the nose there are several inspection hatches. They are functioning, but the hatches lack the Fokker pins to secure them.
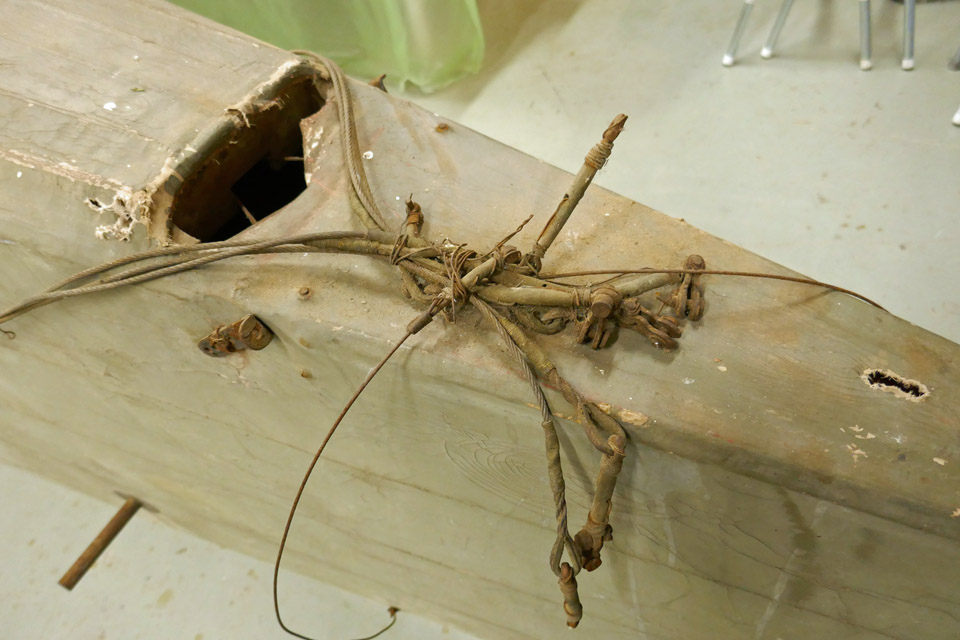
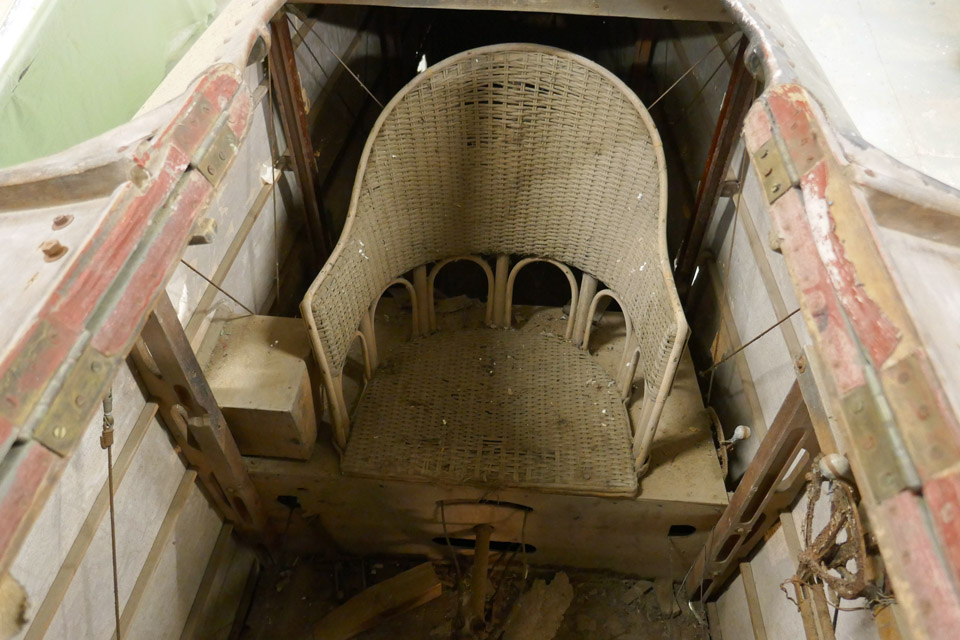
The steering wires from the cockpit to the tail are rusty and they have been tied to a bunch on the fuselage. There are no instruments in either of the cockpits. They have been probably dismantled when the aircraft was written off and stored. The pilots’ rattan seats remain. There’s no control column in the front cockpit. The rear cockpit has one. Both cockpits have the rudder pedals in place. On the left wall of both cockpits the throttle and mixture levers and their connecting rods are all covered with thick rust. There’s plenty on muck and dirt on the rear cockpit floor.
Our first task in the Tuesday Club is to clean the plywood surfaces and engine bay of the dust and dirt and clean up the cockpits. The fabric surfaces will not be touched for the time being because the badly cracked surface, when touched, will easily lose more bits of paint. Photos: Lassi Karivalo Translation: Matti Liuskallio. |
|
Avainsanat: aviation history, restoration, Caudron C.59, CA-50 |
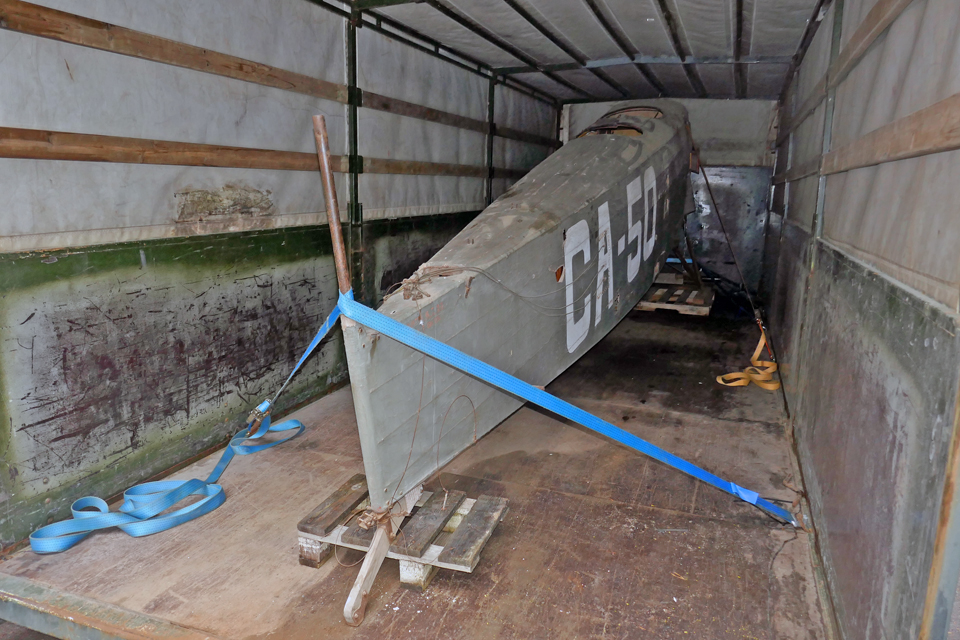
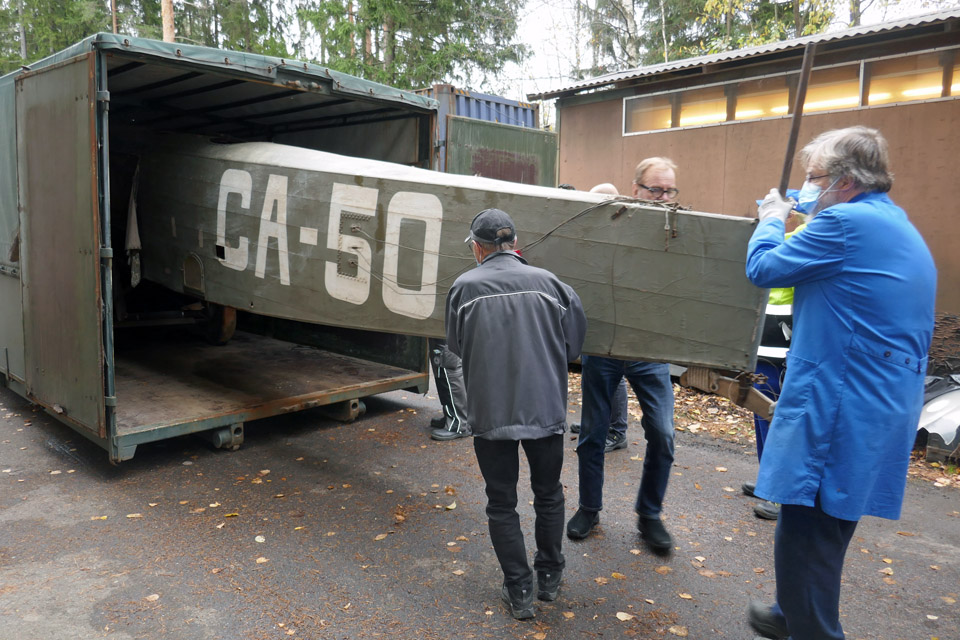
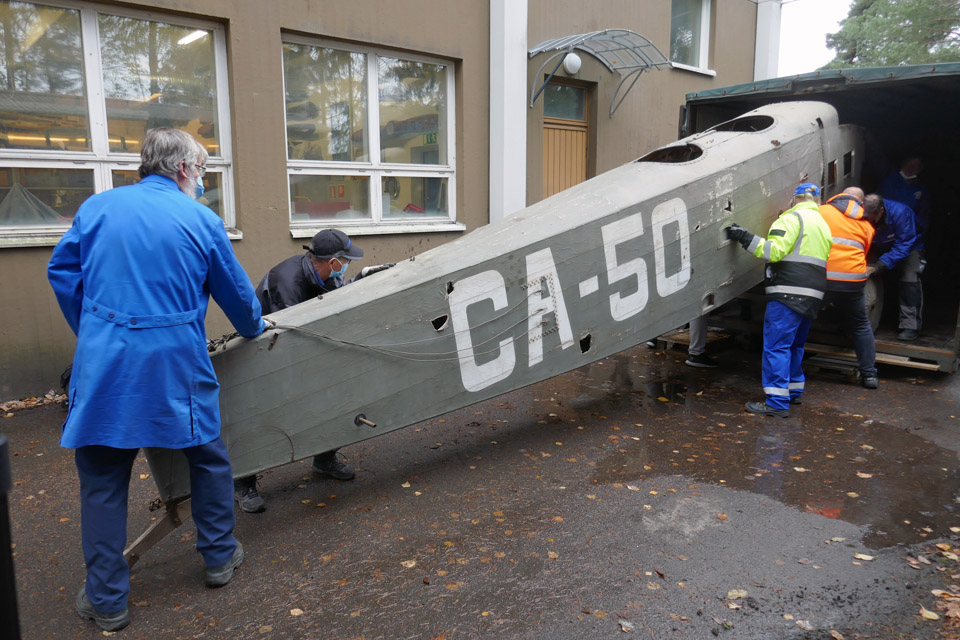
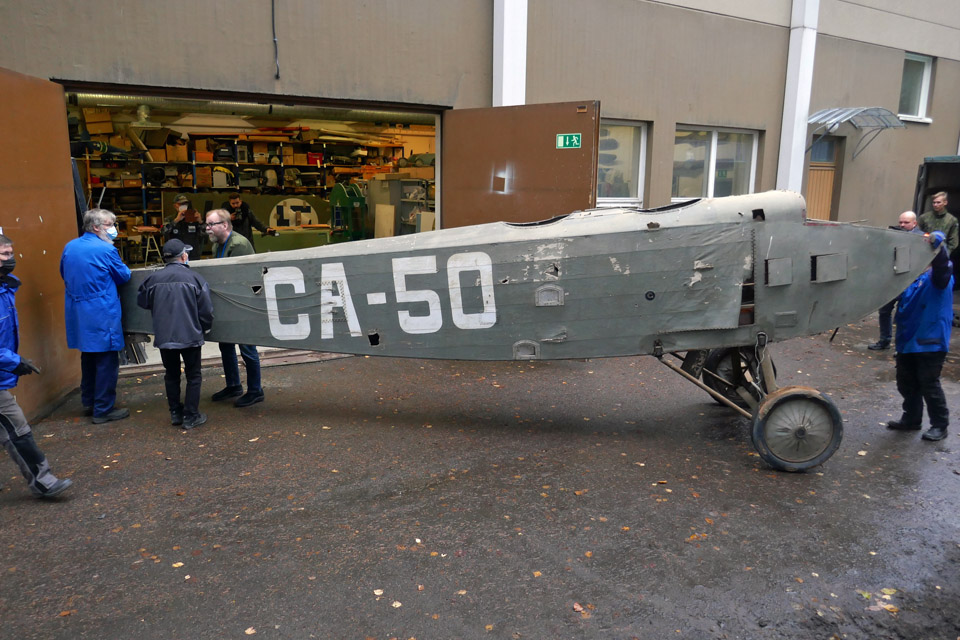
Fuselage of Caudron C.59 came to Finnish Aviation Museum from VesivehmaaSunnuntai 31.10.2021 - Tuesday Club member On Tuesday, October 26th the fuselage of the Caudron C.59 (CA-50) arrived by the Defence Forces transportation at the Finnish Aviation Museum from the Päijänne-Tavastia Aviation Museum at Vesivehmaa.
The Caudron’s fuselage is in poor condition, and it was brought to the Finnish Aviation Museum to be restored by the Tuesday Club. The Caudron’s lower wings and its tail parts have been under work at the Tuesday Club since the spring 2019. The Covid-19 pandemic interrupted the restoration work in March 2020, but from the beginning of September 2021 the work has been continued in the restoration space of the Finnish Aviation Museum.
Now that the fuselage has arrived, the first task is to make an inventory of its present condition and to make a restoration plan for it. The principle in the restoration work is that as much as possible of the original fuselage will be preserved. The rusty parts and equipment will be restored, the broken items will be repaired and the parts which are beyond repair, will be rebuilt. One of the challenging items in the restoration of the Caudron’s fuselage will be the badly cracked painted fabric covering on the fuselage.
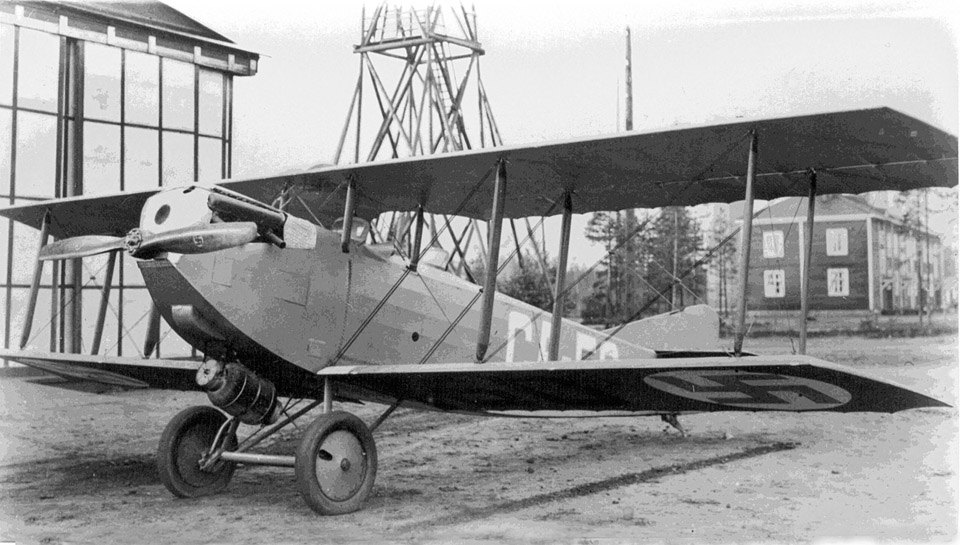
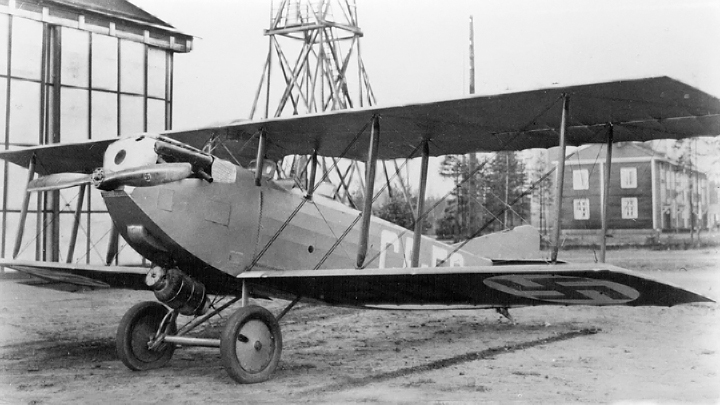
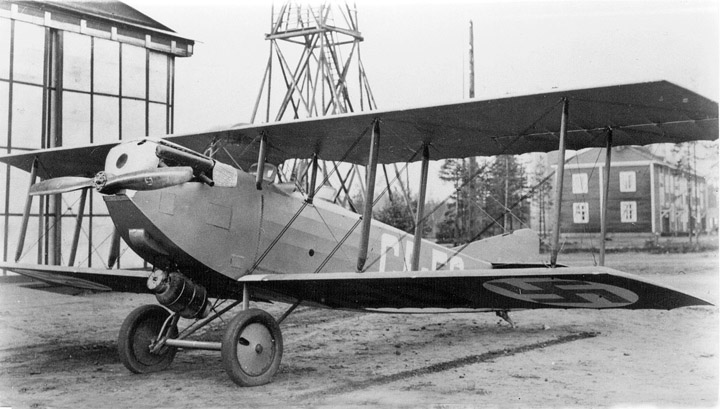
The two-seater fighter trainer Caudron C.59 was in use in the Finnish Air Force in the 1920s. In late 1923 the Air Force purchased three Caudron C.59 aircraft to be used in the advanced training of fighter pilots. The CA-50 is the only one which has been preserved. It is most likely the only remaining Caudron C.59 aircraft in the world. The CA-50 flew its last flight in the Air Force on October 1st, 1929 – which was 90 years ago. Then the aircraft was written off and stored to be placed later in a museum. The aircraft was stored at Santahamina until the end of the 1940s, then it was moved – along with several other old aircraft waiting to go into a museum – into the WW2 aircraft hangar at Vesivehmaa airfield. Today the hangar is the home of the Päijänne-Tavastia Aviation Museum.
In two years, it will be 100 years from the Caudron C.59 aircrafts’ arrival in Finland. We are wondering whether if it would be possible to complete the restoration of the Caudron CA-50 before that? Photos: Lassi Karivalo Translation: Erja Reinikainen. |
|
Avainsanat: aviation history, restoration, Caudron C.59, CA-50 |
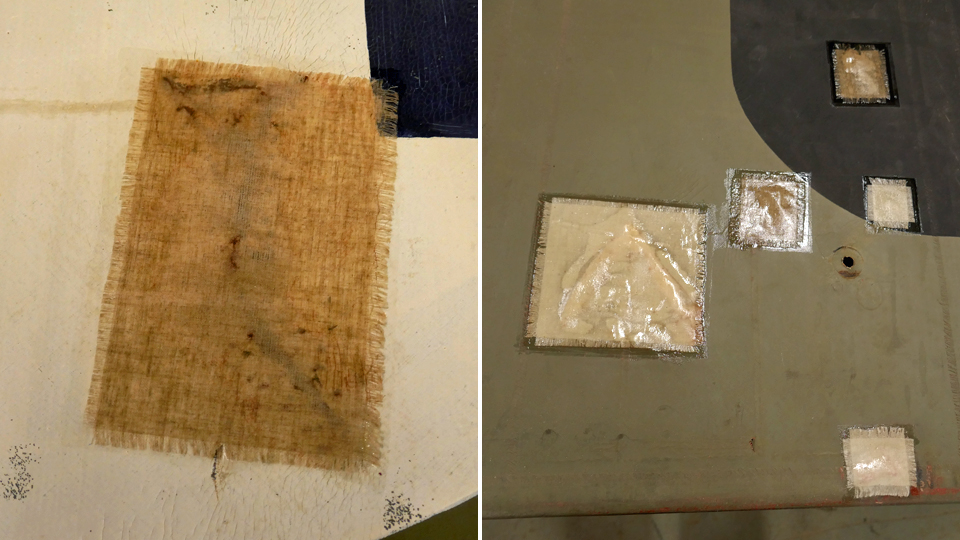
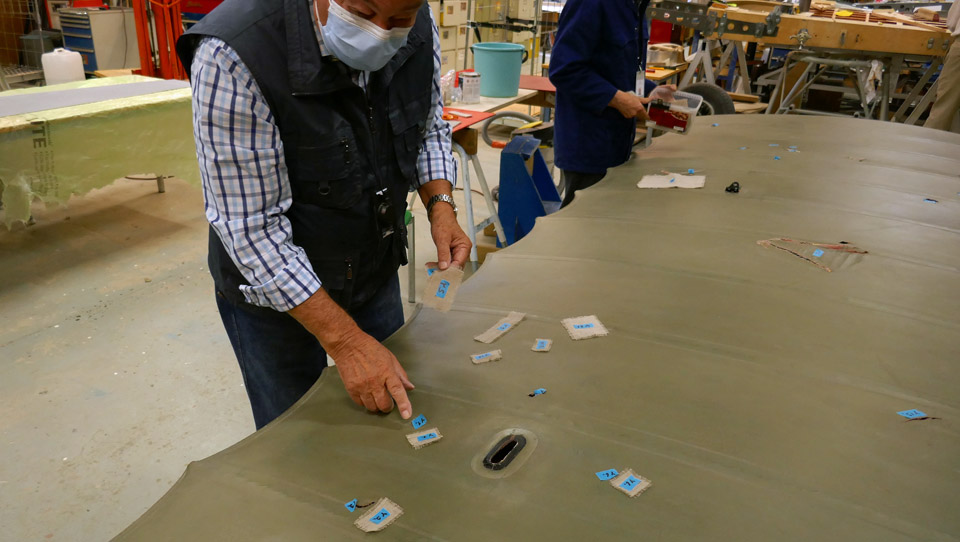
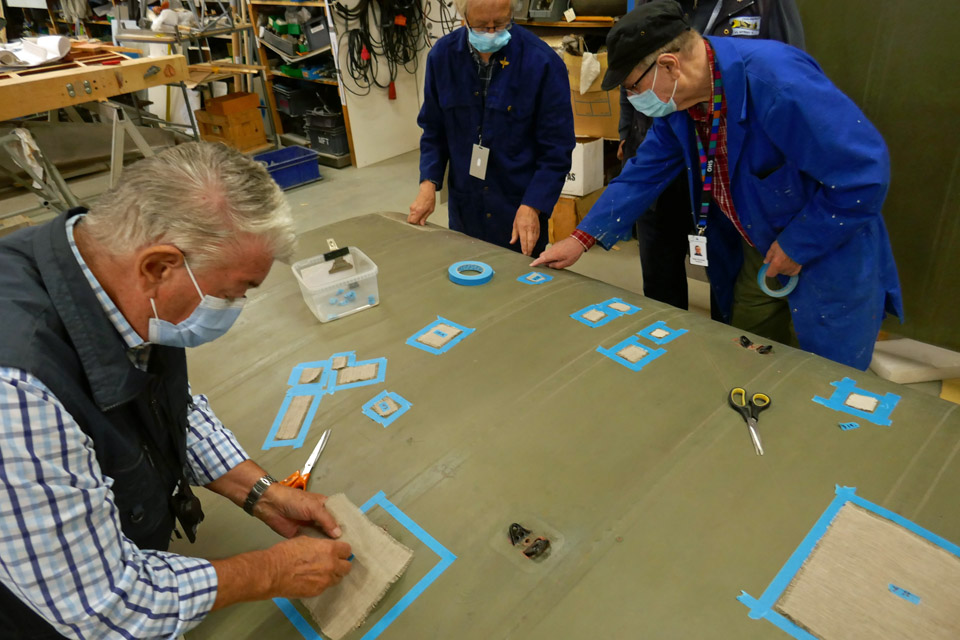
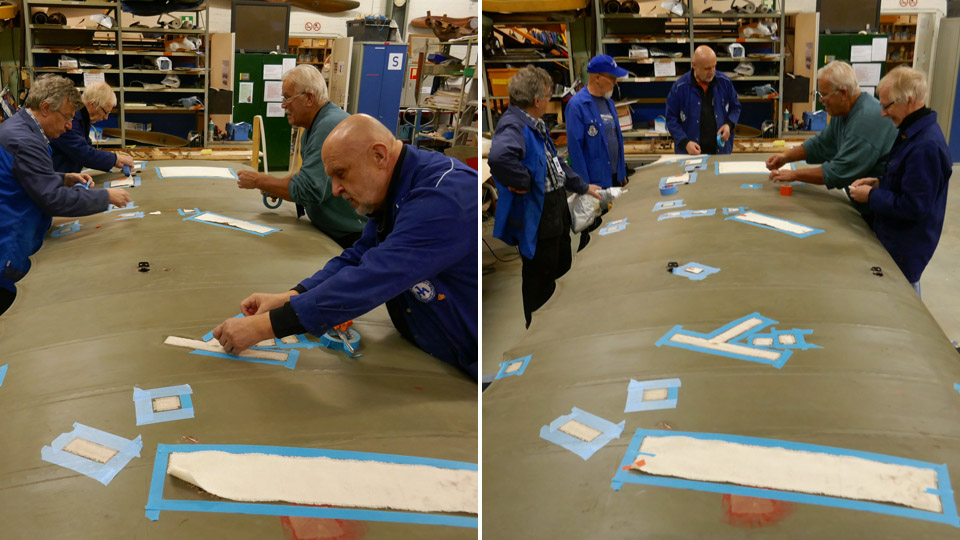
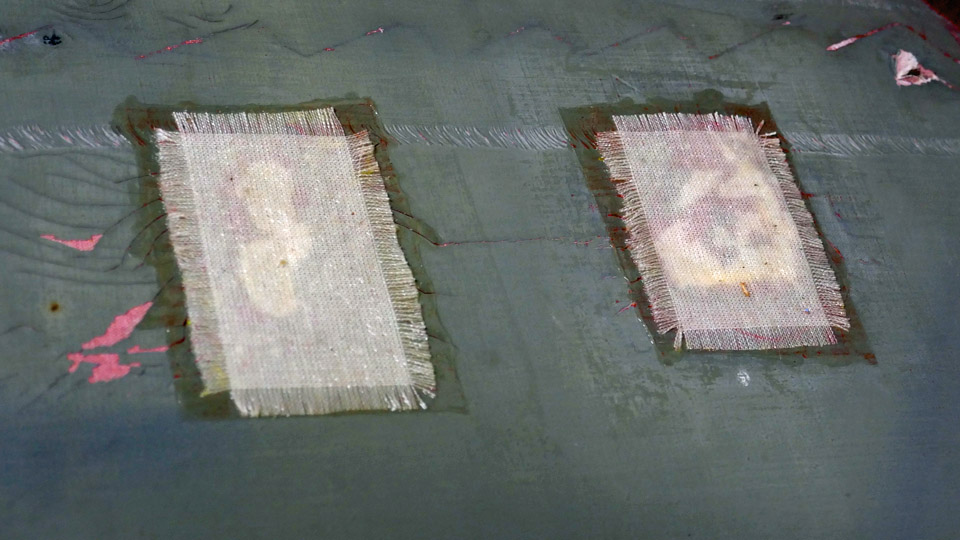
Fabric covering of Caudron C.59 wings is being patchedSunnuntai 12.9.2021 - Tuesday Club member When the Tuesday Club activities were interrupted because of the Covid-19 pandemic in March 2020, the holes and tears on the fabric covering of the lower wings of Caudron C.59 (CA-50) were being patched. The damages on the lower port wing had already been patched. The tears on the fabric covering of the starboard wing had already been sewn and the patches had been cut from linen fabric, they were waiting to be glued with shrinking varnish. There are plenty of holes to be patched on the covering of the lower wings, about 50 on both surfaces.
Now the Tuesday Club can continue its activities again and the Caudron’s starboard wing is underway again. First the surfaces of the fabric-covered lower wing were vacuumed and the wiped with a damp cloth. Then the correct patch had to be found for each hole on the lower wing. Fortunately the holes and the patches had been numbered, so the pairing was easy. During the 18-month break the patches had been carefully stored and none were missing.
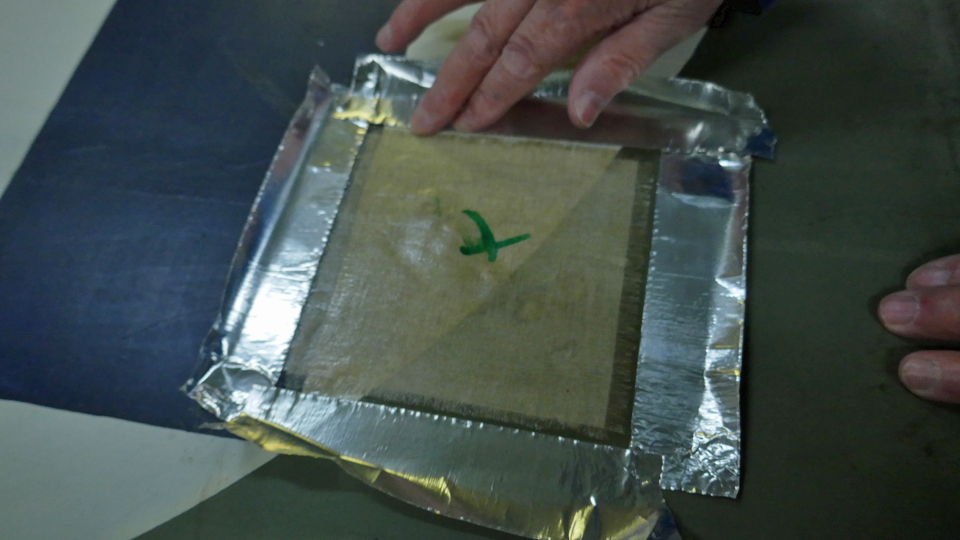
Each patch was placed on its matching hole. Then a protecting circle was taped around each patch so that the gluing varnish will not spread outside the patched area.
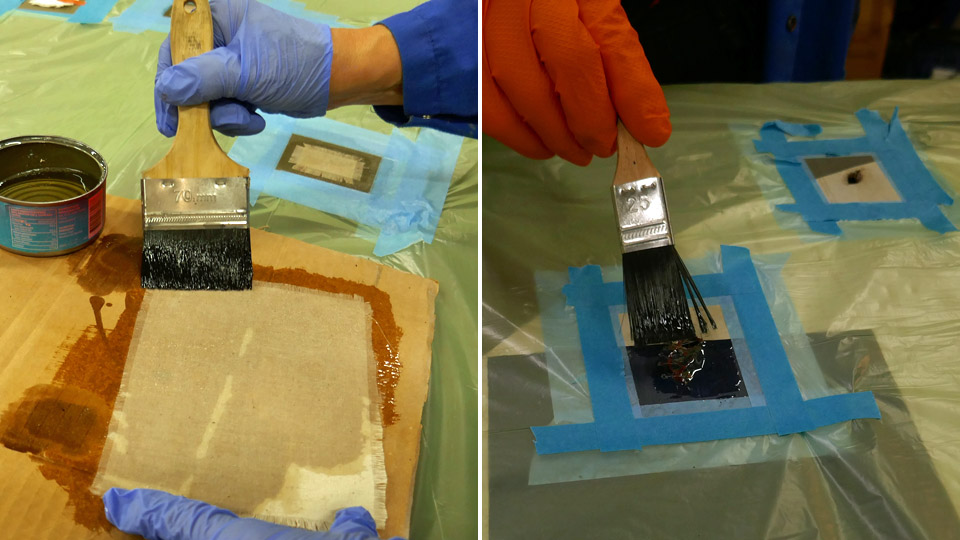
When all the patch areas had been surrounded with tape, nitrocellulose varnish (shrinking dope) was spread on the area inside the tape circle. The edges of each patch had been unravelled and the patches were pressed on the wet varnish. More varnish was applied on each patch so that the fabric and the unravelled edges became thoroughly wet. The unravelled edge will make the edges of the patch fasten better on the original fabric covering. This was the work method when the fabric covering was patched in the 1920s and 1930s.
The protecting tape was removed soon after the varnishing so that the glue of the tape won’t harden on the fabric surface. If the tape is left on the painted surface of the fabric covering for a long time, it is possible that the tape will leave a mark on the painted surface when it is removed.
When the varnish had dried, the patches had shrunk nicely on the holes and damaged areas. The surfaces of the fabric patches and their unravelled edges were ground smooth using a fine grinding pad. The patches will be varnished and ground at least a second time so that the surface becomes very smooth before it is painted. The patched areas will be painted greyish green to match the hue of the Caudron’s wing surfaces, which have been painted in the 1920s and gained patina during the decades. Photos: Lassi Karivalo Translation: Erja Reinikainen. |
|
Avainsanat: aviation history, restoration, Caudron C.59, CA-50 |
Tuesday Club activities are continuedTiistai 7.9.2021 - Tuesday Club member During the Covid-19 pandemic a small Tuesday Club team has been working on the VL Myrsky restoration project. Tuesday August 31st was a day of joy: finally, after a break of about 18 months, the other Tuesday Club activities could be continued. The main work item is the restoration of the Caudron C.59 trainer fighter, which is now in the restoration space of the Finnish Aviation Museum.
Photo: The photo archive of the Finnish Aviation Museum. However, there are still some restrictions and Covid-19 instructions from the Finnish Aviation Museum and the Tuesday Club is not able to start with full capacity. The number of workers in the restoration space is still limited and everybody working there is still wearing a mask.
In order to involve as many Tuesday Club members as possible in the Caudron restoration work, the team has been divided into two groups and works in the restoration space on Tuesdays and Wednesdays. This allows about twenty club members to work on the Caudron and on other projects, too. The Myrsky team continues to work on three days a week. The Caudron C.59 restoration is continued, now the holes on the lower wings are being repaired. About 18 months ago the lower port wing was patched and the patches were made for the starboard wing – then the Covid-19 pandemic interrupted the Tuesday Club activities. Now the patching of the starboard wing is in progress again.
The tail boom stabilizers of the Mil Mi-8P (HS-6) helicopter, which is on display on the yard of the Tuulonen shopping centre, have been brought to the Tuesday Club to be repaired. The stabilizers are partly covered with fabric and the fabric has decayed, because the helicopter has been on display outdoors since it was removed from service in 2007. The fabric covering will be renewed by the Tuesday Club team.
One of the most unique projects the Tuesday Club has come across is the preparation of a DC-3 instrument panel for a movie. A proper DC-3 instrument panel will not be made, but a reasonably plausible version anyway. Photos: Lassi Karivalo except if separately otherwise mentioned. Translation: Erja Reinikainen. |
|
Avainsanat: aviation history, restoration, Caudron C.59, CA-50, Mil Mi-8P, HS-6, DC-3 |
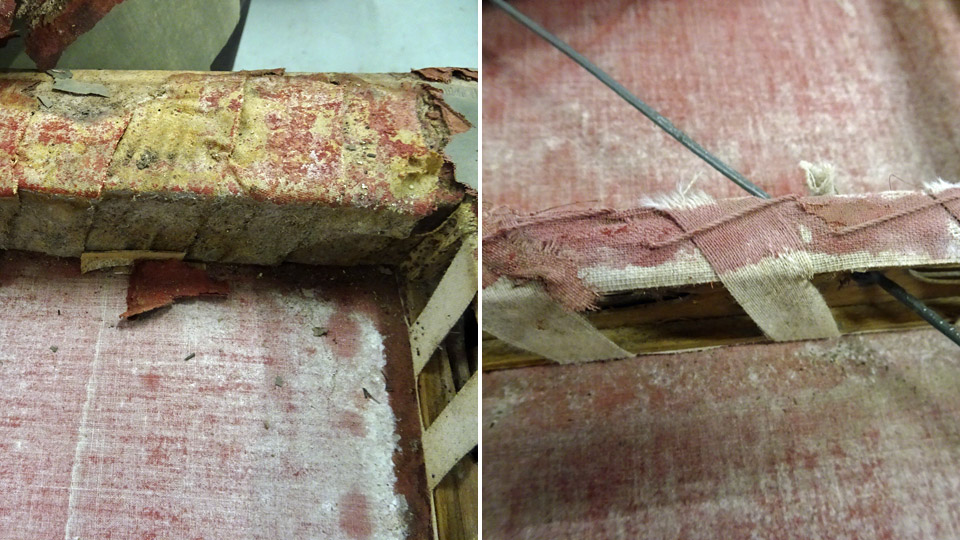
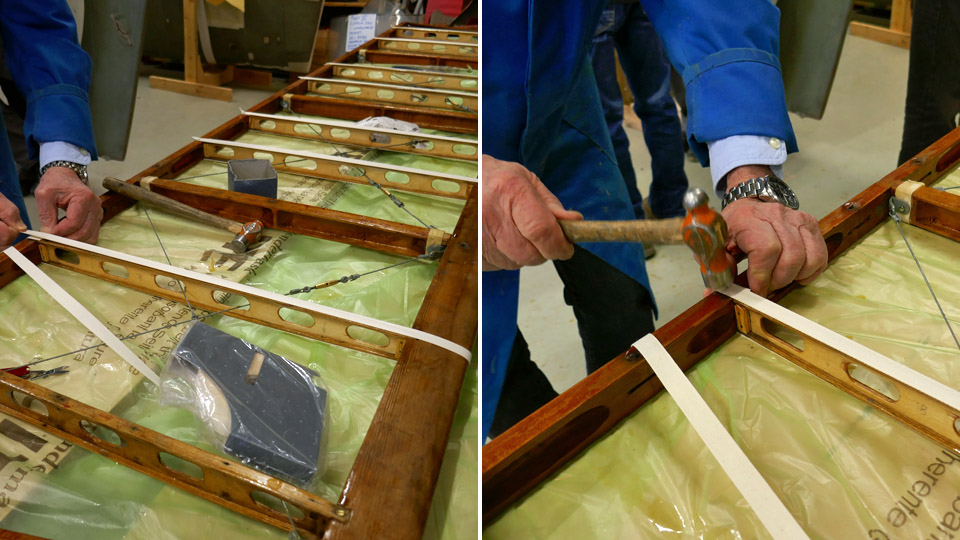
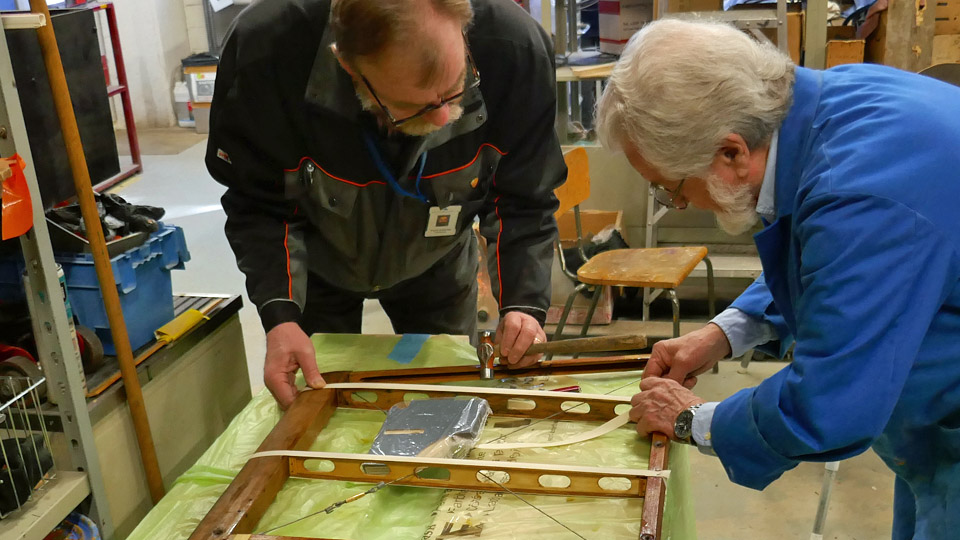
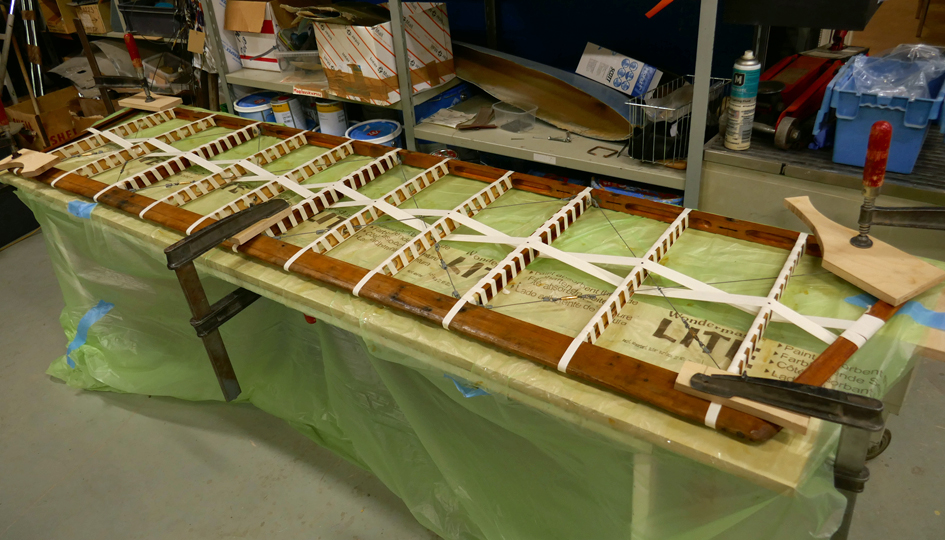
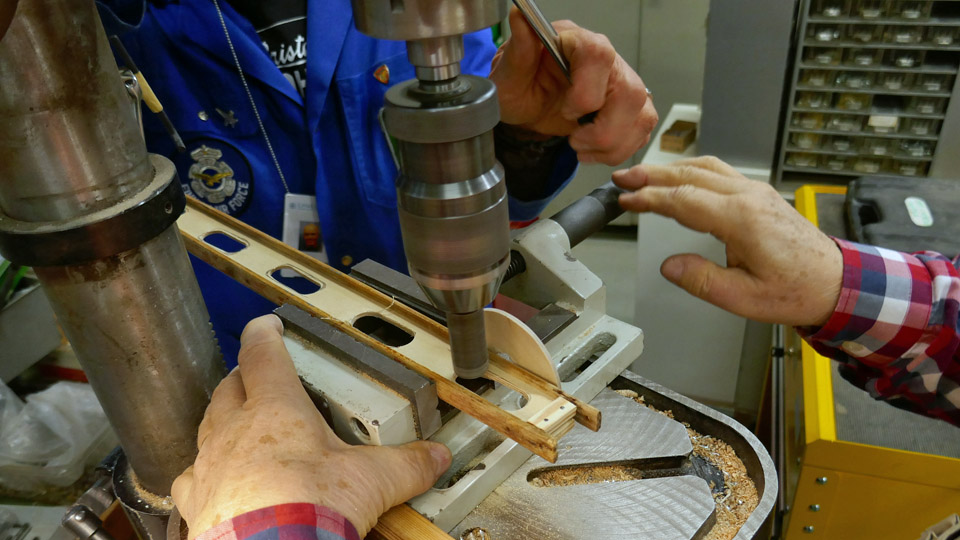
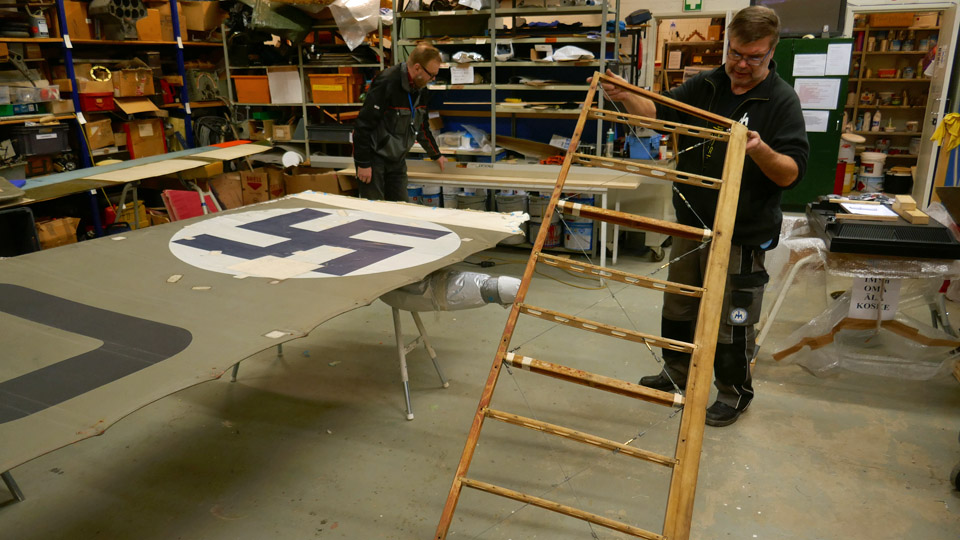
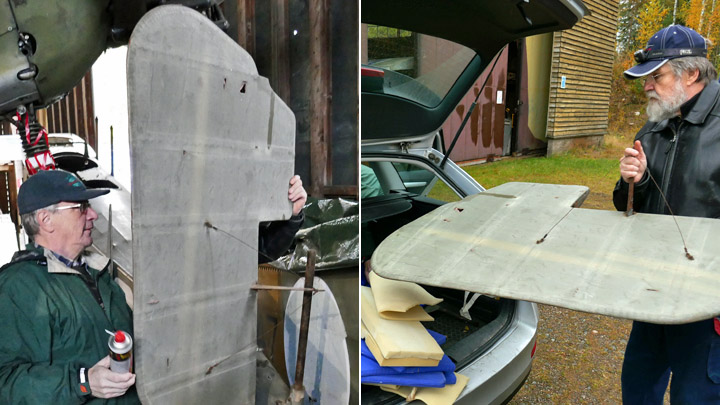
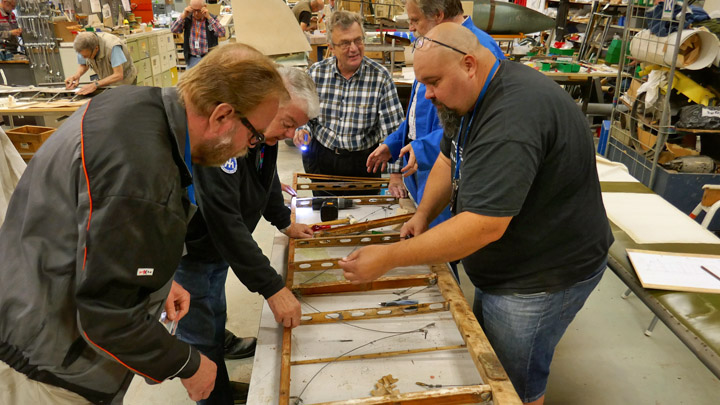
Ribbons of Caudron's horizontal stabilizer frameMaanantai 30.3.2020 - Member of Tuesday Club The horizontal stabilizer frame of Caudron C.59 (CA-50) had bent during the years and it had to be dismantled and straightened. The restoration work was finished in early February – as described in an earlier blog – and the frame was now ready for covering. Before the actual covering with fabric, ribbons or strips of fabric were fastened on the ribs of the stabilizer and its leading edge. The fabric covering will be fastened by sewing on these ribbons.
Before starting to install the ribbons on the horizontal stabilizer, the Tuesday Club team studied carefully the pictures taken of the dismantling phase, the dismantling report and the pieces of fabric covering, which still had some original ribbons attached. Based on these sources the team could see clearly how the stabilizer frame of the CA-50 had been covered and how the ribbons under the covering had been fastened.
The leading edge of the horizontal stabilizer had been tightly covered with a 50 mm wide strip of fabric. The trailing edge and the end battens on the stabilizer didn’t have any ribbons around them. The ribs had 15 mm wide ribbons around them: first a ribbon had been tied along the upper and lower edge of each rib and then it had been tied on the rib, using another 15 mm wide ribbon which was spun around the rib. The leading end of the ribbon used for spinning had been fastened on the leading edge with tacks and the far end fastened on the rib root.
The stabilizer ribs had also been connected to each other at the middle, using a 30 mm wide ribbon with its ends fastened on the end battens of the stabilizer. The ribbon connecting the ribs had been woven through the ribs so that it ran under every other rib and over every other. The ribbon ran weaving over and under the ribs between the end battens.
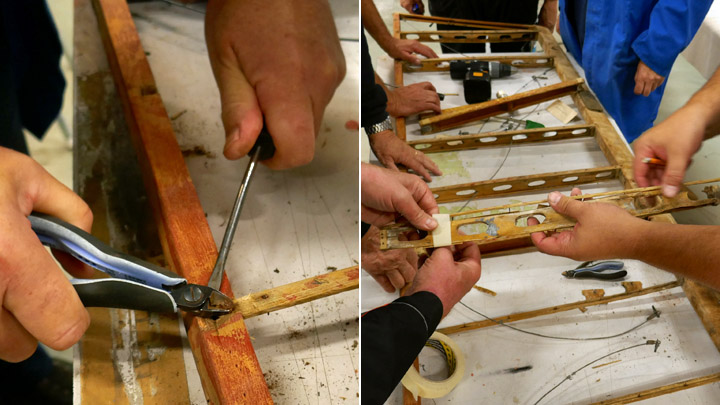
The Tuesday Club team started the ribbon work on the restored horizontal stabilizer frame on the plywood ribs. The leading end of the ribbon was fastened on the leading edge with two tack nails, on the rib position. Then the ribbon was pulled along the upper edge of the rib as far as the trailing edge, around it and along the lower edge of the rib back to the leading edge. There the end of the ribbon was fastened on the starting point with another tack. The same procedure with the ribbon was followed when working all eight plywood ribs.
The following phase was to fasten the ribbons on the ribs into place by spinning another ribbon around each rib. Based on the pictures taken of the cover dismantling, the leading edge of the spinning ribbon was nailed with two tacks on the lower side of the trailing edge batten, where it met the ribbon running along the rib. Then the ribbon was tied diagonally around the rib, with 3 cm wide spaces between each round. At the other end of the rib the ribbon was fastened on the strengthening piece of plywood at the root of the rib. When the eight normal ribs on the stabilizer had been spun, the same principle was used when spinning the three solid wood ribs, which support the stabilizer structure.
When the ribs had been spun with ribbon, the 30 mm wide strip of fabric connecting the ribs was fastened. The leading end of the wide ribbon was fastened with four tack nails onto the inner side of the port end batten, following the original installation. Then the ribbon was spun a couple of times around the end batten before weaving it over and under every other rib until the starboard end batten. Also the location of the ribbon was checked so that it ran halfway along the ribs. The ribbon was locked into place with a tack on the starboard end batten. Then the ribbon was woven in a similar manner back to the port end batten and fastened on it with three tack nails. Finally the ribbon was nailed onto each rib’s upper and lower batten.
The ribbons on the horizontal stablilizer’s leading edge of the Caudron C.59 were not installed before the Tuesday Club’s activities were interrupted due to the corona virus pandemic. Photos: Lassi Karivalo Translation: Erja Reinikainen |
|
Avainsanat: aviation history, restoring, old aircraft, Caudron C.59, CA-50 |
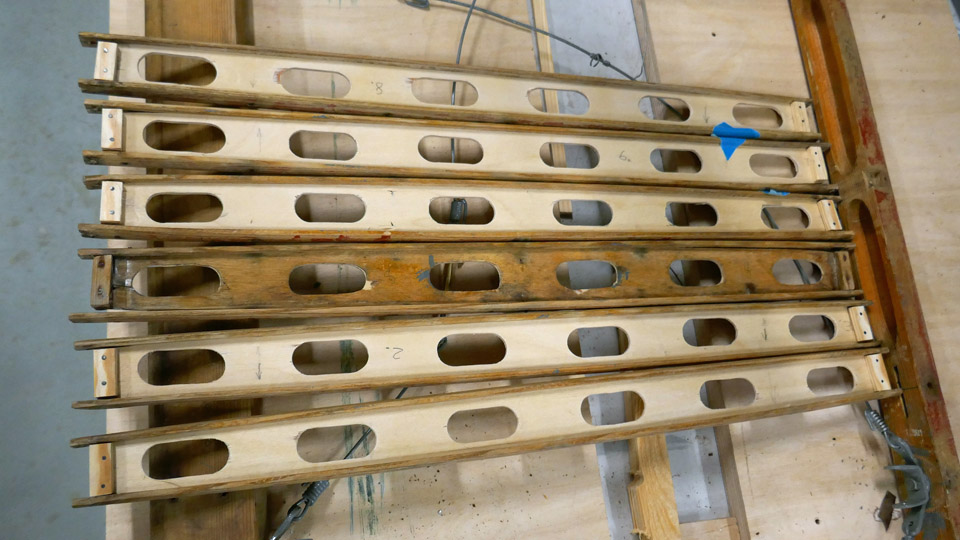
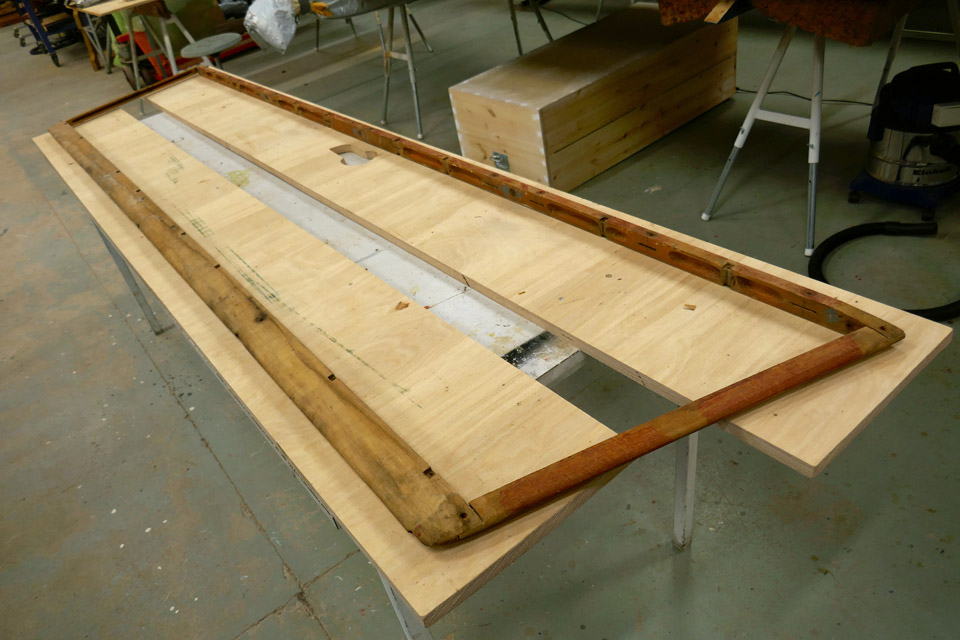
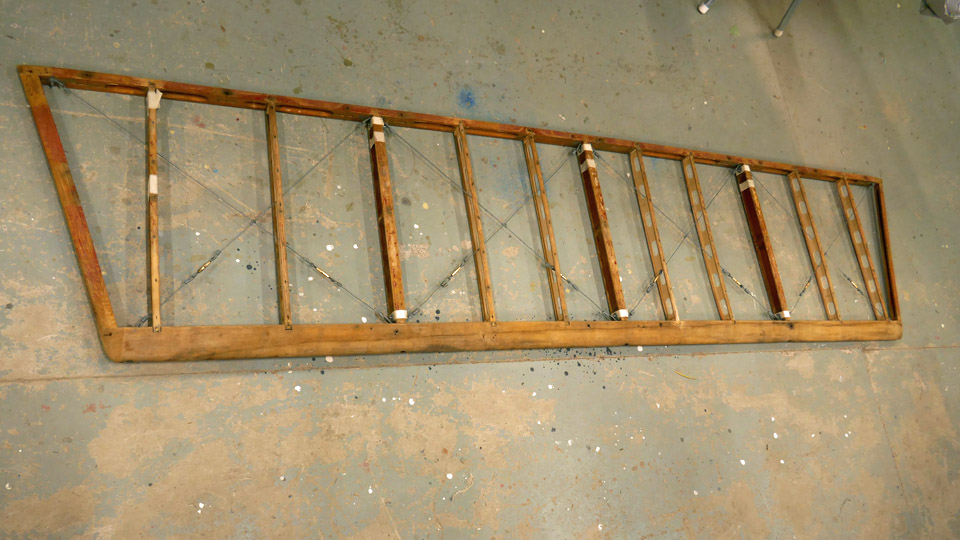
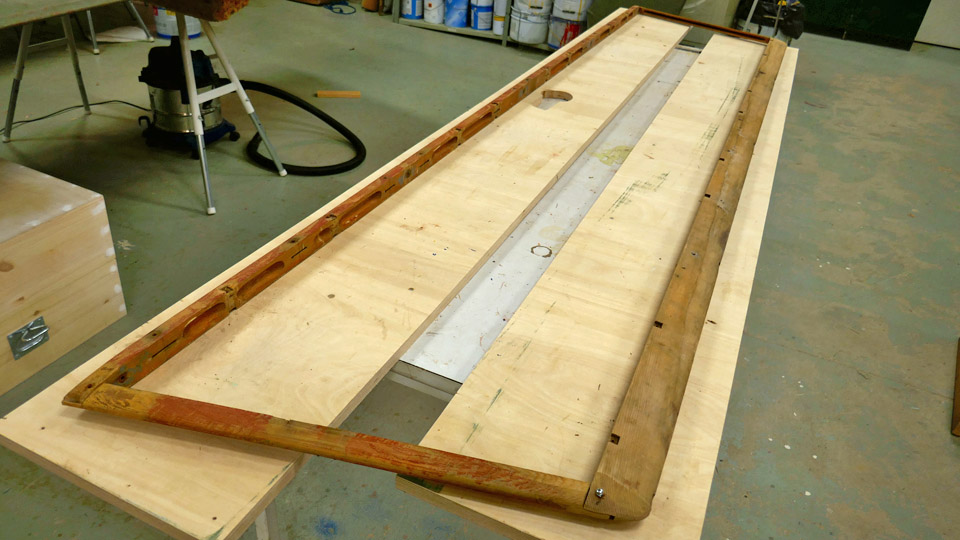
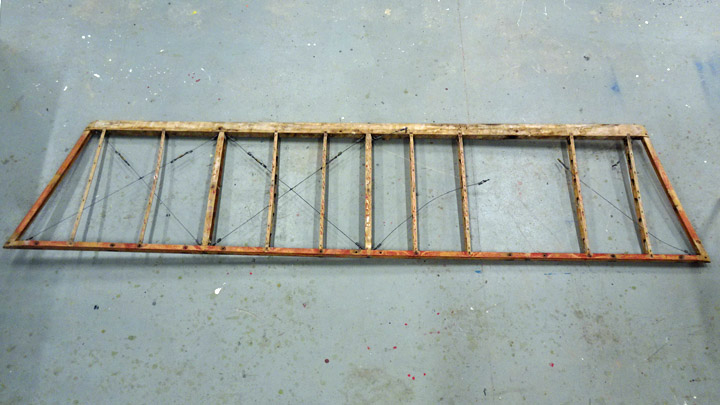
Horizontal stabilizer's frame of Caudron is repairedKeskiviikko 4.3.2020 - Member of Tuesday Club The restoration work on Caudron C.59 advanced trainer’s wooden horizontal stabilizer frame has involved a lot of work and after about six months it is finally ready. The starting point in the restoration work was that the stabilizer’s covering was rotten and broken and had to be replaced. It turned out that the whole frame of the stabilizer was bent and its ribs were rotten. The Tuesday Club team decided to dismantle the whole structure and rebuild most of the ribs, and straighten the bent battens on the leading and trailing edge.
The restoration work on the various parts of the horizontal stabilizer was completed in the beginning of this year. The ribs have been repaired, the bracing wires have been cleaned and painted and the battens on the leading and trailing edge have been straightened. On one rib the half-rotten plywood waist could be fixed with glue, but on the rest of the ribs the plywood waist had to be replaced. Before assembling the horizontal stabilizer the holes, which make the rib lighter, were made even larger to match the size on the original rib holes. This work was done using a vertical rotary tiller.
The assembly work was started by fitting the repaired plywood ribs preliminarily into their places between the leading and trailing edge battens. Some adjustment was needed on the ends of the upper and lower battens on the ribs before they fitted tightly into their places. After the fitting, the fastening of the ribs was started, beginning on the leading edge.
The ends of the upper and lower battens on each rib were pushed into the fishtail joint notches on the leading edge. Then the rib batten ends were fastened on the leading edge batten, using 3x16 mm countersunk brass screws. First a preliminary hole was made, using a thin drill piece, to prevent the batten ends from splitting. In addition to the plywood ribs, also three solid wood ribs were fastened on the leading edge batten. The fasteners for the bracing wires were fastened between the wooden ribs and the leading edge batten. The bracing wires, still attached on the fasteners, were left loose.
The Tuesday Club team didn’t use any glue when fastening the ribs and assembling the horizontal stabilizer. When dismantling the Caudron’s horizontal stabilizer, the team found out that the stabilizer has been originally built in France at the Caudron factory without any glue.
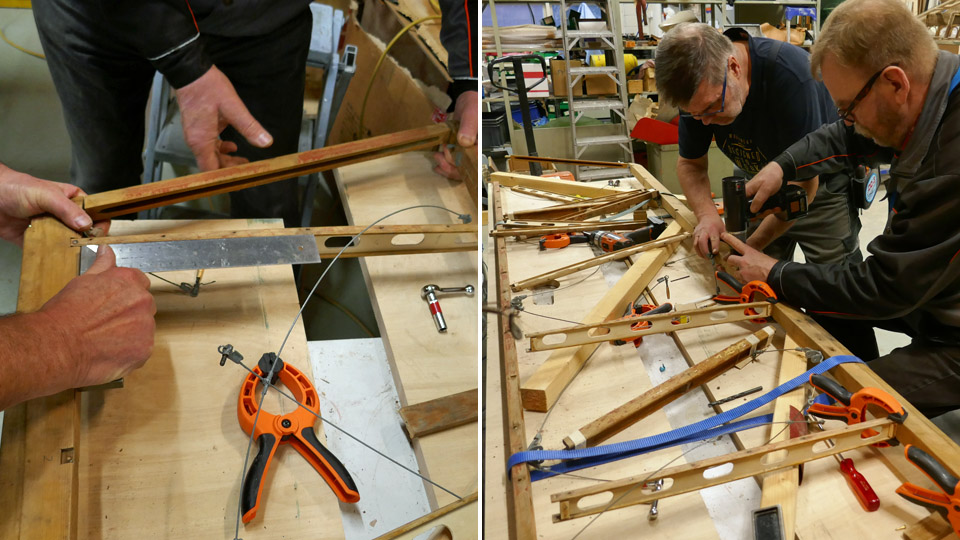
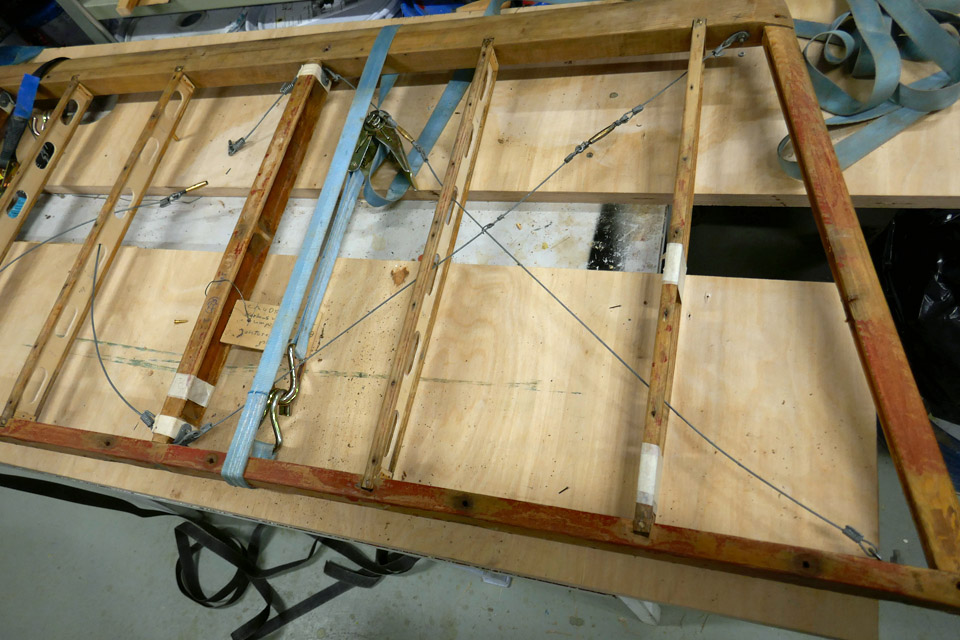
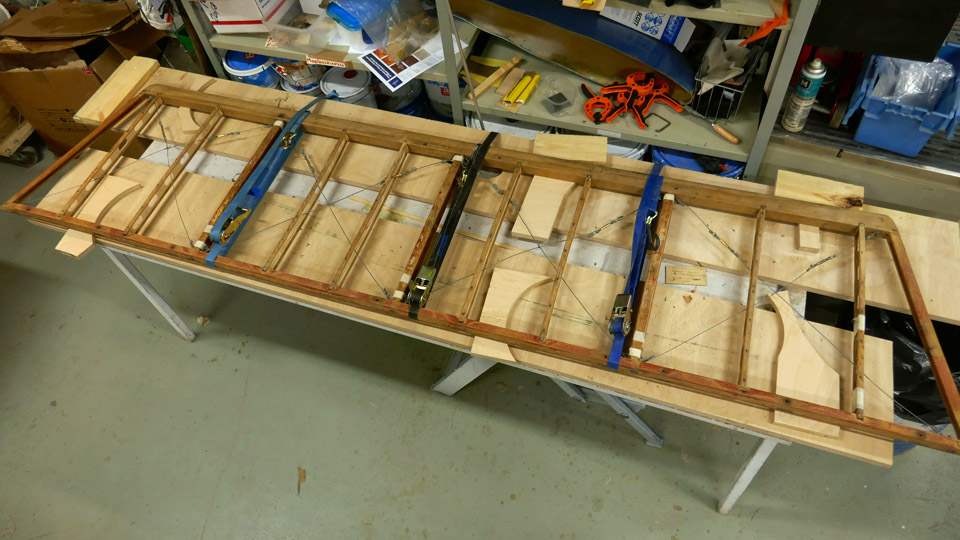
When all the ribs had been fastened on the leading edge batten at one end, the work on the trailing edge could be started. The first step was to fasten the end of each rib into its notch in the trailing edge batten. Three cargo straps were tightened around the horizontal stabilizer to keep it in shape when fastening all nine plywood ribs and three wooden ribs into place.
When all ends of the upper and lower rib battens had been fastened on the trailing edge with fishtail joints, the battens were secured using brass screws. The solid wood ribs with the bracing wires were also fastened on the trailing edge. Now the crossing bracing wires could be slipped through the lightening holes on the plywood ribs. The last step in the assembly work was to fasten the end strips of the port and starboard end of the horizontal stabilizer onto the joints at the ends of the leading edge and trailing edge battens. Now the assembly work had been completed.
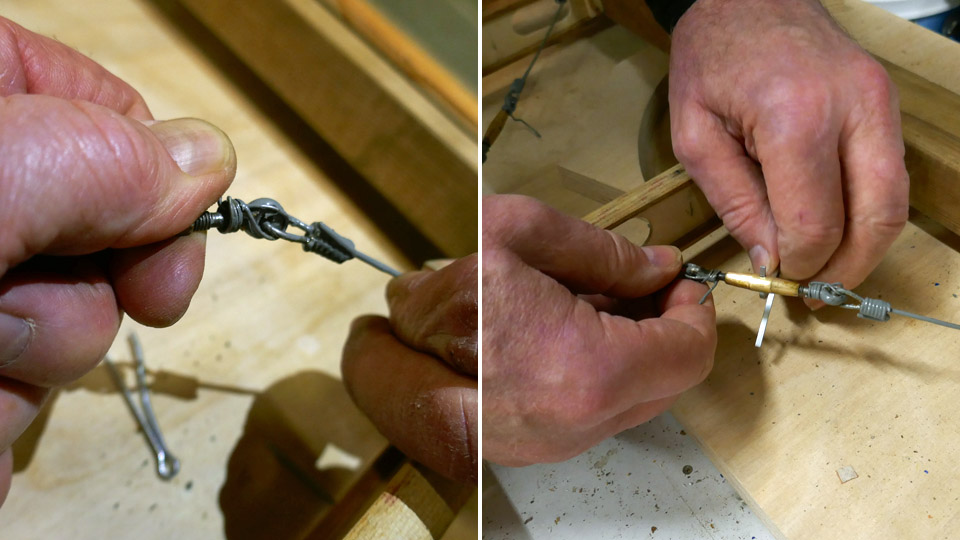
At this point the bracing wires of the horizontal stabilizer could be preliminarily tightened. The work was started by removing remaining old wire strips from the turnbuckles and cleaning the threads on the turnbuckles. Then the crossing wires were tightened using the turnbuckle. The final tightening of the bracing wires will be done before the stabilizer covering work is started.
The horizontal stabilizer had been assembled and the bracing wires preliminarily tightened, so the supporting cargo straps could be removed. When this had been done, the team noticed that the port rear corner of the stabilizer was a couple of millimetres above the table surface. When assembling the stabilizer frame, the team didn’t use any glue, so it was natural that the uncovered stabilizer will bend a little. The team managed to straighten the frame manually so that it rested evenly on the table surface.
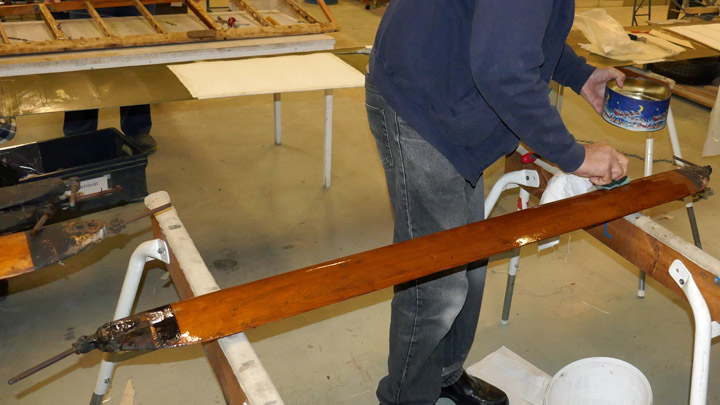
After the assembly, the horizontal stabilizer frame was varnished using protective clear Le Tonkinois varnish. The varnish is a mixture of linseed oil varnish and China wood oil. The Tuesday Club team didn’t use varnish tinted red, as it would normally have done when varnishing a new wooden frame. Clear varnish was chosen because the team wanted to preserve some of the still remaining original red protecting varnish which had been applied on the horizontal stabilizer frame at the Caudron factory in the 1920s. Now the horizontal stabilizer is ready to be covered. Photos: Lassi Karivalo Translation: Erja Reinikainen. |
|
Avainsanat: aviation history, restoring, old aircraft, Caudron C.59, CA-50 |
Fabric covering of Caudron's port wing is patchedKeskiviikko 19.2.2020 - Member of Tuesday Club By the end of January all holes and tears on the Caudron C.59 (CA-50) aircraft’s lower port wing have been mended. The edges of each tear were first sewn together and then a patch for each hole was cut from cotton fabric. The edges of each patch were unravelled in the manner used in the 1920s. The frayed edges help the patch to fasten tightly on the repaired area when the fabric is varnished.
The patches on the upper side of the port wing were glued first. Nitrocellulose varnish was used for the gluing work. This kind of varnish is used also for tightening upholstery fabrics. It is necessary to wear effective protective masks during the varnishing work and there can’t be other ongoing activities in the restoration space of the Finnish Aviation Museum when varnishing is being done.
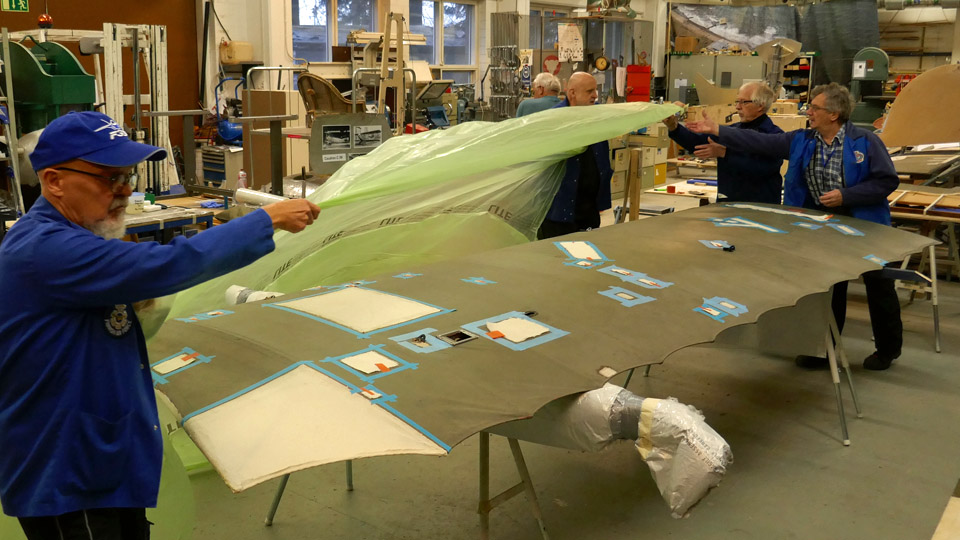
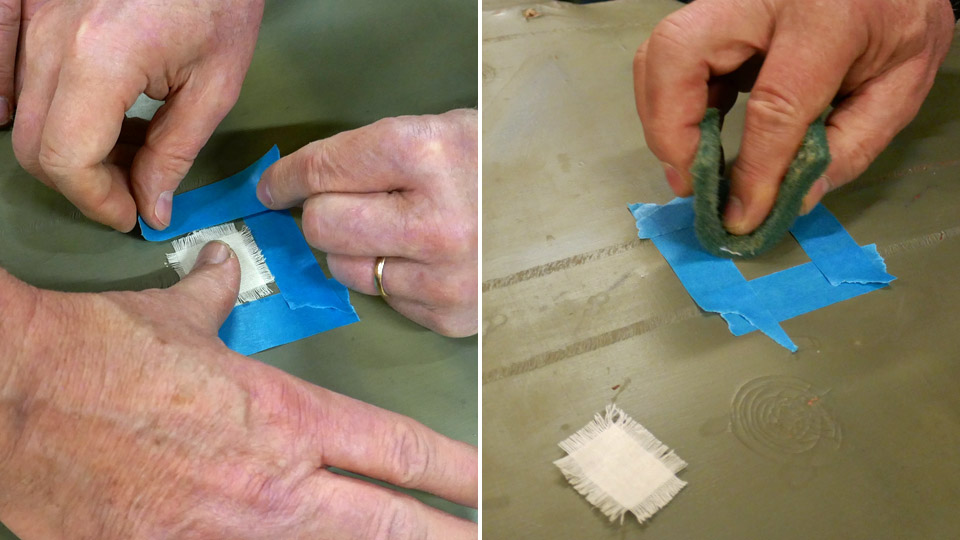
Before gluing the patches, each damaged area was surrounded with protective tape. The tape limits the work area and stops the gluing lacquer from seeping into the fabric covering outside the patching area. When all patch areas had been taped, a thing sheet of protecting plastic was spread on the wing. The plastic protects the fabric covering outside the work area when all the holes around the wing area are being varnished. A hole was cut in the plastic at each taped area. The edges of the protecting sheet were taped on the tape surrounding each work area. The wing was now well protected for the varnishing work.
Half a dozen Tuesday Club members started gluing the patches on the wing. X-Speed nitrocellulose varnish was used. The first phase was to varnish the patches soaking wet while they rested on a sheet of corrugated cardboard. Then the areas surrounded with tape were varnished. The patches were not immediately moved into their places. It took about five minutes before the lacquer became drier and gluey. After a short while the patches were moved and pressed onto their corresponding repair areas. Another layer of lacquer was applied, and the brush was used to straighten the frayed edges of each patch.
When all the patches had been fastened, the protecting sheet of plastic and the tapes around the work areas were removed. The Tuesday Club team used the gentle blue type of painter’s tape around the work areas, but it was noticed that the tapes have to be removed immediately after the varnishing is ready. If the tape stays on the old fabric for more than an hour, the tape may stick too tightly on the original painted fabric and when the tape is unfastened, it will leave a mark or, in the worst case, the original painted surface will be damaged.
When the 34 patches on the upper surface of the port wing had been glued into place, the same procedures were done on the 32 patches on the lower side of the wing. Now the 66 holes on the lower port wing had been patched.
When the patches had dried, the surfaces were honed smooth and varnished again. The varnishing and honing was repeated four times. Now the patches are ready to be painted, using paint which matches the original paint on the wing. The painting will not be done before the work on the lower starboard wing has reached the same phase. Photos: Lassi Karivalo. Translation: Erja Reinikainen. |
|
Avainsanat: aviation history, restoring, old aircraft, Caudron C.59, CA-50 |
Repairing tears in Caudron's (CA-50) fabric coveringMaanantai 30.12.2019 - Member of Tuesday Club
Caudron C.59. Photo: Wikipedia. The Caudron C.59 (CA-59) airplane, which is under restoration at the Tuesday Club, has several holes and tears in its fabric covering. The damage has happened during the 90 years of storage. All damages in the fabric covering will be patched using fabric patches, following original procedures.
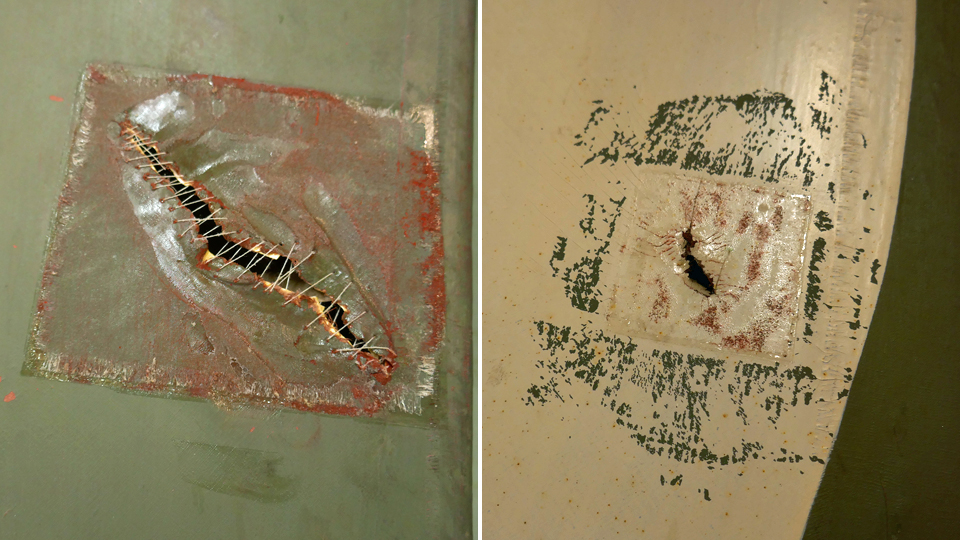
There are several methods to repair the tears on the fabric covering. A thin strip of plywood can be glued under the fabric to support the tear and the edges of the tear are glued on this supporting piece of wood. A covering fabric patch is placed on top. If the damage covers a large area on the fabric covering, the damaged material can be removed and replaced with new fabric. This method can be used e.g. between wing ribs. In this blog we concentrate on how the tears and holes on Caudron’s fabric were repaired by sewing and using fabric patches on top of the stitched area.
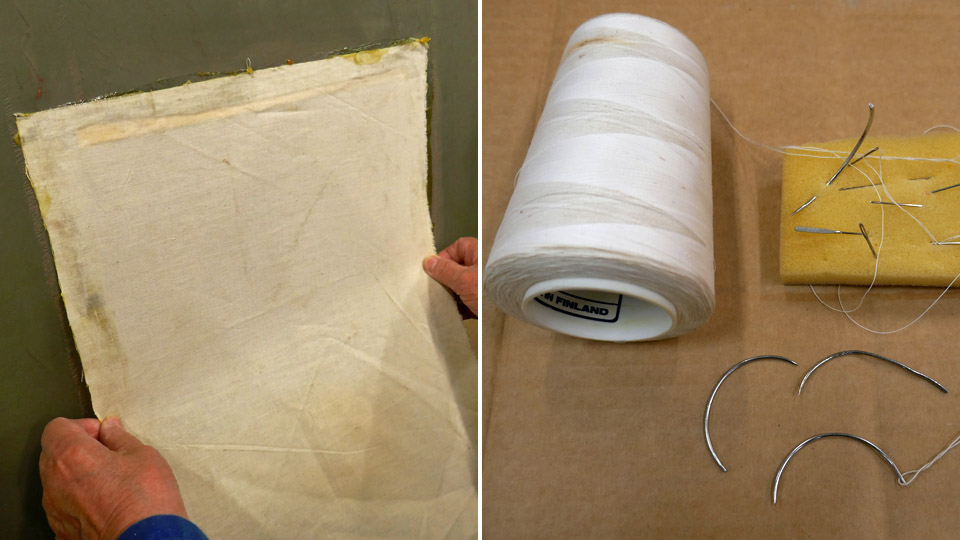
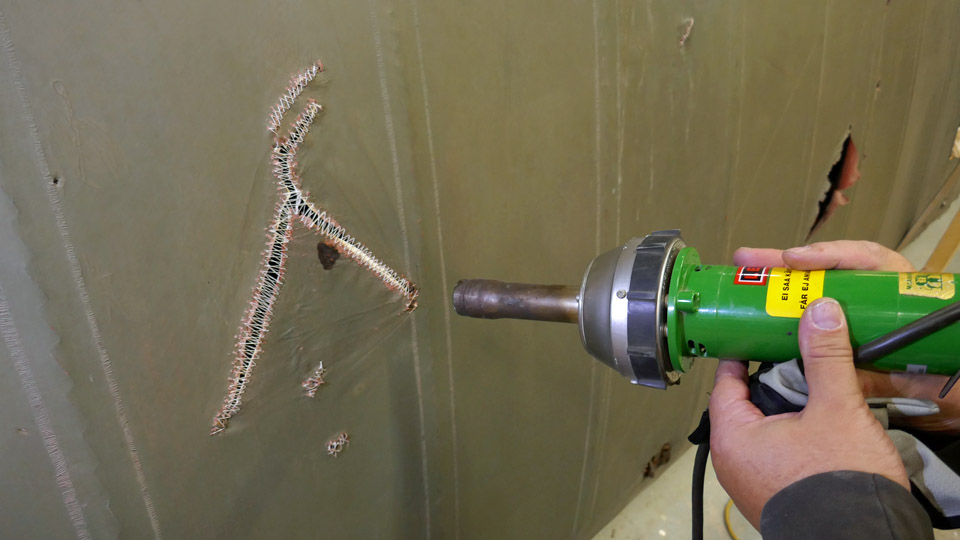
First the edges of the tear will have to be stitched against each other, or at least as close to each other as possible, by tightening the stitching thread. Then a covering fabric patch is glued on the tear. Small punctured holes can be covered with a patch without stitching first. The edges of the tear are stitched using a curved upholstery needle and thin linen thread.
Before the edges of the tear were stitched, a narrow strip of linen was glued under the edges to support the frayed covering fabric. The old fabric is so thin that it would be frayed even more when the edges are pulled together with the stitching thread. When the stitching progressed, the edges of the tear were pulled closer to one another by tightening the thread. Usually the original covering fabric has shrunk during the years and it is impossible to connect the edges of the tear.
Then and now. After the stitching, the fabric in the repair area remains somewhat loose and wrinkled, in spite of tightening the stitching thread. Additional tightening can be done with a heat blower. The heat from the blower melted the old lacquered surface of the 1920s’ covering fabric and it became a little bit loose. When the lacquer cooled down, it shrunk, and tightened also the stitched area. Heat treatment is a useful method to tighten the stitched area before gluing a fabric patch on the damaged area. The fabric patches were glued on the stitched areas and punctured holes using traditional nitrocellulose lacquer. On Caudron’s patches Tikkurila Oy Dicco lacquer was used.
Suitable patch pieces were cut from cotton fabric. The edges of each patch were frayed manually before gluing so that the patch would fasten tightly on the repaired area. The fraying was done by unravelling the warp threads along 3-5 mm around the patch edges. This method was used already in the 1920s’, the edges on the strengthening fabric strips on the Caudron’s wing ribs have been unravelled in this manner. Nowadays special scissors are used when cutting the saw-toothed edges of a fabric patch or a fabric strip before gluing.
The damaged area on the original fabric was surrounded with protective tape, which was placed around the area before gluing the patch. It is necessary to limit the work area and to keep the gluing lacquer in the patching area, preventing it from seeping outside the area. The work area was buffed rough before gluing. The buffed dust and the grease on the fabric surface was removed using water-Sinol solution. Then nitrocellulose lacquer was spread on the work area and on the fabric patch, which was placed on a piece of cardboard. The patch was lacquered soaking wet.
It took about five minutes before the lacquer became drier and gluey. The fabric patch was carefully placed on the stitched work area. Another layer of lacquer was applied, and the brush was used to straighten the frayed edges of the patch. After about ten minutes the protecting tapes were removed, and the patching was ready.
The Tuesday Club team noticed that leaving the protecting tape on the work area for a longer time will cause problems. A “gentle type” of painter’s tape was used but the problem could be seen. The tape may stick too tightly on the original painted fabric and when the tape is unfastened, some original paint will peel off with the tape.
About two dozen holes and tears on Caudron’s port lower wing and tailplane and fin have been repaired, using the method described above. About a dozen holes still need patching. And there is more work ahead when the tears and holes on the starboard lower wing and both upper wings are repaired. Photos: Lassi Karivalo Translation: Erja Reinikainen. |
|
Avainsanat: aviation history, restoring, old aircraft, Caudron C.59, CA-50 |
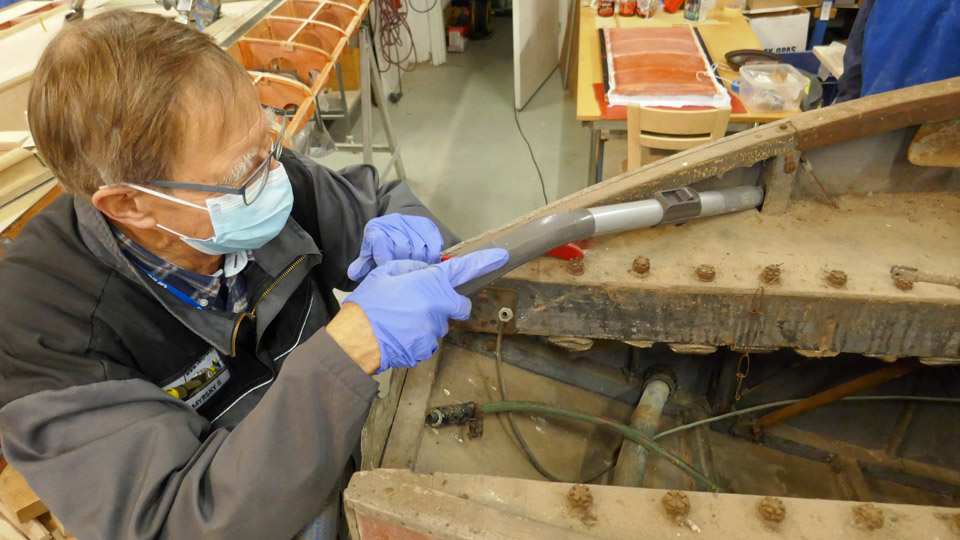
Repairing Caudron C.59 front cockpit's windscreenPerjantai 6.12.2019 - Member of Tuesday Club On Friday, October 11th some of the Caudron’s (CA-50) fuselage parts were dismantled in Vesivehmaa and brought to the Tuesday Club’s workspace. These items included the damaged aluminium frame of the front cockpit’s windscreen. The windscreen had been fastened on the plywood covering of the fuselage with seven bolts. The bolt nuts were easy to unfasten, but it was a challenge to unfasten the windscreen frame from the plywood, because the bolts were covered with a heavy layer of rust. A screwdriver was used as a lever between the windscreen frame and the plywood covering and finally the rusty bolts could be manoeuvred through the plywood.
The windscreen frame, originally made from thin aluminium sheet, had been badly bent and partly damaged. However, it can be straightened and repaired, and it can be installed back on the Caudron’s fuselage. There were fragments of the original windscreen still attached to the frame. The Tuesday Club team concluded that the windscreen had been made of celluloid, typically used in 1920’s airplanes. The celluloid window has been fastened with rivets between the windscreen frame and the aluminium profiles around the window.
The repair work was started by unfastening the four aluminium profiles that surrounded the window. All rivets that had connected the windscreen frame and the surrounding profiles were unfastened using a spike. The original windscreen celluloid fragments were also removed. The bent windscreen frame was carefully hammered into its original shape. The aluminium profiles were also straightened. Then the new windscreen could be made.
The original windscreen windows had been made of 1 mm thick celluloid plate. Such material isn’t available anymore, so a modern polycarbonate plate in the corresponding thickness was used.
First a thin flexible piece of plywood was placed on the windscreen frame and the window shape was drawn on it. The pattern was used to cut the new window from the polycarbonate plate. The new window was cut a couple of centimetres larger than the pattern, in order to have enough material to shape the plate into the correct measurements. The polycarbonate plate was fitted into the windscreen frame, shaping it gradually. When the new window fitted properly between the frame and the surrounding profiles, preparations for the riveting were started.
The polycarbonate window was fastened between the frame and the surrounding profiles using strong clamps. Then the holes for the rivets were drilled through the plate, positioning them at the original rivet holes in the windscreen frame. When each hole had been drilled, a cleko-fastener was placed in it, using pliers. The cleko-fasterers were used to ensure that the window stayed in place and the rivet holes were in the correct positions. Hole by hole, the edge of the windscreen was fastened with clekos.
The polycarbonate window was riveted onto the frame, hole by hole, removing each cleko-fastener and putting a 1,5 mm long aluminium rivet into each hole. A compressed air hammer and a traditional hammer were used to hammer the rivets into place. When the riveting was ready, the Caudron C.59’s front cockpit window was ready. A protecting film still covers the window on both sides, the films will be removed when the windscreen has been installed into its place on the Caudron’s fuselage. The paint on the windscreen frame is worn and damaged, but the decisions about the surfacing of the frame will be made later.
The windscreen of the rear cockpit has been lost. At first the Tuesday Club team thought that the rear cockpit’s windscreen could be built using the front cockpit’s windscreen as a model. When the team studied the surface and the marks of the Caudron’s fuselage in Vesivehmaa more closely, it was discovered that obviously the rear windscreen had been significantly different from the one in front. Therefore it was decided that the rear cockpit’s windscreen won’t be made before the Caudron’s fuselage is moved from Vesivehmaa into the restoration space at the Finnish Aviation Museum. This will probably take place in 2021. Photos: Lassi Karivalo. Translation: Erja Reinikainen. |
|
Avainsanat: aviation history, restoring, old aircraft, Caudron C.59, CA-50 |
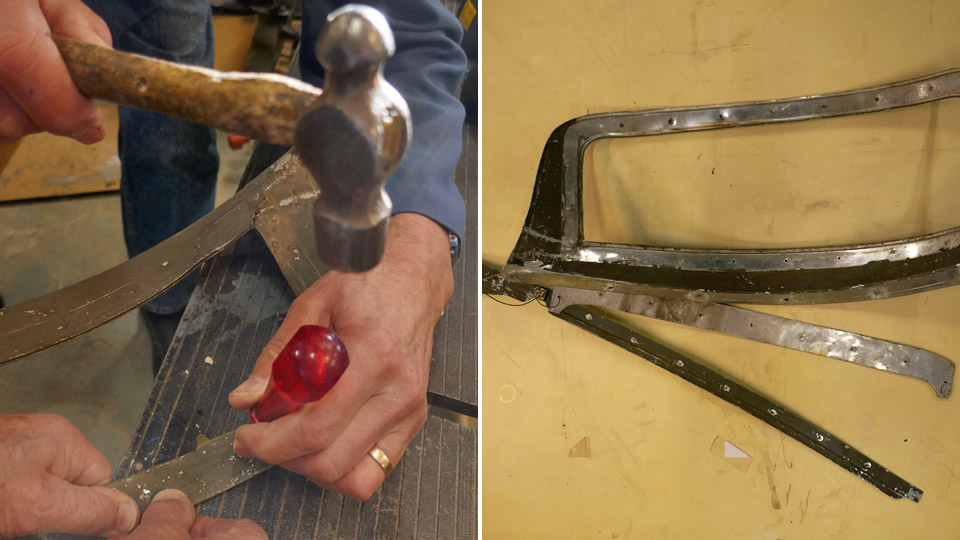
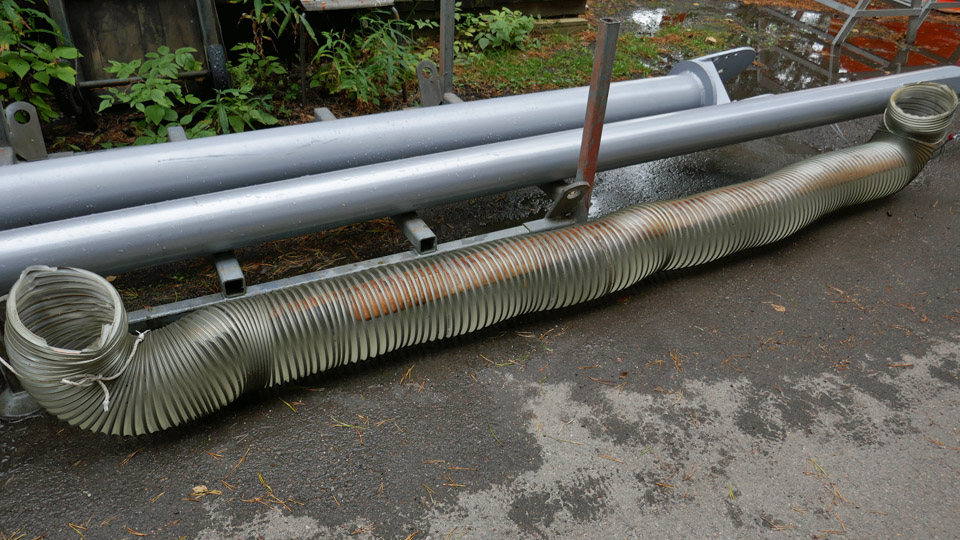
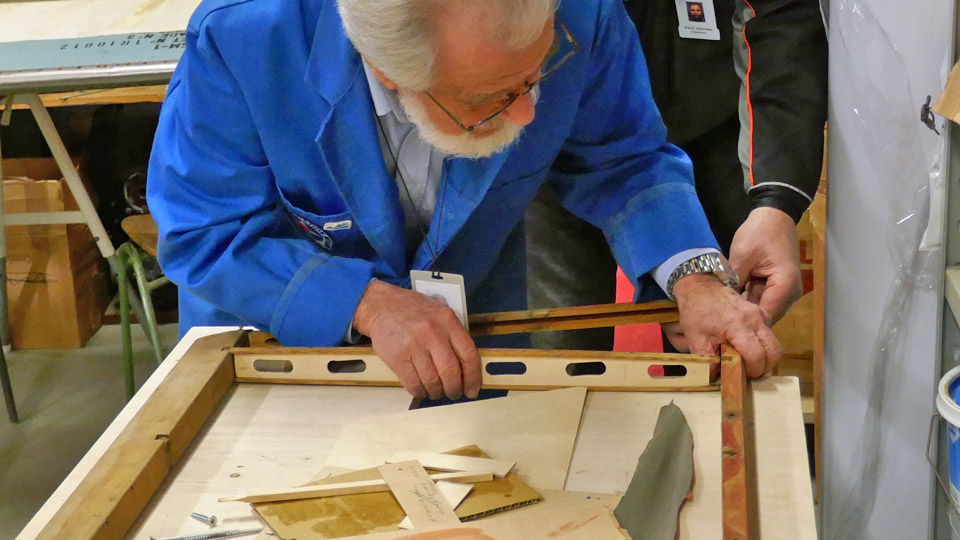
Caudron C.59's horizontal stabilizer is straightenedTiistai 19.11.2019 - Member of Tuesday Club During the 90 years of storage, the Caudron’s horizontal stabilizer has bent badly and it is also otherwise in such poor condition that it had to be dismantled for the restoration work. During the dismantling it became clear that the reason for the bending was the batten on the leading edge. The batten on the trailing edge was also slightly bent. Both battens had to be straightened before re-installing the stabilizer parts and the fabric covering. The team decided to try and straighten the battens by making them thoroughly wet and then fastening them on a level table top to dry and straighten.
Some flexible ventilation duct was found in the storage of the Finnish Aviation Museum and this duct was used to make a container for soaking the leading and trailing edge battens. A four meters long piece of duct was needed for the battens which are nearly three meters long. When the battens had been placed inside the duct, the ends of the duct were bent upwards and the duct “tub” was filled with water. The team estimated that it would take about a week for the battens to get thoroughly soaked when they were submerged in water.
The battens were taken out from their bath after a week, and it seemed that both battens had already straightened by themselves. Obviously wood returns to its original shape when it is thoroughly soaked, in this case to the shape which had been made for the horizontal stabilizer. However, the leading edge and trailing edge battens were fastened on a heavy table surface using clamps. There the battens could dry and hopefully regain their correct shape.
After another week the clamps were unfastened, and the team found out that the battens were dry and almost straight. The thinner trailing edge batten was completely dry but the leading edge batten felt damp and it was still a little bent. The team re-fastened the leading edge batten on the table with the damp side upwards. In the following week the batten was unfastened and the whole horizontal stablizer frame (leading and trailing edge battens and the end battens) was assembled and placed on the table. The team noticed that the leading edge batten was still slightly bent and the whole frame rose 3 cm up from the table top at its starboard rear corner instead of being flat against the table top.
The team decided to soak the leading and trailing edge battens for another week. Also the end battens were placed in the tub because they were a couple of centimeters bent inwards. After a week the battens were taken from the tub and this time they were fastened on the table as a frame. In the assembly work the leading edge batten was pushed straight using wedges. The aim was that when the leading edge batten dries when assembled in the frame, it would not bend back into its previous shape.
Another week went by and the frame was unfastened. The team noticed that again the frame was not flat but the rear corner of the frame rose slightly from the table top. The leading edge batten was still damp on the side which had been against the table. Therefore the leading edge batten was fastened on the table once more and left to dry for two weeks.
After two weeks the horizontal stablizer’s leading edge batten was unfastened and the trailing edge batten and the end battens were assembled. The team was delighted to see that the frame rested flat on the table – the leading edge batten wasn’t bent any more. Now the repaired ribs could be preliminarily tested between the leading and trailing edge battens. The Tuesday Club team had worked hard to return the battens to their original shape and succeeded. Photos: Lassi Karivalo Translation: Erja Reinikainen. |
|
Avainsanat: aviation history, restoring, old aircraft, Caudron C.59, CA-50 |
Parts of Caudron C.59 were transported from VesivehmaaMaanantai 4.11.2019 - Member of Tuesday Club The Tuesday Club has been working on the Caudron c.59’s (CA-50) horizontal stabilizer, both elevators, the wing struts and one lower wing. As there is no major work to be done on these parts of the plane, the team decided to go and fetch some more parts of the Caudron’s fuselage, which is still in the Päijänne-Tavastia Aviation Museum at Vesivehmaa. The Vesivehmaa museum was visited by about ten Tuesday Club members.
As soon as the team arrived in Vesivehmaa, the work was started and the vertical stabilizer, rudder and the bracing wires were unfastened and carried into the car in no time. All the parts fitted well into the spacious boot of the Skoda Octavia.
It took much longer to dismantle the wing struts which were on top of the front fuselage. Each strut bracing had rusted badly. CRC was used to unfasten the rusty bolts and fortunately the team managed to unfasten without damages all the bolts, three on each strut. Also the bracing wires fastened on the bracings were taken along. Furthermore, the aluminum sheet cowling on the engine mounting, the front cockpit seat and the badly damaged windscreen frame were dismantled to be taken to the Tuesday Club work space.
Left photo: Ari Aho. The engine cowling came off easily, as did the front cockpit seat, fastened on the frame with four bolts. More effort was needed to unfasten the damaged front windscreen frame. The frame had been fastened through the plywood covering using eight bolts, which had rusted badly. The nuts below the plywood covering were easy to unfasten, but to maneuver the rusty bolts through the plywood and the frame was challenging. The frame is very bent and there are still some remains of the original celluloid plexiglass on it. There are still several other pieced to be dismantled from the Caudron’s cockpit, e.g. the rear cockpit seat, the control column and the rudder pedals, but more time is needed to do all this.
While the rest of the team was working on the Caudron, a couple of Tuesday Club members installed the securing pins on the bolts of the I.V.L.K.1 Kurki landing gear and wing struts. The Kurki restoration work has been completed and the plane was returned to the Vesivehmaa hall in June.
The following parts of the Caudron C.59 (CA-59) were dismantled and transported from Vesivehmaa to the Tuesday Club hall:
When the team returned to the Aviation Museum in Vantaa, all items were carefully labelled and the smaller parts (such as the nuts and bolts of the wing struts) were stored in plastic bags to wait for cleaning. Photos: Lassi Karivalo except one separately credited Translation: Erja Reinikainen. |
|
Avainsanat: aviation history, restoring, old aircraft, Caudron C.59, CA-50 |
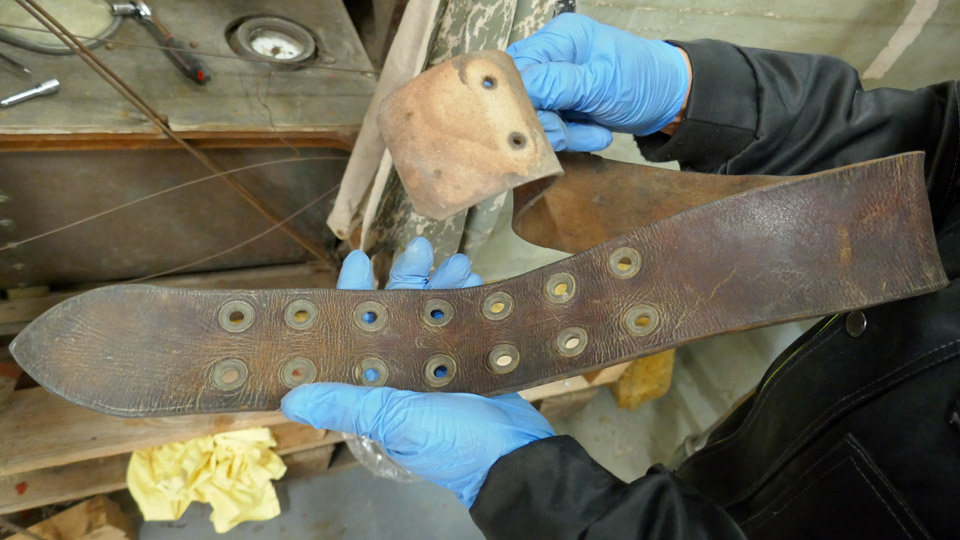
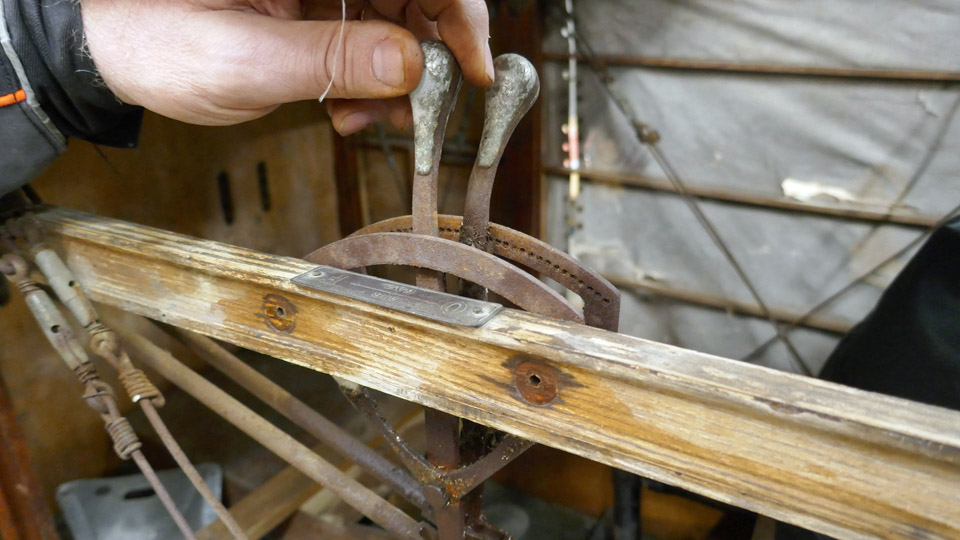
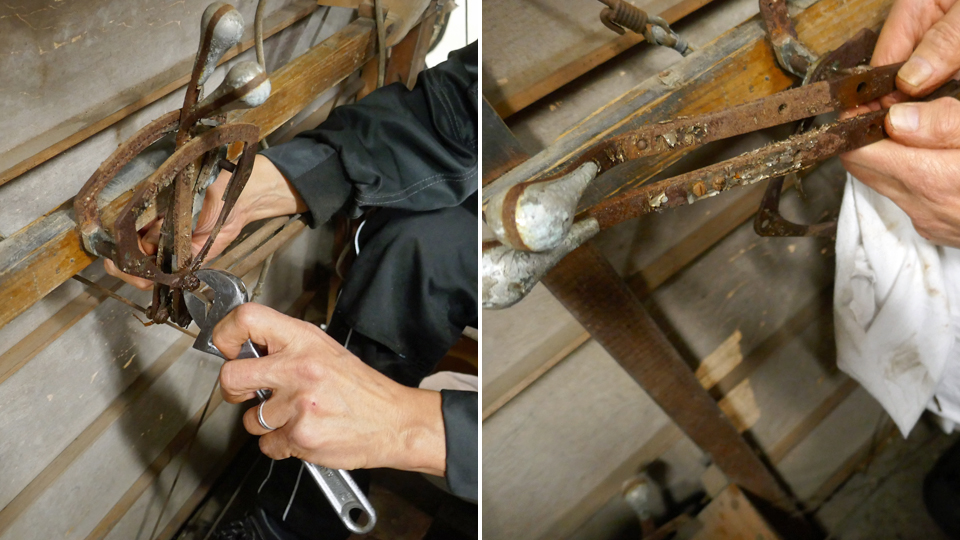
Caudron's wing struts are cleanedPerjantai 30.8.2019 - Member of Tuesday Club Caudron’s eight wing struts were brought from Päijänne-Tavastia Aviation Museum in Vesivehmaa to the Tuesday Club to be restored. The struts are made of wood and have a lacquered surface. The front struts are slightly heavier than the rear ones. All struts are in surprisingly good condition.
Each strut has a fabric covering at the ends, covering about 10 cm and painted using black lacquer. There are also metal insets at the ends, with hinged metal bayonets for fastening the struts on the wings. The struts are fastened by pushing the metal bayonets through the wings and locking the bars into place using castle nuts on the other side of the wing.
The restoration of the wing struts was started by cleaning the lacquered wooden surfaces and black end parts using mild dishwashing liquid. The work was finalized by wiping the surfaces with cloths dipped in clean water.
The metal insets and fastening bayonets were cleaned of dirt and rust. The hinged bayonets were unfastened to make cleaning easier.
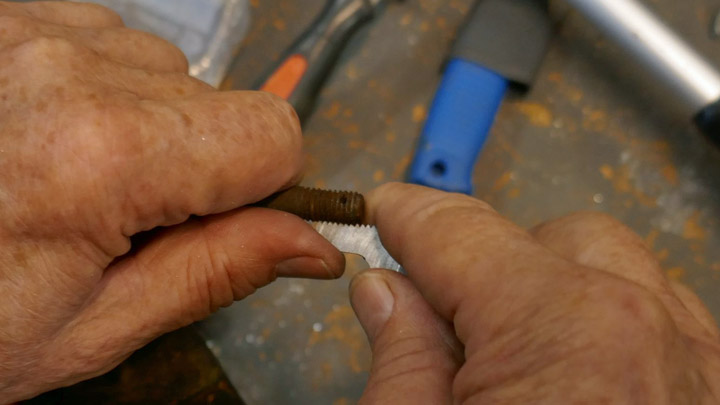
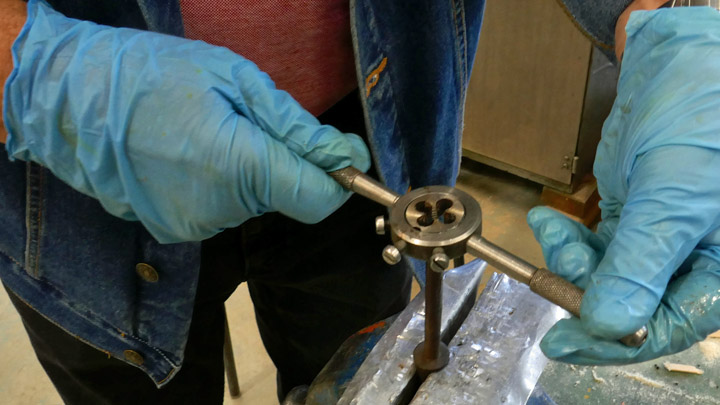
The screw thread at the ends of the bayonets were in poor condition because of rust. The diameter of the bayonet and the thread pitch were measured, the bayonet is 8 mm in diameter and the pitch is 1,5. The thread was opened using a suitable thread cutter from the cutter die.
There is still some work ahead before all 16 strut fastener bayonets have been cleaned. One of the original castle nuts is available, the other 15 will have to be bought.
A historical photo from the Finnish Aviation Museum's photo archive shows what kind of aircraft Caudron C.59 is. Other photos: Lassi Karivalo. Translation from Finnish to English: Erja Reinikainen. |
|
Avainsanat: aviation history, restoring, old aircraft, Caudron C.59, CA-50 |
Caudron's horizontal stabilizer is taken apartTiistai 27.8.2019 - Member of Tuesday Club Before the summer break the Tuesday Club team managed to dismantle the fabric covering on the horizontal stabilizer of the Caudron C.59. (CA-59), which was used by the Air Force in the late 1920s. Also a few ribs were unfastened, too. The horizontal stabilizer has been badly bent, and it will have to be dismantled into parts to straighten it. The wooden edge of the stabilizer is in the worst condition and repairing it won’t be easy.
When the Club’s autumn season started on August 13th, the work continued by unfastening the ribs of the horizontal stabilizer. There are 11 ribs, three wooden ones and eight plywood ribs with wooden battens around the edges. The edge battens are in good condition, but the plywood parts are badly rotten. The ribs were numbered before they were unfastened.
There was busy activity around the work table when the team started to unfasten the ribs. It was hard work because the ends of the wooden battens on the upper and lower edges of the ribs had been fastened on the wooden leading and trailing edges with a fishtail joint, secured with screws.
The screws at the ends of the battens couldn’t be unfastened with a screwdriver. The screwdriver had to be used as a lever when pulling the screws out with pliers. When all the battens had been dismantled, they were bundled together with the broken plywood ribs, using painter’s tape. They will have to wait for further activities.
The wooden ribs were dismantled after the plywood ones. The team noticed that no glue had been used when building the Caudron’s horizontal stabilizer. All joints are either fishtail joints or the joints have been secured with bolts, screws or nails.
When the ribs had been dismantled, the fasteners for the stabilizer’s bracing wires on the leading and trailing edges had to be removed. The bracing wires and fasteners and their bolts were bundled together for further activities.
A historical photo from the Finnish Aviation Museum's photo archive shows what kind of aircraft Caudron C.59 is. Other photos: Lassi Karivalo. Translation from Finnish to English: Erja Reinikainen. |
|
Avainsanat: aviation history, restoring, old aircraft, Caudron C.59, CA-50 |
Ilmailumuseot.fi - Aviationmuseums.fi